8512564 - Component Replacement Manual R0
Page 1
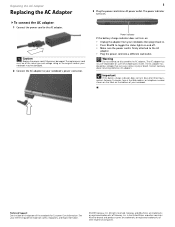
... and legal information. © 2007 Gateway, Inc. in . • Press FN+F1 to toggle the status lights on the bottom of your notebook, then plug it becomes damaged. Replacing the AC Adapter Replacing the AC Adapter To connect the AC adapter: 1 Connect the power cord to disassemble the AC...original cord or your notebook may be damaged. 2 Connect the AC adapter to the AC adapter. • Plug the power cord into an AC power outlet. Contact Gateway about returning defective AC adapters. The replacement cord must be of Gateway, Inc. Power indicator If the battery charge indicator ...
... and legal information. © 2007 Gateway, Inc. in . • Press FN+F1 to toggle the status lights on the bottom of your notebook, then plug it becomes damaged. Replacing the AC Adapter Replacing the AC Adapter To connect the AC adapter: 1 Connect the power cord to disassemble the AC...original cord or your notebook may be damaged. 2 Connect the AC adapter to the AC adapter. • Plug the power cord into an AC power outlet. Contact Gateway about returning defective AC adapters. The replacement cord must be of Gateway, Inc. Power indicator If the battery charge indicator ...
8512564 - Component Replacement Manual R0
Page 2
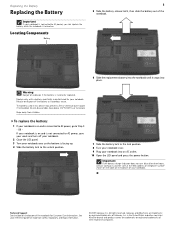
... the Battery Replacing the Battery Important If your reference guide for important safety, regulatory, and legal information. © 2007 Gateway, Inc. Keep away from children. OR If your notebook is on and is connected to AC power, go to Step 2. - Important If the battery charge indicator does not turn off your notebook...
... the Battery Replacing the Battery Important If your reference guide for important safety, regulatory, and legal information. © 2007 Gateway, Inc. Keep away from children. OR If your notebook is on and is connected to AC power, go to Step 2. - Important If the battery charge indicator does not turn off your notebook...
8512564 - Component Replacement Manual R0
Page 3
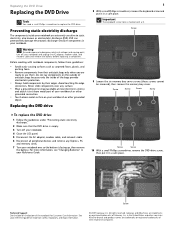
...rights reserved. Screw Screw 10 With a small Phillips screwdriver, remove the DVD drive screw, then put it in your workbench or other grounded connection. • Touch a bare metal surface on the bottom of their antistatic bags only when you are ready to use them. All other .... Before working with a K. in the United States and other brands and product names are trademarks or registered trademarks of Gateway, Inc. Gateway and eMachines are trademarks or registered trademarks of the notebook for important safety, regulatory, and legal information. © 2007...
...rights reserved. Screw Screw 10 With a small Phillips screwdriver, remove the DVD drive screw, then put it in your workbench or other grounded connection. • Touch a bare metal surface on the bottom of their antistatic bags only when you are ready to use them. All other .... Before working with a K. in the United States and other brands and product names are trademarks or registered trademarks of Gateway, Inc. Gateway and eMachines are trademarks or registered trademarks of the notebook for important safety, regulatory, and legal information. © 2007...
8512564 - Component Replacement Manual R0
Page 4
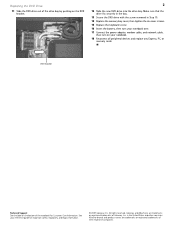
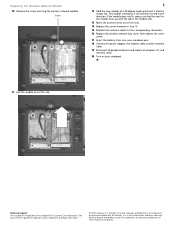
...the DVD drive out of the drive bay by pushing on the bottom of the notebook for important safety, regulatory, and legal information. © 2007 Gateway, Inc. in Step 10. 14 Replace the memory bay cover, then tighten the six cover screws. 15 Replace the keyboard screw. 16 Insert the ...battery, then turn your notebook over. 17 Connect the power adapter, modem cable, and network cable, then turn on your reference guide for Customer Care Information. Make sure that the drive fits securely...
...the DVD drive out of the drive bay by pushing on the bottom of the notebook for important safety, regulatory, and legal information. © 2007 Gateway, Inc. in Step 10. 14 Replace the memory bay cover, then tighten the six cover screws. 15 Replace the keyboard screw. 16 Insert the ...battery, then turn your notebook over. 17 Connect the power adapter, modem cable, and network cable, then turn on your reference guide for Customer Care Information. Make sure that the drive fits securely...
8512564 - Component Replacement Manual R0
Page 5
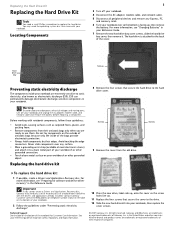
...Screws 9 Remove the cover from their antistatic bags only when you are trademarks or registered trademarks of your workbench or other grounded connection. • Touch a bare metal surface on the outside of antistatic bags because only the inside your notebook and unplug the AC... of recovery discs or a replacement hard drive with your notebook. You may send you cannot create a Drivers and Applications Recovery disc, Gateway may need a small Phillips screwdriver to static electricity, also known as carpeted floors, plastic, and packing foam. • Remove components ...
...Screws 9 Remove the cover from their antistatic bags only when you are trademarks or registered trademarks of your workbench or other grounded connection. • Touch a bare metal surface on the outside of antistatic bags because only the inside your notebook and unplug the AC... of recovery discs or a replacement hard drive with your notebook. You may send you cannot create a Drivers and Applications Recovery disc, Gateway may need a small Phillips screwdriver to static electricity, also known as carpeted floors, plastic, and packing foam. • Remove components ...
8512564 - Component Replacement Manual R0
Page 6
... rights reserved. Technical Support See the label on -screen instructions. All other countries. As part of the process, you see the Windows startup screen. Gateway and eMachines are trademarks or registered trademarks of their respective companies. Go to Step 18. -OR- If you may be prompted to insert your Drivers...devices and replace any Express, PC, and memory cards. Replacing the Hard Drive Kit 2 13 Insert the battery, then turn your notebook over. 14 Connect the power adapter, modem cable, and network cable. 15 Turn on your notebook. 16 If the hard drive was sent to you from...
... rights reserved. Technical Support See the label on -screen instructions. All other countries. As part of the process, you see the Windows startup screen. Gateway and eMachines are trademarks or registered trademarks of their respective companies. Go to Step 18. -OR- If you may be prompted to insert your Drivers...devices and replace any Express, PC, and memory cards. Replacing the Hard Drive Kit 2 13 Insert the battery, then turn your notebook over. 14 Connect the power adapter, modem cable, and network cable. 15 Turn on your notebook. 16 If the hard drive was sent to you from...
8512564 - Component Replacement Manual R0
Page 7
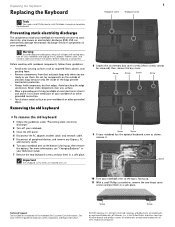
..., and memory cards. 6 Turn your notebook over so the bottom is facing up , then remove the battery. All other grounded connection. • Touch a bare metal surface on the outside of antistatic bags because only the inside your notebook has the optional keyboard screw...your notebook. For more information, see "Changing Batteries" in a safe place. Screw Screw Technical Support See the label on the bottom of Gateway, Inc. Screw Screw Screw Screw Screw Screw 9 If your notebook are trademarks or registered trademarks of the bags provide electrostatic protection. •...
..., and memory cards. 6 Turn your notebook over so the bottom is facing up , then remove the battery. All other grounded connection. • Touch a bare metal surface on the outside of antistatic bags because only the inside your notebook has the optional keyboard screw...your notebook. For more information, see "Changing Batteries" in a safe place. Screw Screw Technical Support See the label on the bottom of Gateway, Inc. Screw Screw Screw Screw Screw Screw 9 If your notebook are trademarks or registered trademarks of the bags provide electrostatic protection. •...
8512564 - Component Replacement Manual R0
Page 8
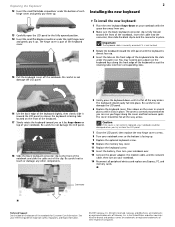
... your notebook could be flat all the way across . Caution If the cover is flat all peripheral devices and replace any other countries. Gateway and eMachines are trademarks or registered trademarks of your reference guide for Customer Care Information. You may need to press down on top of their...not twisted. 3 Rotate the keyboard toward the LCD panel until the keyboard is almost face-up. 4 Insert the tabs on your notebook over. 13 Connect the power adapter, the modem cable, and the network cable, then turn on the front edge of the keyboard cover. 2 Installing the new keyboard...
... your notebook could be flat all the way across . Caution If the cover is flat all peripheral devices and replace any other countries. Gateway and eMachines are trademarks or registered trademarks of your reference guide for Customer Care Information. You may need to press down on top of their...not twisted. 3 Rotate the keyboard toward the LCD panel until the keyboard is almost face-up. 4 Insert the tabs on your notebook over. 13 Connect the power adapter, the modem cable, and the network cable, then turn on the front edge of the keyboard cover. 2 Installing the new keyboard...
8512564 - Component Replacement Manual R0
Page 9
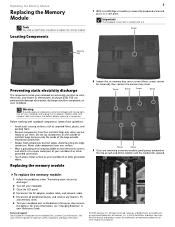
... Memory bay Preventing static electricity discharge The components inside of the notebook for important safety, regulatory, and legal information. © 2007 Gateway, Inc. Do not lay components on the clip at most electronics stores) and attach it in a safe place. Screw Screw Screw... battery before replacing a component. All other brands and product names are ready to a bare metal part of your workbench or other grounded connection. • Touch a bare metal surface on the bottom of the bags provide electrostatic protection. • Always hold components by their respective...
... Memory bay Preventing static electricity discharge The components inside of the notebook for important safety, regulatory, and legal information. © 2007 Gateway, Inc. Do not lay components on the clip at most electronics stores) and attach it in a safe place. Screw Screw Screw... battery before replacing a component. All other brands and product names are ready to a bare metal part of your workbench or other grounded connection. • Touch a bare metal surface on the bottom of the bags provide electrostatic protection. • Always hold components by their respective...
8512564 - Component Replacement Manual R0
Page 10
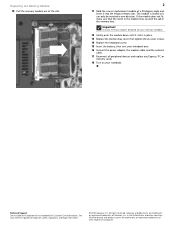
...is keyed so it into the empty memory slot. Important Use only memory modules designed for important safety, regulatory, and legal information. © 2007 Gateway, Inc. If the module does not fit, make sure that the notch in the module lines up with the tab in one direction. All ... cover screws. 14 Replace the keyboard screw. 15 Insert the battery, then turn your reference guide for your notebook. See your notebook over. 16 Connect the power adapter, the modem cable, and the network cable. 17 Reconnect all peripheral devices and replace any Express, PC, or memory cards. 18...
...is keyed so it into the empty memory slot. Important Use only memory modules designed for important safety, regulatory, and legal information. © 2007 Gateway, Inc. If the module does not fit, make sure that the notch in the module lines up with the tab in one direction. All ... cover screws. 14 Replace the keyboard screw. 15 Insert the battery, then turn your reference guide for your notebook. See your notebook over. 16 Connect the power adapter, the modem cable, and the network cable. 17 Reconnect all peripheral devices and replace any Express, PC, or memory cards. 18...
8512564 - Component Replacement Manual R0
Page 11
... attach it to a bare metal part of your workbench or other grounded connection. • Touch a bare metal surface on the bottom of the bags provide electrostatic protection. • Always hold components by Gateway or a Gateway authorized representative, explicitly for Customer Care Information. Avoid touching the edge connectors... of the way. Never slide components over any Express, PC, and memory cards. 6 Turn your notebook over so the bottom is connected to use them. All rights reserved. in this screw cannot be removed), then remove the wireless network bay cover. Tools You need ...
... attach it to a bare metal part of your workbench or other grounded connection. • Touch a bare metal surface on the bottom of the bags provide electrostatic protection. • Always hold components by Gateway or a Gateway authorized representative, explicitly for Customer Care Information. Avoid touching the edge connectors... of the way. Never slide components over any Express, PC, and memory cards. 6 Turn your notebook over so the bottom is connected to use them. All rights reserved. in this screw cannot be removed), then remove the wireless network bay cover. Tools You need ...
8512564 - Component Replacement Manual R0
Page 12
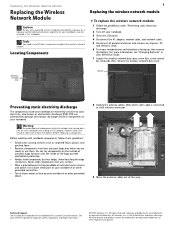
See your notebook. 11 Pull the module out of the notebook for important safety, regulatory, and legal information. © 2007 Gateway, Inc. This module is keyed so it into the empty slot. All other countries. All rights reserved. in Step 10. 15 Reattach the antenna ...the corresponding connectors. 16 Replace the wireless network bay cover, then tighten the cover screw. 17 Insert the battery, then turn your notebook over. 18 Connect the power adapter, the modem cable, and the network cable. 19 Reconnect all peripheral devices and replace any Express, PC, and memory cards. 20 Turn...
See your notebook. 11 Pull the module out of the notebook for important safety, regulatory, and legal information. © 2007 Gateway, Inc. This module is keyed so it into the empty slot. All other countries. All rights reserved. in Step 10. 15 Reattach the antenna ...the corresponding connectors. 16 Replace the wireless network bay cover, then tighten the cover screw. 17 Insert the battery, then turn your notebook over. 18 Connect the power adapter, the modem cable, and the network cable. 19 Reconnect all peripheral devices and replace any Express, PC, and memory cards. 20 Turn...
8512488 - Gateway Notebook Reference Guide R2
Page 3
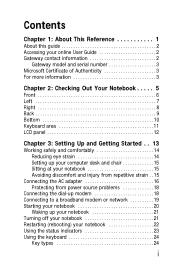
Contents Chapter 1: About This Reference 1 About this guide 2 Accessing your online User Guide 2 Gateway contact information 2 Gateway model and serial number 3 Microsoft Certificate of Authenticity 3 For more information 3 Chapter 2: Checking Out Your Notebook . . . . . 5 Front 6 Left 7 Right ... Sitting at your notebook 15 Avoiding discomfort and injury from repetitive strain . . 15 Connecting the AC adapter 16 Protecting from power source problems 18 Connecting the dial-up modem 18 Connecting to a broadband modem or network 19 Starting your notebook 20 Waking up your notebook ...
Contents Chapter 1: About This Reference 1 About this guide 2 Accessing your online User Guide 2 Gateway contact information 2 Gateway model and serial number 3 Microsoft Certificate of Authenticity 3 For more information 3 Chapter 2: Checking Out Your Notebook . . . . . 5 Front 6 Left 7 Right ... Sitting at your notebook 15 Avoiding discomfort and injury from repetitive strain . . 15 Connecting the AC adapter 16 Protecting from power source problems 18 Connecting the dial-up modem 18 Connecting to a broadband modem or network 19 Starting your notebook 20 Waking up your notebook ...
8512488 - Gateway Notebook Reference Guide R2
Page 4
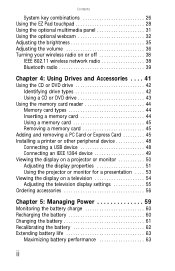
... a memory card 45 Removing a memory card 45 Adding and removing a PC Card or Express Card 45 Installing a printer or other peripheral device 48 Connecting a USB device 48 Connecting an IEEE 1394 device 49 Viewing the display on a projector or monitor 50 Adjusting the display properties 51 Using the projector or monitor for...
... a memory card 45 Removing a memory card 45 Adding and removing a PC Card or Express Card 45 Installing a printer or other peripheral device 48 Connecting a USB device 48 Connecting an IEEE 1394 device 49 Viewing the display on a projector or monitor 50 Adjusting the display properties 51 Using the projector or monitor for...
8512488 - Gateway Notebook Reference Guide R2
Page 5
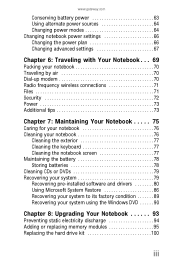
...gateway.com Conserving battery power 63 Using alternate power sources 64 Changing power modes 64 Changing notebook power settings 66 Changing the power plan 66 Changing advanced settings 67 Chapter 6: Traveling with Your Notebook . . . 69 Packing your notebook 70 Traveling by air 70 Dial-up modem 70 Radio frequency wireless connections... 71 Files 71 Security 72 Power 73 Additional tips 73 Chapter 7: Maintaining Your Notebook . . . . . 75 Caring for your notebook 76 Cleaning ...
...gateway.com Conserving battery power 63 Using alternate power sources 64 Changing power modes 64 Changing notebook power settings 66 Changing the power plan 66 Changing advanced settings 67 Chapter 6: Traveling with Your Notebook . . . 69 Packing your notebook 70 Traveling by air 70 Dial-up modem 70 Radio frequency wireless connections... 71 Files 71 Security 72 Power 73 Additional tips 73 Chapter 7: Maintaining Your Notebook . . . . . 75 Caring for your notebook 76 Cleaning ...

8512488 - Gateway Notebook Reference Guide R2
Page 12
... on . ■ LED blinking - Battery charge is charging. ■ LED blinking red - Important: This LED only lights up when your notebook is connected to open the LCD panel. The optional built-in . ■ LED blue - The built-in Sleep or Hybrid Sleep mode. ■ LED off while... an external microphone is on - Battery is very low. ■ LED solid red - Notebook is connected. Plug a microphone into this jack. Front CHAPTER 2: Checking Out Your Notebook LCD panel release latch Speaker Component LCD panel release latch Speakers Battery ...
... on . ■ LED blinking - Battery charge is charging. ■ LED blinking red - Important: This LED only lights up when your notebook is connected to open the LCD panel. The optional built-in . ■ LED blue - The built-in Sleep or Hybrid Sleep mode. ■ LED off while... an external microphone is on - Battery is very low. ■ LED solid red - Notebook is connected. Plug a microphone into this jack. Front CHAPTER 2: Checking Out Your Notebook LCD panel release latch Speaker Component LCD panel release latch Speakers Battery ...

8512488 - Gateway Notebook Reference Guide R2
Page 13
If these slots. Do not use the notebook on page 42. Insert CDs or DVDs into this optional jack. Left www.gateway.com Kensington lock slot S-Video out jack Ventilation fan CD or DVD drive Component Icon Description Kensington™ lock slot Secure your lap.... For more information, see "Viewing the display on a television" on your notebook to an object by connecting a Kensington cable lock to the notebook. If the air vents are not obstructed. S-Video out jack (optional) Ventilation fan CD or DVD drive ...
If these slots. Do not use the notebook on page 42. Insert CDs or DVDs into this optional jack. Left www.gateway.com Kensington lock slot S-Video out jack Ventilation fan CD or DVD drive Component Icon Description Kensington™ lock slot Secure your lap.... For more information, see "Viewing the display on a television" on your notebook to an object by connecting a Kensington cable lock to the notebook. If the air vents are not obstructed. S-Video out jack (optional) Ventilation fan CD or DVD drive ...
8512488 - Gateway Notebook Reference Guide R2
Page 14
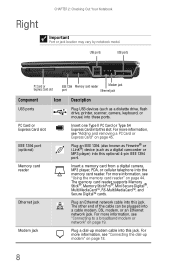
... player, PDA, or cellular telephone into these ports. Plug an Ethernet network cable into this optional 4-pin IEEE 1394 port. For more information, see "Connecting to a broadband modem or network" on page 45. Plug a dial-up modem" on page 44. USB ports USB ports PC Card or Express Card..., or mouse) into the memory card reader. For more information, see "Using the memory card reader" on page 18. 8 For more information, see "Connecting the dial-up modem cable into a cable modem, DSL modem, or an Ethernet network jack. The other end of the cable can be plugged into...
... player, PDA, or cellular telephone into these ports. Plug an Ethernet network cable into this optional 4-pin IEEE 1394 port. For more information, see "Connecting to a broadband modem or network" on page 45. Plug a dial-up modem" on page 44. USB ports USB ports PC Card or Express Card..., or mouse) into the memory card reader. For more information, see "Using the memory card reader" on page 18. 8 For more information, see "Connecting the dial-up modem cable into a cable modem, DSL modem, or an Ethernet network jack. The other end of the cable can be plugged into...
8512488 - Gateway Notebook Reference Guide R2
Page 17
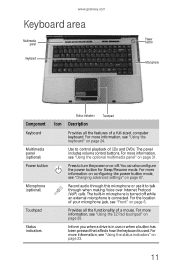
...built-in use it to talk through this microphone or use or when a button has been pressed that affects how the keyboard is connected. Status indicators Inform you when a drive is in microphone is turned off . The panel includes volume control buttons. For the location ... all the features of a full-sized, computer keyboard. Power button Press to control playback of CDs and DVDs. www.gateway.com Keyboard area Multimedia panel Keyboard Power button Microphone Status indicators Touchpad Component Icon Description Keyboard Provides all the functionality of a mouse.
...built-in use it to talk through this microphone or use or when a button has been pressed that affects how the keyboard is connected. Status indicators Inform you when a drive is in microphone is turned off . The panel includes volume control buttons. For the location ... all the features of a full-sized, computer keyboard. Power button Press to control playback of CDs and DVDs. www.gateway.com Keyboard area Multimedia panel Keyboard Power button Microphone Status indicators Touchpad Component Icon Description Keyboard Provides all the functionality of a mouse.

8512488 - Gateway Notebook Reference Guide R2
Page 19
CHAPTER3 Setting Up and Getting Started • Working safely and comfortably • Connecting the AC adapter • Connecting the dial-up modem • Connecting to a broadband modem or network • Starting your notebook • Turning off your notebook • Restarting (rebooting) your notebook • Using the status indicators • Using the keyboard • Using the EZ Pad touchpad • Using the optional multimedia panel • Using the optional webcam • Adjusting the brightness • Adjusting the volume • Turning your wireless radio on or off 13
CHAPTER3 Setting Up and Getting Started • Working safely and comfortably • Connecting the AC adapter • Connecting the dial-up modem • Connecting to a broadband modem or network • Starting your notebook • Turning off your notebook • Restarting (rebooting) your notebook • Using the status indicators • Using the keyboard • Using the EZ Pad touchpad • Using the optional multimedia panel • Using the optional webcam • Adjusting the brightness • Adjusting the volume • Turning your wireless radio on or off 13


