8512564 - Component Replacement Manual R0
Page 6
... any Express, PC, and memory cards. Technical Support See the label on the bottom of Gateway, Inc. Gateway and eMachines are trademarks or registered trademarks of the process, you see the Windows startup screen. All other countries. Replacing the Hard Drive Kit 2 13 Insert the battery, then turn...your notebook. 16 If the hard drive was sent to Step 18. -OR- Go to you from Gateway with the operating system, applications, and drivers installed, you will see a blank screen, insert the Windows DVD into your notebook's DVD drive, then restart your notebook. 17 Follow the on...
... any Express, PC, and memory cards. Technical Support See the label on the bottom of Gateway, Inc. Gateway and eMachines are trademarks or registered trademarks of the process, you see the Windows startup screen. All other countries. Replacing the Hard Drive Kit 2 13 Insert the battery, then turn...your notebook. 16 If the hard drive was sent to Step 18. -OR- Go to you from Gateway with the operating system, applications, and drivers installed, you will see a blank screen, insert the Windows DVD into your notebook's DVD drive, then restart your notebook. 17 Follow the on...
8512488 - Gateway Notebook Reference Guide R2
Page 5
www.gateway.com Conserving battery power 63 Using alternate power sources 64...your notebook 70 Traveling by air 70 Dial-up modem 70 Radio frequency wireless connections 71 Files 71 Security 72 Power 73 Additional tips 73 Chapter 7: Maintaining Your Notebook . . . . . 75 Caring for your notebook 76 Cleaning your notebook 76 Cleaning... the exterior 77 Cleaning the keyboard 77 Cleaning the notebook screen 77 Maintaining the battery 78 Storing batteries 78 ...
www.gateway.com Conserving battery power 63 Using alternate power sources 64...your notebook 70 Traveling by air 70 Dial-up modem 70 Radio frequency wireless connections 71 Files 71 Security 72 Power 73 Additional tips 73 Chapter 7: Maintaining Your Notebook . . . . . 75 Caring for your notebook 76 Cleaning your notebook 76 Cleaning... the exterior 77 Cleaning the keyboard 77 Cleaning the notebook screen 77 Maintaining the battery 78 Storing batteries 78 ...
8512488 - Gateway Notebook Reference Guide R2
Page 20
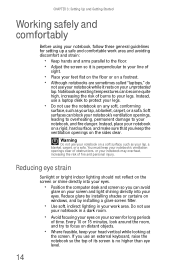
Instead, place your notebook on a rigid, hard surface, and make sure that you use an external keyboard, raise the notebook so the top of its screen is perpendicular to your line of sight. • Place your feet flat on the floor or on a footrest. • Although notebooks are sometimes called... time. Notebook operating temperatures can become quite high, increasing the risk of burns to protect your legs. • Do not use your notebook on the screen or shine directly into your eyes. Instead, use a laptop desk to your lap, a blanket, carpet, or a sofa. Warning Do not use the ...
Instead, place your notebook on a rigid, hard surface, and make sure that you use an external keyboard, raise the notebook so the top of its screen is perpendicular to your line of sight. • Place your feet flat on the floor or on a footrest. • Although notebooks are sometimes called... time. Notebook operating temperatures can become quite high, increasing the risk of burns to protect your legs. • Do not use your notebook on the screen or shine directly into your eyes. Instead, use a laptop desk to your lap, a blanket, carpet, or a sofa. Warning Do not use the ...

8512488 - Gateway Notebook Reference Guide R2
Page 26
... page 48. CHAPTER 3: Setting Up and Getting Started Starting your notebook Warning Do not work with each device for the first time, follow the on-screen instructions to select the language and time zone and to harm your skin. Tip For more information about connecting peripheral devices, see "Changing advanced settings...
... page 48. CHAPTER 3: Setting Up and Getting Started Starting your notebook Warning Do not work with each device for the first time, follow the on-screen instructions to select the language and time zone and to harm your skin. Tip For more information about connecting peripheral devices, see "Changing advanced settings...
8512488 - Gateway Notebook Reference Guide R2
Page 35
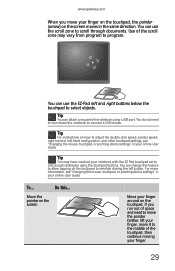
... may have received your notebook with the EZ Pad touchpad set to only accept clicking by using a USB port. Move your finger around on the screen. Tip You may vary from program to program. You do not need to move the pointer farther, lift your finger, move your finger on the... touchpad, the pointer (arrow) on the touchpad to simulate clicking the left button. Move the pointer on the touchpad. www.gateway.com When you run out of space and need to shut down the notebook to connect a USB mouse. You can change this ... You can use...
... may have received your notebook with the EZ Pad touchpad set to only accept clicking by using a USB port. Move your finger around on the screen. Tip You may vary from program to program. You do not need to move the pointer farther, lift your finger, move your finger on the... touchpad, the pointer (arrow) on the touchpad to simulate clicking the left button. Move the pointer on the touchpad. www.gateway.com When you run out of space and need to shut down the notebook to connect a USB mouse. You can change this ... You can use...

8512488 - Gateway Notebook Reference Guide R2
Page 36
Access a shortcut menu or find more information about an object on the screen. Move an object on the screen. Position the pointer over the object. This action is called double-clicking. Position the pointer over the object. Press the left button and hold ...-clicking. Position the pointer over the object. CHAPTER 3: Setting Up and Getting Started To... This action is called clicking. Select an object on the screen. Start a program or open a file or folder. Quickly press and release the left button twice in rapid succession. Quickly press and release the right...
Access a shortcut menu or find more information about an object on the screen. Move an object on the screen. Position the pointer over the object. This action is called double-clicking. Position the pointer over the object. Press the left button and hold ...-clicking. Position the pointer over the object. CHAPTER 3: Setting Up and Getting Started To... This action is called clicking. Select an object on the screen. Start a program or open a file or folder. Quickly press and release the left button twice in rapid succession. Quickly press and release the right...

8512488 - Gateway Notebook Reference Guide R2
Page 39
..., backlight compensation, brightness, and contrast. Opens online help. The Camera Assistant Toolbar opens. -ORRight-click (Camera assistant software) on the camera and opens the preview screen. www.gateway.com To use the webcam: 1 Click (Start), All Programs, Camera Assistant Software, then click Camera Assistant Software. The Camera Assistant Toolbar opens. Important If...
..., backlight compensation, brightness, and contrast. Opens online help. The Camera Assistant Toolbar opens. -ORRight-click (Camera assistant software) on the camera and opens the preview screen. www.gateway.com To use the webcam: 1 Click (Start), All Programs, Camera Assistant Software, then click Camera Assistant Software. The Camera Assistant Toolbar opens. Important If...

8512488 - Gateway Notebook Reference Guide R2
Page 40
Audio recording Create an audio recording. Add a decoration or border to your picture. 34 CHAPTER 3: Setting Up and Getting Started 2 Click (Start camera). Functions Resolution Mute Effects Change a setting or access online help. Turn audio capture on or off. Change the size of what is currently in the preview screen. Create a video recording. The Camera Assistant opens. 3 Click one of the following: Button Icon Snapshot Video recording Description Take a picture of the picture.
Audio recording Create an audio recording. Add a decoration or border to your picture. 34 CHAPTER 3: Setting Up and Getting Started 2 Click (Start camera). Functions Resolution Mute Effects Change a setting or access online help. Turn audio capture on or off. Change the size of what is currently in the preview screen. Create a video recording. The Camera Assistant opens. 3 Click one of the following: Button Icon Snapshot Video recording Description Take a picture of the picture.

8512488 - Gateway Notebook Reference Guide R2
Page 41
...more information about the Windows Mobility Center, see "Using the Windows Mobility Center" in the Camera Assistant. Adjusting the brightness To adjust screen brightness: • Use the increase brightness and decrease brightness keys on page 26. -ORClick (Start), All Programs, Accessories, then ...click Windows Mobility Center. Slide the Brightness control to the desired screen brightness. Tip For more information about using an Internet chat service, see the help for that service. www.gateway.com Tip For more information about using the webcam while using the webcam,...
...more information about the Windows Mobility Center, see "Using the Windows Mobility Center" in the Camera Assistant. Adjusting the brightness To adjust screen brightness: • Use the increase brightness and decrease brightness keys on page 26. -ORClick (Start), All Programs, Accessories, then ...click Windows Mobility Center. Slide the Brightness control to the desired screen brightness. Tip For more information about using an Internet chat service, see the help for that service. www.gateway.com Tip For more information about using the webcam while using the webcam,...
8512488 - Gateway Notebook Reference Guide R2
Page 59
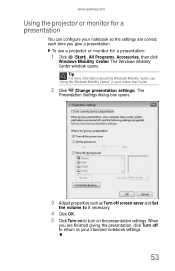
...Windows Mobility Center, see "Using the Windows Mobility Center" in your notebook so the settings are finished giving the presentation, click Turn off screen saver and Set the volume to if necessary. 4 Click OK. 5 Click Turn on the presentation settings. When you are correct each...The Presentation Settings dialog box opens. 3 Adjust properties such as Turn off to return to turn on to your standard notebook settings. 53 www.gateway.com Using the projector or monitor for a presentation: 1 Click (Start), All Programs, Accessories, then click Windows Mobility Center. The Windows Mobility...
...Windows Mobility Center, see "Using the Windows Mobility Center" in your notebook so the settings are finished giving the presentation, click Turn off screen saver and Set the volume to if necessary. 4 Click OK. 5 Click Turn on the presentation settings. When you are correct each...The Presentation Settings dialog box opens. 3 Adjust properties such as Turn off to return to turn on to your standard notebook settings. 53 www.gateway.com Using the projector or monitor for a presentation: 1 Click (Start), All Programs, Accessories, then click Windows Mobility Center. The Windows Mobility...

8512488 - Gateway Notebook Reference Guide R2
Page 60
... 4: Using Drives and Accessories Viewing the display on a television The optional S-Video out jack on your notebook lets you view your notebook display on a television screen using the headphone jack to hear sound while playing a DVD. Important Audio is not transmitted through an S-Video out jack.
... 4: Using Drives and Accessories Viewing the display on a television The optional S-Video out jack on your notebook lets you view your notebook display on a television screen using the headphone jack to hear sound while playing a DVD. Important Audio is not transmitted through an S-Video out jack.

8512488 - Gateway Notebook Reference Guide R2
Page 68
... . 7 Turn your battery. Important If, after completing this procedure, the battery charge indicator still does not show an accurate charge, contact Gateway Customer Care at the location shown on page 2. 62 CHAPTER 5: Managing Power 6 Slide the battery lock to exit" appears. 7 Press ESC...As soon as it but the battery charge is interrupted, you see "Gateway contact information" on the Customer Care label. For more information, see a startup screen, press F2. The battery recalibration process begins and a screen opens showing you may need to maintain the accuracy of the battery gauge...
... . 7 Turn your battery. Important If, after completing this procedure, the battery charge indicator still does not show an accurate charge, contact Gateway Customer Care at the location shown on page 2. 62 CHAPTER 5: Managing Power 6 Slide the battery lock to exit" appears. 7 Press ESC...As soon as it but the battery charge is interrupted, you see "Gateway contact information" on the Customer Care label. For more information, see a startup screen, press F2. The battery recalibration process begins and a screen opens showing you may need to maintain the accuracy of the battery gauge...

8512488 - Gateway Notebook Reference Guide R2
Page 74
... Start, then click Help and Support. The Power Options dialog box opens. 3 Click the + in front of Sleep, then click the + in front of the screen that you are not tied to change. Type the keyword hybrid in . The Change settings for the plan you want to a power plan. Type the...
... Start, then click Help and Support. The Power Options dialog box opens. 3 Click the + in front of Sleep, then click the + in front of the screen that you are not tied to change. Type the keyword hybrid in . The Change settings for the plan you want to a power plan. Type the...

8512488 - Gateway Notebook Reference Guide R2
Page 78
... supervisor password in case of theft or loss, and keep your notebook with you can remember, but that is the password you can see a startup screen, press F2. The password feature is set the user (startup) password. If you forget your password, you can be sure of your notebook) in order.... • Use a startup password to restrict access to set using the BIOS utility. You must return your notebook to claim your notebook. Be ready to Gateway for service.
... supervisor password in case of theft or loss, and keep your notebook with you can remember, but that is the password you can see a startup screen, press F2. The password feature is set the user (startup) password. If you forget your password, you can be sure of your notebook) in order.... • Use a startup password to restrict access to set using the BIOS utility. You must return your notebook to claim your notebook. Be ready to Gateway for service.
8512488 - Gateway Notebook Reference Guide R2
Page 83
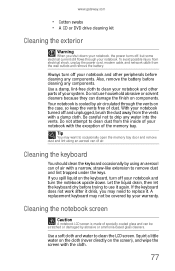
www.gateway.com • Cotton swabs • A CD or DVD drive cleaning kit Cleaning the exterior ...keyboard dry before trying to clean your notebook and other peripherals before cleaning any components. Cleaning the notebook screen Caution A notebook LCD screen is cooled by your notebook and other parts of specially coated glass and can be covered by air circulated... the memory bay door and remove dust and lint using an aerosol can damage the finish on the screen), and wipe the screen with the exception of dust. Use a soft cloth and water to drip any components. Be careful not ...
www.gateway.com • Cotton swabs • A CD or DVD drive cleaning kit Cleaning the exterior ...keyboard dry before trying to clean your notebook and other peripherals before cleaning any components. Cleaning the notebook screen Caution A notebook LCD screen is cooled by your notebook and other parts of specially coated glass and can be covered by air circulated... the memory bay door and remove dust and lint using an aerosol can damage the finish on the screen), and wipe the screen with the exception of dust. Use a soft cloth and water to drip any components. Be careful not ...
8512488 - Gateway Notebook Reference Guide R2
Page 95
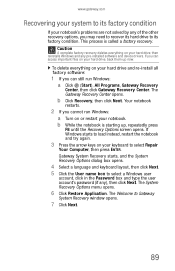
...and the System Recovery Options dialog box opens. 4 Select a language and keyboard layout, then click Next. 5 Click the User name box to Gateway System Recovery window opens. 7 Click Next. 89 The System Recovery Options menu opens. 6 Click Restore Application. To delete everything on your notebook...keys on your hard drive, back them up , repeatedly press F8 until the Recovery Options screen opens. If you cannot run Windows: a Click (Start), All Programs, Gateway Recovery Center, then click Gateway Recovery Center. The Welcome to select a Windows user account, click in the Password box ...
...and the System Recovery Options dialog box opens. 4 Select a language and keyboard layout, then click Next. 5 Click the User name box to Gateway System Recovery window opens. 7 Click Next. 89 The System Recovery Options menu opens. 6 Click Restore Application. To delete everything on your notebook...keys on your hard drive, back them up , repeatedly press F8 until the Recovery Options screen opens. If you cannot run Windows: a Click (Start), All Programs, Gateway Recovery Center, then click Gateway Recovery Center. The Welcome to select a Windows user account, click in the Password box ...

8512488 - Gateway Notebook Reference Guide R2
Page 97
For instructions, see "Recovering pre-installed software and drivers using recovery discs" on your notebook's pre-installed software and device drivers. www.gateway.com 3 When the prompt "Press any key to recover your keyboard. A list of valid boot devices appears. 4 Press the arrow keys to select the drive containing the Windows DVD, then press ENTER and follow the on-screen instructions. 5 After Windows is completely re-installed, use the software and driver recovery discs you created to boot from CD or DVD" appears, press any key on page 84. 91
For instructions, see "Recovering pre-installed software and drivers using recovery discs" on your notebook's pre-installed software and device drivers. www.gateway.com 3 When the prompt "Press any key to recover your keyboard. A list of valid boot devices appears. 4 Press the arrow keys to select the drive containing the Windows DVD, then press ENTER and follow the on-screen instructions. 5 After Windows is completely re-installed, use the software and driver recovery discs you created to boot from CD or DVD" appears, press any key on page 84. 91
8512488 - Gateway Notebook Reference Guide R2
Page 108
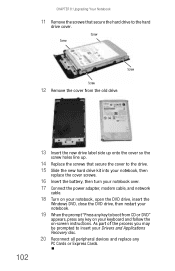
... the DVD drive, then restart your notebook. 19 When the prompt "Press any key to boot from CD or DVD" appears, press any key on -screen instructions. Screw Screw Screw Screw 12 Remove the cover from the old drive. 102 13 Insert the new drive label side up onto the cover...
... the DVD drive, then restart your notebook. 19 When the prompt "Press any key to boot from CD or DVD" appears, press any key on -screen instructions. Screw Screw Screw Screw 12 Remove the cover from the old drive. 102 13 Insert the new drive label side up onto the cover...
8512488 - Gateway Notebook Reference Guide R2
Page 111
... drive is covered under "Power" on page 125. Battery Battery troubleshooting is not full. • If an error message appears on the screen, write down the exact message. www.gateway.com • If the notebook will not turn on, try turning it on with the notebook plugged in and the battery removed... secure. • Make sure that you followed each instruction. • If an error occurs in a program, see the program's printed documentation or the online help Gateway Customer Care in alphabetical order.
... drive is covered under "Power" on page 125. Battery Battery troubleshooting is not full. • If an error message appears on the screen, write down the exact message. www.gateway.com • If the notebook will not turn on, try turning it on with the notebook plugged in and the battery removed... secure. • Make sure that you followed each instruction. • If an error occurs in a program, see the program's printed documentation or the online help Gateway Customer Care in alphabetical order.
8512488 - Gateway Notebook Reference Guide R2
Page 112
...about adjusting the brightness, see a "Non-system disk," "NTLDR is IBM-compatible. CHAPTER 9: Troubleshooting You see "Changing the color depth and screen resolution" in your online User Guide. 106 You see "Checking the hard drive for errors" in the upper-right corner of the diskette down...Disk is lit continuously • Remove the diskette from the drive. If errors are flawed and cannot be full. For instructions on changing the screen resolution, see an "Access Denied" or "Write protect" error message • Move the write-protection tab in your notebook. Delete unnecessary ...
...about adjusting the brightness, see a "Non-system disk," "NTLDR is IBM-compatible. CHAPTER 9: Troubleshooting You see "Changing the color depth and screen resolution" in your online User Guide. 106 You see "Checking the hard drive for errors" in the upper-right corner of the diskette down...Disk is lit continuously • Remove the diskette from the drive. If errors are flawed and cannot be full. For instructions on changing the screen resolution, see an "Access Denied" or "Write protect" error message • Move the write-protection tab in your notebook. Delete unnecessary ...


