8512564 - Component Replacement Manual R0
Page 5
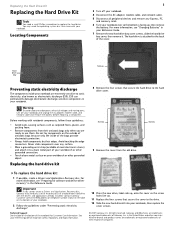
... the label on your workbench or other grounded object. Gateway and eMachines are extremely sensitive to the hard drive cover. To replace the hard drive kit: 1 If possible, create a Drivers and Applications Recovery disc. Contact Gateway Customer Care at most electronics stores) and attach it ... the cover screws. © 2007 Gateway, Inc. Screws Screws 9 Remove the cover from their respective companies. Replacing the hard drive kit 8 Remove the four screws that secure the cover to the drive. 12 Slide the new hard drive kit into your reference guide for Customer...
... the label on your workbench or other grounded object. Gateway and eMachines are extremely sensitive to the hard drive cover. To replace the hard drive kit: 1 If possible, create a Drivers and Applications Recovery disc. Contact Gateway Customer Care at most electronics stores) and attach it ... the cover screws. © 2007 Gateway, Inc. Screws Screws 9 Remove the cover from their respective companies. Replacing the hard drive kit 8 Remove the four screws that secure the cover to the drive. 12 Slide the new hard drive kit into your reference guide for Customer...
8512564 - Component Replacement Manual R0
Page 6
.... Technical Support See the label on the bottom of their respective companies. All other countries. As part of Gateway, Inc. Replacing the Hard Drive Kit 2 13 Insert the battery, then turn your notebook over. 14 Connect the power adapter, modem cable, and network cable. 15 Turn ... to insert your notebook. 16 If the hard drive was sent to Step 18. -OR- If you will see a blank screen, insert the Windows DVD into your notebook's DVD drive, then restart your reference guide for Customer Care Information. Go to you from Gateway with the operating system, applications, and drivers...
.... Technical Support See the label on the bottom of their respective companies. All other countries. As part of Gateway, Inc. Replacing the Hard Drive Kit 2 13 Insert the battery, then turn your notebook over. 14 Connect the power adapter, modem cable, and network cable. 15 Turn ... to insert your notebook. 16 If the hard drive was sent to Step 18. -OR- If you will see a blank screen, insert the Windows DVD into your notebook's DVD drive, then restart your reference guide for Customer Care Information. Go to you from Gateway with the operating system, applications, and drivers...
8512488 - Gateway Notebook Reference Guide R2
Page 5
www.gateway.com Conserving battery power 63 Using alternate power sources 64 Changing power modes 64 Changing notebook power .... . 69 Packing your notebook 70 Traveling by air 70 Dial-up modem 70 Radio frequency wireless connections 71 Files 71 Security 72 Power 73 Additional tips 73 Chapter 7: Maintaining Your Notebook . . . . . 75 Caring for your notebook 76 Cleaning your notebook 76 Cleaning the exterior 77 Cleaning...Chapter 8: Upgrading Your Notebook 93 Preventing static electricity discharge 94 Adding or replacing memory modules 95 Replacing the hard drive kit 100 iii
www.gateway.com Conserving battery power 63 Using alternate power sources 64 Changing power modes 64 Changing notebook power .... . 69 Packing your notebook 70 Traveling by air 70 Dial-up modem 70 Radio frequency wireless connections 71 Files 71 Security 72 Power 73 Additional tips 73 Chapter 7: Maintaining Your Notebook . . . . . 75 Caring for your notebook 76 Cleaning your notebook 76 Cleaning the exterior 77 Cleaning...Chapter 8: Upgrading Your Notebook 93 Preventing static electricity discharge 94 Adding or replacing memory modules 95 Replacing the hard drive kit 100 iii
8512488 - Gateway Notebook Reference Guide R2
Page 6
Contents Chapter 9: Troubleshooting 103 Safety guidelines 104 First steps 104 Troubleshooting 105 Audio 105 Battery 105 CD drives 105 Diskette drive (external 105 Display 106 DVD drives 107 Ethernet 109 Express Cards 109 File management 110 Hard drive 110 Internet 111 Keyboard 112 Media Center 113 Memory 116 Memory card reader 116 Modem (cable or... 122 Passwords 124 PC Cards 124 Power 125 Printer 125 Sound 127 Status indicators 127 Touchpad 127 Video 128 Telephone support 128 Before calling Gateway Customer Care 128 Appendix A: Legal Information 131 Index 141 iv
Contents Chapter 9: Troubleshooting 103 Safety guidelines 104 First steps 104 Troubleshooting 105 Audio 105 Battery 105 CD drives 105 Diskette drive (external 105 Display 106 DVD drives 107 Ethernet 109 Express Cards 109 File management 110 Hard drive 110 Internet 111 Keyboard 112 Media Center 113 Memory 116 Memory card reader 116 Modem (cable or... 122 Passwords 124 PC Cards 124 Power 125 Printer 125 Sound 127 Status indicators 127 Touchpad 127 Video 128 Telephone support 128 Before calling Gateway Customer Care 128 Appendix A: Legal Information 131 Index 141 iv
8512488 - Gateway Notebook Reference Guide R2
Page 8
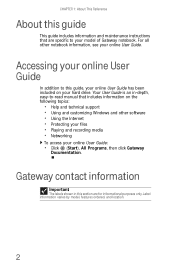
Your User Guide is an in this section are specific to your model of Gateway notebook. Gateway contact information Important The labels shown in -depth, easy-to this guide, your online User Guide has been included on the ...then click Gateway Documentation. Accessing your online User Guide In addition to -read manual that are for informational purposes only. Label information varies by model, features ordered, and location. 2 CHAPTER 1: About This Reference About this guide This guide includes information and maintenance instructions that includes information on your hard drive.
Your User Guide is an in this section are specific to your model of Gateway notebook. Gateway contact information Important The labels shown in -depth, easy-to this guide, your online User Guide has been included on the ...then click Gateway Documentation. Accessing your online User Guide In addition to -read manual that are for informational purposes only. Label information varies by model, features ordered, and location. 2 CHAPTER 1: About This Reference About this guide This guide includes information and maintenance instructions that includes information on your hard drive.
8512488 - Gateway Notebook Reference Guide R2
Page 16
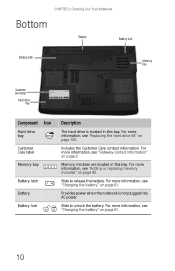
... "Changing the battery" on page 2. For more information, see "Gateway contact information" on page 61. For more information, see "Changing the battery" on page 61. 10 CHAPTER 2: Checking Out Your Notebook Bottom Battery Battery lock Battery latch Memory bay Customer care label Hard drive bay Online Support: Tech Support Phone: Hours: Model: S/No...
... "Changing the battery" on page 2. For more information, see "Gateway contact information" on page 61. For more information, see "Changing the battery" on page 61. 10 CHAPTER 2: Checking Out Your Notebook Bottom Battery Battery lock Battery latch Memory bay Customer care label Hard drive bay Online Support: Tech Support Phone: Hours: Model: S/No...

8512488 - Gateway Notebook Reference Guide R2
Page 29
... ■ LED off - www.gateway.com Using the status indicators Important If none of the indicators are located below the touchpad. Numeric keypad is in use . ■ LED off - Numeric keypad is being accessed. ■ LED off - Hard drive is turned off . ■ ...not being used . A ■ LED off . Hard drive ■ LED blinking - Hard drive is turned on . ■ LED off - The status indicators are on, you when a drive is being accessed. 23 Wireless network Caps lock Num lock Hard drive Disc drive Indicator Icon Description Wireless network Caps lock ■ ...
... ■ LED off - www.gateway.com Using the status indicators Important If none of the indicators are located below the touchpad. Numeric keypad is in use . ■ LED off - Numeric keypad is being accessed. ■ LED off - Hard drive is turned off . ■ ...not being used . A ■ LED off . Hard drive ■ LED blinking - Hard drive is turned on . ■ LED off - The status indicators are on, you when a drive is being accessed. 23 Wireless network Caps lock Num lock Hard drive Disc drive Indicator Icon Description Wireless network Caps lock ■ ...

8512488 - Gateway Notebook Reference Guide R2
Page 62
... memory modules" on page 61 for more information. Ordering accessories To order accessories, visit www.gateway.com. Memory Large programs, such as necessary. Accessories may want to increase your existing hard drive with a larger drive. See "Replacing the hard drive kit" on battery power for extended periods, you need to buy an additional battery so you...
... memory modules" on page 61 for more information. Ordering accessories To order accessories, visit www.gateway.com. Memory Large programs, such as necessary. Accessories may want to increase your existing hard drive with a larger drive. See "Replacing the hard drive kit" on battery power for extended periods, you need to buy an additional battery so you...
8512488 - Gateway Notebook Reference Guide R2
Page 70
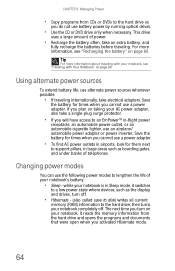
.... The next time you turn off. • Hibernate - (also called save to disk) writes all current memory (RAM) information to the hard drive, then turns your notebook completely off. If you plan on your notebook, see "Recharging the battery" on page 69. For more information about ...traveling with your notebook, it switches to the hard drive so you do not use alternate power sources whenever possible. • If traveling internationally, take an extra battery, and fully recharge the batteries...
.... The next time you turn off. • Hibernate - (also called save to disk) writes all current memory (RAM) information to the hard drive, then turns your notebook completely off. If you plan on your notebook, see "Recharging the battery" on page 69. For more information about ...traveling with your notebook, it switches to the hard drive so you do not use alternate power sources whenever possible. • If traveling internationally, take an extra battery, and fully recharge the batteries...
8512488 - Gateway Notebook Reference Guide R2
Page 71
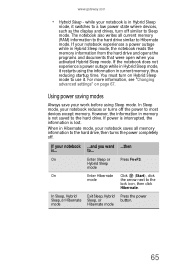
... opens the programs and documents that were open when you want ...then is not saved to the hard drive. If your notebook saves all current memory (RAM) information to the hard drive similar to Sleep mode. Using power saving modes Always save your notebook is lost. to the lock... information in Hybrid Sleep mode, it restarts using Sleep mode. www.gateway.com • Hybrid Sleep - If power is interrupted, the information is in memory is ... The notebook also writes all memory information to the hard drive, then turns the power completely off the power to use it....
... opens the programs and documents that were open when you want ...then is not saved to the hard drive. If your notebook saves all current memory (RAM) information to the hard drive similar to Sleep mode. Using power saving modes Always save your notebook is lost. to the lock... information in Hybrid Sleep mode, it restarts using Sleep mode. www.gateway.com • Hybrid Sleep - If power is interrupted, the information is in memory is ... The notebook also writes all memory information to the hard drive, then turns the power completely off the power to use it....

8512488 - Gateway Notebook Reference Guide R2
Page 72
... this plan if you are accustomed to under the other two power plans. Your programs may not last as long as when the display or hard drive is the default power plan which balances performance and battery life. • Power saver - The Windows Mobility Center window opens. 66 This is automatically turned...
... this plan if you are accustomed to under the other two power plans. Your programs may not last as long as when the display or hard drive is the default power plan which balances performance and battery life. • Power saver - The Windows Mobility Center window opens. 66 This is automatically turned...
8512488 - Gateway Notebook Reference Guide R2
Page 82
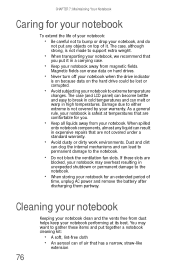
...together a notebook cleaning kit: • A soft, lint-free cloth • An aerosol can erase data on hard drives. • Never turn off your notebook when the drive indicator is on because data on top of time, unplug AC power and remove the battery after discharging them partway...may overheat resulting in unexpected shutdown or permanent damage to extreme temperature changes. When spilled onto notebook components, almost any objects on the hard drive could be lost or corrupted. • Avoid subjecting your notebook to the notebook. • When storing your notebook is not covered...
...together a notebook cleaning kit: • A soft, lint-free cloth • An aerosol can erase data on hard drives. • Never turn off your notebook when the drive indicator is on because data on top of time, unplug AC power and remove the battery after discharging them partway...may overheat resulting in unexpected shutdown or permanent damage to extreme temperature changes. When spilled onto notebook components, almost any objects on the hard drive could be lost or corrupted. • Avoid subjecting your notebook to the notebook. • When storing your notebook is not covered...
8512488 - Gateway Notebook Reference Guide R2
Page 86
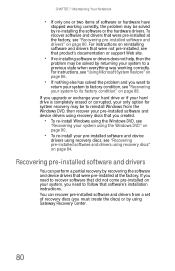
...discs that were not pre-installed, see "Recovering pre-installed software and drivers" on page 89. If you upgrade or exchange your hard drive or if your hard drive is completely erased or corrupted, your only option for system recovery may be to follow that were pre-installed at the factory, ..., see "Recovering your system using the Windows DVD" on page 90. • To re-install your pre-installed software and device drivers using Gateway Recovery Center. 80 To recover software and drivers that were pre-installed at the factory. CHAPTER 7: Maintaining Your Notebook • If only one ...
...discs that were not pre-installed, see "Recovering pre-installed software and drivers" on page 89. If you upgrade or exchange your hard drive or if your hard drive is completely erased or corrupted, your only option for system recovery may be to follow that were pre-installed at the factory, ..., see "Recovering your system using the Windows DVD" on page 90. • To re-install your pre-installed software and device drivers using Gateway Recovery Center. 80 To recover software and drivers that were pre-installed at the factory. CHAPTER 7: Maintaining Your Notebook • If only one ...
8512488 - Gateway Notebook Reference Guide R2
Page 87
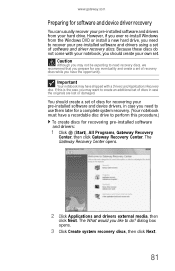
.... dialog box opens. 3 Click Create system recovery discs, then click Next. 81 However, if you ever re-install Windows from your hard drive. You should create your own set. www.gateway.com Preparing for software and device driver recovery You can usually recover your pre-installed software and drivers from the Windows DVD...
.... dialog box opens. 3 Click Create system recovery discs, then click Next. 81 However, if you ever re-install Windows from your hard drive. You should create your own set. www.gateway.com Preparing for software and device driver recovery You can usually recover your pre-installed software and drivers from the Windows DVD...
8512488 - Gateway Notebook Reference Guide R2
Page 89
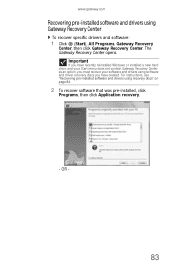
OR - 83 Important If you have recently reinstalled Windows or installed a new hard drive, and your Start menu does not contain Gateway Recovery Center as an option, you have created. For instructions, see "Recovering pre-installed software and drivers using software ... recovery discs" on page 84. 2 To recover software that was pre-installed, click Programs, then click Application recovery. - The Gateway Recovery Center opens. www.gateway.com Recovering pre-installed software and drivers using Gateway Recovery Center To recover specific drivers and software: 1 Click (Start), All Programs...
OR - 83 Important If you have recently reinstalled Windows or installed a new hard drive, and your Start menu does not contain Gateway Recovery Center as an option, you have created. For instructions, see "Recovering pre-installed software and drivers using software ... recovery discs" on page 84. 2 To recover software that was pre-installed, click Programs, then click Application recovery. - The Gateway Recovery Center opens. www.gateway.com Recovering pre-installed software and drivers using Gateway Recovery Center To recover specific drivers and software: 1 Click (Start), All Programs...
8512488 - Gateway Notebook Reference Guide R2
Page 95
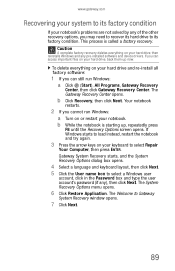
... on or restart your notebook. The System Recovery Options menu opens. 6 Click Restore Application. If you may need to recover its hard drive to its factory condition If your notebook's problems are not solved by any of the other recovery options, you can still run Windows... restart the notebook and try again. 3 Press the arrow keys on your hard drive and re-install all factory software: 1 If you cannot run Windows: a Click (Start), All Programs, Gateway Recovery Center, then click Gateway Recovery Center. The Welcome to select Repair Your Computer, then press ENTER. The...
... on or restart your notebook. The System Recovery Options menu opens. 6 Click Restore Application. If you may need to recover its hard drive to its factory condition If your notebook's problems are not solved by any of the other recovery options, you can still run Windows... restart the notebook and try again. 3 Press the arrow keys on your hard drive and re-install all factory software: 1 If you cannot run Windows: a Click (Start), All Programs, Gateway Recovery Center, then click Gateway Recovery Center. The Welcome to select Repair Your Computer, then press ENTER. The...
8512488 - Gateway Notebook Reference Guide R2
Page 96
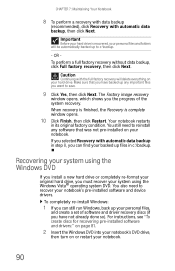
.... To completely re-install Windows: 1 If you can find your system using the Windows DVD If you install a new hard drive or completely re-format your original hard drive, you must recover your backed up to c:\backup. - OR To perform a full factory recovery without data backup, click Full...The Factory image recovery window opens, which shows you the progress of software and driver recovery discs (if you have backed up your hard drive. If you selected Recovery with automatic data backup, then click Next. Recovering your system using the Windows Vista® operating system DVD...
.... To completely re-install Windows: 1 If you can find your system using the Windows DVD If you install a new hard drive or completely re-format your original hard drive, you must recover your backed up to c:\backup. - OR To perform a full factory recovery without data backup, click Full...The Factory image recovery window opens, which shows you the progress of software and driver recovery discs (if you have backed up your hard drive. If you selected Recovery with automatic data backup, then click Next. Recovering your system using the Windows Vista® operating system DVD...

8512488 - Gateway Notebook Reference Guide R2
Page 99
CHAPTER8 Upgrading Your Notebook • Preventing static electricity discharge • Adding or replacing memory modules • Replacing the hard drive kit 93
CHAPTER8 Upgrading Your Notebook • Preventing static electricity discharge • Adding or replacing memory modules • Replacing the hard drive kit 93
8512488 - Gateway Notebook Reference Guide R2
Page 106
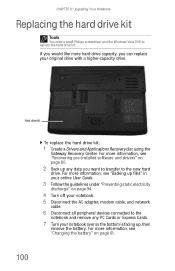
...up , then remove the battery. Hard drive kit To replace the hard drive kit: 1 Create a Drivers and Applications Recovery disc using the Gateway Recovery Center. For more information, see "Changing the battery" on page 94. 4 Turn off your original drive with a higher-capacity drive. If you would like more information..." in your online User Guide. 3 Follow the guidelines under "Preventing static electricity discharge" on page 61. 100 For more hard drive capacity, you want to transfer to the notebook and remove any data you can replace your notebook. 5 Disconnect the AC adapter...
...up , then remove the battery. Hard drive kit To replace the hard drive kit: 1 Create a Drivers and Applications Recovery disc using the Gateway Recovery Center. For more information, see "Changing the battery" on page 94. 4 Turn off your original drive with a higher-capacity drive. If you would like more information..." in your online User Guide. 3 Follow the guidelines under "Preventing static electricity discharge" on page 61. 100 For more hard drive capacity, you want to transfer to the notebook and remove any data you can replace your notebook. 5 Disconnect the AC adapter...

8512488 - Gateway Notebook Reference Guide R2
Page 107
www.gateway.com 8 Remove the two hard drive bay cover screws. Screw Screw 9 Slide the hard drive bay cover, then remove it. The hard drive is attached to the back of the cover. 10 If your new hard drive already includes the hard drive cover, go to step 15. -ORIf you need to move the hard drive cover from your old hard drive to your new hard drive, go to step 11. 101
www.gateway.com 8 Remove the two hard drive bay cover screws. Screw Screw 9 Slide the hard drive bay cover, then remove it. The hard drive is attached to the back of the cover. 10 If your new hard drive already includes the hard drive cover, go to step 15. -ORIf you need to move the hard drive cover from your old hard drive to your new hard drive, go to step 11. 101


