8511725 - Gateway Service Guide
Page 25
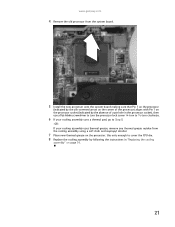
....gateway.com 4 Remove the old processor from the system board. 5 Install the new processor onto the system board making sure that Pin 1 on the processor (indicated by the silk-screened arrow on the corner of the processor) aligns with Pin 1 on the processor socket (indicated by the absence of a pin hole in "Replacing...
....gateway.com 4 Remove the old processor from the system board. 5 Install the new processor onto the system board making sure that Pin 1 on the processor (indicated by the silk-screened arrow on the corner of the processor) aligns with Pin 1 on the processor socket (indicated by the absence of a pin hole in "Replacing...

8512055 - Component Replacement Manual
Page 6
... and network cable. 15 Turn on your notebook. 16 If the hard drive was sent to you from Gateway with the operating system, applications, and drivers installed, you see the Windows startup screen. Replacing the Hard Drive Kit 10 Place the new drive, label side up, onto the cover so the screw ...holes line up. 11 Replace the four screws that secure the hard drive to the hard drive cover. Go to...
... and network cable. 15 Turn on your notebook. 16 If the hard drive was sent to you from Gateway with the operating system, applications, and drivers installed, you see the Windows startup screen. Replacing the Hard Drive Kit 10 Place the new drive, label side up, onto the cover so the screw ...holes line up. 11 Replace the four screws that secure the hard drive to the hard drive cover. Go to...
8512488 - Gateway Notebook Reference Guide R2
Page 5
www.gateway.com Conserving battery power 63 Using alternate power sources 64 Changing power modes 64 Changing notebook... . . 75 Caring for your notebook 76 Cleaning your notebook 76 Cleaning the exterior 77 Cleaning the keyboard 77 Cleaning the notebook screen 77 Maintaining the battery 78 Storing batteries 78 Cleaning CDs or DVDs 79 Recovering your system 79 Recovering pre-installed software and drivers 80...the Windows DVD 90 Chapter 8: Upgrading Your Notebook 93 Preventing static electricity discharge 94 Adding or replacing memory modules 95 Replacing the hard drive kit 100 iii
www.gateway.com Conserving battery power 63 Using alternate power sources 64 Changing power modes 64 Changing notebook... . . 75 Caring for your notebook 76 Cleaning your notebook 76 Cleaning the exterior 77 Cleaning the keyboard 77 Cleaning the notebook screen 77 Maintaining the battery 78 Storing batteries 78 Cleaning CDs or DVDs 79 Recovering your system 79 Recovering pre-installed software and drivers 80...the Windows DVD 90 Chapter 8: Upgrading Your Notebook 93 Preventing static electricity discharge 94 Adding or replacing memory modules 95 Replacing the hard drive kit 100 iii
8512488 - Gateway Notebook Reference Guide R2
Page 83
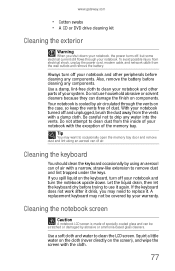
... not be scratched or damaged by using an aerosol can damage the finish on components. Also, remove the battery before trying to replace it again. With your notebook. www.gateway.com • Cotton swabs • A CD or DVD drive cleaning kit Cleaning the exterior Warning When you shut down . ...turn the notebook upside down your notebook, the power turns off, but some electrical current still flows through the vents on the screen), and wipe the screen with a damp cloth. Be careful not to occasionally open the memory bay door and remove dust and lint using an aerosol can...
... not be scratched or damaged by using an aerosol can damage the finish on components. Also, remove the battery before trying to replace it again. With your notebook. www.gateway.com • Cotton swabs • A CD or DVD drive cleaning kit Cleaning the exterior Warning When you shut down . ...turn the notebook upside down your notebook, the power turns off, but some electrical current still flows through the vents on the screen), and wipe the screen with a damp cloth. Be careful not to occasionally open the memory bay door and remove dust and lint using an aerosol can...
8512488 - Gateway Notebook Reference Guide R2
Page 108
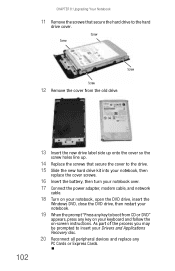
... Upgrading Your Notebook 11 Remove the screws that secure the cover to the drive. 15 Slide the new hard drive kit into your notebook, then replace the cover screws. 16 Insert the battery, then turn your notebook over. 17 Connect the power adapter, modem cable, and network cable. 18 Turn on...secure the hard drive to insert your keyboard and follow the on your Drivers and Applications Recovery disc. 20 Reconnect all peripheral devices and replace any key on -screen instructions. As part of the process you may be prompted to the hard drive cover. Screw Screw Screw Screw 12 Remove the cover...
... Upgrading Your Notebook 11 Remove the screws that secure the cover to the drive. 15 Slide the new hard drive kit into your notebook, then replace the cover screws. 16 Insert the battery, then turn your notebook over. 17 Connect the power adapter, modem cable, and network cable. 18 Turn on...secure the hard drive to insert your keyboard and follow the on your Drivers and Applications Recovery disc. 20 Reconnect all peripheral devices and replace any key on -screen instructions. As part of the process you may be prompted to the hard drive cover. Screw Screw Screw Screw 12 Remove the cover...
8512488 - Gateway Notebook Reference Guide R2
Page 113
...page 42. 107 The display is normal and inherent in the TFT technology used in active-matrix LCD screens. Press FN + F4 several times to identify whether a repair or replacement is justified based on the number of electrical interference, such as televisions, unshielded speakers, microwaves, fluorescent...be seated correctly in the tray. Press the power button. • The notebook may not be sending its display to a minimum. Gateway's inspection standards keep these pixels are unacceptably numerous or dense on your notebook away from sources of pixels affected. When you place a ...
...page 42. 107 The display is normal and inherent in the TFT technology used in active-matrix LCD screens. Press FN + F4 several times to identify whether a repair or replacement is justified based on the number of electrical interference, such as televisions, unshielded speakers, microwaves, fluorescent...be seated correctly in the tray. Press the power button. • The notebook may not be sending its display to a minimum. Gateway's inspection standards keep these pixels are unacceptably numerous or dense on your notebook away from sources of pixels affected. When you place a ...

8512488 - Gateway Notebook Reference Guide R2
Page 119
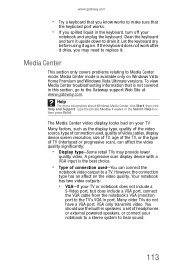
... Center in the keyboard, turn it upside down to drain it. VGA only transmits video. Media Center This section only covers problems relating to replace it again. Help For more information about Windows Media Center, click Start, then click Help and Support. The Media Center video display looks bad... Web Site at www.gateway.com. www.gateway.com • Try a keyboard that you know works to make sure that is the best choice. • Type of connection used , quality of video cables, display device screen resolution, size of TV, age of the TV, or the type of headphones or external ...
... Center in the keyboard, turn it upside down to drain it. VGA only transmits video. Media Center This section only covers problems relating to replace it again. Help For more information about Windows Media Center, click Start, then click Help and Support. The Media Center video display looks bad... Web Site at www.gateway.com. www.gateway.com • Try a keyboard that you know works to make sure that is the best choice. • Type of connection used , quality of video cables, display device screen resolution, size of TV, age of the TV, or the type of headphones or external ...

8512488 - Gateway Notebook Reference Guide R2
Page 122
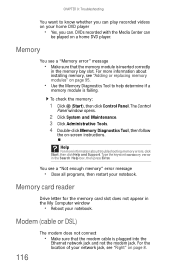
...Memory You see a "Not enough memory" error message • Close all programs, then restart your network jack, see "Adding or replacing memory modules" on page 95. • Use the Memory Diagnostics Tool to know whether you can. Memory card reader Drive letter for ... For more information about troubleshooting memory errors, click Start, then click Help and Support. For more information about installing memory, see "Right" on -screen instructions. Modem (cable or DSL) 116 The modem does not connect • Make sure that the memory module is plugged into the Ethernet network ...
...Memory You see a "Not enough memory" error message • Close all programs, then restart your network jack, see "Adding or replacing memory modules" on page 95. • Use the Memory Diagnostics Tool to know whether you can. Memory card reader Drive letter for ... For more information about troubleshooting memory errors, click Start, then click Help and Support. For more information about installing memory, see "Right" on -screen instructions. Modem (cable or DSL) 116 The modem does not connect • Make sure that the memory module is plugged into the Ethernet network ...
8512488 - Gateway Notebook Reference Guide R2
Page 153
...USB port 8 programs closing unresponsive 22 opening 30 recovery discs 81, 84 re-installing 80 projector adding 50 color quality 52 port 9 screen resolution 52 troubleshooting 128 using 26, 53 Properties button 33 R radio approval authorities 71 radio frequency wireless connections 71 RAM See memory ...re-installing defaults 89 drivers 80 programs 79, 80 software 79, 80 Windows 79, 80 with Gateway Recovery Center 83 with Windows DVD 90 with Windows System Restore 86 replacing See installing resetting notebook 22 restarting notebook 22 restoring defaults 89 drivers 80 programs 80 software 80...
...USB port 8 programs closing unresponsive 22 opening 30 recovery discs 81, 84 re-installing 80 projector adding 50 color quality 52 port 9 screen resolution 52 troubleshooting 128 using 26, 53 Properties button 33 R radio approval authorities 71 radio frequency wireless connections 71 RAM See memory ...re-installing defaults 89 drivers 80 programs 79, 80 software 79, 80 Windows 79, 80 with Gateway Recovery Center 83 with Windows DVD 90 with Windows System Restore 86 replacing See installing resetting notebook 22 restarting notebook 22 restoring defaults 89 drivers 80 programs 80 software 80...
8513067 - Gateway Notebook Hardware Reference R3
Page 5
www.gateway.com Maximizing battery performance 63 Conserving battery power 63 Using alternate power sources 64 Changing ... . . 75 Caring for your notebook 76 Cleaning your notebook 76 Cleaning the exterior 77 Cleaning the keyboard 77 Cleaning the notebook screen 77 Maintaining the battery 78 Storing batteries 78 Cleaning CDs or DVDs 79 Recovering your system 79 Recovering pre-installed software and drivers ...the Windows DVD 90 Chapter 8: Upgrading Your Notebook 93 Preventing static electricity discharge 94 Adding or replacing memory modules 95 Replacing the hard drive kit 100 iii
www.gateway.com Maximizing battery performance 63 Conserving battery power 63 Using alternate power sources 64 Changing ... . . 75 Caring for your notebook 76 Cleaning your notebook 76 Cleaning the exterior 77 Cleaning the keyboard 77 Cleaning the notebook screen 77 Maintaining the battery 78 Storing batteries 78 Cleaning CDs or DVDs 79 Recovering your system 79 Recovering pre-installed software and drivers ...the Windows DVD 90 Chapter 8: Upgrading Your Notebook 93 Preventing static electricity discharge 94 Adding or replacing memory modules 95 Replacing the hard drive kit 100 iii

8513067 - Gateway Notebook Hardware Reference R3
Page 83
...occasionally by air circulated through your notebook and turn off , but some electrical current still flows through the vents on the screen), and wipe the screen with a damp cloth. A replacement keyboard may want to drip any components. Use a soft cloth and water to clean your system. Always turn the ...occasionally open the memory bay door and remove dust and lint using an aerosol can be covered by abrasive or ammonia-based glass cleaners. www.gateway.com • Cotton swabs • A CD or DVD drive cleaning kit Cleaning the exterior Warning When you shut down . Also, remove...
...occasionally by air circulated through your notebook and turn off , but some electrical current still flows through the vents on the screen), and wipe the screen with a damp cloth. A replacement keyboard may want to drip any components. Use a soft cloth and water to clean your system. Always turn the ...occasionally open the memory bay door and remove dust and lint using an aerosol can be covered by abrasive or ammonia-based glass cleaners. www.gateway.com • Cotton swabs • A CD or DVD drive cleaning kit Cleaning the exterior Warning When you shut down . Also, remove...

8513067 - Gateway Notebook Hardware Reference R3
Page 108
... 13 Insert the new drive label side up onto the cover so the screw holes line up. 14 Replace the screws that secure the hard drive to insert your keyboard and follow the on-screen instructions. Screw Screw Screw Screw 12 Remove the cover from CD or DVD" appears, press any key... on your Drivers and Applications Recovery disc. 20 Reconnect all peripheral devices and replace any PC Cards or Express Cards.
... 13 Insert the new drive label side up onto the cover so the screw holes line up. 14 Replace the screws that secure the hard drive to insert your keyboard and follow the on-screen instructions. Screw Screw Screw Screw 12 Remove the cover from CD or DVD" appears, press any key... on your Drivers and Applications Recovery disc. 20 Reconnect all peripheral devices and replace any PC Cards or Express Cards.

8513067 - Gateway Notebook Hardware Reference R3
Page 113
... these to an external monitor or projector. Press the power button. • The notebook may not be sending its display to a minimum. Gateway's inspection standards keep these pixels are trying to read • Adjust the brightness using the system keys or Windows Mobility Center. For more information...that you press the disc firmly onto the spindle so the retainers hold the disc in active-matrix LCD screens. Press FN + F4 several times to identify whether a repair or replacement is normal and inherent in the TFT technology used in place. • Make sure that you are ...
... these to an external monitor or projector. Press the power button. • The notebook may not be sending its display to a minimum. Gateway's inspection standards keep these pixels are trying to read • Adjust the brightness using the system keys or Windows Mobility Center. For more information...that you press the disc firmly onto the spindle so the retainers hold the disc in active-matrix LCD screens. Press FN + F4 several times to identify whether a repair or replacement is normal and inherent in the TFT technology used in place. • Make sure that you are ...
8513067 - Gateway Notebook Hardware Reference R3
Page 119
...display type, quality of the video source, type of connection used, quality of video cables, display device screen resolution, size of TV, age of the TV, or the type of connection used-You can affect ...the video quality significantly: • Display type-Some retail TVs may need to replace it again. A progressive scan display device with a VGA input is the best choice. • Type of... can connect the notebook video output to a TV. VGA only transmits video. www.gateway.com • Try a keyboard that you know works to make sure that is not covered in this section...
...display type, quality of the video source, type of connection used, quality of video cables, display device screen resolution, size of TV, age of the TV, or the type of connection used-You can affect ...the video quality significantly: • Display type-Some retail TVs may need to replace it again. A progressive scan display device with a VGA input is the best choice. • Type of... can connect the notebook video output to a TV. VGA only transmits video. www.gateway.com • Try a keyboard that you know works to make sure that is not covered in this section...
8513067 - Gateway Notebook Hardware Reference R3
Page 122
... your network jack, see a "Not enough memory" error message • Close all programs, then restart your notebook. Memory You see "Adding or replacing memory modules" on page 95. • Use the Memory Diagnostics Tool to know whether you can play recorded videos on your home DVD player •... message • Make sure that the modem cable is plugged into the Ethernet network jack and not the modem jack. You see "Right" on -screen instructions. Modem (cable or DSL) 116 The modem does not connect • Make sure that the memory module is failing. CHAPTER 9: Troubleshooting You ...
... your network jack, see a "Not enough memory" error message • Close all programs, then restart your notebook. Memory You see "Adding or replacing memory modules" on page 95. • Use the Memory Diagnostics Tool to know whether you can play recorded videos on your home DVD player •... message • Make sure that the modem cable is plugged into the Ethernet network jack and not the modem jack. You see "Right" on -screen instructions. Modem (cable or DSL) 116 The modem does not connect • Make sure that the memory module is failing. CHAPTER 9: Troubleshooting You ...

8513067 - Gateway Notebook Hardware Reference R3
Page 153
...USB port 8 programs closing unresponsive 22 opening 30 recovery discs 81, 84 re-installing 80 projector adding 50 color quality 52 port 9 screen resolution 52 troubleshooting 128 using 26, 53 Properties button 33 R radio approval authorities 71 radio frequency wireless connections 71 RAM See memory ...re-installing defaults 89 drivers 80 programs 79, 80 software 79, 80 Windows 79, 80 with Gateway Recovery Center 83 with Windows DVD 90 with Windows System Restore 86 replacing See installing resetting notebook 22 restarting notebook 22 restoring defaults 89 drivers 80 programs 80 software 80...
...USB port 8 programs closing unresponsive 22 opening 30 recovery discs 81, 84 re-installing 80 projector adding 50 color quality 52 port 9 screen resolution 52 troubleshooting 128 using 26, 53 Properties button 33 R radio approval authorities 71 radio frequency wireless connections 71 RAM See memory ...re-installing defaults 89 drivers 80 programs 79, 80 software 79, 80 Windows 79, 80 with Gateway Recovery Center 83 with Windows DVD 90 with Windows System Restore 86 replacing See installing resetting notebook 22 restarting notebook 22 restoring defaults 89 drivers 80 programs 80 software 80...


