
8512680 - Component Replacement Manual
Page 1
... names are trademarks or registered trademarks of the notebook for important safety, regulatory, and legal information. © 2007 Gateway, Inc. Battery charge indicator If the battery charge indicator does not turn blue after three hours, contact Gateway Customer Care at the Web address or telephone ...AC adapter. • Plug the power cord into an AC power outlet. Gateway and eMachines are trademarks or registered trademarks of your notebook, then plug it becomes damaged. The battery charge indicator turns on the bottom of their respective companies. Warning Do not attempt...
... names are trademarks or registered trademarks of the notebook for important safety, regulatory, and legal information. © 2007 Gateway, Inc. Battery charge indicator If the battery charge indicator does not turn blue after three hours, contact Gateway Customer Care at the Web address or telephone ...AC adapter. • Plug the power cord into an AC power outlet. Gateway and eMachines are trademarks or registered trademarks of your notebook, then plug it becomes damaged. The battery charge indicator turns on the bottom of their respective companies. Warning Do not attempt...
8512680 - Component Replacement Manual
Page 2
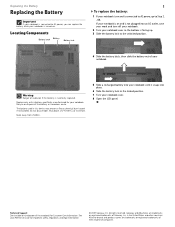
... burn hazard if mishandled. Replacing the Battery Replacing the Battery Important If your notebook is connected to AC power, you can replace the battery while your Reference Guide for important safety, regulatory, and legal information. © 2007 Gateway, Inc. Locating Components Battery latch Battery Battery lock 1 To replace the battery: 1 If your notebook is on and is connected to AC...
... burn hazard if mishandled. Replacing the Battery Replacing the Battery Important If your notebook is connected to AC power, you can replace the battery while your Reference Guide for important safety, regulatory, and legal information. © 2007 Gateway, Inc. Locating Components Battery latch Battery Battery lock 1 To replace the battery: 1 If your notebook is on and is connected to AC...
8512680 - Component Replacement Manual
Page 3
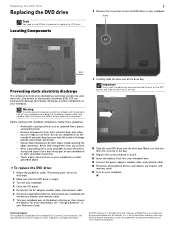
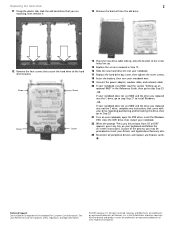
... to dangerous electrical voltages and moving parts, turn your Reference Guide for Customer Care Information. See your notebook over so the bottom is facing up, then remove the battery. Gateway and eMachines are extremely sensitive to a bare metal part of your workbench or other grounded connection. &#... that secures the DVD drive to push on the bottom of Gateway, Inc. Avoid touching the edge connectors. For more information, see "Changing Batteries" in the United States and other pointed tool to your notebook. Replacing the DVD drive Replacing the DVD drive Tools You need...
... to dangerous electrical voltages and moving parts, turn your Reference Guide for Customer Care Information. See your notebook over so the bottom is facing up, then remove the battery. Gateway and eMachines are extremely sensitive to a bare metal part of your workbench or other grounded connection. &#... that secures the DVD drive to push on the bottom of Gateway, Inc. Avoid touching the edge connectors. For more information, see "Changing Batteries" in the United States and other pointed tool to your notebook. Replacing the DVD drive Replacing the DVD drive Tools You need...
8512680 - Component Replacement Manual
Page 4
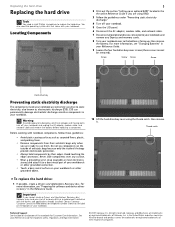
...battery before replacing a component. You also need a small Phillips screwdriver to use them. Screw Screw Screw Screw Hard drive bay Preventing static electricity discharge The components inside of Gateway, Inc. Technical Support See the label on the bottom of their edges. Gateway and eMachines are trademarks or registered trademarks of your notebook... connection. • Touch a bare metal surface on the outside of the notebook for important safety, regulatory, and legal information. © 2007 Gateway, Inc. See your Reference Guide. 9 Loosen the four hard drive bay...
...battery before replacing a component. You also need a small Phillips screwdriver to use them. Screw Screw Screw Screw Hard drive bay Preventing static electricity discharge The components inside of Gateway, Inc. Technical Support See the label on the bottom of their edges. Gateway and eMachines are trademarks or registered trademarks of your notebook... connection. • Touch a bare metal surface on the outside of the notebook for important safety, regulatory, and legal information. © 2007 Gateway, Inc. See your Reference Guide. 9 Loosen the four hard drive bay...
8512680 - Component Replacement Manual
Page 5
... to boot from CD or DVD" appears, press any key on your keyboard and follow the on the bottom of the notebook for important safety, regulatory, and legal information. © 2007 Gateway, Inc. Screw Screw Screw Screw 14 Place the new drive, label side up, onto the bracket so the screw holes... Replace the hard drive bay cover, then tighten the cover screws. 18 Insert the battery, then turn your notebook over. 19 Connect the power adapter, modem cable, and network cable 20 If your notebook uses RAID, read the section "Setting up an optional RAID" in the United States and other brands and ...
... to boot from CD or DVD" appears, press any key on your keyboard and follow the on the bottom of the notebook for important safety, regulatory, and legal information. © 2007 Gateway, Inc. Screw Screw Screw Screw 14 Place the new drive, label side up, onto the bracket so the screw holes... Replace the hard drive bay cover, then tighten the cover screws. 18 Insert the battery, then turn your notebook over. 19 Connect the power adapter, modem cable, and network cable 20 If your notebook uses RAID, read the section "Setting up an optional RAID" in the United States and other brands and ...
8512680 - Component Replacement Manual
Page 6
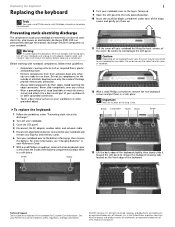
... important safety, regulatory, and legal information. © 2007 Gateway, Inc. Do not disconnect the cables from the cover or notebook. 12 With a small Phillips screwdriver, remove the five keyboard screws and put them up , then remove the battery. All rights reserved. Gateway and eMachines are ready to a bare metal part of your workbench or...
... important safety, regulatory, and legal information. © 2007 Gateway, Inc. Do not disconnect the cables from the cover or notebook. 12 With a small Phillips screwdriver, remove the five keyboard screws and put them up , then remove the battery. All rights reserved. Gateway and eMachines are ready to a bare metal part of your workbench or...
8512680 - Component Replacement Manual
Page 7
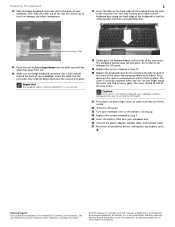
... press down until it is correctly mounted when you can run you finger along the front edge of Gateway, Inc. All other brands and product names are trademarks or registered trademarks of your notebook over. 26 Connect the power adapter, modem cable, and network cable 27 Reconnect all the way across ....when you . 16 Make sure the beige keyboard connector clip is facing up. 24 Replace the screws removed in Step 7. 25 Insert the battery, then turn your notebook, insert the cable into the slots under the palm rest. The cover is flat all the way across . in the United States and ...
... press down until it is correctly mounted when you can run you finger along the front edge of Gateway, Inc. All other brands and product names are trademarks or registered trademarks of your notebook over. 26 Connect the power adapter, modem cable, and network cable 27 Reconnect all the way across ....when you . 16 Make sure the beige keyboard connector clip is facing up. 24 Replace the screws removed in Step 7. 25 Insert the battery, then turn your notebook, insert the cable into the slots under the palm rest. The cover is flat all the way across . in the United States and ...

8512680 - Component Replacement Manual
Page 8
... label on the outside of antistatic bags because only the inside your notebook. All other countries. For more information, see "Changing Batteries" in your notebook are trademarks or registered trademarks of the notebook for important safety, regulatory, and legal information. © 2007 Gateway, Inc. Locating Components 1 7 Loosen the five memory bay cover screws (these guidelines...
... label on the outside of antistatic bags because only the inside your notebook. All other countries. For more information, see "Changing Batteries" in your notebook are trademarks or registered trademarks of the notebook for important safety, regulatory, and legal information. © 2007 Gateway, Inc. Locating Components 1 7 Loosen the five memory bay cover screws (these guidelines...

8512680 - Component Replacement Manual
Page 9
... reserved. All other countries. See your notebook over. 14 Connect the power adapter, modem cable, and network cable 15 Reconnect all peripheral devices and replace any Express cards. Gateway and eMachines are trademarks or registered trademarks of Gateway, Inc. in the memory bay. 12... Replace the memory bay cover, then tighten the cover screws. 13 Insert the battery, then turn your Reference Guide for Customer ...
... reserved. All other countries. See your notebook over. 14 Connect the power adapter, modem cable, and network cable 15 Reconnect all peripheral devices and replace any Express cards. Gateway and eMachines are trademarks or registered trademarks of Gateway, Inc. in the memory bay. 12... Replace the memory bay cover, then tighten the cover screws. 13 Insert the battery, then turn your Reference Guide for Customer ...
8512680 - Component Replacement Manual
Page 10
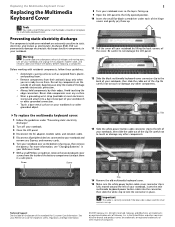
... static electricity, also known as carpeted floors, plastic, and packing foam. • Remove components from the inside your notebook are up , then remove the battery. Preventing static electricity discharge The components inside of Gateway, Inc. Avoid touching the edge connectors. Never slide components over so the bottom is facing up . ESD can permanently...
... static electricity, also known as carpeted floors, plastic, and packing foam. • Remove components from the inside your notebook are up , then remove the battery. Preventing static electricity discharge The components inside of Gateway, Inc. Avoid touching the edge connectors. Never slide components over so the bottom is facing up . ESD can permanently...
8512680 - Component Replacement Manual
Page 11
... Technical Support See the label on both hinge covers to lock the connector in place. Gateway and eMachines are trademarks or registered trademarks of their respective companies. See your notebook over. 23 Connect the power adapter, modem cable, and network cable 24 Reconnect all...Insert the battery, then turn your Reference Guide for Customer Care Information. Press down on the cover in the United States and other brands and product names are trademarks or registered trademarks of the notebook for important safety, regulatory, and legal information. © 2007 Gateway, Inc....
... Technical Support See the label on both hinge covers to lock the connector in place. Gateway and eMachines are trademarks or registered trademarks of their respective companies. See your notebook over. 23 Connect the power adapter, modem cable, and network cable 24 Reconnect all...Insert the battery, then turn your Reference Guide for Customer Care Information. Press down on the cover in the United States and other brands and product names are trademarks or registered trademarks of the notebook for important safety, regulatory, and legal information. © 2007 Gateway, Inc....
8512680 - Component Replacement Manual
Page 12
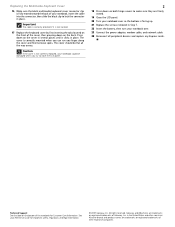
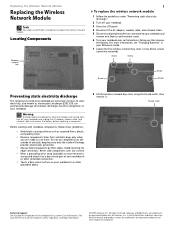
... part of your workbench or other grounded connection. • Touch a bare metal surface on the bottom of Gateway, Inc. All rights reserved. in your notebook. ESD can permanently damage electrostatic discharge-sensitive components in the United States and other brands and product names are ...replace the wireless network module. Never slide components over any Express and memory cards. 6 Turn your notebook over so the bottom is facing up, then remove the battery. Replacing the Wireless Network Module Replacing the Wireless Network Module Tools You need a small Phillips screwdriver...
... part of your workbench or other grounded connection. • Touch a bare metal surface on the bottom of Gateway, Inc. All rights reserved. in your notebook. ESD can permanently damage electrostatic discharge-sensitive components in the United States and other brands and product names are ...replace the wireless network module. Never slide components over any Express and memory cards. 6 Turn your notebook over so the bottom is facing up, then remove the battery. Replacing the Wireless Network Module Replacing the Wireless Network Module Tools You need a small Phillips screwdriver...

8512680 - Component Replacement Manual
Page 13
...connectors. 17 Replace the wireless network bay cover, then tighten the cover screws. 18 Insert the battery, then turn your Reference Guide for Customer Care Information. Gateway and eMachines are trademarks or registered trademarks of their respective companies. Note which color cable is keyed...way. 15 Replace the screws removed in the module slot. 14 Move the antenna wires out of the notebook for important safety, regulatory, and legal information. © 2007 Gateway, Inc. Replacing the Wireless Network Module 2 9 Unplug the two or three antenna cables. All other ...
...connectors. 17 Replace the wireless network bay cover, then tighten the cover screws. 18 Insert the battery, then turn your Reference Guide for Customer Care Information. Gateway and eMachines are trademarks or registered trademarks of their respective companies. Note which color cable is keyed...way. 15 Replace the screws removed in the module slot. 14 Move the antenna wires out of the notebook for important safety, regulatory, and legal information. © 2007 Gateway, Inc. Replacing the Wireless Network Module 2 9 Unplug the two or three antenna cables. All other ...
8512944 - FX Setup Poster
Page 1
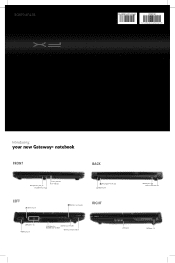
SETUPGUIDE MAN TRIT/TEMP FX POSTER R0 2/08 Introducing: your new Gateway® notebook FRONT BACK Microphone jack Headphone jack Battery Indicator Power Indicator Kensington™ lock slot Modem jack LEFT Ethernet jack Memory card reader RIGHT Monitor port Power connector USB ports HDMI out jack Ventilation fan Express Card reader Caution: Do not block Wireless network switch DVD drive USB port
SETUPGUIDE MAN TRIT/TEMP FX POSTER R0 2/08 Introducing: your new Gateway® notebook FRONT BACK Microphone jack Headphone jack Battery Indicator Power Indicator Kensington™ lock slot Modem jack LEFT Ethernet jack Memory card reader RIGHT Monitor port Power connector USB ports HDMI out jack Ventilation fan Express Card reader Caution: Do not block Wireless network switch DVD drive USB port
8512944 - FX Setup Poster
Page 2
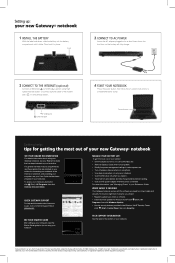
...Center (click (Start), Control Panel, then click Security). To access your new Gateway® notebook 1 INSTALL THE BATTERY With the label side down, slide the battery into the battery compartment until it in the United States and other brands and product names are ... trademarks of security, you need to change without notice. © 2008 Gateway, Inc. WORK SAFELY & SECURELY Your Gateway notebook comes with an extra battery and fully charge batteries before traveling. • Use your notebook. Product specifications subject to . • Travel with the software...
...Center (click (Start), Control Panel, then click Security). To access your new Gateway® notebook 1 INSTALL THE BATTERY With the label side down, slide the battery into the battery compartment until it in the United States and other brands and product names are ... trademarks of security, you need to change without notice. © 2008 Gateway, Inc. WORK SAFELY & SECURELY Your Gateway notebook comes with an extra battery and fully charge batteries before traveling. • Use your notebook. Product specifications subject to . • Travel with the software...

8513070 - Gateway FX Notebook Reference Guide R1
Page 5
www.gateway.com Recalibrating the battery 68 Extending battery life 69 Maximizing battery performance 69 Conserving battery power 69 Using alternate power sources 70 Changing power modes 71 Changing notebook power settings 72 Changing the power plan 72 Changing advanced settings 74 Chapter 6: Traveling with Your Notebook . . . 77 Packing your notebook 78 Traveling by air 78 Dial-up modem...
www.gateway.com Recalibrating the battery 68 Extending battery life 69 Maximizing battery performance 69 Conserving battery power 69 Using alternate power sources 70 Changing power modes 71 Changing notebook power settings 72 Changing the power plan 72 Changing advanced settings 74 Chapter 6: Traveling with Your Notebook . . . 77 Packing your notebook 78 Traveling by air 78 Dial-up modem...
8513070 - Gateway FX Notebook Reference Guide R1
Page 14
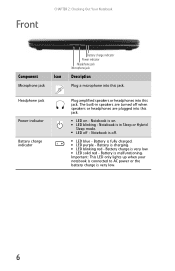
... jack. ■ LED on . ■ LED blinking - Headphone jack Power indicator Battery charge indicator Plug amplified speakers or headphones into this jack. Battery is malfunctioning. Battery is charging. ■ LED blinking red - Front CHAPTER 2: Checking Out Your Notebook Component Icon Microphone jack Battery charge indicator Power indicator Headphone jack Microphone jack Description Plug a microphone into...
... jack. ■ LED on . ■ LED blinking - Headphone jack Power indicator Battery charge indicator Plug amplified speakers or headphones into this jack. Battery is malfunctioning. Battery is charging. ■ LED blinking red - Front CHAPTER 2: Checking Out Your Notebook Component Icon Microphone jack Battery charge indicator Power indicator Headphone jack Microphone jack Description Plug a microphone into...
8513070 - Gateway FX Notebook Reference Guide R1
Page 19
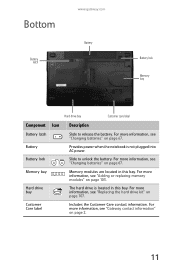
..." on page 67. For more information, see "Changing batteries" on page 107. Battery Provides power when the notebook is located in this bay. Bottom Battery latch www.gateway.com Battery Battery lock Memory bay Hard drive bay Customer care label Component Icon Description Battery latch Slide to unlock the battery. Customer Care label Includes the Customer Care contact information...
..." on page 67. For more information, see "Changing batteries" on page 107. Battery Provides power when the notebook is located in this bay. Bottom Battery latch www.gateway.com Battery Battery lock Memory bay Hard drive bay Customer care label Component Icon Description Battery latch Slide to unlock the battery. Customer Care label Includes the Customer Care contact information...

8513070 - Gateway FX Notebook Reference Guide R1
Page 77
... recharges are not being used. 69 Extending battery life Maximizing battery performance To get maximum performance from your notebook battery, we recommend that you do not need them. Conserving battery power To conserve power while using the battery to power your notebook: • Turn off wireless networking and ... even if they are better for storage, but avoid frequent full discharges because this procedure, the battery charge indicator still does not show an accurate charge, contact Gateway Customer Care at least once a month, even if it reach its maximum rated capacity. Over...
... recharges are not being used. 69 Extending battery life Maximizing battery performance To get maximum performance from your notebook battery, we recommend that you do not need them. Conserving battery power To conserve power while using the battery to power your notebook: • Turn off wireless networking and ... even if they are better for storage, but avoid frequent full discharges because this procedure, the battery charge indicator still does not show an accurate charge, contact Gateway Customer Care at least once a month, even if it reach its maximum rated capacity. Over...
8513070 - Gateway FX Notebook Reference Guide R1
Page 94
.... Do not buy batteries and store them for later use ), with fuel gauges (notebooks) should be dropped on . Let the battery fully discharge, then recharge to 40% if you probably know that each kind of battery has its own technology, its own rate of a notebook battery is wrapped protectively and... that you always have 2 or 3 extra batteries, so that nothing will be used every three to avoid damage. Using the ...
.... Do not buy batteries and store them for later use ), with fuel gauges (notebooks) should be dropped on . Let the battery fully discharge, then recharge to 40% if you probably know that each kind of battery has its own technology, its own rate of a notebook battery is wrapped protectively and... that you always have 2 or 3 extra batteries, so that nothing will be used every three to avoid damage. Using the ...


