
8512149 - Gateway Notebook User Guide for Windows Vista
Page 55
... router, the corresponding green indicator should light on the front of the cable into the Ethernet jack on your computers. 3 Plug one end of the power adapter into the AC connector on the router and the other end into the network jack on the router (except the WAN port). With a wireless... one end of an access point, a cable or DSL modem (for Internet access), and your computer wherever you want to connect to the network. www.gateway.com In addition to a router, you need a straight-through cable for each computer you like. Cable/DSL modem Router WAN port To set up your...
... router, the corresponding green indicator should light on the front of the cable into the Ethernet jack on your computers. 3 Plug one end of the power adapter into the AC connector on the router and the other end into the network jack on the router (except the WAN port). With a wireless... one end of an access point, a cable or DSL modem (for Internet access), and your computer wherever you want to connect to the network. www.gateway.com In addition to a router, you need a straight-through cable for each computer you like. Cable/DSL modem Router WAN port To set up your...
8512149 - Gateway Notebook User Guide for Windows Vista
Page 60
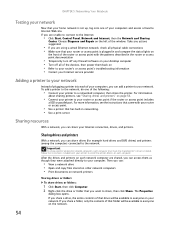
... or access point documentation • Temporarily turn off any actions suggested. • If you are using a wired Ethernet network, check all of the devices, then power them as though they were attached directly to a networked computer, then share the printer. Choose Diagnose and Repair on your network. For more information, see...
... or access point documentation • Temporarily turn off any actions suggested. • If you are using a wired Ethernet network, check all of the devices, then power them as though they were attached directly to a networked computer, then share the printer. Choose Diagnose and Repair on your network. For more information, see...
8512149 - Gateway Notebook User Guide for Windows Vista
Page 88
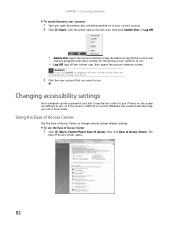
... of Access Center: 1 Click (Start), Control Panel, Ease of Access, then click Ease of Access Center opens. 82 Changing accessibility settings Your notebook can be a powerful tool, but does not log off the current user, and any programs that were running may be closed, and unsaved document changes may be less...
... of Access Center: 1 Click (Start), Control Panel, Ease of Access, then click Ease of Access Center opens. 82 Changing accessibility settings Your notebook can be a powerful tool, but does not log off the current user, and any programs that were running may be closed, and unsaved document changes may be less...
8512149 - Gateway Notebook User Guide for Windows Vista
Page 90
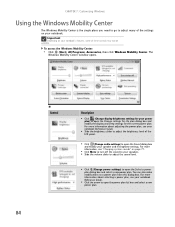
... your speakers. ■ Slide the volume slider to adjust the sound level. ■ Click (Change power settings) to open the Select a power plan dialog box and select a new power plan. For more information, see your notebook Reference Guide. ■ Slide the brightness slider to adjust ...; Click (Change audio settings) to open the Sound dialog box and modify your speaker and microphone settings. For more information about adjusting the power plan, see "Changing system sounds" on your notebook's features, some of these controls may not be available. To access the Windows Mobility ...
... your speakers. ■ Slide the volume slider to adjust the sound level. ■ Click (Change power settings) to open the Select a power plan dialog box and select a new power plan. For more information, see your notebook Reference Guide. ■ Slide the brightness slider to adjust ...; Click (Change audio settings) to open the Sound dialog box and modify your speaker and microphone settings. For more information about adjusting the power plan, see "Changing system sounds" on your notebook's features, some of these controls may not be available. To access the Windows Mobility ...
8512320 - Gateway Notebook Reference Guide R0
Page 3
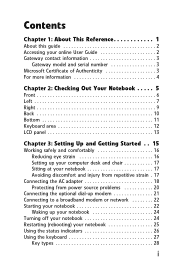
Contents Chapter 1: About This Reference 1 About this guide 2 Accessing your online User Guide 2 Gateway contact information 3 Gateway model and serial number 3 Microsoft Certificate of Authenticity 3 For more information 4 Chapter 2: Checking Out Your Notebook . . . . . 5 Front 6 Left 7 Right 9 ... chair 17 Sitting at your notebook 17 Avoiding discomfort and injury from repetitive strain . 17 Connecting the AC adapter 18 Protecting from power source problems 20 Connecting the optional dial-up modem 21 Connecting to a broadband modem or network 22 Starting your notebook 22 Waking...
Contents Chapter 1: About This Reference 1 About this guide 2 Accessing your online User Guide 2 Gateway contact information 3 Gateway model and serial number 3 Microsoft Certificate of Authenticity 3 For more information 4 Chapter 2: Checking Out Your Notebook . . . . . 5 Front 6 Left 7 Right 9 ... chair 17 Sitting at your notebook 17 Avoiding discomfort and injury from repetitive strain . 17 Connecting the AC adapter 18 Protecting from power source problems 20 Connecting the optional dial-up modem 21 Connecting to a broadband modem or network 22 Starting your notebook 22 Waking...

8512320 - Gateway Notebook Reference Guide R0
Page 4
... display on a projector, monitor, or television 58 Adjusting the display properties 60 Using the projector or monitor for a presentation . . . . 62 Ordering accessories 63 Chapter 5: Managing Power 65 Monitoring the battery charge 66 Recharging the battery 66 Changing batteries 67 Recalibrating the battery 68 ii
... display on a projector, monitor, or television 58 Adjusting the display properties 60 Using the projector or monitor for a presentation . . . . 62 Ordering accessories 63 Chapter 5: Managing Power 65 Monitoring the battery charge 66 Recharging the battery 66 Changing batteries 67 Recalibrating the battery 68 ii

8512320 - Gateway Notebook Reference Guide R0
Page 5
www.gateway.com Extending battery life 68 Maximizing battery performance 68 Conserving battery power 69 Using alternate power sources 70 Changing power modes 70 Changing notebook power settings 71 Changing the power plan 71 Changing advanced settings 73 Chapter 6: Traveling with Your Notebook . . . 75 Packing your ...notebook 76 Traveling by air 76 Dial-up modem 76 Radio frequency wireless connections 77 Files 77 Security 78 Power 79 Additional tips 79 Chapter 7: Maintaining Your Notebook . . . . . 81 Caring for your notebook 82 Cleaning your notebook 83 ...
www.gateway.com Extending battery life 68 Maximizing battery performance 68 Conserving battery power 69 Using alternate power sources 70 Changing power modes 70 Changing notebook power settings 71 Changing the power plan 71 Changing advanced settings 73 Chapter 6: Traveling with Your Notebook . . . 75 Packing your ...notebook 76 Traveling by air 76 Dial-up modem 76 Radio frequency wireless connections 77 Files 77 Security 78 Power 79 Additional tips 79 Chapter 7: Maintaining Your Notebook . . . . . 81 Caring for your notebook 82 Cleaning your notebook 83 ...

8512320 - Gateway Notebook Reference Guide R0
Page 6
... Memory card reader 124 Modem (cable or DSL 124 Modem (dial-up 125 Mouse 128 Networks (wired 129 Networks (wireless 131 Passwords 133 Power 133 Printer 134 Sound 135 Status indicators 136 Touchpad 136 Video 136 Telephone support 137 Before calling Gateway Customer Care 137 Appendix A: Legal Information 139 Index 149 iv
... Memory card reader 124 Modem (cable or DSL 124 Modem (dial-up 125 Mouse 128 Networks (wired 129 Networks (wireless 131 Passwords 133 Power 133 Printer 134 Sound 135 Status indicators 136 Touchpad 136 Video 136 Telephone support 137 Before calling Gateway Customer Care 137 Appendix A: Legal Information 139 Index 149 iv

8512320 - Gateway Notebook Reference Guide R0
Page 12
...this jack. ■ LED on . ■ LED blinking - Important: This LED only lights up when your notebook is connected to AC power or the battery charge is very low. ■ LED solid red - Notebook is off - Battery charge is very low. 6 Notebook ...is on - Front CHAPTER 2: Checking Out Your Notebook Component Icon Microphone jack Battery charge indicator Power indicator Headphone jack Microphone jack Description Plug a microphone into this jack. Headphone jack Power indicator Battery charge indicator Plug amplified speakers or headphones into this jack.
...this jack. ■ LED on . ■ LED blinking - Important: This LED only lights up when your notebook is connected to AC power or the battery charge is very low. ■ LED solid red - Notebook is off - Battery charge is very low. 6 Notebook ...is on - Front CHAPTER 2: Checking Out Your Notebook Component Icon Microphone jack Battery charge indicator Power indicator Headphone jack Microphone jack Description Plug a microphone into this jack. Headphone jack Power indicator Battery charge indicator Plug amplified speakers or headphones into this jack.

8512320 - Gateway Notebook Reference Guide R0
Page 16
...object by connecting a Kensington cable lock to this optional jack. Plug the AC adapter cable into this connector. 10 Monitor port Power connector Plug an analog VGA monitor or projector into this port. Back CHAPTER 2: Checking Out Your Notebook Optional modem jack Kensington lock... slot Component Icon Description Power connector Monitor port Modem jack (optional) Plug a dial-up modem" on page 58. For more information, see "Viewing the display on ...
...object by connecting a Kensington cable lock to this optional jack. Plug the AC adapter cable into this connector. 10 Monitor port Power connector Plug an analog VGA monitor or projector into this port. Back CHAPTER 2: Checking Out Your Notebook Optional modem jack Kensington lock... slot Component Icon Description Power connector Monitor port Modem jack (optional) Plug a dial-up modem" on page 58. For more information, see "Viewing the display on ...

8512320 - Gateway Notebook Reference Guide R0
Page 17
.... The hard drive is not plugged into AC power. Provides power when the notebook is located in this bay. For more information, see "Changing batteries" on page 101. For more information, see "Replacing the hard drive kit" on page 105. 11 Bottom www.gateway.com Battery Battery latch Customer care label Online Support...
.... The hard drive is not plugged into AC power. Provides power when the notebook is located in this bay. For more information, see "Changing batteries" on page 101. For more information, see "Replacing the hard drive kit" on page 105. 11 Bottom www.gateway.com Battery Battery latch Customer care label Online Support...
8512320 - Gateway Notebook Reference Guide R0
Page 18
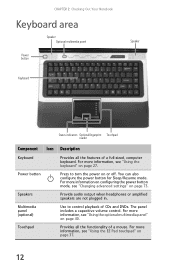
...on or off. Speakers Provide audio output when headphones or amplified speakers are not plugged in. Power button Press to control playback of CDs and DVDs. For more information on configuring the power button mode, see "Using the keyboard" on page 40. For more information, see "Using ... 27. For more information, see "Using the EZ Pad touchpad" on page 37. 12 Multimedia panel (optional) Use to turn the power on page 73. Touchpad Provides all the features of a full-sized, computer keyboard. CHAPTER 2: Checking Out Your Notebook Keyboard area Speaker Optional multimedia...
...on or off. Speakers Provide audio output when headphones or amplified speakers are not plugged in. Power button Press to control playback of CDs and DVDs. For more information on configuring the power button mode, see "Using the keyboard" on page 40. For more information, see "Using ... 27. For more information, see "Using the EZ Pad touchpad" on page 37. 12 Multimedia panel (optional) Use to turn the power on page 73. Touchpad Provides all the features of a full-sized, computer keyboard. CHAPTER 2: Checking Out Your Notebook Keyboard area Speaker Optional multimedia...
8512320 - Gateway Notebook Reference Guide R0
Page 24
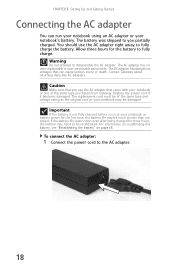
...fully charged before you use the AC adapter right away to you expect. For information on recalibrating the battery, see "Recalibrating the battery" on battery power for three hours, the battery may be much shorter than you partially charged. CHAPTER 3: Setting Up and Getting Started Connecting the AC adapter You can... your notebook on page 68. The replacement cord must be recalibrated. You should use your notebook may need to disassemble the AC adapter. Contact Gateway about returning defective AC adapters. Warning Do not attempt to be of the same type purchased from...
...fully charged before you use the AC adapter right away to you expect. For information on recalibrating the battery, see "Recalibrating the battery" on battery power for three hours, the battery may be much shorter than you partially charged. CHAPTER 3: Setting Up and Getting Started Connecting the AC adapter You can... your notebook on page 68. The replacement cord must be recalibrated. You should use your notebook may need to disassemble the AC adapter. Contact Gateway about returning defective AC adapters. Warning Do not attempt to be of the same type purchased from...
8512320 - Gateway Notebook Reference Guide R0
Page 25
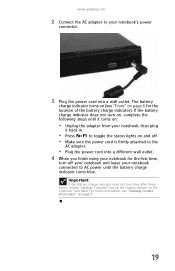
...battery charge indicator does not turn blue after three hours, contact Gateway Customer Care at the location shown on page 3. 19 For more information, see "Front" on and off your notebook and leave your notebook's power connector. 3 Plug the power cord into a different wall outlet. 4 When you finish ...notebook, then plug it back in. • Press FN+F1 to the AC adapter. • Plug the power cord into a wall outlet. The battery charge indicator turns on (see "Gateway contact information" on the Customer Care label. If the battery charge indicator does not turn off . • ...
...battery charge indicator does not turn blue after three hours, contact Gateway Customer Care at the location shown on page 3. 19 For more information, see "Front" on and off your notebook and leave your notebook's power connector. 3 Plug the power cord into a different wall outlet. 4 When you finish ...notebook, then plug it back in. • Press FN+F1 to the AC adapter. • Plug the power cord into a wall outlet. The battery charge indicator turns on (see "Gateway contact information" on the Customer Care label. If the battery charge indicator does not turn off . • ...
8512320 - Gateway Notebook Reference Guide R0
Page 26
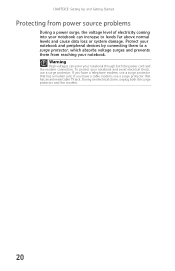
... surge protector and the modem. 20 To protect your notebook can enter your notebook. Protect your notebook and peripheral devices by connecting them from power source problems During a power surge, the voltage level of electricity coming into your notebook and avoid electrical shock, use a surge protector. If you have a telephone modem, use... or system damage. If you have a cable modem, use a surge protector that has an antenna/cable TV jack. During an electrical storm, unplug both the power cord and the modem connection.
... surge protector and the modem. 20 To protect your notebook can enter your notebook. Protect your notebook and peripheral devices by connecting them from power source problems During a power surge, the voltage level of electricity coming into your notebook and avoid electrical shock, use a surge protector. If you have a telephone modem, use... or system damage. If you have a cable modem, use a surge protector that has an antenna/cable TV jack. During an electrical storm, unplug both the power cord and the modem connection.
8512320 - Gateway Notebook Reference Guide R0
Page 29
... files. Tip For more information about connecting peripheral devices, see "Using Windows" and "Customizing Windows" in your online User Guide. 23 www.gateway.com To start your first user account. 4 Attach and turn on any peripheral devices, such as printers, scanners, and speakers. Tip For ...more information on using Windows, see "Installing a printer or other peripheral device" on page 57. For more information about changing the power button mode, see "Changing advanced settings" on page 73. 3 If you can run programs and search for its setup instructions. 5 To open ...
... files. Tip For more information about connecting peripheral devices, see "Using Windows" and "Customizing Windows" in your online User Guide. 23 www.gateway.com To start your first user account. 4 Attach and turn on any peripheral devices, such as printers, scanners, and speakers. Tip For ...more information on using Windows, see "Installing a printer or other peripheral device" on page 57. For more information about changing the power button mode, see "Changing advanced settings" on page 73. 3 If you can run programs and search for its setup instructions. 5 To open ...
8512320 - Gateway Notebook Reference Guide R0
Page 30
...up . If your notebook is an alternative to Sleep mode. Sleep mode saves your notebook. Hibernate mode is in Sleep mode, the power indicator flashes. The notebook saves your notebook, it turns off your notebook Putting your notebook from a Sleep state is much faster than ... you wake your notebook from the standard Sleep mode (default) to sleep: • Click (Start), then click (power). For more information about Sleep mode, see "Changing power modes" on page 70. The notebook saves your notebook into Sleep mode is turned completely off . While in Sleep ...
...up . If your notebook is an alternative to Sleep mode. Sleep mode saves your notebook. Hibernate mode is in Sleep mode, the power indicator flashes. The notebook saves your notebook, it turns off your notebook Putting your notebook from a Sleep state is much faster than ... you wake your notebook from the standard Sleep mode (default) to sleep: • Click (Start), then click (power). For more information about Sleep mode, see "Changing power modes" on page 70. The notebook saves your notebook into Sleep mode is turned completely off . While in Sleep ...
8512320 - Gateway Notebook Reference Guide R0
Page 31
...: • Click (Start), click the arrow next to restart (reboot) your notebook: 1 Press CTRL+ALT+DEL. 2 Click Start Task Manager. Unplug the power cord and remove the battery for about five seconds, then release it . 2. The Windows Task Manager dialog box opens. 3 Click the program that are not... . To restart your notebook: • Click (Start), click the arrow next to turn off your notebook, press and hold the power button for more than 10 seconds. 25 www.gateway.com To turn off . To close programs that is not responding. 4 Click End Task. 5 Click X in Windows to the ...
...: • Click (Start), click the arrow next to restart (reboot) your notebook: 1 Press CTRL+ALT+DEL. 2 Click Start Task Manager. Unplug the power cord and remove the battery for about five seconds, then release it . 2. The Windows Task Manager dialog box opens. 3 Click the program that are not... . To restart your notebook: • Click (Start), click the arrow next to turn off your notebook, press and hold the power button for more than 10 seconds. 25 www.gateway.com To turn off . To close programs that is not responding. 4 Click End Task. 5 Click X in Windows to the ...
8512320 - Gateway Notebook Reference Guide R0
Page 35
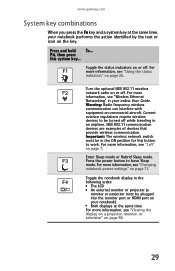
...commercial aircraft. Current aviation regulations require wireless devices to be turned off . Enter Sleep mode or Hybrid Sleep mode. Press the power button to work. www.gateway.com System key combinations When you press the FN key and a system key at the same time For more information, see "...must be in your notebook performs the action identified by the text or icon on page 58. 29 For more information, see "Changing notebook power settings" on or off while traveling in the following order: ■ The LCD ■ An external monitor or projector (a monitor or ...
...commercial aircraft. Current aviation regulations require wireless devices to be turned off . Enter Sleep mode or Hybrid Sleep mode. Press the power button to work. www.gateway.com System key combinations When you press the FN key and a system key at the same time For more information, see "...must be in your notebook performs the action identified by the text or icon on page 58. 29 For more information, see "Changing notebook power settings" on or off while traveling in the following order: ■ The LCD ■ An external monitor or projector (a monitor or ...
8512320 - Gateway Notebook Reference Guide R0
Page 65
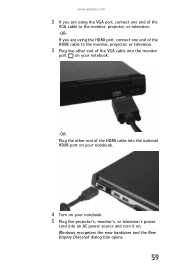
www.gateway.com 2 If you are using the VGA port, connect one end of the VGA cable to the monitor, projector, or television. -ORIf you are using ... the other end of the HDMI cable into the optional HDMI port on your notebook. 4 Turn on your notebook. 5 Plug the projector's, monitor's, or television's power cord into an AC power source and turn it on. Windows recognizes the new hardware and the New Display Detected dialog box opens. 59
www.gateway.com 2 If you are using the VGA port, connect one end of the VGA cable to the monitor, projector, or television. -ORIf you are using ... the other end of the HDMI cable into the optional HDMI port on your notebook. 4 Turn on your notebook. 5 Plug the projector's, monitor's, or television's power cord into an AC power source and turn it on. Windows recognizes the new hardware and the New Display Detected dialog box opens. 59


