8512936 - Gateway Notebook Reference Guide R0
Page 3
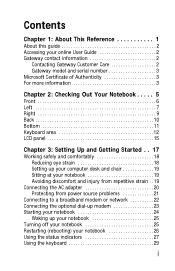
Contents Chapter 1: About This Reference 1 About this guide 2 Accessing your online User Guide 2 Gateway contact information 2 Contacting Gateway Customer Care 2 Gateway model and serial number 3 Microsoft Certificate of Authenticity 3 For more information 3 Chapter 2: Checking Out Your Notebook . . . . . 5 Front 6... desk and chair 19 Sitting at your notebook 19 Avoiding discomfort and injury from repetitive strain . . 19 Connecting the AC adapter 20 Protecting from power source problems 21 Connecting to a broadband modem or network 22 Connecting the optional dial-up modem ...
Contents Chapter 1: About This Reference 1 About this guide 2 Accessing your online User Guide 2 Gateway contact information 2 Contacting Gateway Customer Care 2 Gateway model and serial number 3 Microsoft Certificate of Authenticity 3 For more information 3 Chapter 2: Checking Out Your Notebook . . . . . 5 Front 6... desk and chair 19 Sitting at your notebook 19 Avoiding discomfort and injury from repetitive strain . . 19 Connecting the AC adapter 20 Protecting from power source problems 21 Connecting to a broadband modem or network 22 Connecting the optional dial-up modem ...
8512936 - Gateway Notebook Reference Guide R0
Page 18
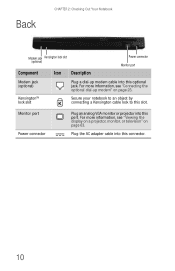
Monitor port Power connector Plug an analog VGA monitor or projector into this connector. 10 Plug the AC adapter cable into this slot. Back CHAPTER 2: Checking Out Your Notebook Modem jack Kensington lock slot (optional) Component Icon Description Power connector Monitor port Modem jack (...
Monitor port Power connector Plug an analog VGA monitor or projector into this connector. 10 Plug the AC adapter cable into this slot. Back CHAPTER 2: Checking Out Your Notebook Modem jack Kensington lock slot (optional) Component Icon Description Power connector Monitor port Modem jack (...
8512936 - Gateway Notebook Reference Guide R0
Page 25
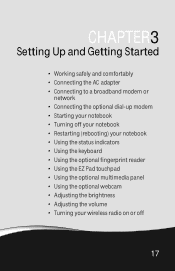
CHAPTER3 Setting Up and Getting Started • Working safely and comfortably • Connecting the AC adapter • Connecting to a broadband modem or network • Connecting the optional dial-up modem • Starting your notebook • Turning off your notebook • Restarting (...
CHAPTER3 Setting Up and Getting Started • Working safely and comfortably • Connecting the AC adapter • Connecting to a broadband modem or network • Connecting the optional dial-up modem • Starting your notebook • Turning off your notebook • Restarting (...
8512936 - Gateway Notebook Reference Guide R0
Page 28
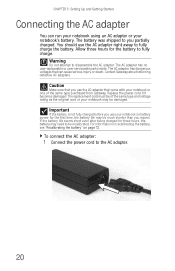
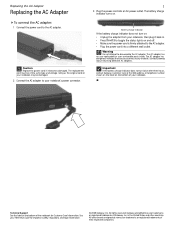
...To connect the AC adapter: 1 Connect the power cord to you use the AC adapter that can run your notebook using an AC adapter or your notebook on page 72. The battery was shipped to the AC adapter. 20 Warning Do not attempt to be recalibrated. Contact Gateway about returning defective AC adapters. Caution Make ... of the same type and voltage rating as the original cord or your notebook or one of the same type purchased from Gateway. The AC adapter has dangerous voltages that came with your notebook may be much shorter than you use your notebook's battery. If the battery...
...To connect the AC adapter: 1 Connect the power cord to you use the AC adapter that can run your notebook using an AC adapter or your notebook on page 72. The battery was shipped to the AC adapter. 20 Warning Do not attempt to be recalibrated. Contact Gateway about returning defective AC adapters. Caution Make ... of the same type and voltage rating as the original cord or your notebook or one of the same type purchased from Gateway. The AC adapter has dangerous voltages that came with your notebook may be much shorter than you use your notebook's battery. If the battery...
8512936 - Gateway Notebook Reference Guide R0
Page 29
... off . • Make sure the power cord is firmly attached to the AC adapter. • Plug the power cord into a different wall outlet. 4 When you finish using your notebook for the first time, turn blue after three hours, contact Gateway Customer Care at the location shown on page 6 for the location of electricity...
... off . • Make sure the power cord is firmly attached to the AC adapter. • Plug the power cord into a different wall outlet. 4 When you finish using your notebook for the first time, turn blue after three hours, contact Gateway Customer Care at the location shown on page 6 for the location of electricity...
8512936 - Gateway Notebook Reference Guide R0
Page 80
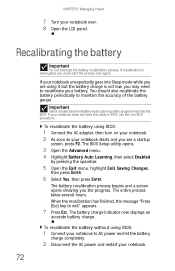
... a startup screen, press F2. To recalibrate the battery using BIOS: 1 Connect the AC adapter, then turn on your notebook. 2 As soon as your notebook starts and you may need to AC power and let the battery charge completely. 2 Disconnect the AC power and restart your notebook. 72 If your notebook does not have the...
... a startup screen, press F2. To recalibrate the battery using BIOS: 1 Connect the AC adapter, then turn on your notebook. 2 As soon as your notebook starts and you may need to AC power and let the battery charge completely. 2 Disconnect the AC power and restart your notebook. 72 If your notebook does not have the...
8512936 - Gateway Notebook Reference Guide R0
Page 115
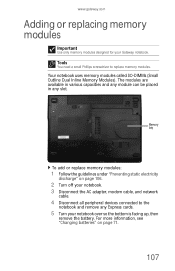
...electricity discharge" on page 71. 107 For more information, see "Changing batteries" on page 106. 2 Turn off your notebook. 3 Disconnect the AC adapter, modem cable, and network cable. 4 Disconnect all peripheral devices connected to replace memory modules. Tools You need a small Phillips screwdriver to the ...). The modules are available in various capacities and any module can be placed in any Express cards. 5 Turn your Gateway notebook. www.gateway.com Adding or replacing memory modules Important Use only memory modules designed for your notebook over so the bottom is facing up...
...electricity discharge" on page 71. 107 For more information, see "Changing batteries" on page 106. 2 Turn off your notebook. 3 Disconnect the AC adapter, modem cable, and network cable. 4 Disconnect all peripheral devices connected to replace memory modules. Tools You need a small Phillips screwdriver to the ...). The modules are available in various capacities and any module can be placed in any Express cards. 5 Turn your Gateway notebook. www.gateway.com Adding or replacing memory modules Important Use only memory modules designed for your notebook over so the bottom is facing up...
8512936 - Gateway Notebook Reference Guide R0
Page 119
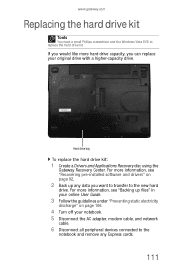
... your original drive with a higher-capacity drive. www.gateway.com Replacing the hard drive kit Tools You need a small Phillips screwdriver and the Windows Vista DVD to the new hard drive. For more hard drive capacity, you can replace your notebook. 5 Disconnect the AC adapter, modem cable, and network cable. 6 Disconnect all peripheral...
... your original drive with a higher-capacity drive. www.gateway.com Replacing the hard drive kit Tools You need a small Phillips screwdriver and the Windows Vista DVD to the new hard drive. For more hard drive capacity, you can replace your notebook. 5 Disconnect the AC adapter, modem cable, and network cable. 6 Disconnect all peripheral...
8512936 - Gateway Notebook Reference Guide R0
Page 145
... is plugged into the outlet and turn it on battery power • Check the power management settings. Call Gateway Customer Care for repair. For more information about recharging the battery, see "Connecting the AC adapter" on page 20. • If your notebook is installed correctly. For more information about using power management settings...
... is plugged into the outlet and turn it on battery power • Check the power management settings. Call Gateway Customer Care for repair. For more information about recharging the battery, see "Connecting the AC adapter" on page 20. • If your notebook is installed correctly. For more information about using power management settings...
8512936 - Gateway Notebook Reference Guide R0
Page 161
Index A AC adapter connecting 20 connector 10 international adapters 74 accessories safety precautions 145 acoustic handset coupler 82 application key 30 arrow keys 30 audio adjusting volume 33, 49 back button 32, 43, 44 ..., 44 stop button 32, 43, 44 troubleshooting 139 volume down button 33 volume up button 33 audio CD cleaning 91 inserting 57, 58 automobile power adapter 74 B battery alternate power sources 74 bay 71 calibrating 90 changing 71 charge indicator 6, 70 charge status 70 charging 20, 70 conserving power 73 extending...
Index A AC adapter connecting 20 connector 10 international adapters 74 accessories safety precautions 145 acoustic handset coupler 82 application key 30 arrow keys 30 audio adjusting volume 33, 49 back button 32, 43, 44 ..., 44 stop button 32, 43, 44 troubleshooting 139 volume down button 33 volume up button 33 audio CD cleaning 91 inserting 57, 58 automobile power adapter 74 B battery alternate power sources 74 bay 71 calibrating 90 changing 71 charge indicator 6, 70 charge status 70 charging 20, 70 conserving power 73 extending...
8512936 - Gateway Notebook Reference Guide R0
Page 162
... 91 case 89 CD 91 DVD 91 keyboard 89 LCD panel 89 notebook exterior 88 screen 89 154 clicking 41 closing unresponsive program 26 connecting AC adapter 20 cable modem 22 dial-up modem 23 DSL modem 22 external keyboard 29 external monitor 63 keyboard 29 mouse 41 printer 62 projector 63...
... 91 case 89 CD 91 DVD 91 keyboard 89 LCD panel 89 notebook exterior 88 screen 89 154 clicking 41 closing unresponsive program 26 connecting AC adapter 20 cable modem 22 dial-up modem 23 DSL modem 22 external keyboard 29 external monitor 63 keyboard 29 mouse 41 printer 62 projector 63...
8512936 - Gateway Notebook Reference Guide R0
Page 166
...peripheral devices 62 Plug and Play devices USB support for 62 pointer identifying 40 moving 41 ports See connections power AC adapter 20, 74 advanced settings 76, 78 alternate sources 74 automobile/airplane adapter 74 battery 70, 71, 72, 73 button 12, 14, 31 changing modes 75 changing plans 76 connector... 10, 20 conserving battery power 73 EmPower adapter 74 extending battery life 73 Hibernate mode 75 Hybrid Sleep mode 31, 75 ...
...peripheral devices 62 Plug and Play devices USB support for 62 pointer identifying 40 moving 41 ports See connections power AC adapter 20, 74 advanced settings 76, 78 alternate sources 74 automobile/airplane adapter 74 battery 70, 71, 72, 73 button 12, 14, 31 changing modes 75 changing plans 76 connector... 10, 20 conserving battery power 73 EmPower adapter 74 extending battery life 73 Hibernate mode 75 Hybrid Sleep mode 31, 75 ...
8512949 - Component Replacement Manual R0
Page 1
... trademarks or registered trademarks of the notebook for important safety, regulatory, and legal information. © 2008 Gateway, Inc. The AC adapter has dangerous voltages that can cause serious injury or death. Caution Replace the power cord if it back in.... Warning Do not attempt to the AC adapter. Important If the battery charge indicator does not turn on: • Unplug the adapter from your notebook's power connector. 1 3 Plug the power cord into a different wall outlet. Contact Gateway about returning defective AC adapters. Technical Support See the label on ...
... trademarks or registered trademarks of the notebook for important safety, regulatory, and legal information. © 2008 Gateway, Inc. The AC adapter has dangerous voltages that can cause serious injury or death. Caution Replace the power cord if it back in.... Warning Do not attempt to the AC adapter. Important If the battery charge indicator does not turn on: • Unplug the adapter from your notebook's power connector. 1 3 Plug the power cord into a different wall outlet. Contact Gateway about returning defective AC adapters. Technical Support See the label on ...
8512949 - Component Replacement Manual R0
Page 3
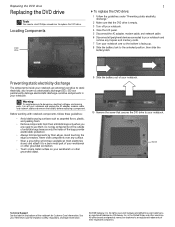
... notebook for important safety, regulatory, and legal information. © 2008 Gateway, Inc. See your notebook. Never slide components over so the bottom is empty. 3 Turn off your notebook. Gateway and eMachines are trademarks or registered trademarks of their respective companies. Preventing... To avoid exposure to dangerous electrical voltages and moving parts, turn off your notebook. 4 Close the LCD panel. 5 Disconnect the AC adapter, modem cable, and network cable. 6 Disconnect all peripheral devices connected to your notebook and remove any Express and memory cards. 7...
... notebook for important safety, regulatory, and legal information. © 2008 Gateway, Inc. See your notebook. Never slide components over so the bottom is empty. 3 Turn off your notebook. Gateway and eMachines are trademarks or registered trademarks of their respective companies. Preventing... To avoid exposure to dangerous electrical voltages and moving parts, turn off your notebook. 4 Close the LCD panel. 5 Disconnect the AC adapter, modem cable, and network cable. 6 Disconnect all peripheral devices connected to your notebook and remove any Express and memory cards. 7...
8512949 - Component Replacement Manual R0
Page 5
... a Drivers and Applications Recovery disc. Contact Gateway Customer Care at most electronics stores) and attach it . Warning To avoid exposure to dangerous electrical voltages and moving parts, turn off your notebook. 4 Close the LCD panel. 5 Disconnect the AC adapter, modem cable, and network cable. 6...electrostatic protection. • Always hold components by their antistatic bags only when you a set of your notebook and unplug the AC adapter, modem cable, and network cable and remove the battery before replacing a component. Before working with notebook components, follow these ...
... a Drivers and Applications Recovery disc. Contact Gateway Customer Care at most electronics stores) and attach it . Warning To avoid exposure to dangerous electrical voltages and moving parts, turn off your notebook. 4 Close the LCD panel. 5 Disconnect the AC adapter, modem cable, and network cable. 6...electrostatic protection. • Always hold components by their antistatic bags only when you a set of your notebook and unplug the AC adapter, modem cable, and network cable and remove the battery before replacing a component. Before working with notebook components, follow these ...
8512949 - Component Replacement Manual R0
Page 7
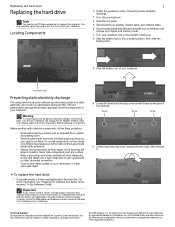
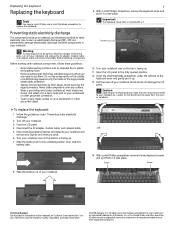
...the small flat-blade screwdriver under "Preventing static electricity discharge." 2 Turn off your notebook. 3 Close the LCD panel. 4 Disconnect the AC adapter, modem cable, and network cable. -OR- 5 Disconnect all peripheral devices connected to your notebook and remove any Express and memory cards....the cover off your Reference Guide for Customer Care Information. Do not disconnect the cable from their respective companies. All rights reserved. Gateway and eMachines are extremely sensitive to use them in a safe place. Before working with a K. Screw 10 Turn your notebook. ...
...the small flat-blade screwdriver under "Preventing static electricity discharge." 2 Turn off your notebook. 3 Close the LCD panel. 4 Disconnect the AC adapter, modem cable, and network cable. -OR- 5 Disconnect all peripheral devices connected to your notebook and remove any Express and memory cards....the cover off your Reference Guide for Customer Care Information. Do not disconnect the cable from their respective companies. All rights reserved. Gateway and eMachines are extremely sensitive to use them in a safe place. Before working with a K. Screw 10 Turn your notebook. ...
8512949 - Component Replacement Manual R0
Page 9
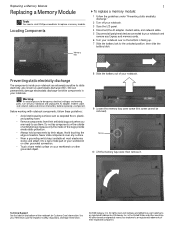
... moving parts, turn off your notebook. 3 Close the LCD panel. 4 Disconnect the AC adapter, modem cable, and network cable. 5 Disconnect all peripheral devices connected to a bare metal part of Gateway, Inc. Do not lay components on the bottom of your notebook. 9 Loosen the memory... over any Express and memory cards. 6 Turn your notebook and unplug the AC adapter, modem cable, and network cable and remove the battery before replacing a component. See your workbench or other countries. Gateway and eMachines are ready to the unlocked position, then slide the battery latch...
... moving parts, turn off your notebook. 3 Close the LCD panel. 4 Disconnect the AC adapter, modem cable, and network cable. 5 Disconnect all peripheral devices connected to a bare metal part of Gateway, Inc. Do not lay components on the bottom of your notebook. 9 Loosen the memory... over any Express and memory cards. 6 Turn your notebook and unplug the AC adapter, modem cable, and network cable and remove the battery before replacing a component. See your workbench or other countries. Gateway and eMachines are ready to the unlocked position, then slide the battery latch...
8512949 - Component Replacement Manual R0
Page 11
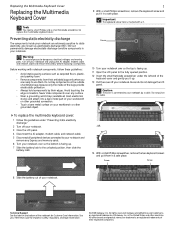
... product names are trademarks or registered trademarks of the bags provide electrostatic protection. • Always hold components by a cable. Gateway and eMachines are extremely sensitive to the unlocked position, then slide the battery latch. -OR- 14 With a small Phillips ...the small flat-blade screwdriver under "Preventing static electricity discharge." 2 Turn off your notebook. 3 Close the LCD panel. 4 Disconnect the AC adapter, modem cable, and network cable. 5 Disconnect all peripheral devices connected to your notebook and remove any surface. • Wear a grounding...
... product names are trademarks or registered trademarks of the bags provide electrostatic protection. • Always hold components by a cable. Gateway and eMachines are extremely sensitive to the unlocked position, then slide the battery latch. -OR- 14 With a small Phillips ...the small flat-blade screwdriver under "Preventing static electricity discharge." 2 Turn off your notebook. 3 Close the LCD panel. 4 Disconnect the AC adapter, modem cable, and network cable. 5 Disconnect all peripheral devices connected to your notebook and remove any surface. • Wear a grounding...
8512949 - Component Replacement Manual R0
Page 13
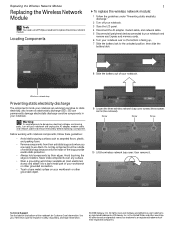
... To avoid exposure to dangerous electrical voltages and moving parts, turn off your notebook. 3 Close the LCD panel. 4 Disconnect the AC adapter, modem cable, and network cable. 5 Disconnect all peripheral devices connected to your notebook and remove any Express and memory cards. 6...(available at most electronics stores) and attach it . See your notebook and unplug the AC adapter, modem cable, and network cable and remove the battery before replacing a component. Gateway and eMachines are trademarks or registered trademarks of antistatic bags because only the inside your workbench ...
... To avoid exposure to dangerous electrical voltages and moving parts, turn off your notebook. 3 Close the LCD panel. 4 Disconnect the AC adapter, modem cable, and network cable. 5 Disconnect all peripheral devices connected to your notebook and remove any Express and memory cards. 6...(available at most electronics stores) and attach it . See your notebook and unplug the AC adapter, modem cable, and network cable and remove the battery before replacing a component. Gateway and eMachines are trademarks or registered trademarks of antistatic bags because only the inside your workbench ...
8512320 - Gateway Notebook Reference Guide R0
Page 3
Contents Chapter 1: About This Reference 1 About this guide 2 Accessing your online User Guide 2 Gateway contact information 3 Gateway model and serial number 3 Microsoft Certificate of Authenticity 3 For more information 4 Chapter 2: Checking Out Your Notebook . . . . . 5 Front 6 Left 7 Right 9... up your computer desk and chair 17 Sitting at your notebook 17 Avoiding discomfort and injury from repetitive strain . 17 Connecting the AC adapter 18 Protecting from power source problems 20 Connecting the optional dial-up modem 21 Connecting to a broadband modem or network 22 Starting...
Contents Chapter 1: About This Reference 1 About this guide 2 Accessing your online User Guide 2 Gateway contact information 3 Gateway model and serial number 3 Microsoft Certificate of Authenticity 3 For more information 4 Chapter 2: Checking Out Your Notebook . . . . . 5 Front 6 Left 7 Right 9... up your computer desk and chair 17 Sitting at your notebook 17 Avoiding discomfort and injury from repetitive strain . 17 Connecting the AC adapter 18 Protecting from power source problems 20 Connecting the optional dial-up modem 21 Connecting to a broadband modem or network 22 Starting...

