8513031 - Gateway Notebook User Guide for Windows Vista R3
Page 53
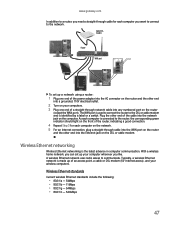
...computer wherever you want to connect to the network. As each computer is made up your computers. 3 Plug one end of the power adapter into the AC connector on the router (except the WAN port). The WAN port is used to connect the router to ... modem (for Internet access), and your wireless computers. Typically, a wireless Ethernet network is connected to communicate. www.gateway.com In addition to a router, you need a straight-through cable for each computer you like. Wireless Ethernet networking Wireless Ethernet networking is identified by a label or a switch. Wireless...
...computer wherever you want to connect to the network. As each computer is made up your computers. 3 Plug one end of the power adapter into the AC connector on the router (except the WAN port). The WAN port is used to connect the router to ... modem (for Internet access), and your wireless computers. Typically, a wireless Ethernet network is connected to communicate. www.gateway.com In addition to a router, you need a straight-through cable for each computer you like. Wireless Ethernet networking Wireless Ethernet networking is identified by a label or a switch. Wireless...
8513031 - Gateway Notebook User Guide for Windows Vista R3
Page 58
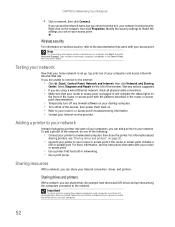
...Start), Control Panel, Network and Internet, then click Network and Sharing Center. To add a printer to the network, do one of the devices, then power them back on. • Refer to your Internet connection, drives, and printers. Sharing drives and printers With a network, you are using security. ... is plugged in networking. • Use a print server. Take any firewall software on your desktop computer. • Turn off all physical cable connections. • Make sure that has built-in and compare the status lights on the front of the router or access point with your...
...Start), Control Panel, Network and Internet, then click Network and Sharing Center. To add a printer to the network, do one of the devices, then power them back on. • Refer to your Internet connection, drives, and printers. Sharing drives and printers With a network, you are using security. ... is plugged in networking. • Use a print server. Take any firewall software on your desktop computer. • Turn off all physical cable connections. • Make sure that has built-in and compare the status lights on the front of the router or access point with your...
8512949 - Component Replacement Manual R0
Page 4
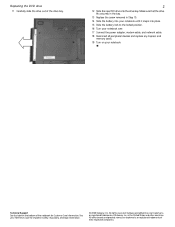
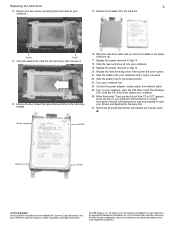
... are trademarks or registered trademarks of their respective companies. All rights reserved. All other countries. Gateway and eMachines are trademarks or registered trademarks of Gateway, Inc. See your notebook over. 17 Connect the power adapter, modem cable, and network cable. 18 Reconnect all peripheral devices and replace any Express and memory cards. 19 Turn on... the drive bay. Replacing the DVD drive 11 Carefully slide the drive out of the notebook for important safety, regulatory, and legal information. © 2008 Gateway, Inc.
... are trademarks or registered trademarks of their respective companies. All rights reserved. All other countries. Gateway and eMachines are trademarks or registered trademarks of Gateway, Inc. See your notebook over. 17 Connect the power adapter, modem cable, and network cable. 18 Reconnect all peripheral devices and replace any Express and memory cards. 19 Turn on... the drive bay. Replacing the DVD drive 11 Carefully slide the drive out of the notebook for important safety, regulatory, and legal information. © 2008 Gateway, Inc.
8512949 - Component Replacement Manual R0
Page 6
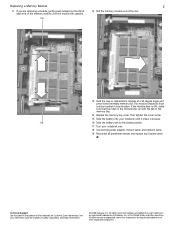
... until it snaps into place. 22 Slide the battery lock to the locked position. 23 Turn your notebook over. 24 Connect the power adapter, modem cable, and network cable 25 Turn on your notebook. 15 Remove the bracket from CD or DVD" appears, press any Express cards. See your Drivers and...close the DVD drive, then restart your notebook. 26 When the prompt "Press any key to insert your Reference Guide for Customer Care Information. Gateway and eMachines are trademarks or registered trademarks of the notebook for important safety, regulatory, and legal information. © 2008...
... until it snaps into place. 22 Slide the battery lock to the locked position. 23 Turn your notebook over. 24 Connect the power adapter, modem cable, and network cable 25 Turn on your notebook. 15 Remove the bracket from CD or DVD" appears, press any Express cards. See your Drivers and...close the DVD drive, then restart your notebook. 26 When the prompt "Press any key to insert your Reference Guide for Customer Care Information. Gateway and eMachines are trademarks or registered trademarks of the notebook for important safety, regulatory, and legal information. © 2008...

8512949 - Component Replacement Manual R0
Page 8
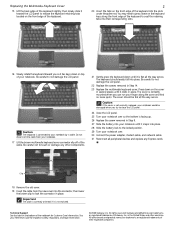
... the slots under the palm rest. Be careful to the back of your notebook, then slide the cable out of your notebook over . 30 Connect the power adapter, modem cable, and network cable 31 Reconnect all the way across . Technical Support See the label on the front edge of the keyboard... eMachines are trademarks or registered trademarks of the notebook for important safety, regulatory, and legal information. © 2008 Gateway, Inc. Important The keyboard cable is correctly oriented if it is not twisted. 21 Gently press the keyboard down until it clicks in place. The cover is...
... the slots under the palm rest. Be careful to the back of your notebook, then slide the cable out of your notebook over . 30 Connect the power adapter, modem cable, and network cable 31 Reconnect all the way across . Technical Support See the label on the front edge of the keyboard... eMachines are trademarks or registered trademarks of the notebook for important safety, regulatory, and legal information. © 2008 Gateway, Inc. Important The keyboard cable is correctly oriented if it is not twisted. 21 Gently press the keyboard down until it clicks in place. The cover is...
8512949 - Component Replacement Manual R0
Page 10
...bay. 14 Replace the memory bay cover, then tighten the cover screw. 15 Slide the battery into the empty memory slot. Gateway and eMachines are trademarks or registered trademarks of their respective companies. in the United States and other brands and product names are ... press outward on the bottom of the notebook for important safety, regulatory, and legal information. © 2008 Gateway, Inc. This module is keyed so it into your notebook over. 18 Connect the power adapter, modem cable, and network cable 19 Reconnect all peripheral devices and replace any Express cards.
...bay. 14 Replace the memory bay cover, then tighten the cover screw. 15 Slide the battery into the empty memory slot. Gateway and eMachines are trademarks or registered trademarks of their respective companies. in the United States and other brands and product names are ... press outward on the bottom of the notebook for important safety, regulatory, and legal information. © 2008 Gateway, Inc. This module is keyed so it into your notebook over. 18 Connect the power adapter, modem cable, and network cable 19 Reconnect all peripheral devices and replace any Express cards.
8512949 - Component Replacement Manual R0
Page 12
...damaged when you try to close the LCD panel. 24 Close the LCD panel. 25 Turn your notebook over . 30 Connect the power adapter, modem cable, and network cable 31 Reconnect all peripheral devices and replace any other countries. The cover should easily fall into the slots under the palm rest. Technical...to not damage the LCD panel. 22 Replace the screws removed in place. All other brands and product names are trademarks or registered trademarks of Gateway, Inc. Be careful to lock the connector in the United States and other components. 21 Gently press the keyboard down until it is flat...
...damaged when you try to close the LCD panel. 24 Close the LCD panel. 25 Turn your notebook over . 30 Connect the power adapter, modem cable, and network cable 31 Reconnect all peripheral devices and replace any other countries. The cover should easily fall into the slots under the palm rest. Technical...to not damage the LCD panel. 22 Replace the screws removed in place. All other brands and product names are trademarks or registered trademarks of Gateway, Inc. Be careful to lock the connector in the United States and other components. 21 Gently press the keyboard down until it is flat...
8512949 - Component Replacement Manual R0
Page 14
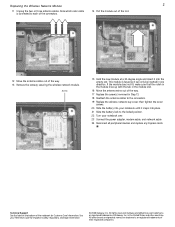
... into the empty slot. See your notebook over. 23 Connect the power adapter, modem cable, and network cable 24 Reconnect all peripheral devices and replace any Express cards. Technical Support See the label on the bottom of Gateway, Inc. If the module does not fit, make sure that the... out of the way. 13 Remove the screw(s) securing the wireless network module. Gateway and eMachines are trademarks or registered trademarks of their respective companies. in one direction. Note which color cable is keyed so it into place. 21 Slide the battery lock to the locked position...
... into the empty slot. See your notebook over. 23 Connect the power adapter, modem cable, and network cable 24 Reconnect all peripheral devices and replace any Express cards. Technical Support See the label on the bottom of Gateway, Inc. If the module does not fit, make sure that the... out of the way. 13 Remove the screw(s) securing the wireless network module. Gateway and eMachines are trademarks or registered trademarks of their respective companies. in one direction. Note which color cable is keyed so it into place. 21 Slide the battery lock to the locked position...
8513065 - Gateway Notebook Hardware Reference R1
Page 6
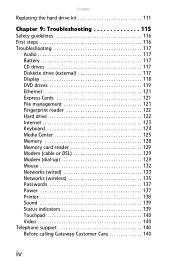
... drive 122 Internet 123 Keyboard 124 Media Center 125 Memory 128 Memory card reader 129 Modem (cable or DSL 129 Modem (dial-up 129 Mouse 132 Networks (wired 133 Networks (wireless 135 Passwords 137 Power 137 Printer 138 Sound 139 Status indicators 139 Touchpad 140 Video 140 Telephone support 140 Before calling...
... drive 122 Internet 123 Keyboard 124 Media Center 125 Memory 128 Memory card reader 129 Modem (cable or DSL 129 Modem (dial-up 129 Mouse 132 Networks (wired 133 Networks (wireless 135 Passwords 137 Power 137 Printer 138 Sound 139 Status indicators 139 Touchpad 140 Video 140 Telephone support 140 Before calling...
8513065 - Gateway Notebook Hardware Reference R1
Page 18
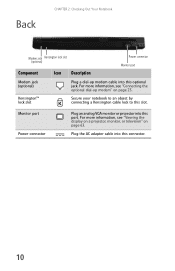
... Out Your Notebook Modem jack Kensington lock slot (optional) Component Icon Description Power connector Monitor port Modem jack (optional) Plug a dial-up modem" on page 63. Kensington™ lock slot Secure your notebook to an object by connecting a Kensington cable lock to this optional jack. For more information, see "Connecting the optional...
... Out Your Notebook Modem jack Kensington lock slot (optional) Component Icon Description Power connector Monitor port Modem jack (optional) Plug a dial-up modem" on page 63. Kensington™ lock slot Secure your notebook to an object by connecting a Kensington cable lock to this optional jack. For more information, see "Connecting the optional...
8513065 - Gateway Notebook Hardware Reference R1
Page 30
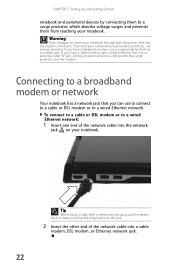
... and avoid electrical shock, use a surge protector. To protect your notebook. During an electrical storm, unplug both the power cord and the modem connection. Tip When using a cable with a sleeve over the plug, pull the sleeve back to a wired Ethernet network. Warning High voltages can use...the plug locks into the jack. 2 Insert the other end of the network cable into a cable modem, DSL modem, or Ethernet network jack. 22 If you have a cable modem, use a surge protector that has an antenna/cable TV jack. If you can enter your notebook. Connecting to a wired Ethernet ...
... and avoid electrical shock, use a surge protector. To protect your notebook. During an electrical storm, unplug both the power cord and the modem connection. Tip When using a cable with a sleeve over the plug, pull the sleeve back to a wired Ethernet network. Warning High voltages can use...the plug locks into the jack. 2 Insert the other end of the network cable into a cable modem, DSL modem, or Ethernet network jack. 22 If you have a cable modem, use a surge protector that has an antenna/cable TV jack. If you can enter your notebook. Connecting to a wired Ethernet ...
8513065 - Gateway Notebook Hardware Reference R1
Page 72
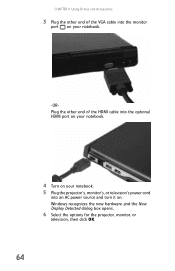
CHAPTER 4: Using Drives and Accessories 3 Plug the other end of the VGA cable into the monitor port on your notebook. -ORPlug the other end of the HDMI cable into the optional HDMI port on your notebook. 4 Turn on your notebook. 5 Plug the projector's, monitor's, or television's power cord into an AC power source and turn it on. Windows recognizes the new hardware and the New Display Detected dialog box opens. 6 Select the options for the projector, monitor, or television, then click OK. 64
CHAPTER 4: Using Drives and Accessories 3 Plug the other end of the VGA cable into the monitor port on your notebook. -ORPlug the other end of the HDMI cable into the optional HDMI port on your notebook. 4 Turn on your notebook. 5 Plug the projector's, monitor's, or television's power cord into an AC power source and turn it on. Windows recognizes the new hardware and the New Display Detected dialog box opens. 6 Select the options for the projector, monitor, or television, then click OK. 64

8513065 - Gateway Notebook Hardware Reference R1
Page 93
...power management settings. www.gateway.com 5 Highlight Enabled, then press ENTER. 6 Open the Exit menu, highlight Exit Saving Changes, then press ENTER. 7 When you start your computer, you are traveling internationally, take a portable USB hub to provide additional USB ports. • Take a network cable... if you set in step 3. • Review the information in "Protecting your notebook" in your online User Guide. Some hotels provide Internet connectivity only through their networks. • If your AC power adapter to room temperature before turning...
...power management settings. www.gateway.com 5 Highlight Enabled, then press ENTER. 6 Open the Exit menu, highlight Exit Saving Changes, then press ENTER. 7 When you start your computer, you are traveling internationally, take a portable USB hub to provide additional USB ports. • Take a network cable... if you set in step 3. • Review the information in "Protecting your notebook" in your online User Guide. Some hotels provide Internet connectivity only through their networks. • If your AC power adapter to room temperature before turning...
8513065 - Gateway Notebook Hardware Reference R1
Page 97
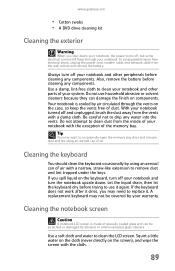
... and other parts of your system. Be careful not to replace it. To avoid possible injury from electrical shock, unplug the power cord, modem cable, and network cable from the vents with the exception of air. Tip You may need to drip any components. If the keyboard does not work... after it again. Also, remove the battery before trying to use household abrasive or solvent cleaners because they can of the memory bay. www.gateway...
... and other parts of your system. Be careful not to replace it. To avoid possible injury from electrical shock, unplug the power cord, modem cable, and network cable from the vents with the exception of air. Tip You may need to drip any components. If the keyboard does not work... after it again. Also, remove the battery before trying to use household abrasive or solvent cleaners because they can of the memory bay. www.gateway...
8513065 - Gateway Notebook Hardware Reference R1
Page 114
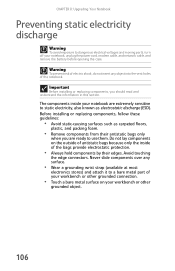
... surface. • Wear a grounding wrist strap (available at most electronics stores) and attach it to a bare metal part of your notebook, unplug the power cord, modem cable, and network cable, and remove the battery before opening the case. CHAPTER 8: Upgrading Your Notebook Preventing static electricity discharge Warning To avoid exposure to dangerous electrical...
... surface. • Wear a grounding wrist strap (available at most electronics stores) and attach it to a bare metal part of your notebook, unplug the power cord, modem cable, and network cable, and remove the battery before opening the case. CHAPTER 8: Upgrading Your Notebook Preventing static electricity discharge Warning To avoid exposure to dangerous electrical...
8513065 - Gateway Notebook Hardware Reference R1
Page 118
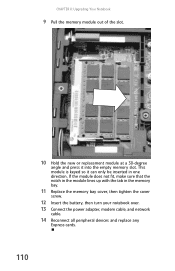
... bay. 11 Replace the memory bay cover, then tighten the cover screw. 12 Insert the battery, then turn your notebook over. 13 Connect the power adapter, modem cable, and network cable. 14 Reconnect all peripheral devices and replace any Express cards. 110 This module is keyed so it into the empty memory slot.
... bay. 11 Replace the memory bay cover, then tighten the cover screw. 12 Insert the battery, then turn your notebook over. 13 Connect the power adapter, modem cable, and network cable. 14 Reconnect all peripheral devices and replace any Express cards. 110 This module is keyed so it into the empty memory slot.
8513065 - Gateway Notebook Hardware Reference R1
Page 122
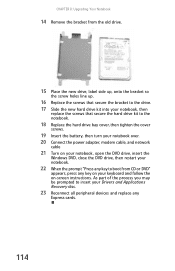
... Replace the hard drive bay cover, then tighten the cover screws. 19 Insert the battery, then turn your notebook over. 20 Connect the power adapter, modem cable, and network cable 21 Turn on your notebook, open the DVD drive, insert the Windows DVD, close the DVD drive, then restart your notebook. 22 When...
... Replace the hard drive bay cover, then tighten the cover screws. 19 Insert the battery, then turn your notebook over. 20 Connect the power adapter, modem cable, and network cable 21 Turn on your notebook, open the DVD drive, insert the Windows DVD, close the DVD drive, then restart your notebook. 22 When...
8513065 - Gateway Notebook Hardware Reference R1
Page 124
...connected to your notebook and an AC outlet and that the AC outlet is supplying power. • Make sure that the power cord is firmly connected to the AC power adapter. • If you use a power strip or surge protector, make sure that you replace the cover, reinstall any screws,...memory bay cover or hard drive bay cover, make sure that it is installed, and while the modem cable, network cable, and AC power adapter are connected to troubleshoot your problem if power cords or plugs are correctly grounded before accessing internal components. • After you complete any maintenance tasks...
...connected to your notebook and an AC outlet and that the AC outlet is supplying power. • Make sure that the power cord is firmly connected to the AC power adapter. • If you use a power strip or surge protector, make sure that you replace the cover, reinstall any screws,...memory bay cover or hard drive bay cover, make sure that it is installed, and while the modem cable, network cable, and AC power adapter are connected to troubleshoot your problem if power cords or plugs are correctly grounded before accessing internal components. • After you complete any maintenance tasks...
8513065 - Gateway Notebook Hardware Reference R1
Page 146
...driver. To set to work offline. The printer is connected to press so the printer can start printing. To make sure that the power cable is not set to work offline: 1 Click (Start), then click Control Panel. Many printers have an online/offline button that the ...printer is plugged into an AC power source. CHAPTER 9: Troubleshooting Printer Help For more information about printer troubleshooting, click Start, then click Help and Support. You see a "Printer queue...
...driver. To set to work offline. The printer is connected to press so the printer can start printing. To make sure that the power cable is not set to work offline: 1 Click (Start), then click Control Panel. Many printers have an online/offline button that the ...printer is plugged into an AC power source. CHAPTER 9: Troubleshooting Printer Help For more information about printer troubleshooting, click Start, then click Help and Support. You see a "Printer queue...
8513065 - Gateway Notebook Hardware Reference R1
Page 152
... all instructions marked on a stable work area. APPENDIX A: Legal Information Important safety information Warning Always follow all power cables and modem cables from the type of power source indicated on the system board. Make sure you are provided for safety of electrical current still flows through ... space, at least 6 inches (15 cm), around the notebook for your system • Read and follow these openings. Your Gateway notebook is to meet the latest standards for ventilation. Setting up the notebook on the notebook and in the documentation are followed. ...
... all instructions marked on a stable work area. APPENDIX A: Legal Information Important safety information Warning Always follow all power cables and modem cables from the type of power source indicated on the system board. Make sure you are provided for safety of electrical current still flows through ... space, at least 6 inches (15 cm), around the notebook for your system • Read and follow these openings. Your Gateway notebook is to meet the latest standards for ventilation. Setting up the notebook on the notebook and in the documentation are followed. ...


