
Service Guide
Page 39
BIOS Flash Utility The BIOS flash memory update is not completely loaded. NOTE: Do not install memory-related drivers (XMS, EMS, DPMI) when you use the AC adaptor power supply when you run the Phlash utility. NOTE: Please use the Phlash. If the battery ...
BIOS Flash Utility The BIOS flash memory update is not completely loaded. NOTE: Do not install memory-related drivers (XMS, EMS, DPMI) when you use the AC adaptor power supply when you run the Phlash utility. NOTE: Please use the Phlash. If the battery ...

Service Guide
Page 87
Using a flat blade screw driver, rotate the CPU screw 90° clockwise to release the CPU from the socket. 3. See "Removing the Thermal Module" on page 75. 2. Chapter 3 77 Removing the CPU 1. Lift the CPU clear of the socket.
Using a flat blade screw driver, rotate the CPU screw 90° clockwise to release the CPU from the socket. 3. See "Removing the Thermal Module" on page 75. 2. Chapter 3 77 Removing the CPU 1. Lift the CPU clear of the socket.

Service Guide
Page 103
NOTE: If replacing only the CPU, make sure to lock the CPU into the socket. Using a flat blade screw driver, rotate the CPU screw 90° counterclockwise to follow the instrucitons for use: • Eapus XR-PE 1. Remove all heat pads are approved for cleaning ...
NOTE: If replacing only the CPU, make sure to lock the CPU into the socket. Using a flat blade screw driver, rotate the CPU screw 90° counterclockwise to follow the instrucitons for use: • Eapus XR-PE 1. Remove all heat pads are approved for cleaning ...
Service Guide
Page 138
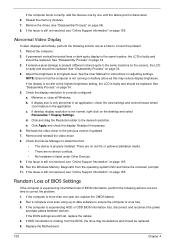
... to determine that the computer is properly installed. If the Issue is missing from the operating system DVD and follow the onscreen prompts. 11. See "Disassembly Process" on page 34. 3. See "Disassembly Process" on adjusting settings. Remove and reinstall the video driver. 8. Run the Windows... the display is too dim at the highest brightness setting, the LCD is discovered. 6. Minimize or close all Windows. e. If the computer is not normal, right-click on page 34). 8. Abnormal Video Display If video displays abnormally, perform the following actions one at a ...
... to determine that the computer is properly installed. If the Issue is missing from the operating system DVD and follow the onscreen prompts. 11. See "Disassembly Process" on page 34. 3. See "Disassembly Process" on adjusting settings. Remove and reinstall the video driver. 8. Run the Windows... the display is too dim at the highest brightness setting, the LCD is discovered. 6. Minimize or close all Windows. e. If the computer is not normal, right-click on page 34). 8. Abnormal Video Display If video displays abnormally, perform the following actions one at a ...

Service Guide
Page 142
.... 132 Chapter 4 Follow the onscreen prompts to start Speaker Setup. Reboot the computer. 2. Check the Device Manager to correct the problem. 1. Remove and reinstall the audio driver. 5. Navigate to the previous version, if updated recently. 4. Roll back the audio driver to Start´ Control Panel´ System and Maintenance´ System´ Device...
.... 132 Chapter 4 Follow the onscreen prompts to start Speaker Setup. Reboot the computer. 2. Check the Device Manager to correct the problem. 1. Remove and reinstall the audio driver. 5. Navigate to the previous version, if updated recently. 4. Roll back the audio driver to Start´ Control Panel´ System and Maintenance´ System´ Device...

Service Guide
Page 144
...the operating system DVD. If the issue is discovered, follow the onscreen information to ensure the computer is set correctly. 7. Run the Windows Vista Startup Repair Utility: a. c. NOTE: Click Load Drivers if controller drives are correct and that CD/DVD drive is virus free. 3. For more ...all cables and jumpers on page 165. g. If an issue is not fixed, repeat the preceding steps and select an earlier time and date. 11. Restore system and file settings from a known good date using up-to-date software to resolve the problem. 4. d. c. When prompted, press ...
...the operating system DVD. If the issue is discovered, follow the onscreen information to ensure the computer is set correctly. 7. Run the Windows Vista Startup Repair Utility: a. c. NOTE: Click Load Drivers if controller drives are correct and that CD/DVD drive is virus free. 3. For more ...all cables and jumpers on page 165. g. If an issue is not fixed, repeat the preceding steps and select an earlier time and date. 11. Restore system and file settings from a known good date using up-to-date software to resolve the problem. 4. d. c. When prompted, press ...

