
Service Guide
Page 7
...Features 1 System Block Diagram 3 Your Gateway Notebook tour 4 Front View 4 Closed Front View 5 Left View 5 Right View 6 Rear and Base View 7 Indicators 8 TouchPad Basics 9 Using the Keyboard 10 Lock Keys and embedded numeric keypad 10 Windows Keys 11 Hot Keys 12 Special Keys 13 Hardware ...Specifications and Configurations 14 System Utilities 21 BIOS Setup Utility 21 Navigating the BIOS Utility 21 Information 22 Main 23 Security 24 Boot 27 Exit 28...
...Features 1 System Block Diagram 3 Your Gateway Notebook tour 4 Front View 4 Closed Front View 5 Left View 5 Right View 6 Rear and Base View 7 Indicators 8 TouchPad Basics 9 Using the Keyboard 10 Lock Keys and embedded numeric keypad 10 Windows Keys 11 Hot Keys 12 Special Keys 13 Hardware ...Specifications and Configurations 14 System Utilities 21 BIOS Setup Utility 21 Navigating the BIOS Utility 21 Information 22 Main 23 Security 24 Boot 27 Exit 28...

Service Guide
Page 8
... the Lower Covers 121 Replacing the Battery Pack 123 Troubleshooting 125 Common Problems 125 Power On Issue 126 No Display Issue 127 Random Loss of BIOS Settings 128 LCD Failure 129 Built-In Keyboard Failure 130 TouchPad Failure 131 Internal Speaker Failure 132 VIII
... the Lower Covers 121 Replacing the Battery Pack 123 Troubleshooting 125 Common Problems 125 Power On Issue 126 No Display Issue 127 Random Loss of BIOS Settings 128 LCD Failure 129 Built-In Keyboard Failure 130 TouchPad Failure 131 Internal Speaker Failure 132 VIII

Service Guide
Page 9
...141 Bottom View 142 Clearing Password Check and BIOS Recovery 143 Motherboard CMOS Discharge 143 BIOS Recovery by Crisis Disk 144 FRU (Field Replaceable Unit) List 147 Gateway LT31 Exploded Diagrams 148 Main Assembly 148 LCD Assembly 149 Gateway LT Series FRU List 150 Model Definition ...and Configuration 156 Gateway LT31 Series 156 Test Compatible ...
...141 Bottom View 142 Clearing Password Check and BIOS Recovery 143 Motherboard CMOS Discharge 143 BIOS Recovery by Crisis Disk 144 FRU (Field Replaceable Unit) List 147 Gateway LT31 Exploded Diagrams 148 Main Assembly 148 LCD Assembly 149 Gateway LT Series FRU List 150 Model Definition ...and Configuration 156 Gateway LT31 Series 156 Test Compatible ...

Service Guide
Page 26
... rate (Mbits/sec, max) 3000 Media data transfer 850 rate (Mbytes/sec max) DC Power Requirements Voltage tolerance 5V ±5% BIOS Item BIOS vendor BIOS Version BIOS ROM type Specification WD WD2500BEVT Toshiba MK1655GSX 250 160 512 512 2 2 1 5400 1 5400 8 MB SATA 3000 850 8 SATA... 3000 363 - 952 typical 5V ±5% Phoenix BIOS V0.2105 Flash 5V ±5% Specification Toshiba MK2555GSX 250 512 2 1 5400 8 SATA 3000 363 - 952 typical 5V ±5% LED 11.6" Item Vendor/model name AUO B11.6XW02 Screen Diagonal (mm) Active Area (mm) Display...
... rate (Mbits/sec, max) 3000 Media data transfer 850 rate (Mbytes/sec max) DC Power Requirements Voltage tolerance 5V ±5% BIOS Item BIOS vendor BIOS Version BIOS ROM type Specification WD WD2500BEVT Toshiba MK1655GSX 250 160 512 512 2 2 1 5400 1 5400 8 MB SATA 3000 850 8 SATA... 3000 363 - 952 typical 5V ±5% Phoenix BIOS V0.2105 Flash 5V ±5% Specification Toshiba MK2555GSX 250 512 2 1 5400 8 SATA 3000 363 - 952 typical 5V ±5% LED 11.6" Item Vendor/model name AUO B11.6XW02 Screen Diagonal (mm) Active Area (mm) Display...

Service Guide
Page 31
.... However, if you encounter configuration problems, you want to change the value of a parameter if it is a hardware configuration program built into your computer's BIOS (Basic Input/ Output System). Help for a particular menu are in any of the screen. Follow these instructions: • To choose a menu,... keys. • To choose an item, use the up and down arrow keys. • To change boot device without entering BIOS SETUP Utility. Your computer is prompted on the bottom of screen). NOTE: You can load default settings by pressing F9. Read this item. • Press...
.... However, if you encounter configuration problems, you want to change the value of a parameter if it is a hardware configuration program built into your computer's BIOS (Basic Input/ Output System). Help for a particular menu are in any of the screen. Follow these instructions: • To choose a menu,... keys. • To choose an item, use the up and down arrow keys. • To change boot device without entering BIOS SETUP Utility. Your computer is prompted on the bottom of screen). NOTE: You can load default settings by pressing F9. Read this item. • Press...

Service Guide
Page 32
... This field displays the serial number of your computer hardware information. Information M a i n PhoenixBIOS Setup Utility Security Boot Exit CPU Type: CPU Speed: IDE Model Name: IDE Serial Number: System BIOS Version: VGA BIOS Version: Serial Number:: Asset Tag Number Product ...Name: Manufacturer Name: UUID: AMD Athlon(tm) Processor L110 1200 MHz Hitachi HTS543216L9A300 090210FB2206LCJZ4V3H V0.11T04_C-Build ATi 010.055.000.051.032329 ZA80SK02B1917060592500 Gateway 40735D1C78DADD11A9D700238BB0B8D4 F1...
... This field displays the serial number of your computer hardware information. Information M a i n PhoenixBIOS Setup Utility Security Boot Exit CPU Type: CPU Speed: IDE Model Name: IDE Serial Number: System BIOS Version: VGA BIOS Version: Serial Number:: Asset Tag Number Product ...Name: Manufacturer Name: UUID: AMD Athlon(tm) Processor L110 1200 MHz Hitachi HTS543216L9A300 090210FB2206LCJZ4V3H V0.11T04_C-Build ATi 010.055.000.051.032329 ZA80SK02B1917060592500 Gateway 40735D1C78DADD11A9D700238BB0B8D4 F1...

Service Guide
Page 34
...dealer to reset it. 24 Chapter 2 Security The Security screen contains parameters that help safeguard and protect your computer from unauthorized access. Settings in this password protects the BIOS Setup Utility from unauthorized use. When user password is set , this screen. It can be grayed out if...and Exit The table below describes the parameters in boldface are prompted to enter a password, you may have to return your notebook computer to set the user password. Parameter Supervisor Password Is User Password Is HDD0 Password IS Set Supervisor Password Set User Password Set ...
...dealer to reset it. 24 Chapter 2 Security The Security screen contains parameters that help safeguard and protect your computer from unauthorized access. Settings in this password protects the BIOS Setup Utility from unauthorized use. When user password is set , this screen. It can be grayed out if...and Exit The table below describes the parameters in boldface are prompted to enter a password, you may have to return your notebook computer to set the user password. Parameter Supervisor Password Is User Password Is HDD0 Password IS Set Supervisor Password Set User Password Set ...
Service Guide
Page 35
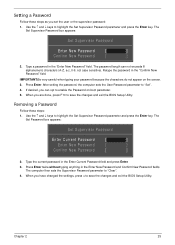
... Password [ ] Enter New Password [ ] Confirm New Password [ ] 2. When you are done, press F10 to save the changes and exit the BIOS Setup Utility. Removing a Password Follow these steps as you can not exceeds 8 alphanumeric characters (A-Z, a-z, 0-9, not case sensitive). Type the current password in... and press the Enter key. When you have changed the settings, press u to enable the Password on the screen. 3. The computer then sets the Supervisor Password parameter to highlight the Set Supervisor Password parameter and press the Enter key. Chapter 2 25 Setting a ...
... Password [ ] Enter New Password [ ] Confirm New Password [ ] 2. When you are done, press F10 to save the changes and exit the BIOS Setup Utility. Removing a Password Follow these steps as you can not exceeds 8 alphanumeric characters (A-Z, a-z, 0-9, not case sensitive). Type the current password in... and press the Enter key. When you have changed the settings, press u to enable the Password on the screen. 3. The computer then sets the Supervisor Password parameter to highlight the Set Supervisor Password parameter and press the Enter key. Chapter 2 25 Setting a ...

Service Guide
Page 36
Type a password in the Confirm New Password field. 4. After setting the password, the computer sets the User Password parameter to highlight the Set Supervisor Password parameter and press the Enter key. Setup Notice Changes have been saved. [Continue] The ...password setting is OK, the screen will show you are done, press F10 to save the changes and exit the BIOS Setup Utility. Use the ↑ and ↓ keys to "Set". 5. If the current password entered does not match the actual current password, the screen will...
Type a password in the Confirm New Password field. 4. After setting the password, the computer sets the User Password parameter to highlight the Set Supervisor Password parameter and press the Enter key. Setup Notice Changes have been saved. [Continue] The ...password setting is OK, the screen will show you are done, press F10 to save the changes and exit the BIOS Setup Utility. Use the ↑ and ↓ keys to "Set". 5. If the current password entered does not match the actual current password, the screen will...

Service Guide
Page 38
... Exit Discarding Changes Load Setup Default Discard Changes Save Changes Description Exit System Setup and save or discard any changes you made and quit the BIOS Utility. Exit utility without saving setup data to save your changes to CMOS. 28 Chapter 2 Load default values for all SETUP item.
... Exit Discarding Changes Load Setup Default Discard Changes Save Changes Description Exit System Setup and save or discard any changes you made and quit the BIOS Utility. Exit utility without saving setup data to save your changes to CMOS. 28 Chapter 2 Load default values for all SETUP item.

Service Guide
Page 39
...adaptor power supply when you run the Phlash utility. NOTE: Please use the Phlash utility. BIOS Flash Utility The BIOS flash memory update is not completely loaded. Chapter 2 29 Use the Phlash utility to finish BIOS flash, you use the Phlash. NOTE: Do not install memory-related drivers (XMS, EMS..., DPMI) when you may not boot the system because the BIOS is required for the following conditions: • New versions of system programs • New features or options • Restore a BIOS when it becomes corrupted. If the battery pack does not contain enough power to...
...adaptor power supply when you run the Phlash utility. NOTE: Please use the Phlash utility. BIOS Flash Utility The BIOS flash memory update is not completely loaded. Chapter 2 29 Use the Phlash utility to finish BIOS flash, you use the Phlash. NOTE: Do not install memory-related drivers (XMS, EMS..., DPMI) when you may not boot the system because the BIOS is required for the following conditions: • New versions of system programs • New features or options • Restore a BIOS when it becomes corrupted. If the battery pack does not contain enough power to...

Service Guide
Page 40
... the bootable diskette. 2. IMPORTANT:Please use the DOS Flash Utility: 1. Copy the flash utilities to update BIOS. Select Boot Menu to modify the boot priority order, for example, if using USB HDD to Update BIOS, move USB HDD to enter the Setup Menu. 3. The flash process begins as shown. 30 Chapter 2 and...
... the bootable diskette. 2. IMPORTANT:Please use the DOS Flash Utility: 1. Copy the flash utilities to update BIOS. Select Boot Menu to modify the boot priority order, for example, if using USB HDD to Update BIOS, move USB HDD to enter the Setup Menu. 3. The flash process begins as shown. 30 Chapter 2 and...

Service Guide
Page 41
If the AC adapter is complete when the message Flash programming complete displays. In flash BIOS, the message Please do not remove AC Power Source displays. Flash is connected, the following message appears. If the AC adapter is not plugged in the AC adapter and rerun the Phlash utility if the above message appears. 6. Chapter 2 31 Plug in the following screen appears. 7. 5.
If the AC adapter is complete when the message Flash programming complete displays. In flash BIOS, the message Please do not remove AC Power Source displays. Flash is connected, the following message appears. If the AC adapter is not plugged in the AC adapter and rerun the Phlash utility if the above message appears. 6. Chapter 2 31 Plug in the following screen appears. 7. 5.

Service Guide
Page 42
... the system will reboot automatically. 32 Chapter 2 When the process is plugged in. WinFlash Utility The Winflash utility consists of two files: • ZA8_3101.WPH (BIOS ROM file) • WinPhlash2.0.3.4 (BIOS windows flash tool) Perform the following error message displays: 3. In the Specify New...
... the system will reboot automatically. 32 Chapter 2 When the process is plugged in. WinFlash Utility The Winflash utility consists of two files: • ZA8_3101.WPH (BIOS ROM file) • WinPhlash2.0.3.4 (BIOS windows flash tool) Perform the following error message displays: 3. In the Specify New...

Service Guide
Page 43
...are generated as the HDD user password. Reboot the machine with the locked HDD and then use either one of the strings. 4. Remove HDD/BIOS Password Utilities This section provides you with the error code generated. Select an option to generate upper case or lower case ASCII code for unlocking... the HDD. 3. On a different machine, run the HDD_PW.EXE file along with details about removing HDD/BIOS password methods: Removing HDD Password: If you key in the wrong HDD password three times, an error code is generated. Select and note down ...
...are generated as the HDD user password. Reboot the machine with the locked HDD and then use either one of the strings. 4. Remove HDD/BIOS Password Utilities This section provides you with the error code generated. Select an option to generate upper case or lower case ASCII code for unlocking... the HDD. 3. On a different machine, run the HDD_PW.EXE file along with details about removing HDD/BIOS password methods: Removing HDD Password: If you key in the wrong HDD password three times, an error code is generated. Select and note down ...

Service Guide
Page 44
Four ASCII strings are generated as the BIOS user password. 34 Chapter 2 Select and note down any of the strings. 3. Reboot the machine with the error code generated. For example: bios_pw 14452 0 2. On a different machine, run the BIOS_PW.EXE file along with the locked BIOS and then use either any one of the strings as output. To unlock the BIOS, perform the following steps: 1. Removing BIOS Passwords: If you key in the wrong Supervisor password three times, an error code is generated and system is disabled.
Four ASCII strings are generated as the BIOS user password. 34 Chapter 2 Select and note down any of the strings. 3. Reboot the machine with the error code generated. For example: bios_pw 14452 0 2. On a different machine, run the BIOS_PW.EXE file along with the locked BIOS and then use either any one of the strings as output. To unlock the BIOS, perform the following steps: 1. Removing BIOS Passwords: If you key in the wrong Supervisor password three times, an error code is generated and system is disabled.
Service Guide
Page 138
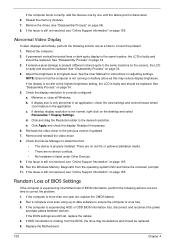
...problem. 1. See "Disassembly Process" on page 34. 4. NOTE: Ensure that : • The device is experiencing intermittent loss of BIOS Settings If the computer is properly installed. Click Apply and check the display. There are no red Xs or yellow exclamation marks. • There are still... correct the problem. 1. Check the display resolution is missing from the operating system DVD and follow the onscreen prompts. 11. c. Random Loss of BIOS information, perform the following actions one at the highest brightness setting, the LCD is faulty and should be replaced. If...
...problem. 1. See "Disassembly Process" on page 34. 4. NOTE: Ensure that : • The device is experiencing intermittent loss of BIOS Settings If the computer is properly installed. Click Apply and check the display. There are no red Xs or yellow exclamation marks. • There are still... correct the problem. 1. Check the display resolution is missing from the operating system DVD and follow the onscreen prompts. 11. c. Random Loss of BIOS information, perform the following actions one at the highest brightness setting, the LCD is faulty and should be replaced. If...

Service Guide
Page 144
...virus scan using System Restore. insert the Windows Vista Operating System DVD in the ODD and restart the computer. When prompted, press any recently added hardware and associated software. 8. Click Next. Select the appropriate ... and click Next. Select Startup Repair. Startup Repair attempts to enter the BIOS Utility. Run the Windows Memory Diagnostic Tool. Check the BIOS settings are correct and that CD/DVD drive is virus free. 3. Run...and select an earlier time and date. 11. When complete, click Finish. c. For more information see Windows Help and Support. 10.
...virus scan using System Restore. insert the Windows Vista Operating System DVD in the ODD and restart the computer. When prompted, press any recently added hardware and associated software. 8. Click Next. Select the appropriate ... and click Next. Select Startup Repair. Startup Repair attempts to enter the BIOS Utility. Run the Windows Memory Diagnostic Tool. Check the BIOS settings are correct and that CD/DVD drive is virus free. 3. Run...and select an earlier time and date. 11. When complete, click Finish. c. For more information see Windows Help and Support. 10.

Service Guide
Page 147
... Load alternate registers with initial POST values Restore CPU control word during warm boot Initialize PCI Bus Mastering devices Initialize keyboard controller BIOS ROM checksum Initialize cache before memory autosize 8254 timer initialization 8237 DMA controller initialization Reset Programmable Interrupt Controller Test DRAM refresh Test ...RAM failure on address line xxxx* RAM failure on data bits xxxx* of low byte of memory bus Enable cache before system BIOS shadow RAM failure on data bits xxxx* of high byte of memory bus Test CPU bus-clock frequency Initialize Phoenix Dispatch Manager Warm...
... Load alternate registers with initial POST values Restore CPU control word during warm boot Initialize PCI Bus Mastering devices Initialize keyboard controller BIOS ROM checksum Initialize cache before memory autosize 8254 timer initialization 8237 DMA controller initialization Reset Programmable Interrupt Controller Test DRAM refresh Test ...RAM failure on address line xxxx* RAM failure on data bits xxxx* of low byte of memory bus Enable cache before system BIOS shadow RAM failure on data bits xxxx* of high byte of memory bus Test CPU bus-clock frequency Initialize Phoenix Dispatch Manager Warm...

Service Guide
Page 148
... notice Check video configuration against CMOS Initialize PCI bus and devices Initialize all video adapters in system QuietBoot start (optional) Shadow video BIOS ROM Display BIOS copyright notice Display CPU type and speed Initialize EISA board Test keyboard Set key click if enabled Test for unexpected interrupts Initialize POST ...controllers Detect and install external parallel ports Initialize PC-compatible PnP ISA devices Re-initialize onboard I/O ports. Configure Motheboard Configurable Devices (optional) Initialize BIOS Data Area Enable Non-Maskable Interrupts (NMIs) 138 Chapter 4
... notice Check video configuration against CMOS Initialize PCI bus and devices Initialize all video adapters in system QuietBoot start (optional) Shadow video BIOS ROM Display BIOS copyright notice Display CPU type and speed Initialize EISA board Test keyboard Set key click if enabled Test for unexpected interrupts Initialize POST ...controllers Detect and install external parallel ports Initialize PC-compatible PnP ISA devices Re-initialize onboard I/O ports. Configure Motheboard Configurable Devices (optional) Initialize BIOS Data Area Enable Non-Maskable Interrupts (NMIs) 138 Chapter 4


