
8512417 - Gateway Setup Guide
Page 2
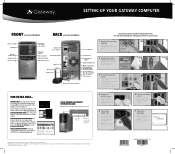
...(network) jack Center/subwoofer jack Surround left/right jack Audio in/side speaker jack Case cover thumbscrew Add-in video (DVI or VGA), otherwise connect to change without notice. © 2007 Gateway, Inc. You can connect your computer during electrical storms, unplug the power cord and...) FOR EXTRA HELP... Icons and color coding help and information about using your computer, call our Automated Troubleshooting System at www.support.gateway.com. All rights reserved. MAN GERSHWIN SETUP POSTER R1 5/07 If you have a speaker bar, follow the instructions that has been...
...(network) jack Center/subwoofer jack Surround left/right jack Audio in/side speaker jack Case cover thumbscrew Add-in video (DVI or VGA), otherwise connect to change without notice. © 2007 Gateway, Inc. You can connect your computer during electrical storms, unplug the power cord and...) FOR EXTRA HELP... Icons and color coding help and information about using your computer, call our Automated Troubleshooting System at www.support.gateway.com. All rights reserved. MAN GERSHWIN SETUP POSTER R1 5/07 If you have a speaker bar, follow the instructions that has been...

8512418 - Gateway Reference Guide
Page 4
... a printer, scanner, or other device 32 Chapter 4: Upgrading Your Computer 33 Preventing static electricity discharge 34 Opening the case 34 Removing the side panel 35 Removing the front bezel 35 Closing the case 37 Replacing the front bezel 37 Replacing the side panel 37 Replacing the color panel 38 Installing memory 40...
... a printer, scanner, or other device 32 Chapter 4: Upgrading Your Computer 33 Preventing static electricity discharge 34 Opening the case 34 Removing the side panel 35 Removing the front bezel 35 Closing the case 37 Replacing the front bezel 37 Replacing the side panel 37 Replacing the color panel 38 Installing memory 40...
8512418 - Gateway Reference Guide
Page 14
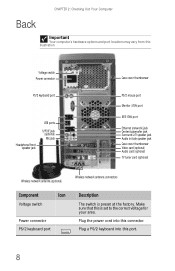
...preset at the factory. Voltage switch Power connector PS/2 keyboard port Headphone/front speaker jack USB ports S/PDIF jack (optional) Mic jack Case cover thumbscrew PS/2 mouse port Monitor (VGA) port IEEE 1394 port Ethernet (network) jack Center/subwoofer jack Surround L/R speaker jack ...Audio in/side speaker jack Case cover thumbscrew Video card (optional) Audio card (optional) TV tuner card (optional) Wireless network antenna (optional) Wireless network antenna connectors ...
...preset at the factory. Voltage switch Power connector PS/2 keyboard port Headphone/front speaker jack USB ports S/PDIF jack (optional) Mic jack Case cover thumbscrew PS/2 mouse port Monitor (VGA) port IEEE 1394 port Ethernet (network) jack Center/subwoofer jack Surround L/R speaker jack ...Audio in/side speaker jack Case cover thumbscrew Video card (optional) Audio card (optional) TV tuner card (optional) Wireless network antenna (optional) Wireless network antenna connectors ...

8512418 - Gateway Reference Guide
Page 15
www.gateway.com Component Icon USB ports S/PDIF output jack (optional) Microphone jack (pink plug) Headphone/analog speakers jack (green plug) -ORFront speakers jack Wireless network antenna (optional) and connectors Case cover thumbscrew PS/2 mouse port Monitor (VGA) port IEEE 1394 port Ethernet (network) ... (such as a DSL or cable modem for one of the following: Headphone: Plug headphones or amplified speakers into this screw before opening the case. For more information, see "Installing a printer, scanner, or other device" on page 31. 9 For more information, see "Installing a ...
www.gateway.com Component Icon USB ports S/PDIF output jack (optional) Microphone jack (pink plug) Headphone/analog speakers jack (green plug) -ORFront speakers jack Wireless network antenna (optional) and connectors Case cover thumbscrew PS/2 mouse port Monitor (VGA) port IEEE 1394 port Ethernet (network) ... (such as a DSL or cable modem for one of the following: Headphone: Plug headphones or amplified speakers into this screw before opening the case. For more information, see "Installing a printer, scanner, or other device" on page 31. 9 For more information, see "Installing a ...

8512418 - Gateway Reference Guide
Page 41
CHAPTER4 Upgrading Your Computer • Preventing static electricity discharge • Opening the case • Closing the case • Replacing the color panel • Installing memory • Adding or replacing an optical disc drive • Replacing the memory card reader • Adding or replacing a hard drive • Replacing the heat sink and processor • Adding or replacing an expansion card • Replacing the system battery • Replacing the system board 33
CHAPTER4 Upgrading Your Computer • Preventing static electricity discharge • Opening the case • Closing the case • Replacing the color panel • Installing memory • Adding or replacing an optical disc drive • Replacing the memory card reader • Adding or replacing a hard drive • Replacing the heat sink and processor • Adding or replacing an expansion card • Replacing the system battery • Replacing the system board 33
8512418 - Gateway Reference Guide
Page 42
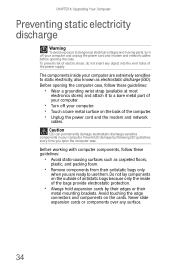
...permanently damage electrostatic discharge-sensitive components in your computer and unplug the power cord and modem and network cables before opening the computer case, follow these guidelines: • Wear a grounding wrist strap (available at most electronics stores) and attach it to a bare ...moving parts, turn off your computer. Prevent ESD damage by their edges or their antistatic bags only when you open the computer case. Before working with computer components, follow these guidelines: • Avoid static-causing surfaces such as electrostatic discharge (ESD). CHAPTER ...
...permanently damage electrostatic discharge-sensitive components in your computer and unplug the power cord and modem and network cables before opening the computer case, follow these guidelines: • Wear a grounding wrist strap (available at most electronics stores) and attach it to a bare ...moving parts, turn off your computer. Prevent ESD damage by their edges or their antistatic bags only when you open the computer case. Before working with computer components, follow these guidelines: • Avoid static-causing surfaces such as electrostatic discharge (ESD). CHAPTER ...

8512418 - Gateway Reference Guide
Page 43
... of your computer, then pull the panel away from your computer, then unplug the power cord and modem cable before opening the case. www.gateway.com Opening the case Your computer case provides easy access to drain any residual power from your computer. 4 Loosen the two captive thumbscrews on page 34. 2 Shut down your...
... of your computer, then pull the panel away from your computer, then unplug the power cord and modem cable before opening the case. www.gateway.com Opening the case Your computer case provides easy access to drain any residual power from your computer. 4 Loosen the two captive thumbscrews on page 34. 2 Shut down your...

8512418 - Gateway Reference Guide
Page 45
www.gateway.com Closing the case Replacing the front bezel To replace the front bezel: 1 Slide the tabs on the right side of the bezel into the slots on the right side of the bezel firmly until the release tabs snap into the slots on the left side of the bezel into place. 37 Tabs 2 Swing the left side of the bezel in to insert the release tabs on the left side of the computer. 3 Press the left side of the computer.
www.gateway.com Closing the case Replacing the front bezel To replace the front bezel: 1 Slide the tabs on the right side of the bezel into the slots on the right side of the bezel firmly until the release tabs snap into the slots on the left side of the bezel into place. 37 Tabs 2 Swing the left side of the bezel in to insert the release tabs on the left side of the computer. 3 Press the left side of the computer.

8512418 - Gateway Reference Guide
Page 49
To avoid scratching the case, place it . - www.gateway.com Installing memory When you upgrade the computer memory, make sure that you are removing a DIMM from the memory module bank, gently pull the plastic ...
To avoid scratching the case, place it . - www.gateway.com Installing memory When you upgrade the computer memory, make sure that you are removing a DIMM from the memory module bank, gently pull the plastic ...

8512418 - Gateway Reference Guide
Page 54
... computer until it clicks into place. 9 Reinstall the bezel by following the instructions in "Replacing the front bezel" on page 37. 10 Reinstall the computer case's side panel by following the instructions in "Replacing the side panel" on page 37. 46
... computer until it clicks into place. 9 Reinstall the bezel by following the instructions in "Replacing the front bezel" on page 37. 10 Reinstall the computer case's side panel by following the instructions in "Replacing the side panel" on page 37. 46
8512418 - Gateway Reference Guide
Page 57
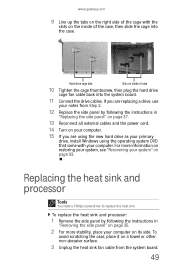
.... 15 If you are replacing a drive, use your notes from the system board. 49 www.gateway.com 9 Line up the tabs on the right side of the cage with your system" on inside of the case, then slide the cage into the system board. 11 Connect the drive cables. To avoid scratching... the case, place it on the inside of case 10 Tighten the cage thumbscrew, then plug the hard drive cage fan cable...
.... 15 If you are replacing a drive, use your notes from the system board. 49 www.gateway.com 9 Line up the tabs on the right side of the cage with your system" on inside of the case, then slide the cage into the system board. 11 Connect the drive cables. To avoid scratching... the case, place it on the inside of case 10 Tighten the cage thumbscrew, then plug the hard drive cage fan cable...
8512418 - Gateway Reference Guide
Page 61
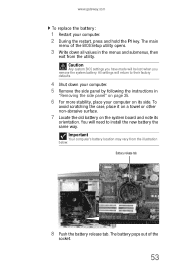
...in "Removing the side panel" on the system board and note its side. Caution Any custom BIOS settings you remove the system battery. www.gateway.com To replace the battery: 1 Restart your computer on its orientation. All settings will return to install the new battery the same way. ...Important Your computer's battery location may vary from the utility. To avoid scratching the case, place it on a towel or other non-abrasive surface. 7 Locate the old battery on page 35. 6 For more stability, place your computer. 2...
...in "Removing the side panel" on the system board and note its side. Caution Any custom BIOS settings you remove the system battery. www.gateway.com To replace the battery: 1 Restart your computer on its orientation. All settings will return to install the new battery the same way. ...Important Your computer's battery location may vary from the utility. To avoid scratching the case, place it on a towel or other non-abrasive surface. 7 Locate the old battery on page 35. 6 For more stability, place your computer. 2...
8512418 - Gateway Reference Guide
Page 63
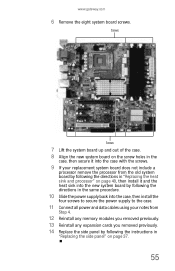
... new system board by following the directions in the same procedure. 10 Slide the power supply back into the case, then install the four screws to secure the power supply to the case. 11 Connect all power and data cables using your notes from Step 4. 12 Reinstall any memory modules you ...removed previously. 13 Reinstall any expansion cards you removed previously. 14 Replace the side panel by following the instructions in "Replacing the side panel" on page 37. 55 www.gateway.com...
... new system board by following the directions in the same procedure. 10 Slide the power supply back into the case, then install the four screws to secure the power supply to the case. 11 Connect all power and data cables using your notes from Step 4. 12 Reinstall any memory modules you ...removed previously. 13 Reinstall any expansion cards you removed previously. 14 Replace the side panel by following the instructions in "Replacing the side panel" on page 37. 55 www.gateway.com...
8512418 - Gateway Reference Guide
Page 66
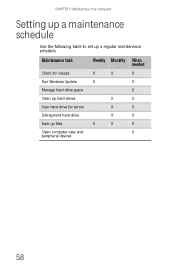
CHAPTER 5: Maintaining Your Computer Setting up a maintenance schedule Use the following table to set up files X X X Clean computer case and X peripheral devices 58 Maintenance task Weekly Monthly When needed Check for viruses X X X Run Windows Update X X Manage hard drive space X Clean up hard drives X X Scan hard drive for errors X X Defragment hard drive X X Back up a regular maintenance schedule.
CHAPTER 5: Maintaining Your Computer Setting up a maintenance schedule Use the following table to set up files X X X Clean computer case and X peripheral devices 58 Maintenance task Weekly Monthly When needed Check for viruses X X X Run Windows Update X X Manage hard drive space X Clean up hard drives X X Scan hard drive for errors X X Defragment hard drive X X Back up a regular maintenance schedule.

8512418 - Gateway Reference Guide
Page 67
..., resulting in the original packaging materials. • Keep your computer away from your computer. The case, although strong, is not covered by your warranty. The case can result in high temperatures. If these slots are comfortable for you put any liquid can become brittle... and easy to support extra weight. • When transporting your computer, we recommend that are not covered under a standard warranty. • Avoid dusty or dirty work environments. www.gateway...
..., resulting in the original packaging materials. • Keep your computer away from your computer. The case, although strong, is not covered by your warranty. The case can result in high temperatures. If these slots are comfortable for you put any liquid can become brittle... and easy to support extra weight. • When transporting your computer, we recommend that are not covered under a standard warranty. • Avoid dusty or dirty work environments. www.gateway...
8512418 - Gateway Reference Guide
Page 68
... keep the vents free of air with a damp cloth. Do not use household abrasive or solvent cleaners because they can damage the finish on the case, so keep your computer performing at its best. To clean the keyboard: 1 Use an aerosol can of your computer and other parts of air that...
... keep the vents free of air with a damp cloth. Do not use household abrasive or solvent cleaners because they can damage the finish on the case, so keep your computer performing at its best. To clean the keyboard: 1 Use an aerosol can of your computer and other parts of air that...

8512418 - Gateway Reference Guide
Page 82
.... Warning Make sure that you are damaged • Liquid has been spilled into your computer • Your computer was dropped • The case was damaged Instead, unplug your computer and contact a qualified computer technician. First steps If you have problems with your computer, try these safety ...guidelines: Warning Never open your computer case while your computer is turned on and while the modem cable, network cable, and power cord are secure. • Make sure that ...
.... Warning Make sure that you are damaged • Liquid has been spilled into your computer • Your computer was dropped • The case was damaged Instead, unplug your computer and contact a qualified computer technician. First steps If you have problems with your computer, try these safety ...guidelines: Warning Never open your computer case while your computer is turned on and while the modem cable, network cable, and power cord are secure. • Make sure that ...
8512418 - Gateway Reference Guide
Page 87
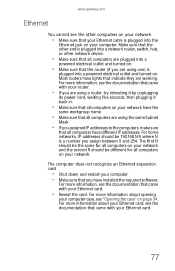
...be the same for all computers are plugged into a powered electrical outlet and turned on. For more information about opening your computer case, see "Opening the case" on your computer. Most routers have installed the required software. For more information, see the documentation that indicate they are using... IP addresses to the computers, make sure that you have lights that came with your Ethernet card. • Reseat the card. www.gateway.com Ethernet You cannot see the other computers on your network • Make sure that came with your Ethernet card. 77 Make sure ...
...be the same for all computers are plugged into a powered electrical outlet and turned on. For more information about opening your computer case, see "Opening the case" on your computer. Most routers have installed the required software. For more information, see the documentation that indicate they are using... IP addresses to the computers, make sure that you have lights that came with your Ethernet card. • Reseat the card. www.gateway.com Ethernet You cannot see the other computers on your network • Make sure that came with your Ethernet card. 77 Make sure ...

8512418 - Gateway Reference Guide
Page 105
...for any eventuality and create a set . Caution Although you should create a set of discs for recovering your pre-installed software and device drivers, in case you have a recordable disc drive to perform this procedure.) To create discs for software and device driver recovery You can usually recover your pre-installed... may not be expecting to do not come with your pre-installed software and drivers using a set of software and driver recovery discs. The Gateway Recovery Center opens. 2 Click Applications and drivers external media, then click Next. Because these discs do ?
...for any eventuality and create a set . Caution Although you should create a set of discs for recovering your pre-installed software and device drivers, in case you have a recordable disc drive to perform this procedure.) To create discs for software and device driver recovery You can usually recover your pre-installed... may not be expecting to do not come with your pre-installed software and drivers using a set of software and driver recovery discs. The Gateway Recovery Center opens. 2 Click Applications and drivers external media, then click Next. Because these discs do ?
8512418 - Gateway Reference Guide
Page 110
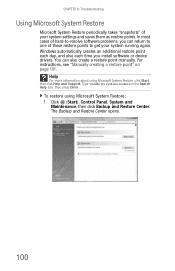
... get your system settings and saves them as restore points. To restore using Microsoft System Restore, click Start, then click Help and Support. In most cases of your system running again. Type windows system restore in the Search Help box, then press ENTER. The Backup and Restore Center opens. 100 CHAPTER...
... get your system settings and saves them as restore points. To restore using Microsoft System Restore, click Start, then click Help and Support. In most cases of your system running again. Type windows system restore in the Search Help box, then press ENTER. The Backup and Restore Center opens. 100 CHAPTER...


