Gateway Notebook User's Guide - Canada/French
Page 66
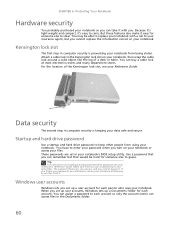
...notebook. But these features also make it 's easy to steal. Kensington lock slot The first step in computer security is keeping your notebook's BIOS setup utility. Use a password that you can access files in your data safe and secure. Data security The second step in computer security ... password you . You have to return your password when you set up user accounts, Windows sets up a user account for someone else to Gateway so we can buy a cable lock at most electronics stores and many department stores. Windows user accounts Windows lets you turn on your notebook. ...
...notebook. But these features also make it 's easy to steal. Kensington lock slot The first step in computer security is keeping your notebook's BIOS setup utility. Use a password that you can access files in your data safe and secure. Data security The second step in computer security ... password you . You have to return your password when you set up user accounts, Windows sets up a user account for someone else to Gateway so we can buy a cable lock at most electronics stores and many department stores. Windows user accounts Windows lets you turn on your notebook. ...

Gateway Notebook User's Guide - English
Page 66
... account for each account so only the account owner can access files in computer security is preventing your notebook's BIOS setup utility. But these features also make it easy for someone else to Gateway so we can buy a cable lock at most electronics stores and many department stores. Make sure that you...
... account for each account so only the account owner can access files in computer security is preventing your notebook's BIOS setup utility. But these features also make it easy for someone else to Gateway so we can buy a cable lock at most electronics stores and many department stores. Make sure that you...

Gateway Notebook User's Guide - Japanese
Page 83
www.jp.gateway.com 2 PC PC PCのBIOS ヒント PCをGateway Windows Windows PC 77
www.jp.gateway.com 2 PC PC PCのBIOS ヒント PCをGateway Windows Windows PC 77

Gateway Quick Start Guide for Windows 7
Page 36
... OK to highlight Safe Mode and press Enter. The screen freezes when the Windows logo displays During the start-up options. 3. When the Gateway logo appears, press F8 to access the advanced start your computer using one of all computers). Start with a different boot device. This option...arrow keys or mouse (if available). 2. Use the arrow keys to default settings. Set the BIOS to highlight Last Known Good Configuration and press Enter. 36 - To fix this feature may freeze when the Gateway logo displays. However, if the test fails, the computer may not be available on . ...
... OK to highlight Safe Mode and press Enter. The screen freezes when the Windows logo displays During the start-up options. 3. When the Gateway logo appears, press F8 to access the advanced start your computer using one of all computers). Start with a different boot device. This option...arrow keys or mouse (if available). 2. Use the arrow keys to default settings. Set the BIOS to highlight Last Known Good Configuration and press Enter. 36 - To fix this feature may freeze when the Gateway logo displays. However, if the test fails, the computer may not be available on . ...
Gateway Quick Start Guide for Windows 7
Page 55
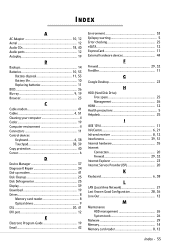
... 12 Audio CDs 18, 40 Audio ports 12 Autoplay 19 B Backups 14 Batteries 10, 53 Battery disposal 11, 53 Battery life 10 Replacing batteries 11 BIOS 36 Blu-ray 9, 19 Browser 23 C Cable modem 41 Cables 4, 51 Cleaning your computer 4 Codec 19 Computer environment 4 Connectors 11 Control devices Keyboard 6, 38 Touchpad...
... 12 Audio CDs 18, 40 Audio ports 12 Autoplay 19 B Backups 14 Batteries 10, 53 Battery disposal 11, 53 Battery life 10 Replacing batteries 11 BIOS 36 Blu-ray 9, 19 Browser 23 C Cable modem 41 Cables 4, 51 Cleaning your computer 4 Codec 19 Computer environment 4 Connectors 11 Control devices Keyboard 6, 38 Touchpad...
Service Guide
Page 7
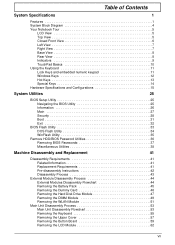
... 14 Hardware Specifications and Configurations 15 System Utilities 25 BIOS Setup Utility 25 Navigating the BIOS Utility 25 Information 26 Main 27 Security 28 Boot 31 Exit 32 BIOS Flash Utility 33 DOS Flash Utility 34 WinFlash Utility 35 Remove HDD/BIOS Password Utilities 36 Removing BIOS Passwords 37 Miscellaneous Utilities 38 Machine Disassembly and...
... 14 Hardware Specifications and Configurations 15 System Utilities 25 BIOS Setup Utility 25 Navigating the BIOS Utility 25 Information 26 Main 27 Security 28 Boot 31 Exit 32 BIOS Flash Utility 33 DOS Flash Utility 34 WinFlash Utility 35 Remove HDD/BIOS Password Utilities 36 Removing BIOS Passwords 37 Miscellaneous Utilities 38 Machine Disassembly and...
Service Guide
Page 8
... Replacing the Battery 118 Replace the Dummy Card 119 Troubleshooting 121 Common Problems 121 Power On Issue 122 No Display Issue 123 Random Loss of BIOS Settings 124 LCD Failure 125 Built-In Keyboard Failure 126 TouchPad Failure 127 Internal Speaker Failure 128 Internal Microphone Failure 129 HDD Not Operating Correctly...
... Replacing the Battery 118 Replace the Dummy Card 119 Troubleshooting 121 Common Problems 121 Power On Issue 122 No Display Issue 123 Random Loss of BIOS Settings 124 LCD Failure 125 Built-In Keyboard Failure 126 TouchPad Failure 127 Internal Speaker Failure 128 Internal Microphone Failure 129 HDD Not Operating Correctly...

Service Guide
Page 9
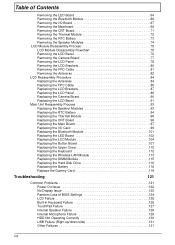
Table of Contents Intermittent Problems 132 Undetermined Problems 132 POST Code Reference Tables 133 Jumper and Connector Locations 137 Mainboard Top View 137 Mainboard Bottom View 138 Clearing Password Check and BIOS Recovery 139 Mainboard CMOS Discharge 139 BIOS Recovery by Crisis Disk 140 FRU (Field Replaceable Unit) List 141 Gateway EC18/EC14 Exploded Diagrams 141 Main Assembly 142 LCD Assembly 144 Screw List 150 Model Definition and Configuration 151 Test Compatible Components 155 Online Support Information 159 IX
Table of Contents Intermittent Problems 132 Undetermined Problems 132 POST Code Reference Tables 133 Jumper and Connector Locations 137 Mainboard Top View 137 Mainboard Bottom View 138 Clearing Password Check and BIOS Recovery 139 Mainboard CMOS Discharge 139 BIOS Recovery by Crisis Disk 140 FRU (Field Replaceable Unit) List 141 Gateway EC18/EC14 Exploded Diagrams 141 Main Assembly 142 LCD Assembly 144 Screw List 150 Model Definition and Configuration 151 Test Compatible Components 155 Online Support Information 159 IX
Service Guide
Page 12
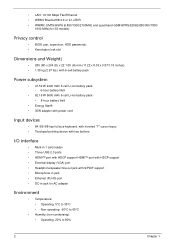
... • WWAN: UMTS/HSPA at 850/1900/2100MHz and quad-band GSM/GPRS/EDGE(850/900/1800/ 1900 MHz)(for 3G models) Privacy control • BIOS user, supervisor, HDD passwords, • Kensington lock slot Dimensions and Weight) • 285 (W) x 204 (D) x 22.1/30 (H) mm (11.22 x 8.03 x 0.87/1.18 inches) • 1.35...
... • WWAN: UMTS/HSPA at 850/1900/2100MHz and quad-band GSM/GPRS/EDGE(850/900/1800/ 1900 MHz)(for 3G models) Privacy control • BIOS user, supervisor, HDD passwords, • Kensington lock slot Dimensions and Weight) • 285 (W) x 204 (D) x 22.1/30 (H) mm (11.22 x 8.03 x 0.87/1.18 inches) • 1.35...

Service Guide
Page 29
...Performance Specifications Buffer size Interface Internal transfer rate (Mbits/sec, max) I/O data transfer rate (Mbytes/sec max) DC Power Requirements Voltage BIOS Item BIOS vendor BIOS Version BIOS Features LCD 11.6" Item Vendor/model name Screen Diagonal (mm) Display Area (mm) Display resolution (pixels) Pixel Pitch (mm) Typical...8226; ACPI 2.0 compliance with Intel Speed Step Support C1e, C2, C3 and S3, S4,S5 for mobile CPU. • DMI utility for BIOS serial number configuration/asset tag • Support PXE • Support Y2K solution • Support Win Flash Wake on LAN from S3 • ...
...Performance Specifications Buffer size Interface Internal transfer rate (Mbits/sec, max) I/O data transfer rate (Mbytes/sec max) DC Power Requirements Voltage BIOS Item BIOS vendor BIOS Version BIOS Features LCD 11.6" Item Vendor/model name Screen Diagonal (mm) Display Area (mm) Display resolution (pixels) Pixel Pitch (mm) Typical...8226; ACPI 2.0 compliance with Intel Speed Step Support C1e, C2, C3 and S3, S4,S5 for mobile CPU. • DMI utility for BIOS serial number configuration/asset tag • Support PXE • Support Y2K solution • Support Win Flash Wake on LAN from S3 • ...

Service Guide
Page 35
... message is already properly configured and optimized, and you do not need to run this menu, user can also press F10 to "enabled". Navigating the BIOS Utility There are in square brackets. Follow these instructions: • To choose a menu, use the left and right arrow keys. • To choose...item has sub-items. Press Enter to expand this carefully when making changes to the Exit menu. • In any changes made and exit the BIOS Setup Utility. NOTE: You can load default settings by pressing F9. Read this item. • Press Esc while you can change the value ...
... message is already properly configured and optimized, and you do not need to run this menu, user can also press F10 to "enabled". Navigating the BIOS Utility There are in square brackets. Follow these instructions: • To choose a menu, use the left and right arrow keys. • To choose...item has sub-items. Press Enter to expand this carefully when making changes to the Exit menu. • In any changes made and exit the BIOS Setup Utility. NOTE: You can load default settings by pressing F9. Read this item. • Press Esc while you can change the value ...

Service Guide
Page 36
...installed on primary IDE master. Parameter CPU Type CPU Speed HDD Model Name HDD Serial Number ATAPI Model Name System BIOS Version VGA BIOS Version Serial Number Asset Tag Number Product Name Manufacturer Name UUID Number Description This field shows the CPU type and ... Utility Information Main Security Boot Exit Rev. 3.5 CPU Type CPU Speed HDD Model Name: HDD Serial Number: ATAPI Model name: System BIOS Version: VGA BIOS Version: Serial Number: Asset Tag Number: Product Name: Manufacturer Name: UUID: Intel(R) Core(TM)2 Solo CPU 1.40GHz Hitachi HTS545032B9A300 090515PB5C06QDGYRDWG...
...installed on primary IDE master. Parameter CPU Type CPU Speed HDD Model Name HDD Serial Number ATAPI Model Name System BIOS Version VGA BIOS Version Serial Number Asset Tag Number Product Name Manufacturer Name UUID Number Description This field shows the CPU type and ... Utility Information Main Security Boot Exit Rev. 3.5 CPU Type CPU Speed HDD Model Name: HDD Serial Number: ATAPI Model name: System BIOS Version: VGA BIOS Version: Serial Number: Asset Tag Number: Product Name: Manufacturer Name: UUID: Intel(R) Core(TM)2 Solo CPU 1.40GHz Hitachi HTS545032B9A300 090515PB5C06QDGYRDWG...

Service Guide
Page 38
...Values F9 Setup Default Select Menu Enter Select SubMenu F10 Save and Exit The table below describes the parameters in this password protects the BIOS Setup Utility from unauthorized use. Parameter Supervisor Password Is User Password Is Set Supervisor Password Set User Password Set Hdd Password Power on ... to change the value of the user password. When user password is required or not while the events defined in this password protects the BIOS Setup Utility from unauthorized access. If you forget the password, you set , this screen. The user can not either enter the Setup...
...Values F9 Setup Default Select Menu Enter Select SubMenu F10 Save and Exit The table below describes the parameters in this password protects the BIOS Setup Utility from unauthorized use. Parameter Supervisor Password Is User Password Is Set Supervisor Password Set User Password Set Hdd Password Power on ... to change the value of the user password. When user password is required or not while the events defined in this password protects the BIOS Setup Utility from unauthorized access. If you forget the password, you set , this screen. The user can not either enter the Setup...
Service Guide
Page 39
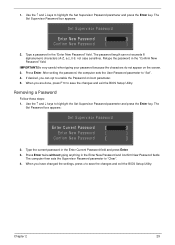
...the characters do not appear on boot parameter. 5. If desired, you are done, press F10 to save the changes and exit the BIOS Setup Utility. The computer then sets the Supervisor Password parameter to "Set". 4. Chapter 2 29 After setting the password, the computer ...not exceeds 8 alphanumeric characters (A-Z, a-z, 0-9, not case sensitive). When you have changed the settings, press u to save the changes and exit the BIOS Setup Utility. Press Enter twice without typing anything in the "Enter New Password" field. Press Enter. The Set Password box appears: Set Supervisor ...
...the characters do not appear on boot parameter. 5. If desired, you are done, press F10 to save the changes and exit the BIOS Setup Utility. The computer then sets the Supervisor Password parameter to "Set". 4. Chapter 2 29 After setting the password, the computer ...not exceeds 8 alphanumeric characters (A-Z, a-z, 0-9, not case sensitive). When you have changed the settings, press u to save the changes and exit the BIOS Setup Utility. Press Enter twice without typing anything in the "Enter New Password" field. Press Enter. The Set Password box appears: Set Supervisor ...
Service Guide
Page 40
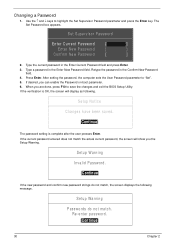
... Enter Current Password field and press Enter. 3. After setting the password, the computer sets the User Password parameter to save the changes and exit the BIOS Setup Utility. Setup Warning Invalid Password. [Continue] If the new password and confirm new password strings do not match. When you are done, press F10...
... Enter Current Password field and press Enter. 3. After setting the password, the computer sets the User Password parameter to save the changes and exit the BIOS Setup Utility. Setup Warning Invalid Password. [Continue] If the new password and confirm new password strings do not match. When you are done, press F10...
Service Guide
Page 42
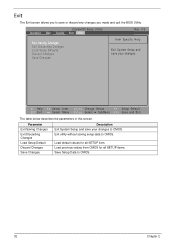
... Description Exit System Setup and save your changes. Load default values for all SETUP item. Exit The Exit screen allows you made and quit the BIOS Utility. F1 Help ESC Exit Select Item F5/F6 Change Values F9 Setup Default Select Menu Enter Select SubMenu F10 Save and Exit The table...
... Description Exit System Setup and save your changes. Load default values for all SETUP item. Exit The Exit screen allows you made and quit the BIOS Utility. F1 Help ESC Exit Select Item F5/F6 Change Values F9 Setup Default Select Menu Enter Select SubMenu F10 Save and Exit The table...

Service Guide
Page 43
Chapter 2 33 BIOS Flash Utility The BIOS flash memory update is required for the following conditions: • New versions of system programs • New features or options • Restore a BIOS when it becomes corrupted.
Chapter 2 33 BIOS Flash Utility The BIOS flash memory update is required for the following conditions: • New versions of system programs • New features or options • Restore a BIOS when it becomes corrupted.

Service Guide
Page 44
... order: 1. IDE1 : 3. USB FDD : Rev. 3.5 Item Specific Help Use < > or < > to select a device, then press to Update BIOS, move it up the list. Flash is not connected, the following steps to position 1. IDE0 : Hitachi HTS545032B9A300 2. NOTE: If the AC power is complete... when the message Flash programming complete displays. 34 Chapter 2 In flash BIOS, the message Please do not remove AC Power Source displays. USB HDD 5. Press to continue. 5. Network Boot : Atheros Boot Agent 4. USB ...
... order: 1. IDE1 : 3. USB FDD : Rev. 3.5 Item Specific Help Use < > or < > to select a device, then press to Update BIOS, move it up the list. Flash is not connected, the following steps to position 1. IDE0 : Hitachi HTS545032B9A300 2. NOTE: If the AC power is complete... when the message Flash programming complete displays. 34 Chapter 2 In flash BIOS, the message Please do not remove AC Power Source displays. USB HDD 5. Press to continue. 5. Network Boot : Atheros Boot Agent 4. USB ...

Service Guide
Page 46
Select Enter Unlock Password and press Enter. Boot up the system to complete the process. 36 Chapter 2 Save and exit the BIOS to a removable bootable drive containing DOS and the UnlockHD.EXE program and open a DOS prompt. Press Enter to display the Select Item screen. 8....password, perform the following error code to reappear. 7. Reboot to the hard disk and wait for example 46548274. 6. Remove HDD/BIOS Password Utilities This section provide you with removing HDD/BIOS method: Remove HDD Password: When the user keys in the example. 4. Make a note of the result, for the error ...
Select Enter Unlock Password and press Enter. Boot up the system to complete the process. 36 Chapter 2 Save and exit the BIOS to a removable bootable drive containing DOS and the UnlockHD.EXE program and open a DOS prompt. Press Enter to display the Select Item screen. 8....password, perform the following error code to reappear. 7. Reboot to the hard disk and wait for example 46548274. 6. Remove HDD/BIOS Password Utilities This section provide you with removing HDD/BIOS method: Remove HDD Password: When the user keys in the example. 4. Make a note of the result, for the error ...

Service Guide
Page 47
To reset the BIOS password, run clnpwd.exe as follows: 1. From a DOS prompt, Execute clnpwd.exe 2. The onscreen message determines whether the function is successful or not. Press 1 or 2 to clean the desired password shown on the screen. Removing BIOS Passwords: If you key in the wrong Supervisor Password three times, System Disabled displays on the screen. See the image below. Chapter 2 37
To reset the BIOS password, run clnpwd.exe as follows: 1. From a DOS prompt, Execute clnpwd.exe 2. The onscreen message determines whether the function is successful or not. Press 1 or 2 to clean the desired password shown on the screen. Removing BIOS Passwords: If you key in the wrong Supervisor Password three times, System Disabled displays on the screen. See the image below. Chapter 2 37


