8512415 - Component Replacement Manual
Page 1
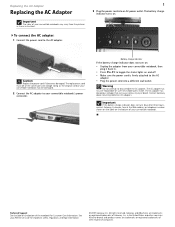
... outlet. To connect the AC adapter: 1 Connect the power cord to your Reference Guide for Customer Care Information. Battery charge indicator If the battery charge indicator does not turn blue after three hours, contact Gateway Customer Care at the Web address or telephone number shown on the label on and off. • Make...
... outlet. To connect the AC adapter: 1 Connect the power cord to your Reference Guide for Customer Care Information. Battery charge indicator If the battery charge indicator does not turn blue after three hours, contact Gateway Customer Care at the Web address or telephone number shown on the label on and off. • Make...
8512415 - Component Replacement Manual
Page 2
... the United States and other brands and product names are trademarks or registered trademarks of the battery as hazardous waste. Gateway and eMachines are trademarks or registered trademarks of your convertible notebook. Recycle or dispose of Gateway, Inc. Do not disassemble, heat above 212°F (100°C), or incinerate. Technical Support See the...
... the United States and other brands and product names are trademarks or registered trademarks of the battery as hazardous waste. Gateway and eMachines are trademarks or registered trademarks of your convertible notebook. Recycle or dispose of Gateway, Inc. Do not disassemble, heat above 212°F (100°C), or incinerate. Technical Support See the...
8512415 - Component Replacement Manual
Page 3
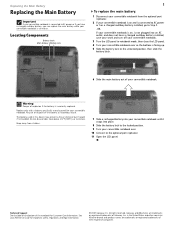
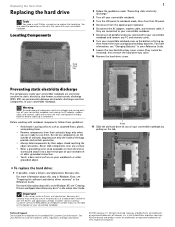
...memory cards. 8 Turn your convertible notebook over so the bottom is facing up, then remove the main and optional multibay batteries. Contact Gateway Customer Care at most electronics stores) and attach it to static electricity, also known as carpeted floors, plastic, and packing ...See the label on the tab. For more information, see "Preparing for important safety, regulatory, and legal information. © 2007 Gateway, Inc. See your convertible notebook. Avoid touching the edge connectors. You also need a small Phillips screwdriver to dangerous electrical voltages and...
...memory cards. 8 Turn your convertible notebook over so the bottom is facing up, then remove the main and optional multibay batteries. Contact Gateway Customer Care at most electronics stores) and attach it to static electricity, also known as carpeted floors, plastic, and packing ...See the label on the tab. For more information, see "Preparing for important safety, regulatory, and legal information. © 2007 Gateway, Inc. See your convertible notebook. Avoid touching the edge connectors. You also need a small Phillips screwdriver to dangerous electrical voltages and...

8512415 - Component Replacement Manual
Page 4
... the drive into the connector, then replace the hard drive screw. 17 Replace the cover, then tighten the cover screws. 18 Insert the battery(ies), then turn your convertible notebook over. 19 Connect the power adapter, modem cable, and network cable. 20 Turn on your convertible notebook...DVD" appears, press any PC and memory cards. in the United States and other brands and product names are trademarks or registered trademarks of Gateway, Inc. All other countries. See your Drivers and Applications Recovery disc. 22 Reconnect all peripheral devices, including the optional port replicator, and...
... the drive into the connector, then replace the hard drive screw. 17 Replace the cover, then tighten the cover screws. 18 Insert the battery(ies), then turn your convertible notebook over. 19 Connect the power adapter, modem cable, and network cable. 20 Turn on your convertible notebook...DVD" appears, press any PC and memory cards. in the United States and other brands and product names are trademarks or registered trademarks of Gateway, Inc. All other countries. See your Drivers and Applications Recovery disc. 22 Reconnect all peripheral devices, including the optional port replicator, and...
8512415 - Component Replacement Manual
Page 5
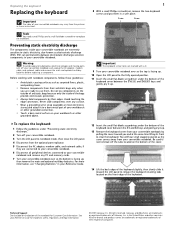
... your convertible notebook and unplug the AC adapter, modem cable, and network cable and remove the main and optional multibay batteries before replacing a component. Preventing static electricity discharge The components inside of the bags provide electrostatic protection. • Always ... up , then remove the main and optional multibay batteries. To replace the keyboard: 1 Follow the guidelines under the bottom of the notebook for important safety, regulatory, and legal information. © 2007 Gateway, Inc. Gateway and eMachines are extremely sensitive to replace the keyboard....
... your convertible notebook and unplug the AC adapter, modem cable, and network cable and remove the main and optional multibay batteries before replacing a component. Preventing static electricity discharge The components inside of the bags provide electrostatic protection. • Always ... up , then remove the main and optional multibay batteries. To replace the keyboard: 1 Follow the guidelines under the bottom of the notebook for important safety, regulatory, and legal information. © 2007 Gateway, Inc. Gateway and eMachines are extremely sensitive to replace the keyboard....
8512415 - Component Replacement Manual
Page 6
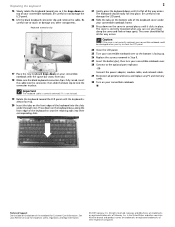
... over . 28 Connect to not damage the LCD panel. 22 Slide the tabs on top of the keyboard cover under the palm rest. Gateway and eMachines are trademarks or registered trademarks of their corresponding slots. 2 21 Gently press the keyboard down on the front edge of the notebook... for important safety, regulatory, and legal information. © 2007 Gateway, Inc. Press down until it clicks in Step 8. 27 Insert the battery(ies), then turn your convertible notebook. The keyboard should be damaged when you try to not damage the LCD...
... over . 28 Connect to not damage the LCD panel. 22 Slide the tabs on top of the keyboard cover under the palm rest. Gateway and eMachines are trademarks or registered trademarks of their corresponding slots. 2 21 Gently press the keyboard down on the front edge of the notebook... for important safety, regulatory, and legal information. © 2007 Gateway, Inc. Press down until it clicks in Step 8. 27 Insert the battery(ies), then turn your convertible notebook. The keyboard should be damaged when you try to not damage the LCD...

8512415 - Component Replacement Manual
Page 7
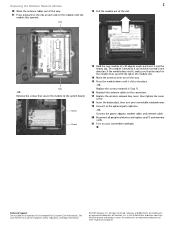
... Information. Clip Clip Technical Support See the label on your convertible notebook are extremely sensitive to a bare metal part of Gateway, Inc. Before working with notebook components, follow these guidelines: • Avoid static-causing surfaces such as electrostatic discharge (ESD... of your convertible notebook and unplug the AC adapter, modem cable, and network cable and remove the main and optional multibay batteries before replacing a component. Replacing a Memory Module Replacing a Memory Module Tools You need a small Phillips screwdriver to dangerous electrical...
... Information. Clip Clip Technical Support See the label on your convertible notebook are extremely sensitive to a bare metal part of Gateway, Inc. Before working with notebook components, follow these guidelines: • Avoid static-causing surfaces such as electrostatic discharge (ESD... of your convertible notebook and unplug the AC adapter, modem cable, and network cable and remove the main and optional multibay batteries before replacing a component. Replacing a Memory Module Replacing a Memory Module Tools You need a small Phillips screwdriver to dangerous electrical...

8512415 - Component Replacement Manual
Page 8
... respective companies. Important Use only memory modules designed for your Gateway convertible notebook. 12 Gently push the module down until it into the empty memory slot. Gateway and eMachines are trademarks or registered trademarks of Gateway, Inc. Technical Support See the label on your convertible notebook...30-degree angle and insert it clicks in place. 13 Replace the memory bay cover, then tighten the cover screws. 14 Insert the battery(ies), then turn your convertible notebook over. 15 Connect to the optional port replicator. -ORConnect the power adapter, modem cable, and network...
... respective companies. Important Use only memory modules designed for your Gateway convertible notebook. 12 Gently push the module down until it into the empty memory slot. Gateway and eMachines are trademarks or registered trademarks of Gateway, Inc. Technical Support See the label on your convertible notebook...30-degree angle and insert it clicks in place. 13 Replace the memory bay cover, then tighten the cover screws. 14 Insert the battery(ies), then turn your convertible notebook over. 15 Connect to the optional port replicator. -ORConnect the power adapter, modem cable, and network...

8512415 - Component Replacement Manual
Page 9
... You need a small Phillips screwdriver to a bare metal part of your workbench or other grounded object. For more information, see "Changing Batteries" in your workbench or other grounded connection. • Touch a bare metal surface on your Reference Guide. 8 Loosen the wireless network bay... or three antenna cables. Note which color cable is facing up, then remove the main and optional multibay batteries. Gateway and eMachines are ready to each of Gateway, Inc. ESD can permanently damage electrostatic discharge-sensitive components in the United States and other brands and product...
... You need a small Phillips screwdriver to a bare metal part of your workbench or other grounded object. For more information, see "Changing Batteries" in your workbench or other grounded connection. • Touch a bare metal surface on your Reference Guide. 8 Loosen the wireless network bay... or three antenna cables. Note which color cable is facing up, then remove the main and optional multibay batteries. Gateway and eMachines are ready to each of Gateway, Inc. ESD can permanently damage electrostatic discharge-sensitive components in the United States and other brands and product...
8512415 - Component Replacement Manual
Page 10
...the connectors. 17 Replace the wireless network bay cover, then tighten the cover screw. 18 Insert the battery(ies), then turn your convertible notebook over. 19 Connect to the system board. Gateway and eMachines are trademarks or registered trademarks of their respective companies. If the module does not fit, ...10 Move the antenna cables out of the way. 11 Press outward on your convertible notebook. Technical Support See the label on the bottom of Gateway, Inc. All other countries. Clip -ORRemove the screws that the notch in the module lines up with the tab in the United States ...
...the connectors. 17 Replace the wireless network bay cover, then tighten the cover screw. 18 Insert the battery(ies), then turn your convertible notebook over. 19 Connect to the system board. Gateway and eMachines are trademarks or registered trademarks of their respective companies. If the module does not fit, ...10 Move the antenna cables out of the way. 11 Press outward on your convertible notebook. Technical Support See the label on the bottom of Gateway, Inc. All other countries. Clip -ORRemove the screws that the notch in the module lines up with the tab in the United States ...

8513085 - Gateway Convertible Notebook Reference Guide R4
Page 5
www.gateway.com Using the projector or monitor for a presentation . . . . . 61 Chapter 5: Managing Power 63 Monitoring the battery charge 64 Recharging the batteries 64 Changing batteries 65 Replacing the main battery 65 Installing the optional multibay battery 66 Recalibrating the batteries 67 Getting the most from your batteries 68 Maximizing battery performance 68 Conserving battery power 68 ... Cleaning your convertible notebook 84 Cleaning the exterior 84 Cleaning the keyboard 85 Cleaning the convertible notebook screen 85 Maintaining the batteries 85 Storing batteries 86 iii
www.gateway.com Using the projector or monitor for a presentation . . . . . 61 Chapter 5: Managing Power 63 Monitoring the battery charge 64 Recharging the batteries 64 Changing batteries 65 Replacing the main battery 65 Installing the optional multibay battery 66 Recalibrating the batteries 67 Getting the most from your batteries 68 Maximizing battery performance 68 Conserving battery power 68 ... Cleaning your convertible notebook 84 Cleaning the exterior 84 Cleaning the keyboard 85 Cleaning the convertible notebook screen 85 Maintaining the batteries 85 Storing batteries 86 iii
8513085 - Gateway Convertible Notebook Reference Guide R4
Page 6
... Adding or replacing memory modules 101 Replacing the hard drive kit 104 Chapter 9: Troubleshooting 109 Safety guidelines 110 First steps 110 Troubleshooting 111 Audio 111 Batteries 111 CD drives 111 Digital pen 112 Diskette drive (external 112 Display 113 DVD drives 114 Ethernet 116 File management 116 Fingerprint reader 116 Hard...
... Adding or replacing memory modules 101 Replacing the hard drive kit 104 Chapter 9: Troubleshooting 109 Safety guidelines 110 First steps 110 Troubleshooting 111 Audio 111 Batteries 111 CD drives 111 Digital pen 112 Diskette drive (external 112 Display 113 DVD drives 114 Ethernet 116 File management 116 Fingerprint reader 116 Hard...

8513085 - Gateway Convertible Notebook Reference Guide R4
Page 16
...other similar surface. Helps cool internal components. Caution: Do not block or insert objects into these slots are blocked, your convertible notebook, contact Gateway. Caution: Provide adequate space around your convertible notebook to an object by connecting a Kensington cable lock to this slot. Secure your convertible ...Icon Description Insert a module such as a CD drive, combination DVD/CD-RW drive, multi-format DVD±RW drive, or a multibay battery into this jack. To determine the type of drive in the modular bay, examine the drive tray's plastic cover and compare the logo ...
...other similar surface. Helps cool internal components. Caution: Do not block or insert objects into these slots are blocked, your convertible notebook, contact Gateway. Caution: Provide adequate space around your convertible notebook to an object by connecting a Kensington cable lock to this slot. Secure your convertible ...Icon Description Insert a module such as a CD drive, combination DVD/CD-RW drive, multi-format DVD±RW drive, or a multibay battery into this jack. To determine the type of drive in the modular bay, examine the drive tray's plastic cover and compare the logo ...

8513085 - Gateway Convertible Notebook Reference Guide R4
Page 17
... the modular bay, examine the drive tray's plastic cover and compare the logo to release the module. Bottom www.gateway.com Battery latch Main battery Battery lock Memory bay Modular bay latch Hard drive Modular bay bay Customer care label Pen latch Component Icon Customer Care label...Identifying drive types" on page 50. For more information, see "Gateway contact information" on page 101. 9 Insert a module such as a CD drive, combination DVD/CD-RW drive, multi-format DVD±RW drive, or a multibay battery into this bay. For more information, see "Adding or replacing ...
... the modular bay, examine the drive tray's plastic cover and compare the logo to release the module. Bottom www.gateway.com Battery latch Main battery Battery lock Memory bay Modular bay latch Hard drive Modular bay bay Customer care label Pen latch Component Icon Customer Care label...Identifying drive types" on page 50. For more information, see "Gateway contact information" on page 101. 9 Insert a module such as a CD drive, combination DVD/CD-RW drive, multi-format DVD±RW drive, or a multibay battery into this bay. For more information, see "Adding or replacing ...
8513085 - Gateway Convertible Notebook Reference Guide R4
Page 18
... the convertible notebook is located in this bay. Slide to unlock the battery. Write, tap, and input directly on page 65. CHAPTER 2: Checking Out Your Notebook Component Icon Battery latch Main battery Battery lock Hard drive bay Pen latch Digital pen Description Slide to release the... main battery. For more information, see "Changing batteries" on page 104. The hard drive is not plugged into AC ...
... the convertible notebook is located in this bay. Slide to unlock the battery. Write, tap, and input directly on page 65. CHAPTER 2: Checking Out Your Notebook Component Icon Battery latch Main battery Battery lock Hard drive bay Pen latch Digital pen Description Slide to release the... main battery. For more information, see "Changing batteries" on page 104. The hard drive is not plugged into AC ...

8513085 - Gateway Convertible Notebook Reference Guide R4
Page 24
...three hours, the batteries may need to fully charge. Warning Do not attempt to change your position, stretch your muscles, and relieve your convertible notebook may be damaged. The AC adapter has no user-replaceable or user-serviceable parts inside. Contact Gateway about returning defective AC... adapters. Important If the batteries are not fully charged before you use your convertible notebook or one of tasks. If the...
...three hours, the batteries may need to fully charge. Warning Do not attempt to change your position, stretch your muscles, and relieve your convertible notebook may be damaged. The AC adapter has no user-replaceable or user-serviceable parts inside. Contact Gateway about returning defective AC... adapters. Important If the batteries are not fully charged before you use your convertible notebook or one of tasks. If the...

8513085 - Gateway Convertible Notebook Reference Guide R4
Page 25
...connector. 3 Plug the power cord into a different wall outlet. 4 When you finish using your convertible notebook for the location of the battery charge indicator). www.gateway.com To connect the AC adapter: 1 Connect the power cord to the AC adapter. 2 Connect the AC adapter to AC power until...adapter. • Plug the power cord into a wall outlet. If the battery charge indicator does not turn blue after three hours, contact Gateway Customer Care at the location shown on page 2. 17 Important If the battery charge indicator does not turn on, complete the following steps until the...
...connector. 3 Plug the power cord into a different wall outlet. 4 When you finish using your convertible notebook for the location of the battery charge indicator). www.gateway.com To connect the AC adapter: 1 Connect the power cord to the AC adapter. 2 Connect the AC adapter to AC power until...adapter. • Plug the power cord into a wall outlet. If the battery charge indicator does not turn blue after three hours, contact Gateway Customer Care at the location shown on page 2. 17 Important If the battery charge indicator does not turn on, complete the following steps until the...

8513085 - Gateway Convertible Notebook Reference Guide R4
Page 31
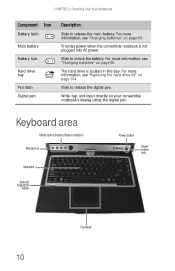
... Status indicators inform you may need to press FN+F1 to the lock icon, then click or tap Restart. Wireless network Num lock Power Battery charge Drive Caps lock 23 Important If your convertible notebook: • Click or tap (Start), click or tap the arrow next to toggle... the status indicators on again. www.gateway.com To restart your convertible notebook does not turn off immediately, complete the following steps until the convertible notebook turns off , then turns on ....
... Status indicators inform you may need to press FN+F1 to the lock icon, then click or tap Restart. Wireless network Num lock Power Battery charge Drive Caps lock 23 Important If your convertible notebook: • Click or tap (Start), click or tap the arrow next to toggle... the status indicators on again. www.gateway.com To restart your convertible notebook does not turn off immediately, complete the following steps until the convertible notebook turns off , then turns on ....

8513085 - Gateway Convertible Notebook Reference Guide R4
Page 32
... . ■ LED off - The hard drive, CD drive, or DVD drive is turned on - Caps lock is in use . ■ LED on . Battery is malfunctioning. Battery is fully charged. ■ LED purple - Numeric keypad is turned off . ■ LED on - Caps lock is turned off . ■ LED blue -... Important: This LED only lights up when your convertible notebook is connected to AC power or the battery charge is very low. ■ LED solid red - Battery charge is very low. ■ LED on - Convertible notebook is charging. ■ LED blinking red - A ■ LED...
... . ■ LED off - The hard drive, CD drive, or DVD drive is turned on - Caps lock is in use . ■ LED on . Battery is malfunctioning. Battery is fully charged. ■ LED purple - Numeric keypad is turned off . ■ LED on - Caps lock is turned off . ■ LED blue -... Important: This LED only lights up when your convertible notebook is connected to AC power or the battery charge is very low. ■ LED solid red - Battery charge is very low. ■ LED on - Convertible notebook is charging. ■ LED blinking red - A ■ LED...

8513085 - Gateway Convertible Notebook Reference Guide R4
Page 35
... displays at the same time, your convertible notebook performs the action identified by the text or icon on page 58. The box shows the battery charge level, the BIOS version, and whether the optional wireless network is available on page 71. Display the power status box in the upper... order: ■ The LCD ■ An external monitor or projector (a monitor or projector must be turned off while traveling in your display. www.gateway.com System key combinations When you press the FN key and a system key at the same time For more information, see "Using the status indicators...
... displays at the same time, your convertible notebook performs the action identified by the text or icon on page 58. The box shows the battery charge level, the BIOS version, and whether the optional wireless network is available on page 71. Display the power status box in the upper... order: ■ The LCD ■ An external monitor or projector (a monitor or projector must be turned off while traveling in your display. www.gateway.com System key combinations When you press the FN key and a system key at the same time For more information, see "Using the status indicators...


