
User Guide
Page 4
... a memory card 43 Using a memory card 43 Removing a memory card 44 Adding and removing a PC Card 44 Viewing the display on a projector or monitor 46 Connecting a video camera to your notebook 48 5 Managing Power 51 Monitoring the battery charge 52 Recharging the battery 53 Recalibrating the battery 53 ... batteries 54 Extending battery life 56 Conserving battery power 56 Using alternate power sources 57 Changing power modes 57 6 Upgrading Your Notebook 59 Preventing static electricity discharge 60 Adding or replacing memory 61 Replacing the hard drive kit 66 7 Maintaining Your...
... a memory card 43 Using a memory card 43 Removing a memory card 44 Adding and removing a PC Card 44 Viewing the display on a projector or monitor 46 Connecting a video camera to your notebook 48 5 Managing Power 51 Monitoring the battery charge 52 Recharging the battery 53 Recalibrating the battery 53 ... batteries 54 Extending battery life 56 Conserving battery power 56 Using alternate power sources 57 Changing power modes 57 6 Upgrading Your Notebook 59 Preventing static electricity discharge 60 Adding or replacing memory 61 Replacing the hard drive kit 66 7 Maintaining Your...
User Guide
Page 5
... viruses 75 Updating Windows 78 Restoring your system 79 Microsoft System Restore 79 Reinstalling applications and drivers 79 Restoring your notebook to the original configuration 80 8 Troubleshooting 81 Safety guidelines 82 First steps 83 Troubleshooting 84 Audio 84 Battery 84 CD drives...card reader 93 Modem (dial-up 93 Mouse 97 Networks 97 Passwords 98 PC Cards 98 Power 99 Printer 100 Sound 101 Status indicators 102 Touchpad 102 Video 103 Telephone support 104 Before calling Gateway Customer Care 104 Telephone numbers 105 Self-help 106 Tutoring 106 Training 106 ...
... viruses 75 Updating Windows 78 Restoring your system 79 Microsoft System Restore 79 Reinstalling applications and drivers 79 Restoring your notebook to the original configuration 80 8 Troubleshooting 81 Safety guidelines 82 First steps 83 Troubleshooting 84 Audio 84 Battery 84 CD drives...card reader 93 Modem (dial-up 93 Mouse 97 Networks 97 Passwords 98 PC Cards 98 Power 99 Printer 100 Sound 101 Status indicators 102 Touchpad 102 Video 103 Telephone support 104 Before calling Gateway Customer Care 104 Telephone numbers 105 Self-help 106 Tutoring 106 Training 106 ...

User Guide
Page 18
... i.Link®) device (such as a diskette drive, flash drive, printer, scanner, camera, keyboard, or mouse) into these ports. 12 www.gateway.com For more information, see "Using the memory card reader" on page 44. USB ports Plug USB devices (such as a digital camcorder) into..., PDA, or cellular telephone into the memory card reader. For more information, see "Adding and removing a PC Card" on page 43. Chapter 2: Checking Out Your Gateway Notebook Right PC Card slot Memory USB ports card reader IEEE 1394 port Ethernet jack USB ports Modem jack Component Icon Description...
... i.Link®) device (such as a diskette drive, flash drive, printer, scanner, camera, keyboard, or mouse) into these ports. 12 www.gateway.com For more information, see "Using the memory card reader" on page 44. USB ports Plug USB devices (such as a digital camcorder) into..., PDA, or cellular telephone into the memory card reader. For more information, see "Adding and removing a PC Card" on page 43. Chapter 2: Checking Out Your Gateway Notebook Right PC Card slot Memory USB ports card reader IEEE 1394 port Ethernet jack USB ports Modem jack Component Icon Description...
User Guide
Page 45
Chapter 4 Using Drives and Ports • Using DVD drives • Using the media card reader • Using a PC Card • Viewing the display on a monitor or projector • Connecting a video camera to your notebook 39
Chapter 4 Using Drives and Ports • Using DVD drives • Using the media card reader • Using a PC Card • Viewing the display on a monitor or projector • Connecting a video camera to your notebook 39
User Guide
Page 50
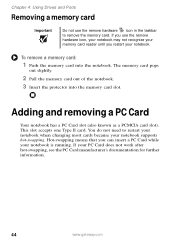
...use the remove hardware icon in the taskbar to restart your notebook when changing most cards because your PC Card does not work after hot-swapping, see the PC Card manufacturer's documentation for further information. 44 www.gateway.com Chapter 4: Using Drives and Ports Removing a memory card... Important Do not use the remove hardware icon, your notebook may not recognize your memory card reader until you restart your notebook. If you can insert a PC Card while your notebook is running. You do...
...use the remove hardware icon in the taskbar to restart your notebook when changing most cards because your PC Card does not work after hot-swapping, see the PC Card manufacturer's documentation for further information. 44 www.gateway.com Chapter 4: Using Drives and Ports Removing a memory card... Important Do not use the remove hardware icon, your notebook may not recognize your memory card reader until you restart your notebook. If you can insert a PC Card while your notebook is running. You do...

User Guide
Page 51
To remove a PC Card: 1 Click the remove hardware name, then click Stop. -OR- www.gateway.com 45 Adding and removing a PC Card To insert a PC Card: ■ Push the card firmly into the PC Card slot label-side up until the outer edge of the card is flush with the side of your notebook. Turn off your notebook. icon in the taskbar, the PC Card Important If the remove hardware icon does not appear on the taskbar, click the show hidden icons button. 2 Release the eject button by pressing the PC Card eject button once.
To remove a PC Card: 1 Click the remove hardware name, then click Stop. -OR- www.gateway.com 45 Adding and removing a PC Card To insert a PC Card: ■ Push the card firmly into the PC Card slot label-side up until the outer edge of the card is flush with the side of your notebook. Turn off your notebook. icon in the taskbar, the PC Card Important If the remove hardware icon does not appear on the taskbar, click the show hidden icons button. 2 Release the eject button by pressing the PC Card eject button once.
User Guide
Page 52
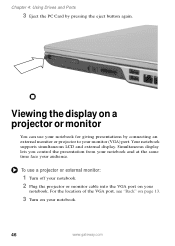
...same time face your monitor (VGA) port. To use your notebook for giving presentations by pressing the eject button again. Your notebook supports simultaneous LCD and external display. Chapter 4: Using Drives and Ports 3 Eject the PC Card by connecting an external monitor or projector to your audience.... For the location of the VGA port, see "Back" on page 13. 3 Turn on your notebook. 46 www.gateway.com
...same time face your monitor (VGA) port. To use your notebook for giving presentations by pressing the eject button again. Your notebook supports simultaneous LCD and external display. Chapter 4: Using Drives and Ports 3 Eject the PC Card by connecting an external monitor or projector to your audience.... For the location of the VGA port, see "Back" on page 13. 3 Turn on your notebook. 46 www.gateway.com
User Guide
Page 62
... included on your hard drive. To access this guide, click Start, All Programs, then click Gateway Documentation. ■ Close the LCD panel to power your notebook: ■ Dim the display as low as is comfortable. ■ Remove PC Cards when you are not being used. ■ Modify the power management settings for maximum...
... included on your hard drive. To access this guide, click Start, All Programs, then click Gateway Documentation. ■ Close the LCD panel to power your notebook: ■ Dim the display as low as is comfortable. ■ Remove PC Cards when you are not being used. ■ Modify the power management settings for maximum...
User Guide
Page 67
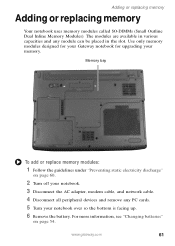
... information, see "Changing batteries" on page 60. 2 Turn off your notebook. 3 Disconnect the AC adapter, modem cable, and network cable. 4 Disconnect all peripheral devices and remove any module can be placed in various capacities and any PC cards. 5 Turn your memory. www.gateway.com 61 Memory bay To add or replace memory modules...
... information, see "Changing batteries" on page 60. 2 Turn off your notebook. 3 Disconnect the AC adapter, modem cable, and network cable. 4 Disconnect all peripheral devices and remove any module can be placed in various capacities and any PC cards. 5 Turn your memory. www.gateway.com 61 Memory bay To add or replace memory modules...
User Guide
Page 72
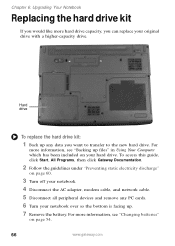
... up . 7 Remove the battery. To access this guide, click Start, All Programs, then click Gateway Documentation. 2 Follow the guidelines under "Preventing static electricity discharge" on page 60. 3 Turn off your notebook. 4 Disconnect the AC adapter, modem cable, and network cable. 5 Disconnect all peripheral devices and ...so the bottom is facing up any PC cards. 6 Turn your hard drive. For more information, see "Backing up files" in Using Your Computer which has been included on page 54. 66 www.gateway.com Chapter 6: Upgrading Your Notebook Replacing the hard drive kit If you ...
... up . 7 Remove the battery. To access this guide, click Start, All Programs, then click Gateway Documentation. 2 Follow the guidelines under "Preventing static electricity discharge" on page 60. 3 Turn off your notebook. 4 Disconnect the AC adapter, modem cable, and network cable. 5 Disconnect all peripheral devices and ...so the bottom is facing up any PC cards. 6 Turn your hard drive. For more information, see "Backing up files" in Using Your Computer which has been included on page 54. 66 www.gateway.com Chapter 6: Upgrading Your Notebook Replacing the hard drive kit If you ...
User Guide
Page 104
Contact your company computer department or network administrator for more information, see your PC Card's documentation. 98 www.gateway.com For more information. ■ Every home network is unique. Passwords Your notebook does not accept your password Make sure that came with no easy way to recover a forgotten password. See the documentation that CAPS...
Contact your company computer department or network administrator for more information, see your PC Card's documentation. 98 www.gateway.com For more information. ■ Every home network is unique. Passwords Your notebook does not accept your password Make sure that came with no easy way to recover a forgotten password. See the documentation that CAPS...
User Guide
Page 105
... plugged into the outlet and turn it on AC power ■ Make sure that the surge protector is fully recharged. www.gateway.com 99 Power Your notebook is not working on . ■ Make sure that the battery is not causing a system resource conflict. To test the outlet...to an electrical outlet, turned on page 84. Troubleshooting ■ Make sure that the PC Card you installed is installed correctly. For more information, see "Device installation" on , and working correctly. Your notebook is not working device, such as a lamp, into a surge protector, make sure ...
... plugged into the outlet and turn it on AC power ■ Make sure that the surge protector is fully recharged. www.gateway.com 99 Power Your notebook is not working on . ■ Make sure that the battery is not causing a system resource conflict. To test the outlet...to an electrical outlet, turned on page 84. Troubleshooting ■ Make sure that the PC Card you installed is installed correctly. For more information, see "Device installation" on , and working correctly. Your notebook is not working device, such as a lamp, into a surge protector, make sure ...
User Guide
Page 115
... allowed in radio frequency safety standards and recommendations, Gateway believes these devices are listed in the 2.4 GHz (i.e. 802.11b/g LAN & Bluetooth), 5.2 GHz (i.e. 802.11a LAN), and traditional cellular or PCS cellular bands (i.e. Because the wireless devices (which may not be embedded into the notebook. ■ The notebook does not operate properly when the operating instructions are...
... allowed in radio frequency safety standards and recommendations, Gateway believes these devices are listed in the 2.4 GHz (i.e. 802.11b/g LAN & Bluetooth), 5.2 GHz (i.e. 802.11a LAN), and traditional cellular or PCS cellular bands (i.e. Because the wireless devices (which may not be embedded into the notebook. ■ The notebook does not operate properly when the operating instructions are...
User Guide
Page 129
... 75 Num Lock status indicator 28 numeric keypad status indicator 28 using 30 O online help 5, 7 opening files 35 folders 35 LCD panel 10 notebook 10 programs 35 shortcut menu 36 P password 98 PC Card adding 44 eject button 44 inserting 44 installing 44 removing 44 slot 44 troubleshooting 98 PCMCIA card See... PC Card PDA memory cards 43 playing audio CD 42 DVD 42 pointer identifying 34 moving 35 power AC adapter 20, 57 automobile/airplane adapter 57 ...
... 75 Num Lock status indicator 28 numeric keypad status indicator 28 using 30 O online help 5, 7 opening files 35 folders 35 LCD panel 10 notebook 10 programs 35 shortcut menu 36 P password 98 PC Card adding 44 eject button 44 inserting 44 installing 44 removing 44 slot 44 troubleshooting 98 PCMCIA card See... PC Card PDA memory cards 43 playing audio CD 42 DVD 42 pointer identifying 34 moving 35 power AC adapter 20, 57 automobile/airplane adapter 57 ...
User Guide
Page 131
Standby mode 26, 31, 58 system key 31 starting notebook 25 programs 35 static electricity 60 status indicators battery charge 10, 52 Caps Lock ... menu 36 right-clicking 36 rocker switch 34 selecting screen objects 35 training CD 106 classroom 106 Gateway Learning Libraries 106 Learn With Gateway 106 troubleshooting audio 101 automated system 105 device installation 84 display 85 DVD drive 86 faxes 95 files... panel 85 memory 92 memory card reader 93 modem 93 mouse 97 network 97 passwords 98 PC Cards 98 power 99 printer 100 safety guidelines 82 screen 85, 103 screen area 85 screen resolution 85 sound 101...
Standby mode 26, 31, 58 system key 31 starting notebook 25 programs 35 static electricity 60 status indicators battery charge 10, 52 Caps Lock ... menu 36 right-clicking 36 rocker switch 34 selecting screen objects 35 training CD 106 classroom 106 Gateway Learning Libraries 106 Learn With Gateway 106 troubleshooting audio 101 automated system 105 device installation 84 display 85 DVD drive 86 faxes 95 files... panel 85 memory 92 memory card reader 93 modem 93 mouse 97 network 97 passwords 98 PC Cards 98 power 99 printer 100 safety guidelines 82 screen 85, 103 screen area 85 screen resolution 85 sound 101...


