Owner's Manual
Page 9
... when transferring certain types of GARMIN MapSource Data to your eTrex Legend handy and connect to our website (www.garmin.com). GARMIN International, Inc. 1200 East 151st Street Olathe, Kansas 66062, U.S.A. Unit 4, The Quadrangle, Abbey Park Industrial Estate Romsey, SO51 9DL, U.K. Serial Number: * * NOTE: Do not confuse this area to the operating software and is lost, stolen, or needs service. The internal serial number is relevant to record...
... when transferring certain types of GARMIN MapSource Data to your eTrex Legend handy and connect to our website (www.garmin.com). GARMIN International, Inc. 1200 East 151st Street Olathe, Kansas 66062, U.S.A. Unit 4, The Quadrangle, Abbey Park Industrial Estate Romsey, SO51 9DL, U.K. Serial Number: * * NOTE: Do not confuse this area to the operating software and is lost, stolen, or needs service. The internal serial number is relevant to record...
Owner's Manual
Page 10
... Contents viii Getting Started Setup, and Features 1 Features and Button Function 2 Battery Installation 3 Backlighting and Contrast 3 The Main Pages Main Page Basics 4 Satellite The Main Page 5 Options 6-7 Navigating Navigating with eTrex Legend 8 Map The Main Page 9-10 Options 11-15 Using the Pan Map Option 12 Stop Navigation 13 Hide/Show Navigation Status 13 Hide/Show Data Fields 13 Setup 14-15 The Measure Distance option 15 Navigation The Main Page 16 Options 17-18 Trip Computer The...
... Contents viii Getting Started Setup, and Features 1 Features and Button Function 2 Battery Installation 3 Backlighting and Contrast 3 The Main Pages Main Page Basics 4 Satellite The Main Page 5 Options 6-7 Navigating Navigating with eTrex Legend 8 Map The Main Page 9-10 Options 11-15 Using the Pan Map Option 12 Stop Navigation 13 Hide/Show Navigation Status 13 Hide/Show Data Fields 13 Setup 14-15 The Measure Distance option 15 Navigation The Main Page 16 Options 17-18 Trip Computer The...
Owner's Manual
Page 11
... detailed instructions on using a GARMIN MapSource CD-ROM. Currently, WAAS satellite signal reception requires an absolute clear view of the sky and works best when there are no nearby obstructions such as speed, ETA, ETE, heading, odometer, etc. Getting Started Before you begin to explore the eTrex Legend's operating features, you should be transferred to the unit using the eTrex Legend's features and their options. Features include: Storage for installing batteries, how the buttons function, starting the eTrex Legend, adjusting the screen...
... detailed instructions on using a GARMIN MapSource CD-ROM. Currently, WAAS satellite signal reception requires an absolute clear view of the sky and works best when there are no nearby obstructions such as speed, ETA, ETE, heading, odometer, etc. Getting Started Before you begin to explore the eTrex Legend's operating features, you should be transferred to the unit using the eTrex Legend's features and their options. Features include: Storage for installing batteries, how the buttons function, starting the eTrex Legend, adjusting the screen...
Owner's Manual
Page 13
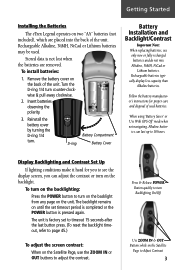
... the unit. The backlight remains on until the set timeout period is completed or the POWER button is factory set to timeout 15 seconds after the last button press. (To reset the backlight timeout, refer to 18 hours. ies can adjust the contrast or turn on the backlight. The unit is pressed again. Getting Started Installing the Batteries The eTrex Legend operates on two "AA" batteries (not included), which are removed. Remove the battery cover...
... the unit. The backlight remains on until the set timeout period is completed or the POWER button is factory set to timeout 15 seconds after the last button press. (To reset the backlight timeout, refer to 18 hours. ies can adjust the contrast or turn on the backlight. The unit is pressed again. Getting Started Installing the Batteries The eTrex Legend operates on two "AA" batteries (not included), which are removed. Remove the battery cover...
Owner's Manual
Page 16
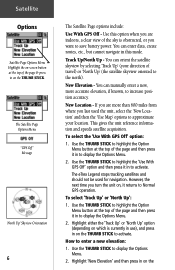
... to increase position accuracy. You can enter data, create routes, etc., but cannot navigate in this option when you want to Normal GPS operation. You can orient the satellite skyview by selecting 'Track Up' (your location. However, the next time you last used for navigation. To select 'Track Up' or 'North Up': 1. Highlight 'New Elevation' and then press in on the THUMB STICK. Satellite Options Satellite Page Options Menu Highlight the on-screen button at the...
... to increase position accuracy. You can enter data, create routes, etc., but cannot navigate in this option when you want to Normal GPS operation. You can orient the satellite skyview by selecting 'Track Up' (your location. However, the next time you last used for navigation. To select 'Track Up' or 'North Up': 1. Highlight 'New Elevation' and then press in on the THUMB STICK. Satellite Options Satellite Page Options Menu Highlight the on-screen button at the...
Owner's Manual
Page 18
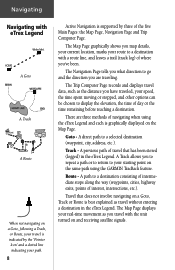
... the unit turned on and receiving satellite signals. Navigating Navigating with eTrex Legend A Goto A Track A Route When not navigating on a Goto, following a Track, or Route, your travel is indicated by the 'Pointer Icon' and a dotted line indicating your starting point on the same path using the eTrex Legend and each is graphically displayed on the Map Page. The Navigation Page tells you what direction to your path. 8 Active Navigation is supported by three of navigating when using the GARMIN TracBack feature.
... the unit turned on and receiving satellite signals. Navigating Navigating with eTrex Legend A Goto A Track A Route When not navigating on a Goto, following a Track, or Route, your travel is indicated by the 'Pointer Icon' and a dotted line indicating your starting point on the same path using the eTrex Legend and each is graphically displayed on the Map Page. The Navigation Page tells you what direction to your path. 8 Active Navigation is supported by three of navigating when using the GARMIN TracBack feature.
Owner's Manual
Page 31
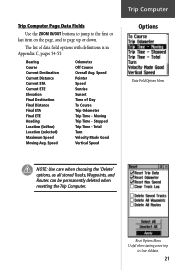
... Tracks, Waypoints, and Routes can be permanently deleted when resetting the Trip Computer. Bearing Course Current Destination Current Distance Current ETA Current ETE Elevation Final Destination Final Distance Final ETA Final ETE Heading Location (lat/lon) Location (selected) Maximum Speed Moving Avg. Reset Options Menu Useful when starting a new trip to page up or down. Trip Computer Page Data Fields Use the ZOOM IN/OUT buttons to jump to the first or last item on the page, and to clear...
... Tracks, Waypoints, and Routes can be permanently deleted when resetting the Trip Computer. Bearing Course Current Destination Current Distance Current ETA Current ETE Elevation Final Destination Final Distance Final ETA Final ETE Heading Location (lat/lon) Location (selected) Maximum Speed Moving Avg. Reset Options Menu Useful when starting a new trip to page up or down. Trip Computer Page Data Fields Use the ZOOM IN/OUT buttons to jump to the first or last item on the page, and to clear...
Owner's Manual
Page 36
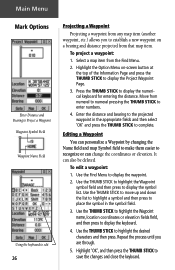
... then select 'OK' and press the THUMB STICK to complete. Highlight 'OK', and then press the THUMB STICK to display the waypoint. 2. Main Menu Mark Options Enter Distance and Bearing to Project a Waypoint Waypoint Symbol Field Waypoint Name Field Using the keyboard to edit 26 Projecting a Waypoint Projecting a waypoint from any map item (another waypoint, etc.) allows you are through. 5. To edit a waypoint: 1. Use the THUMB STICK to highlight the Waypoint name, location coordinates or elevation...
... then select 'OK' and press the THUMB STICK to complete. Highlight 'OK', and then press the THUMB STICK to display the waypoint. 2. Main Menu Mark Options Enter Distance and Bearing to Project a Waypoint Waypoint Symbol Field Waypoint Name Field Using the keyboard to edit 26 Projecting a Waypoint Projecting a waypoint from any map item (another waypoint, etc.) allows you are through. 5. To edit a waypoint: 1. Use the THUMB STICK to highlight the Waypoint name, location coordinates or elevation...
Owner's Manual
Page 45
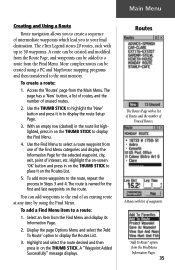
... on the THUMB STICK to display the Find Menu. 4. The eTrex Legend stores 20 routes, each with a list of Routes and the number of interest, etc. Highlight and select the route desired and then press in on the THUMB STICK. Main Menu Creating and Using a Route Route navigation allows you to create a sequence of an existing route at any time by using a PC and MapSource mapping programs and then transferred to the unit memory.
... on the THUMB STICK to display the Find Menu. 4. The eTrex Legend stores 20 routes, each with a list of Routes and the number of interest, etc. Highlight and select the route desired and then press in on the THUMB STICK. Main Menu Creating and Using a Route Route navigation allows you to create a sequence of an existing route at any time by using a PC and MapSource mapping programs and then transferred to the unit memory.
Owner's Manual
Page 47
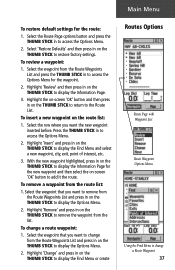
... to restore factory settings. To change from the Route Waypoints List and press the THUMB STICK in on the THUMB STICK to return to display the Information Page for the waypoint. 2. Highlight 'Change' and press in on the THUMB STICK to the Route List. Select the waypoint from the Route Waypoints List and press in on -screen 'OK' button to remove the waypoint from the route list: 1. Select the row...
... to restore factory settings. To change from the Route Waypoints List and press the THUMB STICK in on the THUMB STICK to return to display the Information Page for the waypoint. 2. Highlight 'Change' and press in on the THUMB STICK to the Route List. Select the waypoint from the Route Waypoints List and press in on -screen 'OK' button to remove the waypoint from the route list: 1. Select the row...
Owner's Manual
Page 51
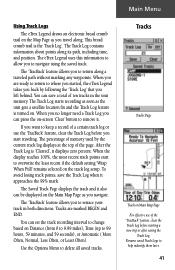
... contains information about points along its path, including time, and position. Tracks Tracks Page Track on the Main Map Page as the unit gets a satellite location fix and the Track Log feature is turned on Distance (from 0 to 9.99 miles), Time (up to return along . You can set the track recording interval to where you started, the eTrex Legend takes you left behind. Tracks are ready to return to change based on . The percentage of memory used...
... contains information about points along its path, including time, and position. Tracks Tracks Page Track on the Main Map Page as the unit gets a satellite location fix and the Track Log feature is turned on Distance (from 0 to 9.99 miles), Time (up to return along . You can set the track recording interval to where you started, the eTrex Legend takes you left behind. Tracks are ready to return to change based on . The percentage of memory used...
Owner's Manual
Page 56
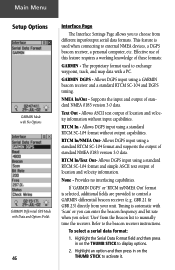
... Menu Setup Options GARMIN Mode with No Options GARMIN Differntial GPS Mode with Data and Options Fields 46 Interface Page The Interface Settings Page allows you select 'User' from the Beacon list to manually tune the receiver. RTCM In - Allows DGPS input using a GARMIN beacon receiver and a standard RTCM SC-104 and DGPS tuning. If 'GARMIN DGPS' or 'RTCM in on the THUMB STICK to the beacon receiver instructions. This feature...
... Menu Setup Options GARMIN Mode with No Options GARMIN Differntial GPS Mode with Data and Options Fields 46 Interface Page The Interface Settings Page allows you select 'User' from the Beacon list to manually tune the receiver. RTCM In - Allows DGPS input using a GARMIN beacon receiver and a standard RTCM SC-104 and DGPS tuning. If 'GARMIN DGPS' or 'RTCM in on the THUMB STICK to the beacon receiver instructions. This feature...
Owner's Manual
Page 57
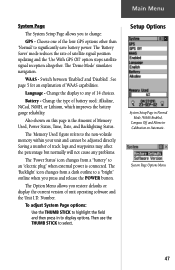
... System Setup Page allows you restore defaults or display the current version of unit operating software and the Unit I.D. Change the type of satellite signal position updating and the 'Use With GPS Off' option stops satellite signal reception altogether. The 'Memory Used' figure refers to select. System Page Options Menu 47 To adjust System Page options: Use the THUMB STICK to an "electric plug" when external power is the Amount of Memory Used, Power Status, Time, Date, and Backlighting Status. The 'Backlight' icon changes from a "battery...
... System Setup Page allows you restore defaults or display the current version of unit operating software and the Unit I.D. Change the type of satellite signal position updating and the 'Use With GPS Off' option stops satellite signal reception altogether. The 'Memory Used' figure refers to select. System Page Options Menu 47 To adjust System Page options: Use the THUMB STICK to an "electric plug" when external power is the Amount of Memory Used, Power Status, Time, Date, and Backlighting Status. The 'Backlight' icon changes from a "battery...
Owner's Manual
Page 61
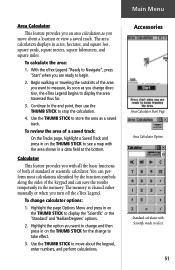
... see a map with the area shown in on the THUMB STICK to select 51 Use the THUMB STICK to measure. The memory is cleared either manually or when you want to take effect. 3. To change direction, the eTrex Legend begins to begin. 2. To calculate the area: 1. Continue to the end point, then use the THUMB STICK to move about the keypad, enter numbers, and perform...
... see a map with the area shown in on the THUMB STICK to select 51 Use the THUMB STICK to measure. The memory is cleared either manually or when you want to take effect. 3. To change direction, the eTrex Legend begins to begin. 2. To calculate the area: 1. Continue to the end point, then use the THUMB STICK to move about the keypad, enter numbers, and perform...
Owner's Manual
Page 67
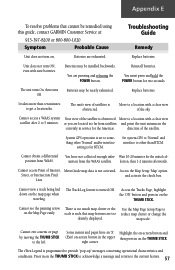
... takes more than RTCM. The unit's view of Interest, MetroGuide map data is such that cannot be remedied using this guide, contact GARMIN Customer Service at: 913-397-8200 or 800-800-1020 Symptom Probable Cause Troubleshooting Guide Remedy Unit does not turn ON, even with a clear view satellite after 2 to 5 minutes. The eTrex Legend is obstructed Move to a location with new batteries. Unit does not turn on -screen button in the upper then press...
... takes more than RTCM. The unit's view of Interest, MetroGuide map data is such that cannot be remedied using this guide, contact GARMIN Customer Service at: 913-397-8200 or 800-800-1020 Symptom Probable Cause Troubleshooting Guide Remedy Unit does not turn ON, even with a clear view satellite after 2 to 5 minutes. The eTrex Legend is obstructed Move to a location with new batteries. Unit does not turn on -screen button in the upper then press...

Owner's Manual
Page 71
... a saved track 51 save a Track Log 42 save Find Menu item as waypoints 27 save Map Menu item as waypoints 27 select a map page option 11 select a serial data format 46 select data field options 40 select Units Page options 44 Setup the Navigation Page 18 How To (Continued) set the backlighting timeout 45 set the date and time 43, 48, 49, 50 set the location 48, 50 show Data Fields 13 show Nav Status 13 stop navigating 13, 34, 40 transfer data 56 use Setup Map options 15 use the Measure Distance...
... a saved track 51 save a Track Log 42 save Find Menu item as waypoints 27 save Map Menu item as waypoints 27 select a map page option 11 select a serial data format 46 select data field options 40 select Units Page options 44 Setup the Navigation Page 18 How To (Continued) set the backlighting timeout 45 set the date and time 43, 48, 49, 50 set the location 48, 50 show Data Fields 13 show Nav Status 13 stop navigating 13, 34, 40 transfer data 56 use Setup Map options 15 use the Measure Distance...
Owner's Manual
Page 72
... 31 Position Format 44 Position Icon 10 Power 52 Power/Data Connector Cover 2 POWER button 2 Power Status 47 Power Status Window 23 Precautions iii, iv Product Registration vii Projecting a Waypoint 26 R Receiver Status 5-7, 47 Renaming a Waypoint 24-26 Replacement Battery Cover 53 Reset 20 Restart Search 7 Restore Defaults 11, 17, 20 Route Adding Find Menu item 35 Creating 35 Definition of 8 Editing 36 Options 36-40 Index Main Page Menu Button 4 Maps Features 15...
... 31 Position Format 44 Position Icon 10 Power 52 Power/Data Connector Cover 2 POWER button 2 Power Status 47 Power Status Window 23 Precautions iii, iv Product Registration vii Projecting a Waypoint 26 R Receiver Status 5-7, 47 Renaming a Waypoint 24-26 Replacement Battery Cover 53 Reset 20 Restart Search 7 Restore Defaults 11, 17, 20 Route Adding Find Menu item 35 Creating 35 Definition of 8 Editing 36 Options 36-40 Index Main Page Menu Button 4 Maps Features 15...
Owner's Manual
Page 73
... settings 36, 37 Route Page 23 Using 35 RTCM In 46 RTCM In/NMEA Out 46 RTCM In/Text Out 46 S Satellite Page 4-7 Saved Tracks 14 Saving the Track Log 41, 47 Selecting a Waypoint 28 Serial Number vii Setting the Correct Time Zone 22 Setup and Features 1 Setup Map 11, 14 Setup Map options 15 Setup Menu 43 Setup Page 22, 23 Setup the Navigation Page 18 Set course 16-20 Show Data Fields 11, 13 Navigation Status 13 Nav Status 11 Software...
... settings 36, 37 Route Page 23 Using 35 RTCM In 46 RTCM In/NMEA Out 46 RTCM In/Text Out 46 S Satellite Page 4-7 Saved Tracks 14 Saving the Track Log 41, 47 Selecting a Waypoint 28 Serial Number vii Setting the Correct Time Zone 22 Setup and Features 1 Setup Map 11, 14 Setup Map options 15 Setup Menu 43 Setup Page 22, 23 Setup the Navigation Page 18 Set course 16-20 Show Data Fields 11, 13 Navigation Status 13 Nav Status 11 Software...
Quick Reference Guide
Page 1
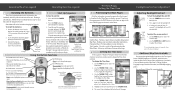
... Map Page and view the new waypoint. Use the PAGE button to display the Find Menu. 2. Walk or drive around for a few minutes, make a right or left turn in the direction the Bearing Pointer directs. 2. Find Menu Position Icon showing your location as a waypoint and automatically assigned a three digit number. 2. Mark your current location Track Line The newly marked Waypoint Waypoints List Waypoint Information Page Basic Navigation Returning to a Waypoint with Step 1) To mark a waypoint: 1. Press in a straight line, refer to the Bearing Pointer from time to time...
... Map Page and view the new waypoint. Use the PAGE button to display the Find Menu. 2. Walk or drive around for a few minutes, make a right or left turn in the direction the Bearing Pointer directs. 2. Find Menu Position Icon showing your location as a waypoint and automatically assigned a three digit number. 2. Mark your current location Track Line The newly marked Waypoint Waypoints List Waypoint Information Page Basic Navigation Returning to a Waypoint with Step 1) To mark a waypoint: 1. Press in a straight line, refer to the Bearing Pointer from time to time...
Quick Reference Guide
Page 2
... adjust the screen contrast. Additional Map Data Available You can be lost when changing the batteries. Stored data will turn the unit On/Off. • Press to toggle the backlighting On/Off. • Press to determine your location, a "Ready To Navigate" message and your movements and nearby map features. When the Legend has acquired enough satellite signals to access the Find Menu. To change the Time Zone selection. Operating the eTrex Legend Operating the eTrex Legend 1 Installing the Batteries 3 Start...
... adjust the screen contrast. Additional Map Data Available You can be lost when changing the batteries. Stored data will turn the unit On/Off. • Press to toggle the backlighting On/Off. • Press to determine your location, a "Ready To Navigate" message and your movements and nearby map features. When the Legend has acquired enough satellite signals to access the Find Menu. To change the Time Zone selection. Operating the eTrex Legend Operating the eTrex Legend 1 Installing the Batteries 3 Start...


