
Owner's Manual
Page 2
... its products and to make changes in the United States and other countries. ANT +™, ANT Agent™, Garmin Connect™, USB ANT Stick™, and Vector™ are trademarks of such changes or improvements. Exustar™ is a registered trademark of Exustar Enterprise Co. ... Garmin reserves the right to www.garmin.com for a list of Garmin. or its subsidiaries. These trademarks may not be used without the written consent of Apple Computer, Inc. Under the copyright laws, this product. Ltd. Visit www.thisisant.com/ directory for current updates and...
... its products and to make changes in the United States and other countries. ANT +™, ANT Agent™, Garmin Connect™, USB ANT Stick™, and Vector™ are trademarks of such changes or improvements. Exustar™ is a registered trademark of Exustar Enterprise Co. ... Garmin reserves the right to www.garmin.com for a list of Garmin. or its subsidiaries. These trademarks may not be used without the written consent of Apple Computer, Inc. Under the copyright laws, this product. Ltd. Visit www.thisisant.com/ directory for current updates and...

Owner's Manual
Page 3
... Ride 2 Customizing the Data Fields 3 Training 3 Pedal-Based Power 3 Maintenance Tips 3 Vector Data 3 Sending Your Ride to Garmin Connect 3 Garmin Connect 3 Disconnecting the USB Cable 3 Device Information 3 Vector Device Care 3 Removing the Pedal Pod and Pedal 4 Replacing the Pedals and Cartridges 4 Vector Storage 4 Vector Specifications 4 USB ANT Stick™ Specifications 4 Battery Information 4 Replacing the Pedal Pod...
... Ride 2 Customizing the Data Fields 3 Training 3 Pedal-Based Power 3 Maintenance Tips 3 Vector Data 3 Sending Your Ride to Garmin Connect 3 Garmin Connect 3 Disconnecting the USB Cable 3 Device Information 3 Vector Device Care 3 Removing the Pedal Pod and Pedal 4 Replacing the Pedals and Cartridges 4 Vector Storage 4 Vector Specifications 4 USB ANT Stick™ Specifications 4 Battery Information 4 Replacing the Pedal Pod...

Owner's Manual
Page 5
... system for your computer (page 3). NOTICE Go to get out there and ride. For software updates, video tutorials, and everything you need to www.garmin.com/ vectorowner for product warnings and other important information. Determining the Bicycle Chain Clearance Before you ...arm is simple, accurate, and easy to fill the recess). Improper use . Vector is recessed, use washers. Introduction WARNING Read all instructions carefully before installing and using the Vector system. Installing Vector Components Preparing the Crank Arms 1 Remove the existing pedals. 2 Clean the ...
... system for your computer (page 3). NOTICE Go to get out there and ride. For software updates, video tutorials, and everything you need to www.garmin.com/ vectorowner for product warnings and other important information. Determining the Bicycle Chain Clearance Before you ...arm is simple, accurate, and easy to fill the recess). Improper use . Vector is recessed, use washers. Introduction WARNING Read all instructions carefully before installing and using the Vector system. Installing Vector Components Preparing the Crank Arms 1 Remove the existing pedals. 2 Clean the ...

Owner's Manual
Page 7
...paper or a towel between the tool and the hardware. • After any bike adjustments, rotate the crank arm to check for the latest updates and information. 2 Plug the small end of the USB cable into the mini-USB port. 3 Plug the large end of your active lifestyle ...cable into a computer USB port. 4 Go to track, analyze, share, and encourage each other. Training Pedal-Based Power Vector measures pedal-based power. Sending Your Ride to Garmin Connect NOTICE To prevent corrosion, thoroughly dry the mini-USB port, the weather cap, and the surrounding area before charging ...
...paper or a towel between the tool and the hardware. • After any bike adjustments, rotate the crank arm to check for the latest updates and information. 2 Plug the small end of the USB cable into the mini-USB port. 3 Plug the large end of your active lifestyle ...cable into a computer USB port. 4 Go to track, analyze, share, and encourage each other. Training Pedal-Based Power Vector measures pedal-based power. Sending Your Ride to Garmin Connect NOTICE To prevent corrosion, thoroughly dry the mini-USB port, the weather cap, and the surrounding area before charging ...

Owner's Manual
Page 10
.... 2 Select Settings > Bike Settings > Data Fields. 3 Select a page. 4 Select the number of power output in kilojoules. Watts/kg: The amount of data fields to www.garmin.com/ vectorowner, and download the Vector Updater application. 2 Bring Vector within range (3 m) of power output. USB hubs are not recommended. • If you can be connected to www...
.... 2 Select Settings > Bike Settings > Data Fields. 3 Select a page. 4 Select the number of power output in kilojoules. Watts/kg: The amount of data fields to www.garmin.com/ vectorowner, and download the Vector Updater application. 2 Bring Vector within range (3 m) of power output. USB hubs are not recommended. • If you can be connected to www...

Owner's Manual
Page 11
... 3 cleats 2 compatibility 6 customizing the device 3, 6 D data storing 3 transferring 3 data fields 3, 6 E Edge 2, 5 G Garmin Connect 3 storing data 3 H history 3 sending to computer 3 I installing 1, 2 M memory 3 P pairing 2, 5 pedal pods 1, 4, 5 pedals 1-4 power 3 product registration 5 R registering the device 5 replacement parts 4 S software, updating 6 specifications 4 storing data 3 storing the device 4 T tools 1 training 3 U updates, software 6 USB, disconnecting 3 USB ANT Stick 4, 6 W water resistance 4 Index 7
... 3 cleats 2 compatibility 6 customizing the device 3, 6 D data storing 3 transferring 3 data fields 3, 6 E Edge 2, 5 G Garmin Connect 3 storing data 3 H history 3 sending to computer 3 I installing 1, 2 M memory 3 P pairing 2, 5 pedal pods 1, 4, 5 pedals 1-4 power 3 product registration 5 R registering the device 5 replacement parts 4 S software, updating 6 specifications 4 storing data 3 storing the device 4 T tools 1 training 3 U updates, software 6 USB, disconnecting 3 USB ANT Stick 4, 6 W water resistance 4 Index 7

Quick Start Manual
Page 1
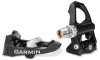
...15 mm pedal wrench • Bike grease • 3 mm and 4 mm hex keys Installing Vector Components Preparing the Crank Arms 1 Remove the existing pedals. 2 Clean the threads and remove old grease... tightens counter clockwise. NOTE: There should be pointing downward. 1 The right pedal tightens clockwise. Garmin recommends placement of the pedal pod on the pedal spindle ➎ and the pedal pod ➏...use could result in the product box for the latest information including bike compatibility, software updates, and video tutorials. The bike chain should be in the crank arm is the...
...15 mm pedal wrench • Bike grease • 3 mm and 4 mm hex keys Installing Vector Components Preparing the Crank Arms 1 Remove the existing pedals. 2 Clean the threads and remove old grease... tightens counter clockwise. NOTE: There should be pointing downward. 1 The right pedal tightens clockwise. Garmin recommends placement of the pedal pod on the pedal spindle ➎ and the pedal pod ➏...use could result in the product box for the latest information including bike compatibility, software updates, and video tutorials. The bike chain should be in the crank arm is the...


