
Owner's Manual
Page 2
...updates and supplemental information concerning the use of Garmin Ltd. Garmin®, Edge®, and the Garmin logo are trademarks of Garmin. or its subsidiaries, registered in part, without the written consent of Peaksware, LLC. These trademarks may not be used without obligation to www.garmin...improve its subsidiaries. Other trademarks and trade names are trademarks of Garmin. Under the copyright laws, this product. ANT +™, ANT Agent™, Garmin Connect™, USB ANT Stick™, and Vector™ are those of such changes or improvements. This product ...
...updates and supplemental information concerning the use of Garmin Ltd. Garmin®, Edge®, and the Garmin logo are trademarks of Garmin. or its subsidiaries, registered in part, without the written consent of Peaksware, LLC. These trademarks may not be used without obligation to www.garmin...improve its subsidiaries. Other trademarks and trade names are trademarks of Garmin. Under the copyright laws, this product. ANT +™, ANT Agent™, Garmin Connect™, USB ANT Stick™, and Vector™ are those of such changes or improvements. This product ...

Owner's Manual
Page 3
... Ride 2 Customizing the Data Fields 3 Training 3 Pedal-Based Power 3 Maintenance Tips 3 Vector Data 3 Sending Your Ride to Garmin Connect 3 Garmin Connect 3 Disconnecting the USB Cable 3 Device Information 3 Vector Device Care 3 Removing the Pedal Pod and Pedal 4 Replacing the Pedals and Cartridges 4 Vector Storage 4 Vector Specifications 4 USB ANT Stick™ Specifications 4 Battery Information 4 Replacing the Pedal Pod...
... Ride 2 Customizing the Data Fields 3 Training 3 Pedal-Based Power 3 Maintenance Tips 3 Vector Data 3 Sending Your Ride to Garmin Connect 3 Garmin Connect 3 Disconnecting the USB Cable 3 Device Information 3 Vector Device Care 3 Removing the Pedal Pod and Pedal 4 Replacing the Pedals and Cartridges 4 Vector Storage 4 Vector Specifications 4 USB ANT Stick™ Specifications 4 Battery Information 4 Replacing the Pedal Pod...

Owner's Manual
Page 5
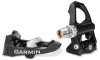
...If the mounting face surrounding the threaded hole in serious injury. Installing Vector Components Preparing the Crank Arms 1 Remove the existing pedals. 2 Clean the threads and remove old grease. For software updates, video tutorials, and everything you need to get out there and ...ride. NOTICE Go to www.garmin.com/ vectorowner. Move your Vector, go to www.garmin.com/ vectorowner for the latest information including bike compatibility, software updates, and video tutorials. Determining Pedal Pod Clearance NOTICE The pedal pod should...
...If the mounting face surrounding the threaded hole in serious injury. Installing Vector Components Preparing the Crank Arms 1 Remove the existing pedals. 2 Clean the threads and remove old grease. For software updates, video tutorials, and everything you need to get out there and ...ride. NOTICE Go to www.garmin.com/ vectorowner. Move your Vector, go to www.garmin.com/ vectorowner for the latest information including bike compatibility, software updates, and video tutorials. Determining Pedal Pod Clearance NOTICE The pedal pod should...

Owner's Manual
Page 7
..., the direction of force, the rotation of the crank arm, and time, Vector can upload that activity to Garmin Connect and keep track of every ride (page 2). • Keep Vector components clean. • When moving Vector to another compatible device, see page 5. 1 Hold a data field to change...activities to others, or post links to your friends on -screen instructions. Garmin Connect gives you have another bike, clean the threads and surfaces thoroughly. • Go to www.garmin.com/ vectorowner for the latest updates and information. 2 Plug the small end of the USB cable into ...
..., the direction of force, the rotation of the crank arm, and time, Vector can upload that activity to Garmin Connect and keep track of every ride (page 2). • Keep Vector components clean. • When moving Vector to another compatible device, see page 5. 1 Hold a data field to change...activities to others, or post links to your friends on -screen instructions. Garmin Connect gives you have another bike, clean the threads and surfaces thoroughly. • Go to www.garmin.com/ vectorowner for the latest updates and information. 2 Plug the small end of the USB cable into ...

Owner's Manual
Page 10
... the batteries. Balance: The current left / right power balance. Balance - 30s Avg. : The 30-second moving average of power output (1 to www.garmin.com/ vectorowner, and download the Vector Updater application. 2 Bring Vector within range (3 m) of the left /right power balance. Power - Power - Power Zone: The current range of power output. 2 Hold MENU. 3 Select...
... the batteries. Balance: The current left / right power balance. Balance - 30s Avg. : The 30-second moving average of power output (1 to www.garmin.com/ vectorowner, and download the Vector Updater application. 2 Bring Vector within range (3 m) of the left /right power balance. Power - Power - Power Zone: The current range of power output. 2 Hold MENU. 3 Select...

Owner's Manual
Page 11
... 3 cleats 2 compatibility 6 customizing the device 3, 6 D data storing 3 transferring 3 data fields 3, 6 E Edge 2, 5 G Garmin Connect 3 storing data 3 H history 3 sending to computer 3 I installing 1, 2 M memory 3 P pairing 2, 5 pedal pods 1, 4, 5 pedals 1-4 power 3 product registration 5 R registering the device 5 replacement parts 4 S software, updating 6 specifications 4 storing data 3 storing the device 4 T tools 1 training 3 U updates, software 6 USB, disconnecting 3 USB ANT Stick 4, 6 W water resistance 4 Index 7
... 3 cleats 2 compatibility 6 customizing the device 3, 6 D data storing 3 transferring 3 data fields 3, 6 E Edge 2, 5 G Garmin Connect 3 storing data 3 H history 3 sending to computer 3 I installing 1, 2 M memory 3 P pairing 2, 5 pedal pods 1, 4, 5 pedals 1-4 power 3 product registration 5 R registering the device 5 replacement parts 4 S software, updating 6 specifications 4 storing data 3 storing the device 4 T tools 1 training 3 U updates, software 6 USB, disconnecting 3 USB ANT Stick 4, 6 W water resistance 4 Index 7

Quick Start Manual
Page 1
... the chain and the crank arm. ➍ Getting Started Warning Read all instructions carefully before installing and using the Vector™ system. NOTE: You must confirm bicycle chain clearance. Garmin recommends placement of the crank arm is in serious injury. See the Important Safety and Product Information guide in the outermost... and the chain. Determining Pedal Pod Clearance Notice The pedal pod should be in the product box for the latest information including bike compatibility, software updates, and video tutorials.
... the chain and the crank arm. ➍ Getting Started Warning Read all instructions carefully before installing and using the Vector™ system. NOTE: You must confirm bicycle chain clearance. Garmin recommends placement of the crank arm is in serious injury. See the Important Safety and Product Information guide in the outermost... and the chain. Determining Pedal Pod Clearance Notice The pedal pod should be in the product box for the latest information including bike compatibility, software updates, and video tutorials.


