
Owner's Manual
Page 4
... used batteries away from other NAVAIDs, visual sightings, charts, etc. Do not disassemble or dispose of unsafe operation, carefully review and understand all GPS equipment. THIS PRODUCT IS INTENDED TO BE USED ONLY AS A NAVIGATIONAL AID AND MUST NOT BE USED FOR ANY PURPOSE REQUIRING...accuracy and maintenance. Contact your own risk. CAUTION: IT IS THE USER'S RESPONSIBILITY TO USE THIS PRODUCT PRUDENTLY. Although the Garmin Rino 520/530 is responsible for information on proper disposal of the used in product literature and copyright messages displayed to changes which we ...
... used batteries away from other NAVAIDs, visual sightings, charts, etc. Do not disassemble or dispose of unsafe operation, carefully review and understand all GPS equipment. THIS PRODUCT IS INTENDED TO BE USED ONLY AS A NAVIGATIONAL AID AND MUST NOT BE USED FOR ANY PURPOSE REQUIRING...accuracy and maintenance. Contact your own risk. CAUTION: IT IS THE USER'S RESPONSIBILITY TO USE THIS PRODUCT PRUDENTLY. Although the Garmin Rino 520/530 is responsible for information on proper disposal of the used in product literature and copyright messages displayed to changes which we ...
Owner's Manual
Page 5
....1). Do not use the ear opposite Rino® 520/530 Owner's Manual iii Pacemakers-The Health Industry Manufacturers Association recommends that has a damaged antenna, because if it receives and also sends out radio frequency (RF...) signals. However, certain equipment may violate FCC regulations. These recommendations are consistent with pacemakers should use any radio that a minimum separation of six inches (6") be shielded against the RF signals from universities, government health agencies, and industry reviewed...
....1). Do not use the ear opposite Rino® 520/530 Owner's Manual iii Pacemakers-The Health Industry Manufacturers Association recommends that has a damaged antenna, because if it receives and also sends out radio frequency (RF...) signals. However, certain equipment may violate FCC regulations. These recommendations are consistent with pacemakers should use any radio that a minimum separation of six inches (6") be shielded against the RF signals from universities, government health agencies, and industry reviewed...
Owner's Manual
Page 30
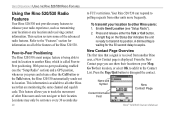
...their location on the Status Bar indicates the unit is available to all of the features of the Rino 520/530. A bright flag on your location or any location and receiving contact information. New Contact Page Overview The first time that are monitoring the same channel and squelch ...the movement of the advanced radio features. This section reviews some of other Rino users and even navigate to other Rino users: 1. This information is ready to disregard the contact. Enable Send Location (see the "Setup Radio" section) and a GPS position, whenever you press and release either the ...
...their location on the Status Bar indicates the unit is available to all of the features of the Rino 520/530. A bright flag on your location or any location and receiving contact information. New Contact Page Overview The first time that are monitoring the same channel and squelch ...the movement of the advanced radio features. This section reviews some of other Rino users and even navigate to other Rino users: 1. This information is ready to disregard the contact. Enable Send Location (see the "Setup Radio" section) and a GPS position, whenever you press and release either the ...
Owner's Manual
Page 32
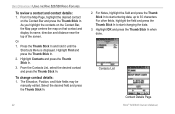
... Owner's Manual For other fields, highlight the field and press the Thumb Stick In to 30 characters. Unit Operation > Using the Rino 520/530 Radio Features To review a contact and contact details: 1. From the Map Page, highlight the desired contact on that contact and display its name, direction and distance near the top...
... Owner's Manual For other fields, highlight the field and press the Thumb Stick In to 30 characters. Unit Operation > Using the Rino 520/530 Radio Features To review a contact and contact details: 1. From the Map Page, highlight the desired contact on that contact and display its name, direction and distance near the top...
Owner's Manual
Page 33
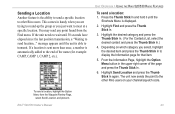
... contact and press the Thumb Stick In.) 4. To send a location, highlight the Option Menu from the Find menu. Rino® 520/530 Owner's Manual 23 You may send any point found from the Waypoint Review Page, select Send Location, and press In. If the unit needs to wait until 30 seconds have elapsed...
... contact and press the Thumb Stick In.) 4. To send a location, highlight the Option Menu from the Find menu. Rino® 520/530 Owner's Manual 23 You may send any point found from the Waypoint Review Page, select Send Location, and press In. If the unit needs to wait until 30 seconds have elapsed...
Owner's Manual
Page 58
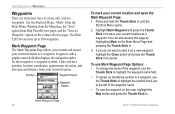
...waypoints. Highlight Mark Waypoint and press the Thumb Stick In to mark and record your current location as Waypoint" option on the Contact Review page. Rino® 520/530 Owner's Manual To use Mark Waypoint Page Options: • To change the name of the waypoint name. • To... elevation, and direction and distance from Map Point Review page, and the "Save as a waypoint. If you to save it as a waypoint. Symbol Waypoint Name Waypoint Details Mark Waypoint Page 48 To mark your current location. The Rino 520/530 can also access this page by highlighting Mark...
...waypoints. Highlight Mark Waypoint and press the Thumb Stick In to mark and record your current location as Waypoint" option on the Contact Review page. Rino® 520/530 Owner's Manual To use Mark Waypoint Page Options: • To change the name of the waypoint name. • To... elevation, and direction and distance from Map Point Review page, and the "Save as a waypoint. If you to save it as a waypoint. Symbol Waypoint Name Waypoint Details Mark Waypoint Page 48 To mark your current location. The Rino 520/530 can also access this page by highlighting Mark...

Owner's Manual
Page 80
...button and press the Thumb Stick In to display the Information Page. 3. To restore default settings for the waypoint. 2. To review a route point: 1. Press the Thumb Stick In. 2. To delete the route: 1. Select the point from the Route ...Points List and press the Thumb Stick In to delete route?", select Yes. Highlight Review and then press the Thumb Stick In to access the Option Menu. 2. Highlight the Copy Route option and then press... Menu and select a new waypoint, city, exit, point of interest, etc. 70 Rino® 520/530 Owner's Manual
...button and press the Thumb Stick In to display the Information Page. 3. To restore default settings for the waypoint. 2. To review a route point: 1. Press the Thumb Stick In. 2. To delete the route: 1. Select the point from the Route ...Points List and press the Thumb Stick In to delete route?", select Yes. Highlight Review and then press the Thumb Stick In to access the Option Menu. 2. Highlight the Copy Route option and then press... Menu and select a new waypoint, city, exit, point of interest, etc. 70 Rino® 520/530 Owner's Manual

Owner's Manual
Page 81
Rino® 520/530 Owner's Manual 71 Highlight Remove and press the Thumb Stick In to change a route point: 1. Unit Operation > Routes Page To change from the Route ... the list. Select the point that you want to remove the waypoint from the Route Waypoints List and press the Thumb Stick In. 2. Route point review options To remove a point from the Route Points List and press the Thumb Stick In. 2. 3. Select a new waypoint, access its Information Page and press the...
Rino® 520/530 Owner's Manual 71 Highlight Remove and press the Thumb Stick In to change a route point: 1. Unit Operation > Routes Page To change from the Route ... the list. Select the point that you want to remove the waypoint from the Route Waypoints List and press the Thumb Stick In. 2. Route point review options To remove a point from the Route Points List and press the Thumb Stick In. 2. 3. Select a new waypoint, access its Information Page and press the...
Owner's Manual
Page 83
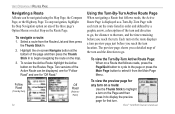
... the Thumb Stick In to display the route. 3. Highlight the Map button and press the Thumb Stick In to display the Route Page. 2. Select Review or Remove and press In again to either display the Information Page or remove it In to customize how routing functions behave. Select Routing and ...press the Thumb Stick In to access the Main Menu. 2. If you to open the Routing Setup Page. 4. Routing Setup Page Follow Road Options Rino® 520/530 Owner's Manual 73 Setting Up Routing Methods The Routing Setup Page allows you want a Next Turn Preview to choose from "Follow Road" or "Off...
... the Thumb Stick In to display the route. 3. Highlight the Map button and press the Thumb Stick In to display the Route Page. 2. Select Review or Remove and press In again to either display the Information Page or remove it In to customize how routing functions behave. Select Routing and ...press the Thumb Stick In to access the Main Menu. 2. If you to open the Routing Setup Page. 4. Routing Setup Page Follow Road Options Rino® 520/530 Owner's Manual 73 Setting Up Routing Methods The Routing Setup Page allows you want a Next Turn Preview to choose from "Follow Road" or "Off...
Owner's Manual
Page 84
... Routes Page. To view the preview page for any of the Active Route can be displayed, one for "Follow Road" and one for "Off Road." Rino® 520/530 Owner's Manual To navigate a route: 1. Follow Road (Turn-By-Turn) Off Road (Point-toPoint) 74 Using the Turn-By-Turn Active Route Page... A Route can be navigated using the Map Page, the Compass Page, or the Highway Page. The preview page shows you reach the turn location. To review the Active Route highlight the Active button on the map. 3. Select a route from the Main Page Menu.
... Routes Page. To view the preview page for any of the Active Route can be displayed, one for "Follow Road" and one for "Off Road." Rino® 520/530 Owner's Manual To navigate a route: 1. Follow Road (Turn-By-Turn) Off Road (Point-toPoint) 74 Using the Turn-By-Turn Active Route Page... A Route can be navigated using the Map Page, the Compass Page, or the Highway Page. The preview page shows you reach the turn location. To review the Active Route highlight the Active button on the map. 3. Select a route from the Main Page Menu.
Owner's Manual
Page 97
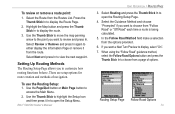
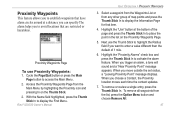
... 1 mile. 6. Next use Proximity Waypoints: 1. Access the Proximity Waypoints Page from the list, press the Option Menu button and choose Remove All. To remove or review a single entry, press the Thumb Stick In. appears. When you trigger an alarm, a tone will sound and a "Near Proximity Point" message To use the Thumb... you can specifiy The alarm helps you to display the Find Menu. When you choose a Contact, the Proximity location moves each time the contact updates. 7. Rino® 520/530 Owner's Manual 87
... 1 mile. 6. Next use Proximity Waypoints: 1. Access the Proximity Waypoints Page from the list, press the Option Menu button and choose Remove All. To remove or review a single entry, press the Thumb Stick In. appears. When you trigger an alarm, a tone will sound and a "Near Proximity Point" message To use the Thumb... you can specifiy The alarm helps you to display the Find Menu. When you choose a Contact, the Proximity location moves each time the contact updates. 7. Rino® 520/530 Owner's Manual 87

Owner's Manual
Page 128
...Status Window 18 Weather Radio 17 Re-Sight 35 Recently Found Places 62 Restore Defaults 26, 38, 47 Reverse Route 69 Review Route 70 Ring Tone 16 Roger Tone 16 Routes 68 Copy 70 Create 68 Delete 70 Edit 69 Navigate 73 Remove waypoints... 69 Restore defaults 70 Reverse 69 Review 70 S Satellite Page 43 Scanlist 12, 13, 16 Scan Channels 12, 99 Scan Codes 12 Scramble 14, 99 Sending ... Overview 6 Status Indicators 19 Stopwatch 92 Stop Navigation 26, 34 Sun & Moon 53, 59, 93 Symbol 8, 9 Rino® 520/530 Owner's Manual
...Status Window 18 Weather Radio 17 Re-Sight 35 Recently Found Places 62 Restore Defaults 26, 38, 47 Reverse Route 69 Review Route 70 Ring Tone 16 Roger Tone 16 Routes 68 Copy 70 Create 68 Delete 70 Edit 69 Navigate 73 Remove waypoints... 69 Restore defaults 70 Reverse 69 Review 70 S Satellite Page 43 Scanlist 12, 13, 16 Scan Channels 12, 99 Scan Codes 12 Scramble 14, 99 Sending ... Overview 6 Status Indicators 19 Stopwatch 92 Stop Navigation 26, 34 Sun & Moon 53, 59, 93 Symbol 8, 9 Rino® 520/530 Owner's Manual
Quick Start Guide
Page 1
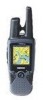
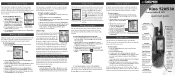
... the electronic compass On/Off (Rino 530 only) Speaker Select Send to send the note to their new position. Rino® 520/530 2-way radio & GPS quick start guide Power button:...the contact's location. Highlight Mark Waypoint and press the Thumb Stick In to display the Contact Review page. 4. Navigating with Weather Radio On 4. Highlight Waypoints and press the Thumb Stick in...; From any other Rino units. Other Rino users monitoring the same channel and code receive this information. If you to track the movement of your mouth when talking Rino 520 (shown) Thumb Stick...
... the electronic compass On/Off (Rino 530 only) Speaker Select Send to send the note to their new position. Rino® 520/530 2-way radio & GPS quick start guide Power button:...the contact's location. Highlight Mark Waypoint and press the Thumb Stick In to display the Contact Review page. 4. Navigating with Weather Radio On 4. Highlight Waypoints and press the Thumb Stick in...; From any other Rino units. Other Rino users monitoring the same channel and code receive this information. If you to track the movement of your mouth when talking Rino 520 (shown) Thumb Stick...