
Owner's Manual
Page 3
Table of Contents Introduction 1 GPSMAP 8000 Series Front View 1 Inserting a Memory Card 1 Using the Touchscreen 1 Locking the Touchscreen 1 Tips and Shortcuts 1 GPS Satellite Signals 1 Stations and Station Layouts 1 Customizing the Home Screen 1 Customizing the Layout of a Page 1 Resetting the Station Layouts 2 Adjusting the Backlight 2 Adjusting the Color Mode 2 Charts and 3D Chart Views...
Table of Contents Introduction 1 GPSMAP 8000 Series Front View 1 Inserting a Memory Card 1 Using the Touchscreen 1 Locking the Touchscreen 1 Tips and Shortcuts 1 GPS Satellite Signals 1 Stations and Station Layouts 1 Customizing the Home Screen 1 Customizing the Layout of a Page 1 Resetting the Station Layouts 2 Adjusting the Backlight 2 Adjusting the Color Mode 2 Charts and 3D Chart Views...

Owner's Manual
Page 7
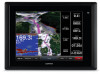
... to add. • To remove an item, select Delete Layout, and select the item to www.garmin.com / aboutGPS. Tips and Shortcuts • Select Home from any screen to return to the Home screen. • Select Menu from any main screen to access additional settings about GPS, go to remove... as several separate displays. Introduction WARNING See the Important Safety and Product Information guide in the product box for the name and symbol. GPSMAP 8000 Series Front View The location of the layout, those changes appear on or off. For more information about that display. With the...
... to add. • To remove an item, select Delete Layout, and select the item to www.garmin.com / aboutGPS. Tips and Shortcuts • Select Home from any screen to return to the Home screen. • Select Menu from any main screen to access additional settings about GPS, go to remove... as several separate displays. Introduction WARNING See the Important Safety and Product Information guide in the product box for the name and symbol. GPSMAP 8000 Series Front View The location of the layout, those changes appear on or off. For more information about that display. With the...

Owner's Manual
Page 32
...the card slot. 2 Select Settings > System > Beeper and Display > Screenshot Capture > On. 3 Go to a screen you by following the instructions on www.garmin.com. 2 Turn on the chartplotter. 3 Insert the memory card into the card slot. 2 Select Info > User Data > Data Transfer > Card > Save ...list, or select Add New File. 4 Select Save to capture. 4 Hold Home for waypoints, routes, and tracks from one chartplotter connected to the Garmin Marine Network to every other chartplotters connected to http: / / my .garmin .com. • Keep the original sales receipt, or a photocopy, in ...
...the card slot. 2 Select Settings > System > Beeper and Display > Screenshot Capture > On. 3 Go to a screen you by following the instructions on www.garmin.com. 2 Turn on the chartplotter. 3 Insert the memory card into the card slot. 2 Select Info > User Data > Data Transfer > Card > Save ...list, or select Add New File. 4 Select Save to capture. 4 Hold Home for waypoints, routes, and tracks from one chartplotter connected to the Garmin Marine Network to every other chartplotters connected to http: / / my .garmin .com. • Keep the original sales receipt, or a photocopy, in ...

Owner's Manual
Page 34
...fuel alarm 17, 24 fuel capacity 17, 24 fuel gauges 17 status alarm 17, 24 synchronizing with actual fuel 17, 24 fuel onboard 24 G Garmin Marine Network 24 gauges engine 17 fuel 17 limits 17 status alarms 17 trip 17 Go To 7 GPS, signals 1 GPS accuracy 24 graphs air... temperature 18 atmospheric pressure 18 configuring 18 depth 18 water temperature 18 wind angle 18 wind speed 18 GRID pairing 22 H hazard colors 6 home screen, customizing 1 K keel offset 24 keyboard 22 L lane width 6 language 22 locking, screen 1 M man overboard 8 marine services 7 mark location 8 MARPA 4 navigation chart ...
...fuel alarm 17, 24 fuel capacity 17, 24 fuel gauges 17 status alarm 17, 24 synchronizing with actual fuel 17, 24 fuel onboard 24 G Garmin Marine Network 24 gauges engine 17 fuel 17 limits 17 status alarms 17 trip 17 Go To 7 GPS, signals 1 GPS accuracy 24 graphs air... temperature 18 atmospheric pressure 18 configuring 18 depth 18 water temperature 18 wind angle 18 wind speed 18 GRID pairing 22 H hazard colors 6 home screen, customizing 1 K keel offset 24 keyboard 22 L lane width 6 language 22 locking, screen 1 M man overboard 8 marine services 7 mark location 8 MARPA 4 navigation chart ...
Owner's Manual
Page 35
... scroll speed 11 surface noise 11 suspended targets 11 views 10 waypoint 10 whiteline 11 zoom 10 SOS 8 stations 1 changing the station 22 customizing the home screen of 1 ordering the displays 22 restoring the layout 2, 22 suspended targets 6 symbols 4 system information 22, 26 T targeting 13 temperature log 18 tide stations 3, 18...
... scroll speed 11 surface noise 11 suspended targets 11 views 10 waypoint 10 whiteline 11 zoom 10 SOS 8 stations 1 changing the station 22 customizing the home screen of 1 ordering the displays 22 restoring the layout 2, 22 suspended targets 6 symbols 4 system information 22, 26 T targeting 13 temperature log 18 tide stations 3, 18...

Quick Start Manual
Page 2
... Overboard > Yes. Map cards allow you can use blank memory cards to transfer data such as waypoints, routes, and tracks to another compatible Garmin chartplotter or a computer. 1 Open the door À on the memory card reader. À Power key Á Automatic backlight sensor Â...can use optional memory cards in the device. Marking and Navigating to turn on or off. GPSMAP 8000 Series Front View The location of the Home screen. You can lock the touchscreen to www.garmin.com / aboutGPS. Select an option: • From any screen, select Mark > Man ...
... Overboard > Yes. Map cards allow you can use blank memory cards to transfer data such as waypoints, routes, and tracks to another compatible Garmin chartplotter or a computer. 1 Open the door À on the memory card reader. À Power key Á Automatic backlight sensor Â...can use optional memory cards in the device. Marking and Navigating to turn on or off. GPSMAP 8000 Series Front View The location of the Home screen. You can lock the touchscreen to www.garmin.com / aboutGPS. Select an option: • From any screen, select Mark > Man ...

