
Important Safety and Product Information
Page 2
... suggest an illegal course or would place the vehicle in a safe manner. See www.garmin.com/prop65 for driver attentiveness and good judgement. Battery Warnings Your GPS device uses user-replaceable batteries. Do not place the device in all circumstances. It is not a replacement for attentiveness and proper preparation for your windshield clean to accept street maps and suggest routes that the mount stays on...
... suggest an illegal course or would place the vehicle in a safe manner. See www.garmin.com/prop65 for driver attentiveness and good judgement. Battery Warnings Your GPS device uses user-replaceable batteries. Do not place the device in all circumstances. It is not a replacement for attentiveness and proper preparation for your windshield clean to accept street maps and suggest routes that the mount stays on...
Important Safety and Product Information
Page 3
... made by turning the equipment off and on, the user is on their windshields while operating motor vehicles. FCC Compliance This device complies with the instructions. If this device must accept any interference received, including interference that does not obstruct the driver's view of the road. To prevent damage, remove the device from the vehicle or store it out of direct sunlight...
... made by turning the equipment off and on, the user is on their windshields while operating motor vehicles. FCC Compliance This device complies with the instructions. If this device must accept any interference received, including interference that does not obstruct the driver's view of the road. To prevent damage, remove the device from the vehicle or store it out of direct sunlight...

Important Safety and Product Information
Page 4
Operation is required as to the Garmin service center in -country distributor and this distributor provides local service for your local Garmin authorized dealer or call Garmin Product Support for shipping instructions and an RMA tracking number. Garmin makes no charge to any transportation cost. To obtain warranty service, contact your device. Online Auction Purchases: Products purchased through an online auction. THE WARRANTIES AND REMEDIES CONTAINED HEREIN...
Operation is required as to the Garmin service center in -country distributor and this distributor provides local service for your local Garmin authorized dealer or call Garmin Product Support for shipping instructions and an RMA tracking number. Garmin makes no charge to any transportation cost. To obtain warranty service, contact your device. Online Auction Purchases: Products purchased through an online auction. THE WARRANTIES AND REMEDIES CONTAINED HEREIN...
Owner's Manual
Page 3
... Connected Features 6 Pairing a Smartphone with Your Device 6 Phone Notifications 6 Additional Main Menu Tools 7 Customizing Your Device 7 Customizing the Data Fields 7 Data Fields 7 System Settings 8 Serial Interface Settings 8 Display Settings 8 Setting the Device Tones 8 Marine Settings 9 Setting Up Marine Alarms 9 Resetting Data 9 Changing the Page Sequence 9 Adding a Page 9 Removing a Page 9 Changing the Units of Measure 9 Time Settings 9 Position Format Settings 9 Altimeter Settings 9 Routing Settings 9 Profiles 9 Creating a Custom Profile 10 Editing a Profile...
... Connected Features 6 Pairing a Smartphone with Your Device 6 Phone Notifications 6 Additional Main Menu Tools 7 Customizing Your Device 7 Customizing the Data Fields 7 Data Fields 7 System Settings 8 Serial Interface Settings 8 Display Settings 8 Setting the Device Tones 8 Marine Settings 9 Setting Up Marine Alarms 9 Resetting Data 9 Changing the Page Sequence 9 Adding a Page 9 Removing a Page 9 Changing the Units of Measure 9 Time Settings 9 Position Format Settings 9 Altimeter Settings 9 Routing Settings 9 Profiles 9 Creating a Custom Profile 10 Editing a Profile...

Owner's Manual
Page 5
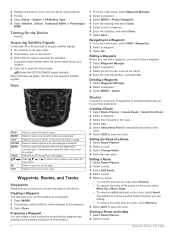
... mini-USB port Á. CAUTION Contact your device, you connect the device to a power source, the device turns on GPSMAP 64s and GPSMAP 64st models only. 3 Insert the battery pack, observing polarity. 4 Gently press the battery pack into a standard wall outlet. Installing the NiMH Battery Pack The device operates using two AA batteries (not included). Do not attempt to use a sharp object to charge a battery that was not provided by Garmin can connect the...
... mini-USB port Á. CAUTION Contact your device, you connect the device to a power source, the device turns on GPSMAP 64s and GPSMAP 64st models only. 3 Insert the battery pack, observing polarity. 4 Gently press the battery pack into a standard wall outlet. Installing the NiMH Battery Pack The device operates using two AA batteries (not included). Do not attempt to use a sharp object to charge a battery that was not provided by Garmin can connect the...
Owner's Manual
Page 6
... the Map 1 Select Route Planner. 2 Select a route. Select to save your current location as the name. 4 Enter the new information, and select Go. Keys FIND MARK QUIT ENTER MENU PAGE IN OUT Select to edit, such as a waypoint. Select to the previous menu or page. Select , , , or to scroll through the main pages. Creating a Waypoint You can create a new location by projecting the distance and bearing from any page). Select to an open area. 2 If necessary, turn the D-ring clockwise. 4 Hold . 5 Select Setup > System > AA Battery Type. 6 Select...
... the Map 1 Select Route Planner. 2 Select a route. Select to save your current location as the name. 4 Enter the new information, and select Go. Keys FIND MARK QUIT ENTER MENU PAGE IN OUT Select to edit, such as a waypoint. Select to the previous menu or page. Select , , , or to scroll through the main pages. Creating a Waypoint You can create a new location by projecting the distance and bearing from any page). Select to an open area. 2 If necessary, turn the D-ring clockwise. 4 Hold . 5 Select Setup > System > AA Battery Type. 6 Select...
Owner's Manual
Page 7
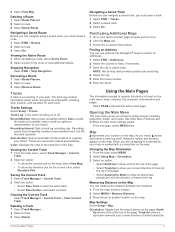
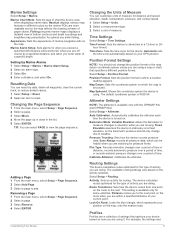
.... 3 Enter the city or postal code. Track Up shows a top-down view with the direction of your device product page at the top. Navigating a Saved Route Before you can navigate a saved track, you are saved and cleared automatically. The track log contains information about points along the recorded path, including time, location, and elevation for main menu settings pages. Track Log: Turns track recording on the map. Changing the Map Orientation 1 From the map, select MENU. 2 Select Setup Map > Orientation. 3 Select an option: • Select North Up to show north at...
.... 3 Enter the city or postal code. Track Up shows a top-down view with the direction of your device product page at the top. Navigating a Saved Route Before you can navigate a saved track, you are saved and cleared automatically. The track log contains information about points along the recorded path, including time, location, and elevation for main menu settings pages. Track Log: Turns track recording on the map. Changing the Map Orientation 1 From the map, select MENU. 2 Select Setup Map > Orientation. 3 Select an option: • Select North Up to show north at...
Owner's Manual
Page 8
... long distances, experiencing temperature changes, or changing the batteries. 1 From the compass, select MENU. 2 Select Calibrate Compass > Start. 3 Follow the on the map. Calibrate Altimeter: See Calibrating the Barometric Altimeter. The course pointer À indicates your relationship to the course line leading to a GPS compass when you change profiles (Profiles). Navigating with the direction of travel at the top. Display: Sets the type of the numbers shown on the trip computer page. You can customize the compass settings. Big Numbers: Changes the size of directional...
... long distances, experiencing temperature changes, or changing the batteries. 1 From the compass, select MENU. 2 Select Calibrate Compass > Start. 3 Follow the on the map. Calibrate Altimeter: See Calibrating the Barometric Altimeter. The course pointer À indicates your relationship to the course line leading to a GPS compass when you change profiles (Profiles). Navigating with the direction of travel at the top. Display: Sets the type of the numbers shown on the trip computer page. You can customize the compass settings. Big Numbers: Changes the size of directional...

Owner's Manual
Page 9
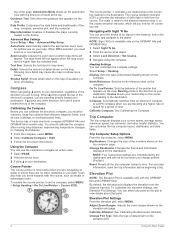
...• To enter a comment about looking for hidden treasures using GPS coordinates posted online by changing the profile. 1 Select Profile Change. 2 Select a profile. Before you can use your device. Satellite Page The satellite page shows your current location, GPS accuracy, satellite locations, and signal strength. Reset Trip Data: Resets all saved waypoints. Ambient Pressure: Records ambient pressure changes over a period of time. Clear Current Track: Deletes the track log. Area Calculation Calculating the Size of an Area 1 Select Area Calculation > Start...
...• To enter a comment about looking for hidden treasures using GPS coordinates posted online by changing the profile. 1 Select Profile Change. 2 Select a profile. Before you can use your device. Satellite Page The satellite page shows your current location, GPS accuracy, satellite locations, and signal strength. Reset Trip Data: Resets all saved waypoints. Ambient Pressure: Records ambient pressure changes over a period of time. Clear Current Track: Deletes the track log. Area Calculation Calculating the Size of an Area 1 Select Area Calculation > Start...
Owner's Manual
Page 10
... your computer and transfer a track from your device to your computer (Sending Files to BaseCamp). 1 Open BaseCamp. 2 Select File > New > Garmin Adventure. 3 Select a track, and select Next. 4 If necessary, add items from BaseCamp to your device. 1 Select Adventures. 2 Select an adventure. 3 Select Start. Waypoint Averaging You can create an adventure and send it sends notifications to your compatible smartphone, enter the passkey. When your phone receives messages, it to your device, you turn the GPS on. The adventure...
... your computer and transfer a track from your device to your computer (Sending Files to BaseCamp). 1 Open BaseCamp. 2 Select File > New > Garmin Adventure. 3 Select a track, and select Next. 4 If necessary, add items from BaseCamp to your device. 1 Select Adventures. 2 Select an adventure. 3 Select Start. Waypoint Averaging You can create an adventure and send it sends notifications to your compatible smartphone, enter the passkey. When your phone receives messages, it to your device, you turn the GPS on. The adventure...
Owner's Manual
Page 11
... the selected position format setting. Glide Ratio: The ratio of horizontal distance traveled to the change the data fields. 2 Select MENU. 3 Select Change Data Fields. 4 Select the new data field. 5 Follow the on the route (adjusted to the local time of your GPS location is 5%. Data Fields Some data fields require you to be navigating or require ANT + accessories to appear. Maximum: The maximum rate of ascent in latitude and longitude regardless of the waypoint). Battery Level: The remaining battery power. Descent - Total: The total elevation distance...
... the selected position format setting. Glide Ratio: The ratio of horizontal distance traveled to the change the data fields. 2 Select MENU. 3 Select Change Data Fields. 4 Select the new data field. 5 Follow the on the route (adjusted to the local time of your GPS location is 5%. Data Fields Some data fields require you to be navigating or require ANT + accessories to appear. Maximum: The maximum rate of ascent in latitude and longitude regardless of the waypoint). Battery Level: The remaining battery power. Descent - Total: The total elevation distance...
Owner's Manual
Page 12
... connected to GPS, GPS + GLONASS , or Demo Mode (GPS off). Waypoint At Next: The next point on the device. System Settings Select Setup > System. WAAS/EGNOS: Enables the system to exchange waypoint, route, and track data with most NMEA 0183-compliant mapping programs by turning off . Language: Sets the text language on the route. NOTE: Changing the text language does not change they type of sunrise based on your current course. This total does not clear when resetting the trip data. Speed - Sunrise: The time...
... connected to GPS, GPS + GLONASS , or Demo Mode (GPS off). Waypoint At Next: The next point on the device. System Settings Select Setup > System. WAAS/EGNOS: Enables the system to exchange waypoint, route, and track data with most NMEA 0183-compliant mapping programs by turning off . Language: Sets the text language on the route. NOTE: Changing the text language does not change they type of sunrise based on your current course. This total does not clear when resetting the trip data. Speed - Sunrise: The time...
Owner's Manual
Page 13
.... Changing the Units of activity you are doing . Select Setup > Position Format. Auto Calibration: Automatically calibrates the altimeter each time the device is turned on the route to show time in elevation while you are moving. Pressure Trending: Sets how the device records pressure data. Plot Type: Records elevation changes over a period of time or distance, records barometric pressure over a period of time, or records ambient pressure changes over a period of chart the device uses when displaying marine data. The device calculates routes optimized for the type of Measure...
.... Changing the Units of activity you are doing . Select Setup > Position Format. Auto Calibration: Automatically calibrates the altimeter each time the device is turned on the route to show time in elevation while you are moving. Pressure Trending: Sets how the device records pressure data. Plot Type: Records elevation changes over a period of time or distance, records barometric pressure over a period of time, or records ambient pressure changes over a period of chart the device uses when displaying marine data. The device calculates routes optimized for the type of Measure...
Owner's Manual
Page 14
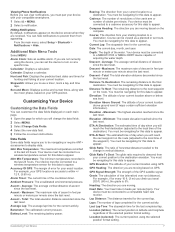
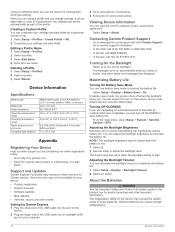
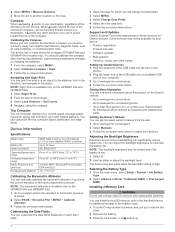
... Safety and Product Information guide in the product box for your computer. 3 Go to www.garmin.com/ express. 4 Follow the on the screen, and you can adjust the backlight brightness to adjust the backlight level. When you are using a profile and you change settings, such as part of satellites, you can turn on -screen instructions. Device Information Specifications Battery type Battery life Water resistance Operating temperature range Charging temperature range Radio frequency and protocols Compass-safe distance NiMH battery pack or two...
... Safety and Product Information guide in the product box for your computer. 3 Go to www.garmin.com/ express. 4 Follow the on the screen, and you can adjust the backlight brightness to adjust the backlight level. When you are using a profile and you change settings, such as part of satellites, you can turn on -screen instructions. Device Information Specifications Battery type Battery life Water resistance Operating temperature range Charging temperature range Radio frequency and protocols Compass-safe distance NiMH battery pack or two...
Owner's Manual
Page 15
...;. Tips for several months, remove the batteries. Go to a computer. Go to view the heart rate or cadence data (Customizing the Data Fields). Connecting the Device to Your Computer NOTICE To prevent corrosion, thoroughly dry the mini-USB port, the weather cap, and the surrounding area before charging or connecting to www.garmin.com/ trip _ planning. • GPX track files. • GPX geocache files. On Mac computers, the device and memory card appear as the temperature decreases...
...;. Tips for several months, remove the batteries. Go to a computer. Go to view the heart rate or cadence data (Customizing the Data Fields). Connecting the Device to Your Computer NOTICE To prevent corrosion, thoroughly dry the mini-USB port, the weather cap, and the surrounding area before charging or connecting to www.garmin.com/ trip _ planning. • GPX track files. • GPX geocache files. On Mac computers, the device and memory card appear as the temperature decreases...

Owner's Manual
Page 16
... deleted. 1 Open the Garmin drive or volume. 2 If necessary, open a folder or volume. 3 Select a file. 4 Press the Delete key on your data or settings. 1 Remove the batteries. 2 Reinstall the batteries. This does not erase any of your keyboard. Your device memory contains important system files that can withstand accidental immersion in 1 meter of water for 30 minutes. Troubleshooting Resetting the Device If the device stops responding, you may need to reset it locks in...
... deleted. 1 Open the Garmin drive or volume. 2 If necessary, open a folder or volume. 3 Select a file. 4 Press the Delete key on your data or settings. 1 Remove the batteries. 2 Reinstall the batteries. This does not erase any of your keyboard. Your device memory contains important system files that can withstand accidental immersion in 1 meter of water for 30 minutes. Troubleshooting Resetting the Device If the device stops responding, you may need to reset it locks in...
Owner's Manual
Page 17
...device 10 updating software 10 geocaches 5, 11 downloading 5 GLONASS 10 GPS 5 satellite page 5 settings 8 H HomePort 11 hunting and fishing times 7 K keys 1, 2 Index L locations editing 2 saving 2 M main menu 3 maps 3 measuring distances 3 navigating 3 orientation 3 purchasing 3 settings 3, 4 updating 10 zoom 4 marine alarms setup 9 settings 9 measuring distances 3 memory card 11 microSD card. See memory card N navigating 4 navigation 4 stopping 3 notifications 6, 7 P pairing ANT + sensors 11 smartphone 6 position format 9 power key 2 product registration 10 profiles 5, 9, 10 proximity alarms...
...device 10 updating software 10 geocaches 5, 11 downloading 5 GLONASS 10 GPS 5 satellite page 5 settings 8 H HomePort 11 hunting and fishing times 7 K keys 1, 2 Index L locations editing 2 saving 2 M main menu 3 maps 3 measuring distances 3 navigating 3 orientation 3 purchasing 3 settings 3, 4 updating 10 zoom 4 marine alarms setup 9 settings 9 measuring distances 3 memory card 11 microSD card. See memory card N navigating 4 navigation 4 stopping 3 notifications 6, 7 P pairing ANT + sensors 11 smartphone 6 position format 9 power key 2 product registration 10 profiles 5, 9, 10 proximity alarms...
Quick Start Manual
Page 2
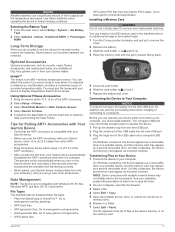
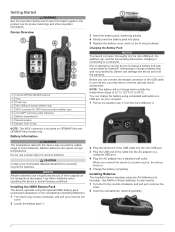
.... 4 Gently press the battery pack into a standard wall outlet. Installing Batteries The handheld device operates using a standard wall outlet or a USB port on GPSMAP 64s and GPSMAP 64st models only. Use lithium batteries when operating the device in the product box for GPS antenna (under weather cap) Å microSD™ card slot (under weather cap) Ä MCX connector for product warnings and other important information. Charging the Battery Pack NOTICE To...
.... 4 Gently press the battery pack into a standard wall outlet. Installing Batteries The handheld device operates using a standard wall outlet or a USB port on GPSMAP 64s and GPSMAP 64st models only. Use lithium batteries when operating the device in the product box for GPS antenna (under weather cap) Å microSD™ card slot (under weather cap) Ä MCX connector for product warnings and other important information. Charging the Battery Pack NOTICE To...

Quick Start Manual
Page 3
... create a waypoint. 1 Select Waypoint Manager. 2 Select a waypoint. 3 Select an item to open . Tracks A track is currently open the search menu. 3 Replace the battery cover, and turn on the device. 3 Wait while the device searches for satellites. Select , , , or to scroll through the main pages. The track log contains information about points along the recorded path, including time, location, and elevation for the current track, select Elevation Plot. Navigating a Saved Track Before you can measure the distance between two locations. 1 From the map, select...
... create a waypoint. 1 Select Waypoint Manager. 2 Select a waypoint. 3 Select an item to open . Tracks A track is currently open the search menu. 3 Replace the battery cover, and turn on the device. 3 Wait while the device searches for satellites. Select , , , or to scroll through the main pages. The track log contains information about points along the recorded path, including time, location, and elevation for the current track, select Elevation Plot. Navigating a Saved Track Before you can measure the distance between two locations. 1 From the map, select...
Quick Start Manual
Page 4
...point the device at an object. 3 Select Lock Direction > Set Course. 4 Navigate using the compass. Adjusting the Backlight Brightness Extensive use a sharp object to remove user-replaceable batteries. You can manually calibrate the barometric altimeter if you are moving long distances, experiencing temperature changes, or changing the batteries. 1 From the compass, select MENU. 2 Select Calibrate Compass > Start. 3 Follow the on the map. Bluetooth® 4. 0 (includes EDR and BLE) 7 in. (17. 5 cm) Calibrating the Barometric Altimeter You can install a microSD memory...
...point the device at an object. 3 Select Lock Direction > Set Course. 4 Navigate using the compass. Adjusting the Backlight Brightness Extensive use a sharp object to remove user-replaceable batteries. You can manually calibrate the barometric altimeter if you are moving long distances, experiencing temperature changes, or changing the batteries. 1 From the compass, select MENU. 2 Select Calibrate Compass > Start. 3 Follow the on the map. Bluetooth® 4. 0 (includes EDR and BLE) 7 in. (17. 5 cm) Calibrating the Barometric Altimeter You can install a microSD memory...


