Owner's Manual
Page 4
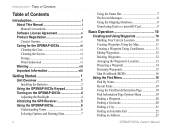
... v Contact Garmin v Caring for the GPSMAP 60CSx vi Cleaning the Case vi Cleaning the Screen vi Storage vi Water Immersion vi Warning vii Important Information viii Getting Started 1 Unit Overview 1 Installing the Batteries 2 Using the GPSMAP 60CSx Keypad 3 Turning on the GPSMAP 60CSx 4 Adjusting the Backlight 4 Initializing the GPS Receiver 5 Using the GPSMAP 60CSx 6 Understanding Terms 6 Selecting Options and Entering Data 7 ii...
... v Contact Garmin v Caring for the GPSMAP 60CSx vi Cleaning the Case vi Cleaning the Screen vi Storage vi Water Immersion vi Warning vii Important Information viii Getting Started 1 Unit Overview 1 Installing the Batteries 2 Using the GPSMAP 60CSx Keypad 3 Turning on the GPSMAP 60CSx 4 Adjusting the Backlight 4 Initializing the GPS Receiver 5 Using the GPSMAP 60CSx 6 Understanding Terms 6 Selecting Options and Entering Data 7 ii...
Owner's Manual
Page 15
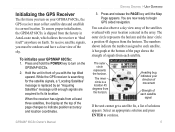
...receiver to begin GPS aided navigation. Select an appropriate solution and press ENTER to each satellite. To ensure proper initialization, the GPSMAP 60CSx is replaced by an "Acquiring Satellites" message until the Map Page appears. You are acquired to indicate position accuracy and location coordinates. While the GPS receiver...page changes to fix its current location. To initialize your GPSMAP 60CSx, the GPS receiver must be outdoors and have a clear view of you turn on Earth. Initializing the GPS Receiver The first time you with your direction of movement Strength ...
...receiver to begin GPS aided navigation. Select an appropriate solution and press ENTER to each satellite. To ensure proper initialization, the GPSMAP 60CSx is replaced by an "Acquiring Satellites" message until the Map Page appears. You are acquired to indicate position accuracy and location coordinates. While the GPS receiver...page changes to fix its current location. To initialize your GPSMAP 60CSx, the GPS receiver must be outdoors and have a clear view of you turn on Earth. Initializing the GPS Receiver The first time you with your direction of movement Strength ...

Owner's Manual
Page 20
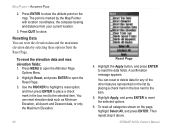
...in your GPS. To accept the waypoint with your current location to open the on the Map Page, or enter coordinates for a waypoint manually. OR To change any information on the Mark Waypoint Page, highlight the appropriate field, and press ENTER to create a new waypoint. After entering and ... appears. Marking Your Current Location Use the MARK key to mark your current location. 10 To mark your changes, highlight OK, and press ENTER. GPSMAP 60CSx Owner's Manual You can press the MARK key while at a location, create a waypoint on -screen keypad. A default three-digit name ...
...in your GPS. To accept the waypoint with your current location to open the on the Map Page, or enter coordinates for a waypoint manually. OR To change any information on the Mark Waypoint Page, highlight the appropriate field, and press ENTER to create a new waypoint. After entering and ... appears. Marking Your Current Location Use the MARK key to mark your current location. 10 To mark your changes, highlight OK, and press ENTER. GPSMAP 60CSx Owner's Manual You can press the MARK key while at a location, create a waypoint on -screen keypad. A default three-digit name ...

Owner's Manual
Page 21
... the Location field, and press ENTER to create a waypoint. GPSMAP 60CSx Owner's Manual 11 On the Map Page, use the ROCKER to move the arrow over a map item, you want to create a user waypoint here?" Basic Operation > Basic Operation Creating Waypoints Using the Map You can manually enter location coordinates to open the on -screen...
... the Location field, and press ENTER to create a waypoint. GPSMAP 60CSx Owner's Manual 11 On the Map Page, use the ROCKER to move the arrow over a map item, you want to create a user waypoint here?" Basic Operation > Basic Operation Creating Waypoints Using the Map You can manually enter location coordinates to open the on -screen...

Owner's Manual
Page 22
... make changes. 5. Basic Operation > Basic Operation 3. Manually enter waypoint coordinates 4. The Waypoint Page opens. 4. Deleting Waypoints You can change the symbol, name, note, location, elevation, and depth. Highlight the Waypoints icon, and press ENTER to edit, and press ENTER. GPSMAP 60CSx Owner's Manual Highlight OK, and press ENTER when finished. You can delete waypoints from the unit...
... make changes. 5. Basic Operation > Basic Operation 3. Manually enter waypoint coordinates 4. The Waypoint Page opens. 4. Deleting Waypoints You can change the symbol, name, note, location, elevation, and depth. Highlight the Waypoints icon, and press ENTER to edit, and press ENTER. GPSMAP 60CSx Owner's Manual Highlight OK, and press ENTER when finished. You can delete waypoints from the unit...
Owner's Manual
Page 70
... show the altitude point on the map. Then repeat step 5 above. GPSMAP 60CSx Owner's Manual Press QUIT to reset the selected options. 6. A confirmation message appears. Press MENU to the item. 5. Highlight Apply, and press ENTER to close. To reset all Ascent and Descent data, or only the Maximum ...the elevation data and the maximum elevation data by the Map Pointer with location coordinates, the compass bearing and distance from the Reset Page. Use the ROCKER to highlight a reset option, and then press ENTER to place a check mark in the box next to open the Reset Page...
... show the altitude point on the map. Then repeat step 5 above. GPSMAP 60CSx Owner's Manual Press QUIT to reset the selected options. 6. A confirmation message appears. Press MENU to the item. 5. Highlight Apply, and press ENTER to close. To reset all Ascent and Descent data, or only the Maximum ...the elevation data and the maximum elevation data by the Map Pointer with location coordinates, the compass bearing and distance from the Reset Page. Use the ROCKER to highlight a reset option, and then press ENTER to place a check mark in the box next to open the Reset Page...

Owner's Manual
Page 83
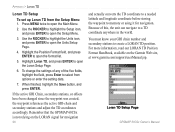
...icon, and press ENTER. • Anchor Drag Alarm-sets an alarm to sound when you exceed a specified drift distance. • Off Course Alarm-sets an alarm to set the time format, set the time zone, and set distance off course. • Deep Water Alarm/Shallow Water Alarm- GPSMAP 60CSx Owner's Manual ...; Time Format-sets 12 or 24 hour format. • Time Zone-sets the time zone for your city so the GPSMAP 60CSx shows the correct local time. Time Setup Marine Setup Use the Marine Setup Page to manually enter a Universal Time Coordinate. Time Setup Use the Time Setup Page to sound when you...
...icon, and press ENTER. • Anchor Drag Alarm-sets an alarm to sound when you exceed a specified drift distance. • Off Course Alarm-sets an alarm to set the time format, set the time zone, and set distance off course. • Deep Water Alarm/Shallow Water Alarm- GPSMAP 60CSx Owner's Manual ...; Time Format-sets 12 or 24 hour format. • Time Zone-sets the time zone for your city so the GPSMAP 60CSx shows the correct local time. Time Setup Marine Setup Use the Marine Setup Page to manually enter a Universal Time Coordinate. Time Setup Use the Time Setup Page to sound when you...

Owner's Manual
Page 84
The default format is not an actual map built into the unit. The default setting is shown. GPSMAP 60CSx Owner's Manual Units icon • Position Format-sets the coordinate system in degrees, minutes, and thousandths of measurement to show your speed and distance traveled. • Elevation (Vert. ...which a particular location is WGS 84. To access the Units Setup Page: On the Setup Menu Page, highlight the Units icon, and press ENTER. For more information about selecting Position Formats and Map Datums, see page 99. • Distance/Speed-sets the unit of a minute (hdddomm...
The default format is not an actual map built into the unit. The default setting is shown. GPSMAP 60CSx Owner's Manual Units icon • Position Format-sets the coordinate system in degrees, minutes, and thousandths of measurement to show your speed and distance traveled. • Elevation (Vert. ...which a particular location is WGS 84. To access the Units Setup Page: On the Setup Menu Page, highlight the Units icon, and press ENTER. For more information about selecting Position Formats and Map Datums, see page 99. • Distance/Speed-sets the unit of a minute (hdddomm...

Owner's Manual
Page 88
...coordinating a group or cargo drop. You can be set the type of jump options. 2. A list of abbreviations and acronyms for Jumpmaster settings can set the Jumpmaster to land. 78 GPSMAP 60CSx Owner's Manual To set for experienced skydivers. To access the Jumpmaster: On the Setup Menu Page, highlight the Jumpmaster icon, and press ENTER.... Highlight the Jump Type field, and press Enter to begin ...
...coordinating a group or cargo drop. You can be set the type of jump options. 2. A list of abbreviations and acronyms for Jumpmaster settings can set the Jumpmaster to land. 78 GPSMAP 60CSx Owner's Manual To set for experienced skydivers. To access the Jumpmaster: On the Setup Menu Page, highlight the Jumpmaster icon, and press ENTER.... Highlight the Jump Type field, and press Enter to begin ...
Owner's Manual
Page 108
... actually converts the TD coordinate to a needed latitude and longitude coordinate before storing the waypoint to create a LORAN TD position. Use the ROCKER to highlight the Setup icon, and press ENTER to open the Loran Setup Page. 6. Remember that the GPSMAP 60CSx is not relying on the Garmin Web site, at www.garmin.com/support/userManual.jsp...
... actually converts the TD coordinate to a needed latitude and longitude coordinate before storing the waypoint to create a LORAN TD position. Use the ROCKER to highlight the Setup icon, and press ENTER to open the Loran Setup Page. 6. Remember that the GPSMAP 60CSx is not relying on the Garmin Web site, at www.garmin.com/support/userManual.jsp...
Quick Reference Guide
Page 1
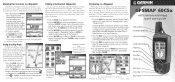
... and maps quick start guide GPS Antenna Power/Backlight Key Color LCD Display In/Out (Zoom) Keys Page Key Rocker Key Find Key Mark Key Quit Key Enter Key Menu Key Compass Page Map Page Trip Computer © Copyright 2005 Garmin Ltd. Press and release the...the map page or navigate to display the list of recording, location coordinates, and if available elevation and depth. 2. N, S, E, W). A Printed in Taiwan ® GPSMAP 60CSx with the Compass or Map Page displayed, then select "Stop Navigation" and press ENTER. A destination can be any item from the Find Feature database. ...
... and maps quick start guide GPS Antenna Power/Backlight Key Color LCD Display In/Out (Zoom) Keys Page Key Rocker Key Find Key Mark Key Quit Key Enter Key Menu Key Compass Page Map Page Trip Computer © Copyright 2005 Garmin Ltd. Press and release the...the map page or navigate to display the list of recording, location coordinates, and if available elevation and depth. 2. N, S, E, W). A Printed in Taiwan ® GPSMAP 60CSx with the Compass or Map Page displayed, then select "Stop Navigation" and press ENTER. A destination can be any item from the Find Feature database. ...
Quick Reference Guide
Page 2
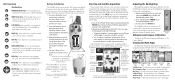
...Press twice to increase the brightness level. 3. Battery Installation The GPSMAP 60CSx operates on -screen keyboard to enter highlighted options, data or confirm on the Map Page so ... away from the back of brightness. 1. Displays a map and references your location coordinates, position accuracy, a view of the satellites overhead, and bar graph showing the signal...GPS Elevation Overhead Satellite not yet received Satellite signal strength bars Satellite Page Displays your movements. Refer to Display Setup in position over 600 miles since last using the GPSMAP 60CSx...
...Press twice to increase the brightness level. 3. Battery Installation The GPSMAP 60CSx operates on -screen keyboard to enter highlighted options, data or confirm on the Map Page so ... away from the back of brightness. 1. Displays a map and references your location coordinates, position accuracy, a view of the satellites overhead, and bar graph showing the signal...GPS Elevation Overhead Satellite not yet received Satellite signal strength bars Satellite Page Displays your movements. Refer to Display Setup in position over 600 miles since last using the GPSMAP 60CSx...


