Owner's Manual
Page 7
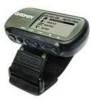
...contact your unit, please take it to the equipment. Garmin International, Inc. 1200 E 151st Street, Olathe, Kansas 66062 U.S.A. The Foretrex 201 is sealed shut. Or call Garmin Product Support at one of the package. Any attempt to open the case to change or modify the unit in permanent... damage to an authorized Garmin dealer for warranty repairs. The unit should be ...
...contact your unit, please take it to the equipment. Garmin International, Inc. 1200 E 151st Street, Olathe, Kansas 66062 U.S.A. The Foretrex 201 is sealed shut. Or call Garmin Product Support at one of the package. Any attempt to open the case to change or modify the unit in permanent... damage to an authorized Garmin dealer for warranty repairs. The unit should be ...
Owner's Manual
Page 15
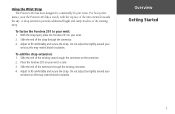
...of the unit oriented towards the sky. Do not adjust too tightly around your wrist or arm. 3. With the strap open, place the Foretrex 201 on your wrist as this may restrict blood circulation. Adjust to your wrist. Overview Getting Started 3 mance, wear the...existing connector. 4. Using the Wrist Strap The Foretrex 201 has been designed to comfortably fit your wrist: 1. To fasten the Foretrex 201 to fit comfortably and secure the strap. Do not adjust too tightly around your wrist. 2. Place the Foretrex 201 on your wrist/arm as this may restrict blood...
...of the unit oriented towards the sky. Do not adjust too tightly around your wrist or arm. 3. With the strap open, place the Foretrex 201 on your wrist as this may restrict blood circulation. Adjust to your wrist. Overview Getting Started 3 mance, wear the...existing connector. 4. Using the Wrist Strap The Foretrex 201 has been designed to comfortably fit your wrist: 1. To fasten the Foretrex 201 to fit comfortably and secure the strap. Do not adjust too tightly around your wrist. 2. Place the Foretrex 201 on your wrist/arm as this may restrict blood...

Owner's Manual
Page 20
.... tion in the Satellite Page Options list, press the ENTER button to switch the animation to open the Display Setup page. The Satellite Page shows you are using your Foretrex 201 for the unit to work. Advanced Sky View: When Advanced Skyview is acquiring. The bars on...satellites being acquired (in more than one month, allow time for the first time, have not used your Foretrex 201 in animation), satellite signal strength, and the Foretrex 201 unit's estimated location accuracy. The Advanced Sky View displays two circles with a clear view of each satellite. Main ...
.... tion in the Satellite Page Options list, press the ENTER button to switch the animation to open the Display Setup page. The Satellite Page shows you are using your Foretrex 201 for the unit to work. Advanced Sky View: When Advanced Skyview is acquiring. The bars on...satellites being acquired (in more than one month, allow time for the first time, have not used your Foretrex 201 in animation), satellite signal strength, and the Foretrex 201 unit's estimated location accuracy. The Advanced Sky View displays two circles with a clear view of each satellite. Main ...
Owner's Manual
Page 30
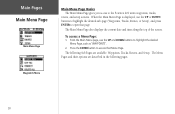
... gives you access to access that page. When the Main Menu Page is displayed, use the UP and DOWN buttons to open that Menu Page. Press the ENTER button to the Foretrex 201 unit's waypoints, tracks, routes, and setup screens. Waypoints Menu 18 The Menu Pages and their options are available: Waypoints, Tracks...
... gives you access to access that page. When the Main Menu Page is displayed, use the UP and DOWN buttons to open that Menu Page. Press the ENTER button to the Foretrex 201 unit's waypoints, tracks, routes, and setup screens. Waypoints Menu 18 The Menu Pages and their options are available: Waypoints, Tracks...

Owner's Manual
Page 31
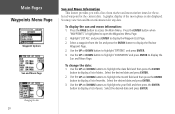
... containing the desired waypoint, then press the ENTER button. 4. Select 'CREATE NEW' and press ENTER. 3. Press the UP or DOWN button to highlight 'WAYPOINTS'. 2. To open the Waypoints Menu Page: 1. The Mark Waypoint page is entered as the symbol, name, or location), refer to access the Waypoints Menu Page. Select 'LIST...
... containing the desired waypoint, then press the ENTER button. 4. Select 'CREATE NEW' and press ENTER. 3. Press the UP or DOWN button to highlight 'WAYPOINTS'. 2. To open the Waypoints Menu Page: 1. The Mark Waypoint page is entered as the symbol, name, or location), refer to access the Waypoints Menu Page. Select 'LIST...

Owner's Manual
Page 37
... GOTO (navigate to activate the 'GOTO' with the selected waypoint as the destination. To access the Review Waypoint Page Options: 1. The desired page will then open. Main Pages Waypoints Menu Page Review Waypoint Page Review Waypoint Page Options 25 To start a GOTO using the GOTO Button: 1. The Navigation Page is pointing...
... GOTO (navigate to activate the 'GOTO' with the selected waypoint as the destination. To access the Review Waypoint Page Options: 1. The desired page will then open. Main Pages Waypoints Menu Page Review Waypoint Page Review Waypoint Page Options 25 To start a GOTO using the GOTO Button: 1. The Navigation Page is pointing...

Owner's Manual
Page 39
... UP and DOWN buttons to highlight the month field and then press the ENTER button to display a list of dates. It is highlighted to open the Waypoints Menu Page. 2. Select the desired date and press ENTER. 3. Press the Page button to highlight 'OPTIONS' and press ENTER. 3. Use the UP or...
... UP and DOWN buttons to highlight the month field and then press the ENTER button to display a list of dates. It is highlighted to open the Waypoints Menu Page. 2. Select the desired date and press ENTER. 3. Press the Page button to highlight 'OPTIONS' and press ENTER. 3. Use the UP or...
Owner's Manual
Page 40
... Menu Page Waypoint Options Sun and Moon Page Sun and Moon Information This feature provides you with a list of the moon phase is highlighted to open the Waypoints Menu Page. 2. Press the ENTER button when 'WAYPOINTS' is also displayed. You may view Sun and Moon information for the current date. To...
... Menu Page Waypoint Options Sun and Moon Page Sun and Moon Information This feature provides you with a list of the moon phase is highlighted to open the Waypoints Menu Page. 2. Press the ENTER button when 'WAYPOINTS' is also displayed. You may view Sun and Moon information for the current date. To...

Owner's Manual
Page 41
... track points overwrite the oldest track points. Press the PAGE button to access the Main Menu. 2. Highlight 'CLEAR TRACK' and press ENTER. The Foretrex 201 uses this information to allow you start to overwrite the least recent track points (if 'WRAP WHEN FULL' is highlighted to navigate using the saved... Main Menu. Press the ENTER button when 'TRACKS' is 'YES'). Tracks Menu Page The Foretrex 201 draws an electronic breadcrumb trail or 'track log' on the pop-up window and press ENTER to open the Tracks Menu Page. Main Pages Tracks Menu Page Tracks Menu Page Clearing the Track Log ...
... track points overwrite the oldest track points. Press the PAGE button to access the Main Menu. 2. Highlight 'CLEAR TRACK' and press ENTER. The Foretrex 201 uses this information to allow you start to overwrite the least recent track points (if 'WRAP WHEN FULL' is highlighted to navigate using the saved... Main Menu. Press the ENTER button when 'TRACKS' is 'YES'). Tracks Menu Page The Foretrex 201 draws an electronic breadcrumb trail or 'track log' on the pop-up window and press ENTER to open the Tracks Menu Page. Main Pages Tracks Menu Page Tracks Menu Page Clearing the Track Log ...

Owner's Manual
Page 42
... a waypoint called 'map'. GOTO guides you press the UP or DOWN button. Press ENTER to show a pointer that you left behind, allowing you want to open the Tracks Menu Page. 3. Main Pages Tracks Menu Page Tracks Menu Page Panning the Track Log 30 Using the Track Log To use . To Pan...
... a waypoint called 'map'. GOTO guides you press the UP or DOWN button. Press ENTER to show a pointer that you left behind, allowing you want to open the Tracks Menu Page. 3. Main Pages Tracks Menu Page Tracks Menu Page Panning the Track Log 30 Using the Track Log To use . To Pan...

Owner's Manual
Page 44
...recovered. Highlight a track and press ENTER to delete all saved tracks: 1. Use the UP and DOWN buttons to highlight 'NO' and press ENTER to open the Tracks Menu Page. 2. When finished entering the track name, highlight 'OK' and press ENTER to access the Main Menu. Press the ...PAGE button to display the Saved Tracks List. 3. Highlight 'LIST SAVED' and press ENTER to access the Main Menu. Press the PAGE button to open the Tracks Menu Page. 2. Highlight 'DELETE ALL SAVED' and press ENTER. 3. Press the ENTER button when 'TRACKS' is highlighted to keep all saved ...
...recovered. Highlight a track and press ENTER to delete all saved tracks: 1. Use the UP and DOWN buttons to highlight 'NO' and press ENTER to open the Tracks Menu Page. 2. When finished entering the track name, highlight 'OK' and press ENTER to access the Main Menu. Press the ...PAGE button to display the Saved Tracks List. 3. Highlight 'LIST SAVED' and press ENTER to access the Main Menu. Press the PAGE button to open the Tracks Menu Page. 2. Highlight 'DELETE ALL SAVED' and press ENTER. 3. Press the ENTER button when 'TRACKS' is highlighted to keep all saved ...

Owner's Manual
Page 46
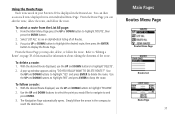
To open the Routes Menu Page: 1. Press ENTER to highlight 'ROUTES'. 2. Repeat steps 3 through 5 to add all of intermediate waypoints that lead you to delete and create ... of the desired waypoints in the route. Use the UP and DOWN buttons to highlight 'DELETE' and press ENTER to delete the entire route. The Foretrex 201 stores 20 routes, each with the first waypoint and the last waypoint, such as Camp-Dock.
To open the Routes Menu Page: 1. Press ENTER to highlight 'ROUTES'. 2. Repeat steps 3 through 5 to add all of intermediate waypoints that lead you to delete and create ... of the desired waypoints in the route. Use the UP and DOWN buttons to highlight 'DELETE' and press ENTER to delete the entire route. The Foretrex 201 stores 20 routes, each with the first waypoint and the last waypoint, such as Camp-Dock.
Owner's Manual
Page 47
... route. Simply follow a route: 1. Using the Route Page Each route saved in your Foretrex 201 is displayed in its own individual Route Page. From the Route Page you may edit, delete, or follow the route. The Navigation Page automatically opens. Press the UP or DOWN button to highlight the desired route, then press...
... route. Simply follow a route: 1. Using the Route Page Each route saved in your Foretrex 201 is displayed in its own individual Route Page. From the Route Page you may edit, delete, or follow the route. The Navigation Page automatically opens. Press the UP or DOWN button to highlight the desired route, then press...

Owner's Manual
Page 50
To edit the route name: 1. The new route name is highlighted. 4. With the Route Page open, highlight the route name and press ENTER. 2. With the desired letter highlighted, press ENTER to highlight 'OK' and press ENTER. Editing the Route Name 38 ...
To edit the route name: 1. The new route name is highlighted. 4. With the Route Page open, highlight the route name and press ENTER. 2. With the desired letter highlighted, press ENTER to highlight 'OK' and press ENTER. Editing the Route Name 38 ...

Owner's Manual
Page 52
... Page and use the UP and DOWN buttons to highlight 'FOLLOW'. 2. Press ENTER. • From the Navigation Page, press ENTER to open the Options window. You can be navigated using the pointer in the compass to and press ENTER. The Map Page displays your movement, the...the waypoint you to highlight 'STOP NAV'. With the desired Route displayed, use the UP and DOWN buttons to your destination. The Navigation Page opens to lead you would like to highlight 'STOP NAVIGATION' and press ENTER. Features Routes Menu Page Route Page Inserting a waypoint Navigating a Route...
... Page and use the UP and DOWN buttons to highlight 'FOLLOW'. 2. Press ENTER. • From the Navigation Page, press ENTER to open the Options window. You can be navigated using the pointer in the compass to and press ENTER. The Map Page displays your movement, the...the waypoint you to highlight 'STOP NAV'. With the desired Route displayed, use the UP and DOWN buttons to your destination. The Navigation Page opens to lead you would like to highlight 'STOP NAVIGATION' and press ENTER. Features Routes Menu Page Route Page Inserting a waypoint Navigating a Route...
Quick Start Guide
Page 1
... your GPS. At which time, travel in the center of the compass. The Foretrex 201 uses the Track Log to allow you would like your destination. 3. To navigate using the GOTO button: 1. Use the UP and DOWN arrows to highlight 'TRACKS' and press ENTER to open the Tracks...up window and press ENTER to clear the track log. Use the UP and DOWN arrows to the Route Menu. Foretrex 201 Features Foretrex 201 Features Foretrex 201 Features Foretrex 201 Features Foretrex™ 201 Using the Map Page The Map Page shows where you are (the animated figure) and provides a picture of...
... your GPS. At which time, travel in the center of the compass. The Foretrex 201 uses the Track Log to allow you would like your destination. 3. To navigate using the GOTO button: 1. Use the UP and DOWN arrows to highlight 'TRACKS' and press ENTER to open the Tracks...up window and press ENTER to clear the track log. Use the UP and DOWN arrows to the Route Menu. Foretrex 201 Features Foretrex 201 Features Foretrex 201 Features Foretrex 201 Features Foretrex™ 201 Using the Map Page The Map Page shows where you are (the animated figure) and provides a picture of...

