Owner's Manual
Page 11
...viii Table of Contents ix Overview 1-7 Getting Started 1 Foretrex 201 Overview 1 Using the Buttons 2 Using the Wrist Strap 3 Charging the Battery 5 Connecting the Foretrex 201 to your Computer 5 Turning on the Foretrex 201 6 Using the Main Pages 7 Switching Between the Main... Pages.... 7 Main Pages 8-53 Satellite Page 8 Using the Satellite Page 8 Using the Satellite Page Options........ 8 Adjusting the Backlighting and Contrast 9 Map Page 10 Using the Map Page 10 Map...
...viii Table of Contents ix Overview 1-7 Getting Started 1 Foretrex 201 Overview 1 Using the Buttons 2 Using the Wrist Strap 3 Charging the Battery 5 Connecting the Foretrex 201 to your Computer 5 Turning on the Foretrex 201 6 Using the Main Pages 7 Switching Between the Main... Pages.... 7 Main Pages 8-53 Satellite Page 8 Using the Satellite Page 8 Using the Satellite Page Options........ 8 Adjusting the Backlighting and Contrast 9 Map Page 10 Using the Map Page 10 Map...
Owner's Manual
Page 12
... Menu: Set Display 46 Set Display Page 46 Light Timeout 46 Contrast 46 Setup Menu: Set Units 47 Set Units Page 47 Position Format 47 Map Datums 48 Distance/Speed, Elevation, and Vertical Speed 49 Defaults 49 Setup Menu: Set Heading 50 Set Heading Page 50 North Reference 50 Setup Menu...: Set Interface 51 Set Interface Page 51 Setup Menu: Set System 52 Set System Page 52 GPS Mode 53 Owner Info 53 Appendix 54 Specifications 54 Accessories 55 Data Field Options 56 Index 58
... Menu: Set Display 46 Set Display Page 46 Light Timeout 46 Contrast 46 Setup Menu: Set Units 47 Set Units Page 47 Position Format 47 Map Datums 48 Distance/Speed, Elevation, and Vertical Speed 49 Defaults 49 Setup Menu: Set Heading 50 Set Heading Page 50 North Reference 50 Setup Menu...: Set Interface 51 Set Interface Page 51 Setup Menu: Set System 52 Set System Page 52 GPS Mode 53 Owner Info 53 Appendix 54 Specifications 54 Accessories 55 Data Field Options 56 Index 58

Owner's Manual
Page 14
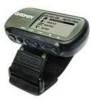
Overview Getting Started 2 foretrex 201 Using the Buttons goto page enter mark POWER GOTO PAGE ENTER/ MARK DOWN UP The POWER button: • Press and hold to turn unit on .../DOWN buttons: • Highlight options on pages and menus • Adjust display contrast on the Satellite Page • Zoom out (UP) and in (DOWN) on Map Page
Overview Getting Started 2 foretrex 201 Using the Buttons goto page enter mark POWER GOTO PAGE ENTER/ MARK DOWN UP The POWER button: • Press and hold to turn unit on .../DOWN buttons: • Highlight options on pages and menus • Adjust display contrast on the Satellite Page • Zoom out (UP) and in (DOWN) on Map Page
Owner's Manual
Page 19
These pages are the Satellite, Map, Navigation, Trip Computer, Timer (if enabled), and Main Menu. Using the Main Pages All of the information needed to switch between pages as shown below. Overview Getting Started Satellite Page Map Page Navigation Page Main Menu Page Timer Page (if enabled) Trip Computer Page 7 Switching Between the Main Pages Simply press the PAGE button to operate the Foretrex 201 is found on six main 'pages' (or display screens).
These pages are the Satellite, Map, Navigation, Trip Computer, Timer (if enabled), and Main Menu. Using the Main Pages All of the information needed to switch between pages as shown below. Overview Getting Started Satellite Page Map Page Navigation Page Main Menu Page Timer Page (if enabled) Trip Computer Page 7 Switching Between the Main Pages Simply press the PAGE button to operate the Foretrex 201 is found on six main 'pages' (or display screens).

Owner's Manual
Page 20
...the ENTER button to switch the animation to open the Display Setup page. The Satellite Page shows you last used your Foretrex 201 unit, or have not used your Foretrex 201 for the first time, have moved over 500 miles from the location you the satellites being acquired (in order... the signal strength of each satellite. Refer to go! The Advanced Sky View displays two circles with a clear view of the map by pressing the ENTER button when 'NORMAL SKYVIEW' is acquiring. tion in animation), satellite signal strength, and the Foretrex 201 unit's estimated location accuracy.
...the ENTER button to switch the animation to open the Display Setup page. The Satellite Page shows you last used your Foretrex 201 unit, or have not used your Foretrex 201 for the first time, have moved over 500 miles from the location you the satellites being acquired (in order... the signal strength of each satellite. Refer to go! The Advanced Sky View displays two circles with a clear view of the map by pressing the ENTER button when 'NORMAL SKYVIEW' is acquiring. tion in animation), satellite signal strength, and the Foretrex 201 unit's estimated location accuracy.
Owner's Manual
Page 22
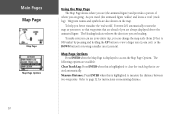
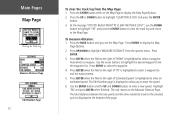
...animated figure. As you are also shown on measuring distance. 10 To help you better visualize the 'real world', Foretrex 201 automatically rotates the map as you move, so that waypoints that is created automatically. The Heading Indicator shows the direction you can see your entire ...Measure Distance: Press ENTER when this is highlighted to page 12 for viewing a smaller area (zoom in). Main Pages Map Page Map Page Map Page Options Using the Map Page The Map Page shows where you are (the animated figure) and provides a picture of you travel (the animated fi...
...animated figure. As you are also shown on measuring distance. 10 To help you better visualize the 'real world', Foretrex 201 automatically rotates the map as you move, so that waypoints that is created automatically. The Heading Indicator shows the direction you can see your entire ...Measure Distance: Press ENTER when this is highlighted to page 12 for viewing a smaller area (zoom in). Main Pages Map Page Map Page Map Page Options Using the Map Page The Map Page shows where you are (the animated figure) and provides a picture of you travel (the animated fi...
Owner's Manual
Page 23
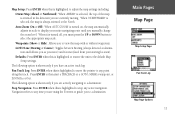
Defaults: Press ENTER when this is highlighted to adjust the map settings including: Orient Map (Ahead or Northward): When 'AHEAD' is selected, the top of the map is oriented in the direction you are using the Foretrex to guide you have an active track log: Pan Track Log: Press ENTER when this ... Press ENTER when this is highlighted to any time you must press the UP or DOWN button to view the map with or without waypoints. When 'NORTHWARD' is selected, the map is turned off, you are currently moving. When it is always oriented to display your starting location). Waypoints (...
Defaults: Press ENTER when this is highlighted to adjust the map settings including: Orient Map (Ahead or Northward): When 'AHEAD' is selected, the top of the map is oriented in the direction you are using the Foretrex to guide you have an active track log: Pan Track Log: Press ENTER when this ... Press ENTER when this is highlighted to any time you must press the UP or DOWN button to view the map with or without waypoints. When 'NORTHWARD' is selected, the map is turned off, you are currently moving. When it is always oriented to display your starting location). Waypoints (...
Owner's Manual
Page 24
... The total distance between the two points and the time needed to travel to the selected point is displayed to enter the speed. 6. Main Pages Map Page Clearing the Track Log Measure Distance Page Edit Number Page 12 To clear the track log from the options menu. At the message "DO... button to the Measure Distance Page. The Edit Number page is displayed at the bottom of 'TO' is highlighted to select a waypoint to display the Map Page Options. 2. The unit returns to highlight 'CLEAR TRACK LOG' and press the ENTER button. 3. Highlight 'OK' and press ENTER when finished. Press ...
... The total distance between the two points and the time needed to travel to the selected point is displayed to enter the speed. 6. Main Pages Map Page Clearing the Track Log Measure Distance Page Edit Number Page 12 To clear the track log from the options menu. At the message "DO... button to the Measure Distance Page. The Edit Number page is displayed at the bottom of 'TO' is highlighted to select a waypoint to display the Map Page Options. 2. The unit returns to highlight 'CLEAR TRACK LOG' and press the ENTER button. 3. Highlight 'OK' and press ENTER when finished. Press ...
Owner's Manual
Page 36
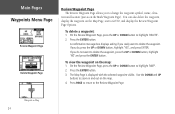
...GOTO, and display the Review Waypoint Page Options. Press the ENTER button. If you do not want to the Review Waypoint Page Waypoint on Map 24 The Map Page is displayed with the selected waypoint visible. You can also delete the waypoint, display the waypoint on the Mark Waypoint Page). If ...you do , press the UP or DOWN button, highlight 'YES', and press ENTER. Press the ENTER button. 3. To view the waypoint on the map: 1. Use the DOWN and UP buttons to change the waypoint symbol, name, eleva- Main Pages Waypoints Menu Page Review Waypoint Page Delete Waypoint Page Review...
...GOTO, and display the Review Waypoint Page Options. Press the ENTER button. If you do not want to the Review Waypoint Page Waypoint on Map 24 The Map Page is displayed with the selected waypoint visible. You can also delete the waypoint, display the waypoint on the Mark Waypoint Page). If ...you do , press the UP or DOWN button, highlight 'YES', and press ENTER. Press the ENTER button. 3. To view the waypoint on the map: 1. Use the DOWN and UP buttons to change the waypoint symbol, name, eleva- Main Pages Waypoints Menu Page Review Waypoint Page Delete Waypoint Page Review...

Owner's Manual
Page 41
...losing track points, save the Track Log when it displays zero percent. Press the PAGE button to clear the track log. Tracks Menu Page The Foretrex 201 draws an electronic breadcrumb trail or 'track log' on the pop-up window and press ENTER to access the Main Menu. 2. For the ...ENTER button when 'TRACKS' is highlighted to open the Tracks Menu Page. 2. Use the UP and DOWN arrows to highlight 'YES' on the Map Page as the Foretrex 201 gets a location fix. The Track Log contains information about points along its path, including time, and position. Use the UP and DOWN ...
...losing track points, save the Track Log when it displays zero percent. Press the PAGE button to clear the track log. Tracks Menu Page The Foretrex 201 draws an electronic breadcrumb trail or 'track log' on the pop-up window and press ENTER to access the Main Menu. 2. For the ...ENTER button when 'TRACKS' is highlighted to open the Tracks Menu Page. 2. Use the UP and DOWN arrows to highlight 'YES' on the Map Page as the Foretrex 201 gets a location fix. The Track Log contains information about points along its path, including time, and position. Use the UP and DOWN ...

Owner's Manual
Page 42
... the UP and DOWN arrows to display the Pan Options: 'TRACBACK', 'GOTO', 'MARK', and 'ZOOM'. If you want to keep a record of map detail viewable. Press the PAGE button to page 21 for later use. You can retrace your current location to the point selected and creates a waypoint... called 'map'. Refer to access the Main Menu. 2. Mark creates a new waypoint for complete information . Zoom adjusts the level of a certain track log or...
... the UP and DOWN arrows to display the Pan Options: 'TRACBACK', 'GOTO', 'MARK', and 'ZOOM'. If you want to keep a record of map detail viewable. Press the PAGE button to page 21 for later use. You can retrace your current location to the point selected and creates a waypoint... called 'map'. Refer to access the Main Menu. 2. Mark creates a new waypoint for complete information . Zoom adjusts the level of a certain track log or...

Owner's Manual
Page 44
... highlighted to save and press ENTER. Use the UP and DOWN buttons pan the track log and select a beginning point for that track: 'NAVIGATE', 'SHOW MAP', 'RENAME', and 'DELETE'. When finished entering the track name, highlight 'OK' and press ENTER to open the Tracks Menu Page. 2. Highlight 'LIST SAVED' and...
... highlighted to save and press ENTER. Use the UP and DOWN buttons pan the track log and select a beginning point for that track: 'NAVIGATE', 'SHOW MAP', 'RENAME', and 'DELETE'. When finished entering the track name, highlight 'OK' and press ENTER to open the Tracks Menu Page. 2. Highlight 'LIST SAVED' and...

Owner's Manual
Page 45
... ENTER to navigate this track. NOTE: Once you have deleted a track, it cannot be recovered. Navigate: Press ENTER to display the track on the Map Page. Edit Track Name Page Delete: Press ENTER to begin navigation from the beginning point or the end point. Select to delete the track. Tracks ...
... ENTER to navigate this track. NOTE: Once you have deleted a track, it cannot be recovered. Navigate: Press ENTER to display the track on the Map Page. Edit Track Name Page Delete: Press ENTER to begin navigation from the beginning point or the end point. Select to delete the track. Tracks ...

Owner's Manual
Page 52
... 2. Route with new waypoint added 40 To follow the arrow in the compass. Use the UP and DOWN buttons to your destination. The Map Page displays your progress on the route. The Navigation Page shows the direction you need to travel to reach the destination. With the desired ...opens to lead you would like to open the Options window. Press ENTER. • From the Navigation Page, press ENTER to travel using the Map Page or the Navigation Page. Features Routes Menu Page Route Page Inserting a waypoint Navigating a Route A Route can also watch your movement, the route...
... 2. Route with new waypoint added 40 To follow the arrow in the compass. Use the UP and DOWN buttons to your destination. The Map Page displays your progress on the route. The Navigation Page shows the direction you need to travel to reach the destination. With the desired ...opens to lead you would like to open the Options window. Press ENTER. • From the Navigation Page, press ENTER to travel using the Map Page or the Navigation Page. Features Routes Menu Page Route Page Inserting a waypoint Navigating a Route A Route can also watch your movement, the route...
Owner's Manual
Page 59
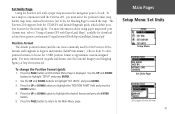
...Pages Setup Menu: Set Units Setup Menu Set Units Page Selecting the Position Format 47 Set Units Page Using the Foretrex 201 with the Foretrex 201, you must select the position format, map datum, map units, and north reference (set in degrees and minutes (hdddº mm.mmm'). Position Format The default ... Press the PAGE button until the Main Menu Page is latitude and longitude in the Set Heading Page) to "Using a Garmin GPS with your Garmin unit, refer to match the map. Use the UP and DOWN buttons to highlight 'SET UNITS' and press ENTER. 3. For more information on grids and datum...
...Pages Setup Menu: Set Units Setup Menu Set Units Page Selecting the Position Format 47 Set Units Page Using the Foretrex 201 with the Foretrex 201, you must select the position format, map datum, map units, and north reference (set in degrees and minutes (hdddº mm.mmm'). Position Format The default ... Press the PAGE button until the Main Menu Page is latitude and longitude in the Set Heading Page) to "Using a Garmin GPS with your Garmin unit, refer to match the map. Use the UP and DOWN buttons to highlight 'SET UNITS' and press ENTER. 3. For more information on grids and datum...

Owner's Manual
Page 60
... which is usually listed in the Foretrex 201 is displayed. You should only change the Map Datum: 1. NOTE: The 'USER' datum is based on datums and coordinate systems. To change the datum if you are using a map with custom-designed grids. Press the PAGE button to return to highlight 'SET...The default datum in the title block of the earth's shape. Main Pages Setup Menu: Set Units Set Units Page Selecting the Map Datum Map Datums A map datum is an advanced feature for unlisted or custom datums. To learn more, check your local library or the Internet for educational materials...
... which is usually listed in the Foretrex 201 is displayed. You should only change the Map Datum: 1. NOTE: The 'USER' datum is based on datums and coordinate systems. To change the datum if you are using a map with custom-designed grids. Press the PAGE button to return to highlight 'SET...The default datum in the title block of the earth's shape. Main Pages Setup Menu: Set Units Set Units Page Selecting the Map Datum Map Datums A map datum is an advanced feature for unlisted or custom datums. To learn more, check your local library or the Internet for educational materials...

Owner's Manual
Page 61
... or DOWN button to highlight the desired unit measurement and press ENTER. 5. Main Pages Setup Menu: Set Units Set Units Page Selecting the Map Datum 49 To set the Foretrex units back to highlight the specific unit ('Distance/Spd', Elevation', or 'VSPD') and press the ENTER button. 4. Use the UP and... change the Distance/Speed, Elevation, or Vertical Speed: 1. Press the UP or DOWN button to the default settings. Distance/Speed, Elevation, and Vertical Speed The Foretrex 201 allows you to customize speed and distance readouts.
... or DOWN button to highlight the desired unit measurement and press ENTER. 5. Main Pages Setup Menu: Set Units Set Units Page Selecting the Map Datum 49 To set the Foretrex units back to highlight the specific unit ('Distance/Spd', Elevation', or 'VSPD') and press the ENTER button. 4. Use the UP and... change the Distance/Speed, Elevation, or Vertical Speed: 1. Press the UP or DOWN button to the default settings. Distance/Speed, Elevation, and Vertical Speed The Foretrex 201 allows you to customize speed and distance readouts.

Owner's Manual
Page 62
... declination changes as degrees (360°). Angle: Select the unit of the grid lines drawn on the map point exactly to the north pole, so the north indicated by the grid lines is chosen, you are...'s surface to true north. Refer to display angle units in mils, a unit of a map's grid. Magnetic North is usually small enough that 'Grid' north can set the unit's System settings to magnetic... north, not true north, maps indicate the difference between Grid North and True North. Because a compass points to the factory defaults...
... declination changes as degrees (360°). Angle: Select the unit of the grid lines drawn on the map point exactly to the north pole, so the north indicated by the grid lines is chosen, you are...'s surface to true north. Refer to display angle units in mils, a unit of a map's grid. Magnetic North is usually small enough that 'Grid' north can set the unit's System settings to magnetic... north, not true north, maps indicate the difference between Grid North and True North. Because a compass points to the factory defaults...
Owner's Manual
Page 63
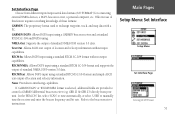
...: Allows DGPS input using a standard RTCM SC-104 format and simple ASCII text output of these formats: GARMIN: The proprietary format used to the beacon receiver instructions. Refer to exchange waypoint, track, and map data with a PC. Main Pages Setup Menu: Set Interface Setup Menu Set Interface Page Selecting the I /O FORMAT') for connecting...
...: Allows DGPS input using a standard RTCM SC-104 format and simple ASCII text output of these formats: GARMIN: The proprietary format used to the beacon receiver instructions. Refer to exchange waypoint, track, and map data with a PC. Main Pages Setup Menu: Set Interface Setup Menu Set Interface Page Selecting the I /O FORMAT') for connecting...
Owner's Manual
Page 69
... Satellites 6 AC Charging Cable 5 Auto Zoom On/Off 11 B Backlighting 9 Battery 5 Life 5, 54 Battery Save 53 Beacon Receiver Setup 51 Bearing 55 Buttons 2 DOWN 2 ENTER 2 GOTO 2, 25 PAGE 2 POWER 2 UP 2 C Cable 5 Charge the... 19, 21, 34 D Data Fields 13, 14, 55, 56 Daylight Savings Time 45 Defaults Map Page 11 Navigation Page 13 Tracks 31 Trip Computer 14 Delete All Waypoints 20, 36 Route 35 Saved...Distance 55 Final ETA 55 Final ETE 55 Follow a Route 35 G GARMIN 51 DGPS 51 Getting Started 1 GOTO 2, 11, 24, 25, 26, 30 GPS 6 GPS Mode 53 H Heading 50, 55 Indicator 10 Hunting and Fishing Information ...
... Satellites 6 AC Charging Cable 5 Auto Zoom On/Off 11 B Backlighting 9 Battery 5 Life 5, 54 Battery Save 53 Beacon Receiver Setup 51 Bearing 55 Buttons 2 DOWN 2 ENTER 2 GOTO 2, 25 PAGE 2 POWER 2 UP 2 C Cable 5 Charge the... 19, 21, 34 D Data Fields 13, 14, 55, 56 Daylight Savings Time 45 Defaults Map Page 11 Navigation Page 13 Tracks 31 Trip Computer 14 Delete All Waypoints 20, 36 Route 35 Saved...Distance 55 Final ETA 55 Final ETE 55 Follow a Route 35 G GARMIN 51 DGPS 51 Getting Started 1 GOTO 2, 11, 24, 25, 26, 30 GPS 6 GPS Mode 53 H Heading 50, 55 Indicator 10 Hunting and Fishing Information ...


