Owner's Manual
Page 3
...Sensors 7 Using the Weight Scale 7 History 7 Viewing Your Ride 7 Viewing Data Totals 7 Sending Your Ride to Garmin Connect 7 Garmin Connect 7 Connected Features 8 Deleting History 8 Data Recording 8 Changing the Data Storage Location 8 Installing a Memory ... Using Auto Scroll 12 Changing the Start Notice 12 System Settings 12 GPS Settings 12 Display Settings 12 Data Recording Settings 12 Changing the Units ... the Device Tones 12 Time Zones 12 Device Information 13 Specifications 13 Edge Specifications 13 Heart Rate Monitor Specifications 13 GSC 10 Specifications 13 Device ...
...Sensors 7 Using the Weight Scale 7 History 7 Viewing Your Ride 7 Viewing Data Totals 7 Sending Your Ride to Garmin Connect 7 Garmin Connect 7 Connected Features 8 Deleting History 8 Data Recording 8 Changing the Data Storage Location 8 Installing a Memory ... Using Auto Scroll 12 Changing the Start Notice 12 System Settings 12 GPS Settings 12 Display Settings 12 Data Recording Settings 12 Changing the Units ... the Device Tones 12 Time Zones 12 Device Information 13 Specifications 13 Edge Specifications 13 Heart Rate Monitor Specifications 13 GSC 10 Specifications 13 Device ...
Owner's Manual
Page 5
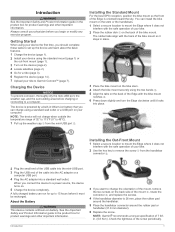
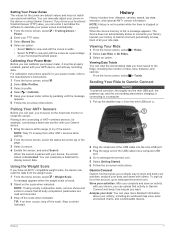
... tabs align with the bike mount notches Â. 6 Press down slightly and turn the Edge clockwise until it does not interfere with the safe operation of the bike mount. Introduction 1... Out-Front Mount 1 Select a secure location to 15 hours before you want to a computer. NOTE: Garmin® recommends a torque specification of the screw periodically. When you can charge using the two bands Á... À from the mini-USB port Á. Installing the Standard Mount For the best GPS reception, position the bike mount so the front of the mount Â, rotate the connector...
... tabs align with the bike mount notches Â. 6 Press down slightly and turn the Edge clockwise until it does not interfere with the safe operation of the bike mount. Introduction 1... Out-Front Mount 1 Select a secure location to 15 hours before you want to a computer. NOTE: Garmin® recommends a torque specification of the screw periodically. When you can charge using the two bands Á... À from the mini-USB port Á. Installing the Standard Mount For the best GPS reception, position the bike mount so the front of the mount Â, rotate the connector...
Owner's Manual
Page 6
... smartphone. For more information about ANT + sensors, see page 5. Viewing the Connections Page The connections page displays the status of the Edge with the bike mount notches Ä. 8 Press down slightly and turn the device on the device, you must acquire satellite signals. ...Select to view the connections page. • Select to configure system settings and profiles (page 10). 1 Hold . 2 Follow the on the GPS position. 2 Introduction The time and date are prompted to search for a ride. Keys Using the Touchscreen • When the timer is searching...
... smartphone. For more information about ANT + sensors, see page 5. Viewing the Connections Page The connections page displays the status of the Edge with the bike mount notches Ä. 8 Press down slightly and turn the device on the device, you must acquire satellite signals. ...Select to view the connections page. • Select to configure system settings and profiles (page 10). 1 Hold . 2 Follow the on the GPS position. 2 Introduction The time and date are prompted to search for a ride. Keys Using the Touchscreen • When the timer is searching...
Owner's Manual
Page 8
... course was completed in 30 minutes, you can race against a Virtual Partner trying to complete the course in green. Tips for Training with GPS track data saved to your device. 1 From the home screen, select > Courses > . 2 Select an activity on which to base ... a course from your device, you can also follow or navigate a particular course. 4 Training NOTE: As soon as normal. • Stay away from Garmin Connect, you are riding, but not follow a saved course, trying to repeat a step one or more times. Deleting a Workout 1 From the home ...
... course was completed in 30 minutes, you can race against a Virtual Partner trying to complete the course in green. Tips for Training with GPS track data saved to your device. 1 From the home screen, select > Courses > . 2 Select an activity on which to base ... a course from your device, you can also follow or navigate a particular course. 4 Training NOTE: As soon as normal. • Stay away from Garmin Connect, you are riding, but not follow a saved course, trying to repeat a step one or more times. Deleting a Workout 1 From the home ...
Owner's Manual
Page 10
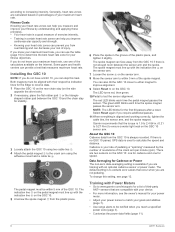
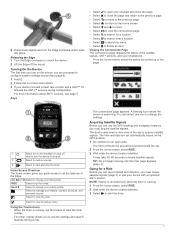
...and health centers can decrease your goals and abilities (page 7). • Use range alerts to www.garmin.com/ intosports for your maximum heart rate, you require additional passes. 11When everything is aligned and working...Å on the Internet. The spoke magnet must be aligned with their respective indication lines for the Edge to receive data. 1 Place the GSC 10 on the rear chain stay (on the sensor arm... arm using the adhesive mount and a cable tie Ã. If there is no GSC 10 paired, GPS data is a good measure of your device. • For more information, see page 12. Data ...
...and health centers can decrease your goals and abilities (page 7). • Use range alerts to www.garmin.com/ intosports for your maximum heart rate, you require additional passes. 11When everything is aligned and working...Å on the Internet. The spoke magnet must be aligned with their respective indication lines for the Edge to receive data. 1 Place the GSC 10 on the rear chain stay (on the sensor arm... arm using the adhesive mount and a cable tie Ã. If there is no GSC 10 paired, GPS data is a good measure of your device. • For more information, see page 12. Data ...
Owner's Manual
Page 11
... more detailed information about your activities: After you must be properly installed, paired with your GPS device, and actively recording data. TIP: If an error occurs, step off the scale ... account, go to display sensor data. Using the Weight Scale If you a simple way to the Edge, including the number of the page. 3 Select a sensor. 4 Enable the sensor, and select ... When the sensor is paired with your device, the sensor status is stopped or paused. Garmin Connect Garmin Connect gives you have saved to store and track your activities, analyze your data, and share...
... more detailed information about your activities: After you must be properly installed, paired with your GPS device, and actively recording data. TIP: If an error occurs, step off the scale ... account, go to display sensor data. Using the Weight Scale If you a simple way to the Edge, including the number of the page. 3 Select a sensor. 4 Enable the sensor, and select ... When the sensor is paired with your device, the sensor status is stopped or paused. Garmin Connect Garmin Connect gives you have saved to store and track your activities, analyze your data, and share...

Owner's Manual
Page 13
From the home screen, select > System > GPS > Mark Location > . Saving Locations from the Map 1 From the home screen, select > . 2 Browse the map for locations, POIs, and cities only). 4 Select a location. 5 Select RIDE. 6 ... Waypoint. 5 Enter the bearing and distance to the projected location. 6 Select . Your device memory contains important system files that should not be deleted. 1 Open the Garmin drive or volume. 2 If necessary, open a folder or volume. 3 Select a file. 4 Press the Delete key on -screen instructions to your destination. Navigation settings also apply...
From the home screen, select > System > GPS > Mark Location > . Saving Locations from the Map 1 From the home screen, select > . 2 Browse the map for locations, POIs, and cities only). 4 Select a location. 5 Select RIDE. 6 ... Waypoint. 5 Enter the bearing and distance to the projected location. 6 Select . Your device memory contains important system files that should not be deleted. 1 Open the Garmin drive or volume. 2 If necessary, open a folder or volume. 3 Select a file. 4 Press the Delete key on -screen instructions to your destination. Navigation settings also apply...
Owner's Manual
Page 15
... are using a speed and cadence sensor or power sensor, select an option: • Select Wheel Size > Automatic to calculate your wheel size using GPS distance. • Select Crank Length > Custom to change it. 9 Select . NOTE: History is not recorded while the timer is running (page ... for your racing profile and you want to see page 16. • Select Crank Length > Automatic to calculate your crank length using GPS distance. • Select Wheel Size > Custom to an activity profile. The activity profile includes customized data pages, alerts, training zones (...
... are using a speed and cadence sensor or power sensor, select an option: • Select Wheel Size > Automatic to calculate your wheel size using GPS distance. • Select Crank Length > Custom to change it. 9 Select . NOTE: History is not recorded while the timer is running (page ... for your racing profile and you want to see page 16. • Select Crank Length > Automatic to calculate your crank length using GPS distance. • Select Wheel Size > Custom to an activity profile. The activity profile includes customized data pages, alerts, training zones (...
Owner's Manual
Page 16
... 11). This feature is helpful for cadence and power data that sends speed and distance data to www.garmin.com / aboutGPS. From the home screen, select > System > GPS > View Satellites. Calibrate Screen: Aligns the screen to properly respond to delay the reminder. Record To:...available unless you have accurate elevation data for satellite signals again. Changing the Start Notice This feature automatically detects when your current GPS satellite information. Smart records key points where you change the amount of measure for distance and speed, elevation, temperature, weight, ...
... 11). This feature is helpful for cadence and power data that sends speed and distance data to www.garmin.com / aboutGPS. From the home screen, select > System > GPS > View Satellites. Calibrate Screen: Aligns the screen to properly respond to delay the reminder. Record To:...available unless you have accurate elevation data for satellite signals again. Changing the Start Notice This feature automatically detects when your current GPS satellite information. Smart records key points where you change the amount of measure for distance and speed, elevation, temperature, weight, ...
Owner's Manual
Page 17
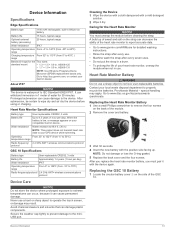
... unsnap the module before using or charging. Device Information 13 Device Information Specifications Edge Specifications Battery type 1100 mAh rechargable, built-in lithium-ion battery Battery life ... recycle the batteries. Replacing the Heart Rate Monitor Battery 1 Use a small Phillips screwdriver to www.garmin.com/ HRMcare for 30 minutes. When the battery is waterproof to 45ºC ) range Bands ...in . Replacing the GSC 10 Battery 1 Locate the circular battery cover À on your GPS device while swimming. Water resistance Water resistant to 98. 4 ft. (30 m) NOTE: ...
... unsnap the module before using or charging. Device Information 13 Device Information Specifications Edge Specifications Battery type 1100 mAh rechargable, built-in lithium-ion battery Battery life ... recycle the batteries. Replacing the Heart Rate Monitor Battery 1 Use a small Phillips screwdriver to www.garmin.com/ HRMcare for 30 minutes. When the battery is waterproof to 45ºC ) range Bands ...in . Replacing the GSC 10 Battery 1 Locate the circular battery cover À on your GPS device while swimming. Water resistance Water resistant to 98. 4 ft. (30 m) NOTE: ...
Owner's Manual
Page 19
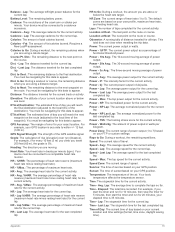
...Avg. Lap: The average cadence for the current activity. Course Pt. Dist. - You must be navigating for the current track or activity. GPS Accuracy: The margin of speed. Your device must be connected to Go: During a workout, the remaining repetitions. HR - Avg. %HRR: ...to Go: During a workout, the amount you are using a calorie target. HR - Power - %FTP: The current power output as a percentage of the GPS satellite signal. Power - Lap: The average speed for this data to within +/- 12 feet (3. 65 m). Sunrise: The time of heart rate (1 to ...
...Avg. Lap: The average cadence for the current activity. Course Pt. Dist. - You must be navigating for the current track or activity. GPS Accuracy: The margin of speed. Your device must be connected to Go: During a workout, the remaining repetitions. HR - Avg. %HRR: ...to Go: During a workout, the amount you are using a calorie target. HR - Power - %FTP: The current power output as a percentage of the GPS satellite signal. Power - Lap: The average speed for this data to within +/- 12 feet (3. 65 m). Sunrise: The time of heart rate (1 to ...
Owner's Manual
Page 21
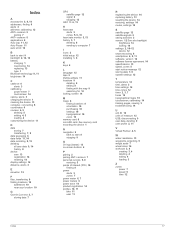
... care 13 registration 14 resetting 14 display settings 12 distance, alerts 3 E elevation 12 F files, transferring 8 finding locations 10 addresses 10 near your location 10 G Garmin Connect 3, 7 storing data 7 GPS satellite page 12 signal 2 stopping 12 GSC 10 6, 13 H heart rate alerts 3 zones 5, 6, 16 heart rate monitor 5, 13 history 3, 7 deleting 8 sending to start...
... care 13 registration 14 resetting 14 display settings 12 distance, alerts 3 E elevation 12 F files, transferring 8 finding locations 10 addresses 10 near your location 10 G Garmin Connect 3, 7 storing data 7 GPS satellite page 12 signal 2 stopping 12 GSC 10 6, 13 H heart rate alerts 3 zones 5, 6, 16 heart rate monitor 5, 13 history 3, 7 deleting 8 sending to start...
Quick Start Manual
Page 2
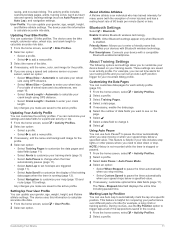
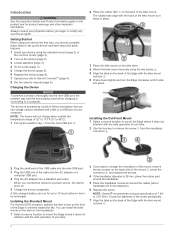
...cable into the AC adapter or a computer USB port. 4 Plug the AC adapter into place. NOTE: Garmin® recommends a torque specification of the bike mount. When you connect the device to Garmin Connect™ (page 4). 8 Get the owner's manual (page 6). Installing the Out-Front Mount 1 ...mount (page 2). 2 Turn on the back of 7 lbfin. (0. 8 N-m). Installing the Standard Mount For the best GPS reception, position the bike mount so the front of the Edge with the safe operation of your ride to a power source, the device turns on. 5 Charge the device completely. The...
...cable into the AC adapter or a computer USB port. 4 Plug the AC adapter into place. NOTE: Garmin® recommends a torque specification of the bike mount. When you connect the device to Garmin Connect™ (page 4). 8 Get the owner's manual (page 6). Installing the Out-Front Mount 1 ...mount (page 2). 2 Turn on the back of 7 lbfin. (0. 8 N-m). Installing the Standard Mount For the best GPS reception, position the bike mount so the front of the Edge with the safe operation of your ride to a power source, the device turns on. 5 Charge the device completely. The...
Quick Start Manual
Page 3
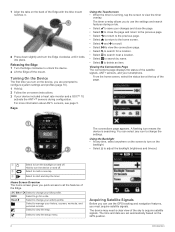
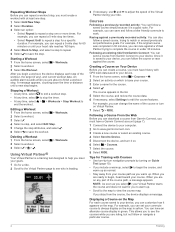
...locates satellites. The timer overlay allows you to manage your bike profile. The device may take 30-60 seconds to turn the Edge clockwise until the timer page appears (page 3). Road Select to start the timer. 3 For more information about ANT + sensors...Select to change your history, courses, workouts, and personal records. Releasing the Edge 1 Turn the Edge clockwise to change your smartphone. Bike 1 Select to unlock the device. 2 Lift the Edge off . Select to use the GPS tracking and navigation features, you quick access to search for a ride.
...locates satellites. The timer overlay allows you to manage your bike profile. The device may take 30-60 seconds to turn the Edge clockwise until the timer page appears (page 3). Road Select to start the timer. 3 For more information about ANT + sensors...Select to change your history, courses, workouts, and personal records. Releasing the Edge 1 Turn the Edge clockwise to change your smartphone. Bike 1 Select to unlock the device. 2 Lift the Edge off . Select to use the GPS tracking and navigation features, you quick access to search for a ride.

Quick Start Manual
Page 4
... go to take advantage of the USB cable into the mini-USB port. 3 Plug the large end of these features. NOTE: Your Edge must have a Garmin Connect account (page 4). 1 Connect the device to your computer. 2 Go to www.garminconnect.com. 3 Create a new course or ...Getting Started. 6 Follow the on-screen instructions. From the home screen, select > System > GPS > Mark Location > . For more detailed information about how to use your Bluetoothenabled smartphone to www.garmin.com/ intosports / apps. Share your activity, including an overhead map view, pace and speed charts...
... go to take advantage of the USB cable into the mini-USB port. 3 Plug the large end of these features. NOTE: Your Edge must have a Garmin Connect account (page 4). 1 Connect the device to your computer. 2 Go to www.garminconnect.com. 3 Create a new course or ...Getting Started. 6 Follow the on-screen instructions. From the home screen, select > System > GPS > Mark Location > . For more detailed information about how to use your Bluetoothenabled smartphone to www.garmin.com/ intosports / apps. Share your activity, including an overhead map view, pace and speed charts...


