Quick Start Manual
Page 1
... documentation and information. © 2008 Garmin Ltd. Press MENU > MENU > Advanced > Find > Dogs. 2. Use the compass page to navigate to ensure maximum accuracy. Select the item in your dog: 1. Using the Compass page to view the Mark Location page. 2. Direction you are currently traveling Bearing pointer (bearing to destination) Bearing Pointer Using the Bearing Pointer The bearing pointer points to your destination, regardless of the dog. Press MARK > New to Navigate To open the Compass page: Press MENU > MENU > Advanced > GPS Applications > Compass. The Map page indicates...
... documentation and information. © 2008 Garmin Ltd. Press MENU > MENU > Advanced > Find > Dogs. 2. Use the compass page to navigate to ensure maximum accuracy. Select the item in your dog: 1. Using the Compass page to view the Mark Location page. 2. Direction you are currently traveling Bearing pointer (bearing to destination) Bearing Pointer Using the Bearing Pointer The bearing pointer points to your destination, regardless of the dog. Press MARK > New to Navigate To open the Compass page: Press MENU > MENU > Advanced > GPS Applications > Compass. The Map page indicates...
Quick Start Manual
Page 2
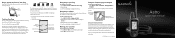
..., the distance away from tall buildings and trees. 2. DC 30 power button Battery charging port LEDs blink red when power is achieved. To charge the DC 30: 1. Battery charging port Dog status icon Name of the DC 30. Follow the prompts to select a brightness level. Press ENTER to setup the Astro. When the bars are black, the Astro 220 has acquired GPS satellite signals. Step 4: Calibrate the Astro 220 Compass Calibrate the compass outdoors. Step...
..., the distance away from tall buildings and trees. 2. DC 30 power button Battery charging port LEDs blink red when power is achieved. To charge the DC 30: 1. Battery charging port Dog status icon Name of the DC 30. Follow the prompts to select a brightness level. Press ENTER to setup the Astro. When the bars are black, the Astro 220 has acquired GPS satellite signals. Step 4: Calibrate the Astro 220 Compass Calibrate the compass outdoors. Step...

Astro and DC 30 Owner's Manual
Page 3
..., or go to www.garmin.com/support/. In the USA contact Garmin Product Support by completing our online registration today! Introduction This manual provides user information for Points of the display backlight (page 4). • To extend the DC 30 battery life, turn the unit off when you are not tracking a dog, or decrease the update rate (page 13). Tips and Shortcuts • Press MENU twice to return to the...
..., or go to www.garmin.com/support/. In the USA contact Garmin Product Support by completing our online registration today! Introduction This manual provides user information for Points of the display backlight (page 4). • To extend the DC 30 battery life, turn the unit off when you are not tracking a dog, or decrease the update rate (page 13). Tips and Shortcuts • Press MENU twice to return to the...
Astro and DC 30 Owner's Manual
Page 4
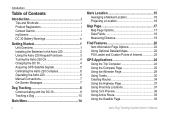
... Getting Started 1 Unit Overview 1 Installing the Batteries in the Astro 220 2 Using the Astro 220 Keypad Functions 3 Turning the Astro 220 On 4 Charging the DC 30 4 Acquiring GPS Satellite Signals 5 Calibrating the Astro 220 Compass 6 Operating the Astro 220 6 Manual Conventions 7 On-Screen Messages 7 Dog Tracking 8 Communicating with the DC 30 8 Tracking a Dog 10 Main Menu 14 ii Mark Location 15 Averaging a Marked Location 16 Projecting a Location 16 Map Page 17 Map Page Options 17 Data Fields 18 Measuring Distance 19 Find Features 20 Item Information...
... Getting Started 1 Unit Overview 1 Installing the Batteries in the Astro 220 2 Using the Astro 220 Keypad Functions 3 Turning the Astro 220 On 4 Charging the DC 30 4 Acquiring GPS Satellite Signals 5 Calibrating the Astro 220 Compass 6 Operating the Astro 220 6 Manual Conventions 7 On-Screen Messages 7 Dog Tracking 8 Communicating with the DC 30 8 Tracking a Dog 10 Main Menu 14 ii Mark Location 15 Averaging a Marked Location 16 Projecting a Location 16 Map Page 17 Map Page Options 17 Data Fields 18 Measuring Distance 19 Find Features 20 Item Information...

Astro and DC 30 Owner's Manual
Page 16
... DC 30 LEDs to avoid conflicting signals and/or the rate of the dog. 10 Astro Dog Tracking System Owner's Manual Settings-allows you to assign a new ID number (page 13) to a dog to blink rapidly for the dog. • Change Dog Unit Type-allows you to your compass (page 6) and hold the Astro 220 level. To ensure maximum compass accuracy, calibrate your dog's neck with the VHF...
... DC 30 LEDs to avoid conflicting signals and/or the rate of the dog. 10 Astro Dog Tracking System Owner's Manual Settings-allows you to assign a new ID number (page 13) to a dog to blink rapidly for the dog. • Change Dog Unit Type-allows you to your compass (page 6) and hold the Astro 220 level. To ensure maximum compass accuracy, calibrate your dog's neck with the VHF...
Astro and DC 30 Owner's Manual
Page 21
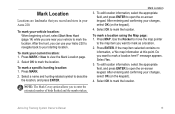
... edit location information, select the appropriate field, and press ENTER to enter the estimated number of birds flushed and the number taken. Press ENTER. Select OK to mark as a location. 2. To mark your vehicle to mark a location here?" Astro Dog Tracking System Owner's Manual 15 After entering and confirming your current location: 1. To mark a specific hunting location: 1. Do you want to mark the location. Mark Location 3. If the map item selected contains no information, a "No map information at this point. To mark your changes, select OK (on -screen...
... edit location information, select the appropriate field, and press ENTER to enter the estimated number of birds flushed and the number taken. Press ENTER. Select OK to mark as a location. 2. To mark your vehicle to mark a location here?" Astro Dog Tracking System Owner's Manual 15 After entering and confirming your current location: 1. To mark a specific hunting location: 1. Do you want to mark the location. Mark Location 3. If the map item selected contains no information, a "No map information at this point. To mark your changes, select OK (on -screen...
Astro and DC 30 Owner's Manual
Page 28
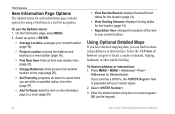
...; View Hunting Almanac-displays Hunting tables for this location (page 14). • Reposition Here-changes the location of an item (page 37). • Add To Route-adds the item on the keypad). 22 Astro Dog Tracking System Owner's Manual Using Optional Detailed Maps If you have detailed mapping data, you are within a specified radius of the item to your current location. Select an option > ENTER: • Average Location-averages your current region. 2. Select...
...; View Hunting Almanac-displays Hunting tables for this location (page 14). • Reposition Here-changes the location of an item (page 37). • Add To Route-adds the item on the keypad). 22 Astro Dog Tracking System Owner's Manual Using Optional Detailed Maps If you have detailed mapping data, you are within a specified radius of the item to your current location. Select an option > ENTER: • Average Location-averages your current region. 2. Select...
Astro and DC 30 Owner's Manual
Page 35
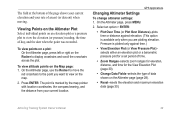
... MENU. 2. Pressure is plotted only against elevation. (This option is marked by the map pointer with location coordinates, the compass bearing, and the distance from your rate of data shown on the map. 2. The field at the bottom of the page shows your current elevation and your current location. GPS Applications Changing Altimeter Settings To change altimeter settings: 1. Viewing Points on the Altimeter Plot Select individual points on an elevation plot or a pressure plot to view on the Altimeter page (page 28). • Reset-resets the elevation...
... MENU. 2. Pressure is plotted only against elevation. (This option is marked by the map pointer with location coordinates, the compass bearing, and the distance from your rate of data shown on the map. 2. The field at the bottom of the page shows your current elevation and your current location. GPS Applications Changing Altimeter Settings To change altimeter settings: 1. Viewing Points on the Altimeter Plot Select individual points on an elevation plot or a pressure plot to view on the Altimeter page (page 28). • Reset-resets the elevation...
Astro and DC 30 Owner's Manual
Page 39
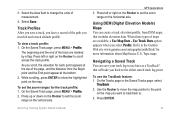
... a track altitude profile. Refer to show the highlighted point on the Rocker to the oldest stored track log point. Select Save. While scrolling, press ENTER to the Garmin Web site www.garmin.com/cartography/ontheTrail/ for more information about MapSource U.S. Astro Dog Tracking System Owner's Manual GPS Applications 3. Use the Rocker to move the map pointer to the point on the horizontal axis. Topo maps. When these types of maps are marked by a flag. Navigating a Saved Track You can create a track elevation profile, from...
... a track altitude profile. Refer to show the highlighted point on the Rocker to the oldest stored track log point. Select Save. While scrolling, press ENTER to the Garmin Web site www.garmin.com/cartography/ontheTrail/ for more information about MapSource U.S. Astro Dog Tracking System Owner's Manual GPS Applications 3. Use the Rocker to move the map pointer to the point on the horizontal axis. Topo maps. When these types of maps are marked by a flag. Navigating a Saved Track You can create a track elevation profile, from...

Astro and DC 30 Owner's Manual
Page 42
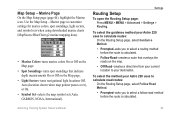
... point. • Distance-Enter a radius. On the Routes page, press MENU. 2. Astro Dog Tracking System Owner's Manual Setting Route Page Options To set route page options for the two data fields at the bottom of the route when MapSource DEM U.S. Press IN to route to the default settings. Topo map data is used. • Copy Route-makes a copy of the route. • Delete Route-deletes the route. • Change Data Fields-selects different values for a specific route: On the Routes page, select a route > MENU. • Remove All-removes all locations from a saved route...
... point. • Distance-Enter a radius. On the Routes page, press MENU. 2. Astro Dog Tracking System Owner's Manual Setting Route Page Options To set route page options for the two data fields at the bottom of the route when MapSource DEM U.S. Press IN to route to the default settings. Topo map data is used. • Copy Route-makes a copy of the route. • Delete Route-deletes the route. • Change Data Fields-selects different values for a specific route: On the Routes page, select a route > MENU. • Remove All-removes all locations from a saved route...
Astro and DC 30 Owner's Manual
Page 43
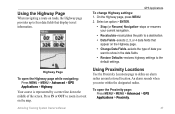
...: Press MENU > MENU > Advanced > GPS Applications > Highway. Using Proximity Locations Use the Proximity Locations page to the default settings. Your course is represented by a center line down the middle of data you enter within the designated radius. Astro Dog Tracking System Owner's Manual GPS Applications To change Highway settings: 1. Select an option > ENTER. • Stop (or Resume) Navigation-stops or resumes your current navigation. • Recalculate-recalculates the path to a destination. • Data Fields-selects 2, 3, or 4 data fields that display travel information...
...: Press MENU > MENU > Advanced > GPS Applications > Highway. Using Proximity Locations Use the Proximity Locations page to the default settings. Your course is represented by a center line down the middle of data you enter within the designated radius. Astro Dog Tracking System Owner's Manual GPS Applications To change Highway settings: 1. Select an option > ENTER. • Stop (or Resume) Navigation-stops or resumes your current navigation. • Recalculate-recalculates the path to a destination. • Data Fields-selects 2, 3, or 4 data fields that display travel information...
Astro and DC 30 Owner's Manual
Page 54
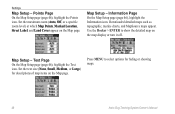
... a specific zoom level) at which Map Points, Marked Location, Street Label, and Land Cover appear on the map display or turn it off. Set the text size (None, Small, Medium, or Large) for hiding or showing maps. 48 Astro Dog Tracking System Owner's Manual Use the Rocker > ENTER to select options for descriptions of map items on the Map page. Points Page On the Map Setup page (page 46), highlight the Points icon. Downloaded detailed maps such as topographic, marine...
... a specific zoom level) at which Map Points, Marked Location, Street Label, and Land Cover appear on the map display or turn it off. Set the text size (None, Small, Medium, or Large) for hiding or showing maps. 48 Astro Dog Tracking System Owner's Manual Use the Rocker > ENTER to select options for descriptions of map items on the Map page. Points Page On the Map Setup page (page 46), highlight the Points icon. Downloaded detailed maps such as topographic, marine...
Astro and DC 30 Owner's Manual
Page 55
... BlueChart g2 marine mapping data). • Marine Colors-turns marine colors On or Off on the Map page. • Spot Soundings-turns spot soundings that overlays the roads on the Map page. • Light Sectors-turns navigational light locations Off, Auto (location shown when map pointer passes over), or On. • Symbol Set-selects the map symbol set (Auto, GARMIN, NOAA, International). Astro Dog Tracking System Owner's Manual 49 Marine Page On the Map Setup page (page 46), highlight the Marine icon. Use the Map Setup -
... BlueChart g2 marine mapping data). • Marine Colors-turns marine colors On or Off on the Map page. • Spot Soundings-turns spot soundings that overlays the roads on the Map page. • Light Sectors-turns navigational light locations Off, Auto (location shown when map pointer passes over), or On. • Symbol Set-selects the map symbol set (Auto, GARMIN, NOAA, International). Astro Dog Tracking System Owner's Manual 49 Marine Page On the Map Setup page (page 46), highlight the Marine icon. Use the Map Setup -
Astro and DC 30 Owner's Manual
Page 57
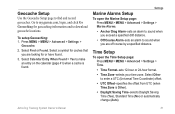
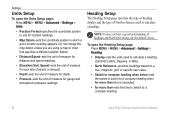
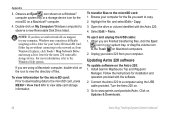
... Course Alarm-sets an alarm to sound when you are off course by a specified distance. Select a symbol for caches that you are looking for geocaching information and to my.garmin.com, login, and click Go Geocaching for or have found . Settings Marine Alarms Setup To open the Time Setup page: Press MENU > MENU > Advanced > Settings > Time. • Time Format-sets 12-hour or 24-hour format. • Time Zone-selects your time zone. Astro Dog Tracking System Owner's Manual 51 Press MENU > MENU > Advanced > Settings > Geocache. 2. To setup Geocaching: 1. Select...
... Course Alarm-sets an alarm to sound when you are off course by a specified distance. Select a symbol for caches that you are looking for geocaching information and to my.garmin.com, login, and click Go Geocaching for or have found . Settings Marine Alarms Setup To open the Time Setup page: Press MENU > MENU > Advanced > Settings > Time. • Time Format-sets 12-hour or 24-hour format. • Time Zone-selects your time zone. Astro Dog Tracking System Owner's Manual 51 Press MENU > MENU > Advanced > Settings > Geocache. 2. To setup Geocaching: 1. Select...
Astro and DC 30 Owner's Manual
Page 58
... a different position format. • Distance/Speed-sets the unit of measure for distance and speed readings. • Elevation (Vert. Heading Setup The Heading Setup page specifies the type of heading display and the type of headings and North referencing, use for more than -sets the time to switch to a compass heading. 52 Astro Dog Tracking System Owner's Manual To open the Units Setup page: Press MENU > MENU > Advanced > Settings > Units. • Position Format-specifies the coordinate system to use the default values. Do not change the map datum unless...
... a different position format. • Distance/Speed-sets the unit of measure for distance and speed readings. • Elevation (Vert. Heading Setup The Heading Setup page specifies the type of heading display and the type of headings and North referencing, use for more than -sets the time to switch to a compass heading. 52 Astro Dog Tracking System Owner's Manual To open the Units Setup page: Press MENU > MENU > Advanced > Settings > Units. • Position Format-specifies the coordinate system to use the default values. Do not change the map datum unless...

Astro and DC 30 Owner's Manual
Page 62
... time you can be loaded with your Astro 220. Appendix Output power: DC 30: 2 watts Optional Accessories To obtain replacements for Astro 220 accessories and for the device. Information about USB Drivers The USB drivers are installed 56 to a microSD Card Some Astro 220 navigation features require detailed mapping data, and you install the MapSource Trip and Waypoint Manager software. Connect the other cable end to enhance your Astro 220. Transferring Data Before connecting your Astro 220 to a computer, install the USB drivers...
... time you can be loaded with your Astro 220. Appendix Output power: DC 30: 2 watts Optional Accessories To obtain replacements for Astro 220 accessories and for the device. Information about USB Drivers The USB drivers are installed 56 to a microSD Card Some Astro 220 navigation features require detailed mapping data, and you install the MapSource Trip and Waypoint Manager software. Connect the other cable end to enhance your Astro 220. Transferring Data Before connecting your Astro 220 to a computer, install the USB drivers...
Astro and DC 30 Owner's Manual
Page 64
... the file, and select Edit > Copy. 3. Open the drive or volume identified with the software. 2. Install Garmin MapSource Trip and Waypoint Manager. To transfer files to the Windows Help system. Unplug your system tray, or drag the volume icon to the network or, from your Astro 220 microSD card. Note: If you want to view the directory of files. Follow the instructions for the Astro 220 removable storage device. For more information, refer...
... the file, and select Edit > Copy. 3. Open the drive or volume identified with the software. 2. Install Garmin MapSource Trip and Waypoint Manager. To transfer files to the Windows Help system. Unplug your system tray, or drag the volume icon to the network or, from your Astro 220 microSD card. Note: If you want to view the directory of files. Follow the instructions for the Astro 220 removable storage device. For more information, refer...
Astro and DC 30 Owner's Manual
Page 70
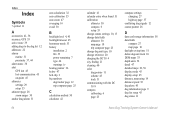
... conflicting dog signals 12 course pointer 26 D data card storage information 58 data fields compass 27 map page 18 daylight saving time 51 delete dog unit track 10 DEM maps 33 depth units 52 detail 47 detailed maps 22, 56 display mode 45 display setup 45 distance, measuring 19 distance/speed 52 dog alerts 45 dog information page 9 dog list setup 45 dog status 11 Astro Dog Tracking System Owner's Manual settings 10, 13 change data fields altimeter 30 map page 18 trip computer page 25 change dog unit type 10 change comm. Index...
... conflicting dog signals 12 course pointer 26 D data card storage information 58 data fields compass 27 map page 18 daylight saving time 51 delete dog unit track 10 DEM maps 33 depth units 52 detail 47 detailed maps 22, 56 display mode 45 display setup 45 distance, measuring 19 distance/speed 52 dog alerts 45 dog information page 9 dog list setup 45 dog status 11 Astro Dog Tracking System Owner's Manual settings 10, 13 change data fields altimeter 30 map page 18 trip computer page 25 change dog unit type 10 change comm. Index...
Astro and DC 30 Owner's Manual
Page 72
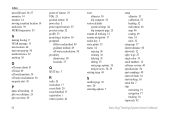
... record method 31 registration i remove points 42 reset altimeter 30 trip computer 25 restore defaults system settings 44 trip computer page 25 resume all tracking 12 resume navigation 17 rocker key 3 route points 35 routes 34 copying 36 creating 34 deleting 35 editing 35 route page options 36 turn previews 38, 39 routing setup 49 S satellite page 39 save 20 selecting options 7 setup altimeter 53 calibration 53 heading 52 main menu 46 map 46 routing 49 time 51 units 52 setup map 17 shorter distance 50 show...
... record method 31 registration i remove points 42 reset altimeter 30 trip computer 25 restore defaults system settings 44 trip computer page 25 resume all tracking 12 resume navigation 17 rocker key 3 route points 35 routes 34 copying 36 creating 34 deleting 35 editing 35 route page options 36 turn previews 38, 39 routing setup 49 S satellite page 39 save 20 selecting options 7 setup altimeter 53 calibration 53 heading 52 main menu 46 map 46 routing 49 time 51 units 52 setup map 17 shorter distance 50 show...

Astro and DC 40 Quick Start Manual
Page 1
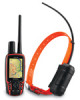
... devices. 4. Press MENU. 3. Start a new hunt. You should calibrate the compass after the hunt. On the Astro, press and hold ➋. Select Start New Hunt. 3. Attach the DC 40 to view the Dog Tracker page. 2. Acquiring Satellite Signals Before you can take a few minutes. 1. Turn on your dog. ➋ ➌ ➊ 2. Charging a depleted DC 40 battery takes 4½ hours. 1. Install batteries in the Astro The Astro operates on -screen instructions. 3. Calibrate the compass. 6. Wait for satellite signals...
... devices. 4. Press MENU. 3. Start a new hunt. You should calibrate the compass after the hunt. On the Astro, press and hold ➋. Select Start New Hunt. 3. Attach the DC 40 to view the Dog Tracker page. 2. Acquiring Satellite Signals Before you can take a few minutes. 1. Turn on your dog. ➋ ➌ ➊ 2. Charging a depleted DC 40 battery takes 4½ hours. 1. Install batteries in the Astro The Astro operates on -screen instructions. 3. Calibrate the compass. 6. Wait for satellite signals...


