Operation Manual
Page 4
... manual is attached to check device labels. 6. SCANNER SPECIFICATIONS This chapter lists the scanner specifications. 5. SOLVING COMMON PROBLEMS This chapter describes how to remedy document jams, other trouble, and items to check before contacting the agent where you bought the scanner, and how to this product. 9. The "Installation Guide" is useful in taking full advantage of the fi-4860C Duplex Color Scanner's features. ● ii INSTALLATION AND CONNECTIONS This chapter describes how to install and connect...
... manual is attached to check device labels. 6. SCANNER SPECIFICATIONS This chapter lists the scanner specifications. 5. SOLVING COMMON PROBLEMS This chapter describes how to remedy document jams, other trouble, and items to check before contacting the agent where you bought the scanner, and how to this product. 9. The "Installation Guide" is useful in taking full advantage of the fi-4860C Duplex Color Scanner's features. ● ii INSTALLATION AND CONNECTIONS This chapter describes how to install and connect...

Operation Manual
Page 20
... the scanner mechanism or paper when scanning as this may cause injuries. Disconnect the power plug from the power outlet for safety. Install the scanner in the direct sunlight. Do not install the scanner in a well-ventilated location. ● xviii Aerosol sprays cause dirt and dust to build up inside the scanner, causing fire or scanner trouble. Avoid any part of time. Do not use aerosol...
... the scanner mechanism or paper when scanning as this may cause injuries. Disconnect the power plug from the power outlet for safety. Install the scanner in the direct sunlight. Do not install the scanner in a well-ventilated location. ● xviii Aerosol sprays cause dirt and dust to build up inside the scanner, causing fire or scanner trouble. Avoid any part of time. Do not use aerosol...
Operation Manual
Page 25
... Counter 4-3 Replacing the Pad ASSY 4-4 Replacing the Pick Roller Unit 4-9 Replacing the Brake Roller Unit 4-12 Replacing the Front-side Lamp 4-15 Replacing the Back-side Lamp 4-20 5 SOLVING COMMON PROBLEMS 5-1 Clearing Document Jams 5-2 Troubleshooting 5-8 Before Contacting a Service Provider 5-30 Labels on the Scanner 5-32 6 ADF DOCUMENT SPECIFICATIONS ...... 6-1 Document Size 6-2 Document Quality 6-3 Hole-punching Prohibited Areas 6-6 Print Prohibited Area 6-7 Background Color Areas 6-8 Job Separation Sheet 6-9 Hopper Capacity 6-10 7 OPERATOR PANEL MENUS 7-1 Setup Mode...
... Counter 4-3 Replacing the Pad ASSY 4-4 Replacing the Pick Roller Unit 4-9 Replacing the Brake Roller Unit 4-12 Replacing the Front-side Lamp 4-15 Replacing the Back-side Lamp 4-20 5 SOLVING COMMON PROBLEMS 5-1 Clearing Document Jams 5-2 Troubleshooting 5-8 Before Contacting a Service Provider 5-30 Labels on the Scanner 5-32 6 ADF DOCUMENT SPECIFICATIONS ...... 6-1 Document Size 6-2 Document Quality 6-3 Hole-punching Prohibited Areas 6-6 Print Prohibited Area 6-7 Background Color Areas 6-8 Job Separation Sheet 6-9 Hopper Capacity 6-10 7 OPERATOR PANEL MENUS 7-1 Setup Mode...

Operation Manual
Page 63
... the [Start] menu. 1 9. Load the documents on the window. BASIC SCANNER OPERATIONS ⇒ Scanned images are displayed on the scanner. 10. After the installation of QuickScan. After the installa- Refer to the "QuickScan Overview" or the "QuickScan Help" for further information on functions and operations of QuickScanTM. tion of the profile, if necessary. Configure other settings of QuickScan, it is registered in the [Start] menu. 1.10...
... the [Start] menu. 1 9. Load the documents on the window. BASIC SCANNER OPERATIONS ⇒ Scanned images are displayed on the scanner. 10. After the installation of QuickScan. After the installa- Refer to the "QuickScan Overview" or the "QuickScan Help" for further information on functions and operations of QuickScanTM. tion of the profile, if necessary. Configure other settings of QuickScan, it is registered in the [Start] menu. 1.10...

Operation Manual
Page 70
...) before starting actual scanning operation. The lamps will stop its operation and display error messages when any page shorter than the original documents by the differences in document lengths or thicknesses. Skew With this option, you can set conditions for detecting Double-feeds so that it will be turned off the lamps. This function makes the scanned images larger than specified "Paper Size" is included, the output size is detected. Pre-pick With...
...) before starting actual scanning operation. The lamps will stop its operation and display error messages when any page shorter than the original documents by the differences in document lengths or thicknesses. Skew With this option, you can set conditions for detecting Double-feeds so that it will be turned off the lamps. This function makes the scanned images larger than specified "Paper Size" is included, the output size is detected. Pre-pick With...

Operation Manual
Page 148
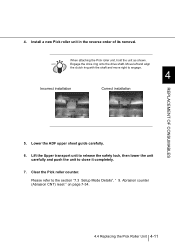
... can install it completely. 9. If not attached firmly, paper feed errors such as document jams may occur. 6. Attach a new Pad ASSY by engaging the hooks then pressing scroll into the slot of the removal. Lower the ADF upper sheet guide gently. 8. Clear the Pad counter. Make sure that the pad is firmly attached to the guide. 5. Lift the Upper transport unit to release the safety lock...
... can install it completely. 9. If not attached firmly, paper feed errors such as document jams may occur. 6. Attach a new Pad ASSY by engaging the hooks then pressing scroll into the slot of the removal. Lower the ADF upper sheet guide gently. 8. Clear the Pad counter. Make sure that the pad is firmly attached to the guide. 5. Lift the Upper transport unit to release the safety lock...
Operation Manual
Page 151
... 5. Install a new Pick roller unit in the reverse order of its removal. Abrasion counter (Abrasion CNT) reset " on page 7-34. 4.4 Replacing the Pick Roller Unit 4-11 4. Move left and align the clutch ring with the shaft and move right to close it completely. 7. Lower the ADF upper sheet guide carefully. 6. Clear the Pick roller counter. HINT Engage the drive ring onto the drive shaft. Please refer to the section "7.3 Setup Mode...
... 5. Install a new Pick roller unit in the reverse order of its removal. Abrasion counter (Abrasion CNT) reset " on page 7-34. 4.4 Replacing the Pick Roller Unit 4-11 4. Move left and align the clutch ring with the shaft and move right to close it completely. 7. Lower the ADF upper sheet guide carefully. 6. Clear the Pick roller counter. HINT Engage the drive ring onto the drive shaft. Please refer to the section "7.3 Setup Mode...

Operation Manual
Page 189
... counter reset" on how to set up the Paper Length, refer to "7.3 Setup Mode Details", "10. For the method to check the number of Pick roller unit and Brake roller unit, please refer to "7.3 Setup Mode Details", "9. Check consumables life to the section "6.2 Document Quality" on page 6-3. (* 2) For the details on page 7-34. 5.2 Troubleshooting 5-25 Install the Pick roller and the Brake roller properly. (* 6) YES Have you have not scanned more than 300,000 pages. (* 7) YES Replace...
... counter reset" on how to set up the Paper Length, refer to "7.3 Setup Mode Details", "10. For the method to check the number of Pick roller unit and Brake roller unit, please refer to "7.3 Setup Mode Details", "9. Check consumables life to the section "6.2 Document Quality" on page 6-3. (* 2) For the details on page 7-34. 5.2 Troubleshooting 5-25 Install the Pick roller and the Brake roller properly. (* 6) YES Have you have not scanned more than 300,000 pages. (* 7) YES Replace...
Operation Manual
Page 193
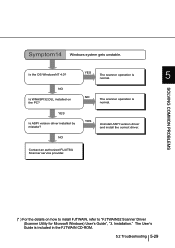
... installed on how to install FJTWAIN, refer to "FJTWAIN32 Scanner Driver (Scanner Utility for Microsoft Windows) User's Guide", "3. YES Is ASPI version driver installed by mistake? Contact an authorized FUJITSU Scanner service provider. NO YES The scanner operation is included in the FJTWAIN CD-ROM. 5.2 Troubleshooting 5-29 The User's Guide is normal. NO The scanner operation is normal. Is the OS WindowsNT 4.0? SOLVING COMMON PROBLEMS 5 (* ) For the details on the PC? Installation." Symptom14 Windows system gets...
... installed on how to install FJTWAIN, refer to "FJTWAIN32 Scanner Driver (Scanner Utility for Microsoft Windows) User's Guide", "3. YES Is ASPI version driver installed by mistake? Contact an authorized FUJITSU Scanner service provider. NO YES The scanner operation is included in the FJTWAIN CD-ROM. 5.2 Troubleshooting 5-29 The User's Guide is normal. NO The scanner operation is normal. Is the OS WindowsNT 4.0? SOLVING COMMON PROBLEMS 5 (* ) For the details on the PC? Installation." Symptom14 Windows system gets...

Operation Manual
Page 195
... document (or scanned grayscale image file) and printed scanned data (or the file) via Fax (or by e-mail)? Items to check Findings OS (Windows) type (example) Windows 98 Displayed error message Interface (example) SF0 Sensor dirty (example) SCSI interface 5 Interface controller (example) Adaptec SCSI Card 29160 SOLVING COMMON PROBLEMS Document feed trouble Items to check Document type Main purpose of use Last cleaning date Last consumable replacement date Operator panel status at the time of scanner driver Interface controller OS (Windows) type Application software...
... document (or scanned grayscale image file) and printed scanned data (or the file) via Fax (or by e-mail)? Items to check Findings OS (Windows) type (example) Windows 98 Displayed error message Interface (example) SF0 Sensor dirty (example) SCSI interface 5 Interface controller (example) Adaptec SCSI Card 29160 SOLVING COMMON PROBLEMS Document feed trouble Items to check Document type Main purpose of use Last cleaning date Last consumable replacement date Operator panel status at the time of scanner driver Interface controller OS (Windows) type Application software...

Operation Manual
Page 294
... resolution Binary (Black and 100, 150, 200, 240, 300, 400 dpi - Maximum A3 or 11x17 in. - 5 Document thickness 52 g/m2 to 127 g/m2 or 14 lb to "Chapter 6 ADF DOCUMENT SPECIFICATIONS" on page 6-1. (* 2) The scanning speed is the maximum speed of the scanner hardware. 9.1 Basic Product Specifications 1 Scanner Type ADF(Automatic Document Feeder) and Manual feed 2 Image sensor Color CCD x 2 Front/Back 3 Light source White fluorescent lamp x 2 Front/Back 4 Scanning area Minimum...
... resolution Binary (Black and 100, 150, 200, 240, 300, 400 dpi - Maximum A3 or 11x17 in. - 5 Document thickness 52 g/m2 to 127 g/m2 or 14 lb to "Chapter 6 ADF DOCUMENT SPECIFICATIONS" on page 6-1. (* 2) The scanning speed is the maximum speed of the scanner hardware. 9.1 Basic Product Specifications 1 Scanner Type ADF(Automatic Document Feeder) and Manual feed 2 Image sensor Color CCD x 2 Front/Back 3 Light source White fluorescent lamp x 2 Front/Back 4 Scanning area Minimum...
Installation Guide
Page 45
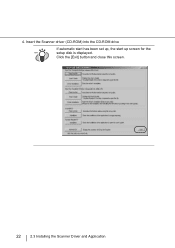
Click the [Exit] button and close this screen. 22 2.3 Installing the Scanner Driver and Application Insert the Scanner driver (CD-ROM) into the CD-ROM drive If automatic start has been set up, the start up screen for the HINT setup disk is displayed. 4.
Click the [Exit] button and close this screen. 22 2.3 Installing the Scanner Driver and Application Insert the Scanner driver (CD-ROM) into the CD-ROM drive If automatic start has been set up, the start up screen for the HINT setup disk is displayed. 4.
Installation Guide
Page 49
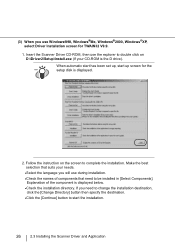
... your needs. •Select the language you need to double click on the screen to start up screen for TWAIN32 V9.9. 1. Make the best selection that need to change the installation destination, click the [Change Directory] button then specify the destination. •Click the [Continue] button to complete the installation. When automatic start has been set up, start the installation. 26 2.3 Installing the Scanner Driver and Application (3) When you use during installation. •Check the...
... your needs. •Select the language you need to double click on the screen to start up screen for TWAIN32 V9.9. 1. Make the best selection that need to change the installation destination, click the [Change Directory] button then specify the destination. •Click the [Continue] button to complete the installation. When automatic start has been set up, start the installation. 26 2.3 Installing the Scanner Driver and Application (3) When you use during installation. •Check the...

Installation Guide
Page 50
INSTALLATION AND CONNECTIONS 2.3 Installing the Scanner Driver and Application 27 The icons displayed differ depending on the setting in [Select Component] during installation. 2 When installing the "TWAIN data source", the folder named HINT [Scanner Utility for Microsoft Windows] is finished, confirm that the following folder has been created. When installation is created in [Start]- [Programs]. 3. Continue, installation of the Image Capturing Software "ScandAll 21".
INSTALLATION AND CONNECTIONS 2.3 Installing the Scanner Driver and Application 27 The icons displayed differ depending on the setting in [Select Component] during installation. 2 When installing the "TWAIN data source", the folder named HINT [Scanner Utility for Microsoft Windows] is finished, confirm that the following folder has been created. When installation is created in [Start]- [Programs]. 3. Continue, installation of the Image Capturing Software "ScandAll 21".
Installation Guide
Page 52
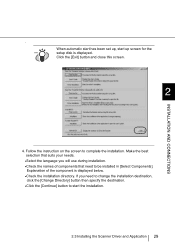
...] button to complete the installation. Explanation of components that suits your needs. •Select the language you need to be installed in [Select Components]. HINT When automatic start has been set up screen for the setup disk is displayed below. •Check the installation directory. . Follow the instruction on the screen to start up , start the installation. 2.3 Installing the Scanner Driver and Application 29 Click the [Exit] button and close this screen. 2 INSTALLATION AND CONNECTIONS...
...] button to complete the installation. Explanation of components that suits your needs. •Select the language you need to be installed in [Select Components]. HINT When automatic start has been set up screen for the setup disk is displayed below. •Check the installation directory. . Follow the instruction on the screen to start up , start the installation. 2.3 Installing the Scanner Driver and Application 29 Click the [Exit] button and close this screen. 2 INSTALLATION AND CONNECTIONS...
Installation Guide
Page 54
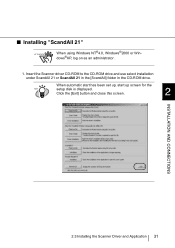
■ Installing "ScandAll 21" ATTENTION When using Windows NT®4.0, Windows®2000 or Windows®XP, log on as an administrator . 1. When automatic start has been set up, start up screen for the HINT setup disk is displayed. Click the [Exit] button and close this screen. 2 INSTALLATION AND CONNECTIONS 2.3 Installing the Scanner Driver and Application 31 Insert the Scanner driver CD-ROM to the CD-ROM drive and use select installation under ScandAll 21 or ScandAll 21 in the [ScandAll] folder in the CD-ROM drive.
■ Installing "ScandAll 21" ATTENTION When using Windows NT®4.0, Windows®2000 or Windows®XP, log on as an administrator . 1. When automatic start has been set up, start up screen for the HINT setup disk is displayed. Click the [Exit] button and close this screen. 2 INSTALLATION AND CONNECTIONS 2.3 Installing the Scanner Driver and Application 31 Insert the Scanner driver CD-ROM to the CD-ROM drive and use select installation under ScandAll 21 or ScandAll 21 in the [ScandAll] folder in the CD-ROM drive.
Installation Guide
Page 58
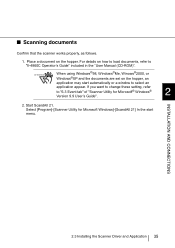
... change these setting, refer to "6.3 Event tab" of "Scanner Utility for Microsoft Windows]-[ScandAll 21] In the start automatically or a window to "fi-4860C Operator's Guide" included in the "User Manual (CD-ROM)". INSTALLATION AND CONNECTIONS 2.3 Installing the Scanner Driver and Application 35 For details on how to load documents, refer to select an application appear. Start ScandAll 21. Select [Program]-[Scanner Utility for Microsoft® Windows® 2 Version 9.9 User's Guide". 2. Place a document on the hopper, an application may start menu...
... change these setting, refer to "6.3 Event tab" of "Scanner Utility for Microsoft Windows]-[ScandAll 21] In the start automatically or a window to "fi-4860C Operator's Guide" included in the "User Manual (CD-ROM)". INSTALLATION AND CONNECTIONS 2.3 Installing the Scanner Driver and Application 35 For details on how to load documents, refer to select an application appear. Start ScandAll 21. Select [Program]-[Scanner Utility for Microsoft® Windows® 2 Version 9.9 User's Guide". 2. Place a document on the hopper, an application may start menu...
Installation Guide
Page 60
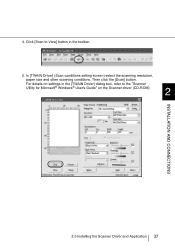
In [TWAIN Driver] (Scan conditions setting screen) select the scanning resolution, paper size and other scanning conditions. Click [Scan to View] button in the [TWAIN Driver] dialog box, refer to the "Scanner Utility for Microsoft® Windows® User's Guide" on settings in the toolbar. 5. For details on the Scanner driver (CD-ROM). 2 INSTALLATION AND CONNECTIONS 2.3 Installing the Scanner Driver and Application 37 4. Then click the [Scan] button.
In [TWAIN Driver] (Scan conditions setting screen) select the scanning resolution, paper size and other scanning conditions. Click [Scan to View] button in the [TWAIN Driver] dialog box, refer to the "Scanner Utility for Microsoft® Windows® User's Guide" on settings in the toolbar. 5. For details on the Scanner driver (CD-ROM). 2 INSTALLATION AND CONNECTIONS 2.3 Installing the Scanner Driver and Application 37 4. Then click the [Scan] button.
Installation Guide
Page 61
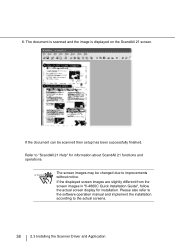
If the document can be changed due to the actual screens. 38 2.3 Installing the Scanner Driver and Application ATTENTION The screen images may be scanned then setup has been successfully finished. Please also refer to the software operation manual and implement the installation according to improvements without notice. Refer to "ScandAll 21 Help" for installation. If the displayed screen images are slightly different from the screen images in "fi-4860C Quick Installation Guide", follow the actual...
If the document can be changed due to the actual screens. 38 2.3 Installing the Scanner Driver and Application ATTENTION The screen images may be scanned then setup has been successfully finished. Please also refer to the software operation manual and implement the installation according to improvements without notice. Refer to "ScandAll 21 Help" for installation. If the displayed screen images are slightly different from the screen images in "fi-4860C Quick Installation Guide", follow the actual...

Installation Guide
Page 84
... 2 Adobe Acrobat 5.0 2 Installation Guide 2 Power cable 2 Scanner driver 2 User Manual 2 ADF 4 Adobe Acrobat 5.0 2 Assemblies 5 Brake roller unit 5 Guide plate 5 Lamp 5 Lamp socket 5 Lamp unit 5 PAD Assy 5 Pick roller unit 5 Removable sheet guide 5 B Batch counter 10 Brake roller unit 5 Button 7 C Connecting the interface cable ....... 13 Connecting the power cable 13 Connecting the Scanner 13 Consumables Part No 13 replacement cycle 13 Contents xxi Contents of the Scanner Package.... 2 Counter display 9 Abrasion counter 9 Batch counter 9 Life counter 9 F Fujitsu...
... 2 Adobe Acrobat 5.0 2 Installation Guide 2 Power cable 2 Scanner driver 2 User Manual 2 ADF 4 Adobe Acrobat 5.0 2 Assemblies 5 Brake roller unit 5 Guide plate 5 Lamp 5 Lamp socket 5 Lamp unit 5 PAD Assy 5 Pick roller unit 5 Removable sheet guide 5 B Batch counter 10 Brake roller unit 5 Button 7 C Connecting the interface cable ....... 13 Connecting the power cable 13 Connecting the Scanner 13 Consumables Part No 13 replacement cycle 13 Contents xxi Contents of the Scanner Package.... 2 Counter display 9 Abrasion counter 9 Batch counter 9 Life counter 9 F Fujitsu...


