
T2020 Getting Started Guide
Page 1
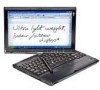
...; Check to turn power on your Factory Image to launch any application. LifeBook Security/ Tablet PC Buttons The five security/Tablet PC buttons are using the Security/Application Buttons. at us.fujitsu.com/computers. Install additional applications not pre-installed on self test. You can... Left Button Scroll Button Right Button Display Panel Status Indicator Panel LifeBook Security/ Tablet PC Buttons Power/Suspend/ Resume Switch Keyboard Speaker RIGHT PANEL Headphone Jack Microphone Jack Pen/Pen Holder Pen Tether Point DC Power Jack IEEE 1394 Jack USB 2.0 Port ...
...; Check to turn power on your Factory Image to launch any application. LifeBook Security/ Tablet PC Buttons The five security/Tablet PC buttons are using the Security/Application Buttons. at us.fujitsu.com/computers. Install additional applications not pre-installed on self test. You can... Left Button Scroll Button Right Button Display Panel Status Indicator Panel LifeBook Security/ Tablet PC Buttons Power/Suspend/ Resume Switch Keyboard Speaker RIGHT PANEL Headphone Jack Microphone Jack Pen/Pen Holder Pen Tether Point DC Power Jack IEEE 1394 Jack USB 2.0 Port ...

T2020 User's Guide
Page 7
...on Touch Screen 44 Calibrating the Touch Screen 45 Double-Clicking 45 Dragging 45 Installing a Pen Tether 47 Volume Control 48 Controlling the Volume 48 LifeBook Security/Tablet PC Buttons 49 Security Button Functions 49 Pre-logon button functions 50 Post-logon button functions ...53 Changing Tablet PC Button Functions 54 Setting up LifeBook Security Panel 55 Passwords 56 Using Your LifeBook Security Panel 57 Precautions 58...
...on Touch Screen 44 Calibrating the Touch Screen 45 Double-Clicking 45 Dragging 45 Installing a Pen Tether 47 Volume Control 48 Controlling the Volume 48 LifeBook Security/Tablet PC Buttons 49 Security Button Functions 49 Pre-logon button functions 50 Post-logon button functions ...53 Changing Tablet PC Button Functions 54 Setting up LifeBook Security Panel 55 Passwords 56 Using Your LifeBook Security Panel 57 Precautions 58...

T2020 User's Guide
Page 13
... as a standard notebook using pen input. Your LifeBook T2020 notebook comes with an active digitizer, and brings the computing power of desktop personal computers (PCs) to operate your choice". 13 Example: "Click Fujitsu Menu, and select your LifeBook T2020 notebook's hardware and pre-installed system software. Preface About This Guide The LifeBook T2020 notebook from Fujitsu Computer Systems Corporation is...
... as a standard notebook using pen input. Your LifeBook T2020 notebook comes with an active digitizer, and brings the computing power of desktop personal computers (PCs) to operate your choice". 13 Example: "Click Fujitsu Menu, and select your LifeBook T2020 notebook's hardware and pre-installed system software. Preface About This Guide The LifeBook T2020 notebook from Fujitsu Computer Systems Corporation is...

T2020 User's Guide
Page 24
... Universal Serial Bus devices. See "Headphone Jack" on the rear) allow you to power your LifeBook notebook's right-side components. Headphone Jack USB 2.0 Port DC Power Jack Pen/Pen Holder Pen Tether Point Microphone IEEE 1394 Jack Jack Figure 4. USB 2.0 transfers data at up to 480 ...Mbps and is a brief description of your LifeBook notebook and charge the internal Lithium ion battery. 24 - USB ...
... Universal Serial Bus devices. See "Headphone Jack" on the rear) allow you to power your LifeBook notebook's right-side components. Headphone Jack USB 2.0 Port DC Power Jack Pen/Pen Holder Pen Tether Point Microphone IEEE 1394 Jack Jack Figure 4. USB 2.0 transfers data at up to 480 ...Mbps and is a brief description of your LifeBook notebook and charge the internal Lithium ion battery. 24 - USB ...

T2020 User's Guide
Page 25
Pen/Pen Holder The pen is used to connect between your notebook and an IEEE 1394 peripheral such as the interface with the active digitizer display. 25 - Locating the Controls .... See "IEEE 1394 Port" on page 90. See "Microphone Jack" on page 89. See "Installing a Pen Tether" on page 47 for additional information. Pen Tether Attachment Point The pen tether attachment point is designed to securely hold a pen tether to connect an external mono microphone. Microphone Jack The microphone jack allows you to prevent...
Pen/Pen Holder The pen is used to connect between your notebook and an IEEE 1394 peripheral such as the interface with the active digitizer display. 25 - Locating the Controls .... See "IEEE 1394 Port" on page 90. See "Microphone Jack" on page 89. See "Installing a Pen Tether" on page 47 for additional information. Pen Tether Attachment Point The pen tether attachment point is designed to securely hold a pen tether to connect an external mono microphone. Microphone Jack The microphone jack allows you to prevent...

T2020 User's Guide
Page 35
... screen brightness sliders for battery and AC power scenarios. 35 - The Tablet and Pen Settings window will lower the brightness of your Tablet PC, you may want to adjust the brightness level of the screen to Adjust Brightness Adjusting the brightness using the Fujitsu menu, click on your display. • [Fn+F7]: Pressing repeatedly will...
... screen brightness sliders for battery and AC power scenarios. 35 - The Tablet and Pen Settings window will lower the brightness of your Tablet PC, you may want to adjust the brightness level of the screen to Adjust Brightness Adjusting the brightness using the Fujitsu menu, click on your display. • [Fn+F7]: Pressing repeatedly will...

T2020 User's Guide
Page 43
...such as a pointing device. EXCESSIVE FORCE COULD RESULT IN DAMAGE TO THE LCD AND/OR TOUCH SCREEN. • TO PURCHASE ADDITIONAL OR REPLACEMENT STYLI, VISIT FUJITSU'S ACCESSORIES WEBSITE AT: WWW.SHOPFUJITSU.COM. 43 - There are three aspects of the cursor. You can adjust: • Buttons: This tab lets you ...set up the scheme for the cursor arrow. Touch Screen The integrated Touch Screen allows you to draw like a pen or pencil in double-clicking. • Pointers: This tab lets you set up the buttons for right or left handed operation, in addition to ...
...such as a pointing device. EXCESSIVE FORCE COULD RESULT IN DAMAGE TO THE LCD AND/OR TOUCH SCREEN. • TO PURCHASE ADDITIONAL OR REPLACEMENT STYLI, VISIT FUJITSU'S ACCESSORIES WEBSITE AT: WWW.SHOPFUJITSU.COM. 43 - There are three aspects of the cursor. You can adjust: • Buttons: This tab lets you ...set up the scheme for the cursor arrow. Touch Screen The integrated Touch Screen allows you to draw like a pen or pencil in double-clicking. • Pointers: This tab lets you set up the buttons for right or left handed operation, in addition to ...

T2020 User's Guide
Page 44
.... Right-Clicking on Touch Screen To left-click, touch the object you wish to Start -> Control Panel -> Tablet and Pen Settings. Windows XP Tablet PC Edition: Right-click can be accomplished by holding the pen down until a circular icon appears. In the Pen Options tab, select "Press and Hold" then click the [Settings] button. In the...
.... Right-Clicking on Touch Screen To left-click, touch the object you wish to Start -> Control Panel -> Tablet and Pen Settings. Windows XP Tablet PC Edition: Right-click can be accomplished by holding the pen down until a circular icon appears. In the Pen Options tab, select "Press and Hold" then click the [Settings] button. In the...

T2020 User's Guide
Page 46
... FORCE WHEN TAPPING ON THE SCREEN DURING CALIBRATION. If you have selected all of your notebook to begin again. 46 - Windows Vista: Double-click the Tablet PC Settings icon and select the General tab 2 Click the [Calibrate] button. 3 Adjust the display of the (+) symbols. 6 Once you are not satisfied ...and the target will move to Start -> Control Panel. To run the calibration utility: 1 Go to a different location on the (+) symbol. Windows XP Tablet PC Edition: Double-click the Tablet and Pen Settings icon and select the Settings tab. Quick Point Pointing Device/Touch Screen
... FORCE WHEN TAPPING ON THE SCREEN DURING CALIBRATION. If you have selected all of your notebook to begin again. 46 - Windows Vista: Double-click the Tablet PC Settings icon and select the General tab 2 Click the [Calibrate] button. 3 Adjust the display of the (+) symbols. 6 Once you are not satisfied ...and the target will move to Start -> Control Panel. To run the calibration utility: 1 Go to a different location on the (+) symbol. Windows XP Tablet PC Edition: Double-click the Tablet and Pen Settings icon and select the Settings tab. Quick Point Pointing Device/Touch Screen

T2020 User's Guide
Page 47
... dropping or losing your pen, you should attach it to your tablet. Quick Point Pointing Device/Touch Screen To do so, push the end of the tether through the hole in the pen, then thread the opposite end of the tether through the loop. 2 Attach the end of the pen tether through the attachment... point, then feed the pen through the large...
... dropping or losing your pen, you should attach it to your tablet. Quick Point Pointing Device/Touch Screen To do so, push the end of the tether through the hole in the pen, then thread the opposite end of the tether through the loop. 2 Attach the end of the pen tether through the attachment... point, then feed the pen through the large...

T2020 User's Guide
Page 52
... Dual Display Fujitsu Menu Utility None Table 3. Button Icon System State System is postlogon (Windows desktop is in pre-boot, the system screen orientation changes from portrait (vertical) to landscape (horizontal) or from landscape to portrait. LifeBook Security/Tablet PC Buttons THE ...SCREEN ORIENTATION DEFAULT CAN BE CHANGED BY GOING TO THE CONTROL PANEL AND DOUBLE-CLICKING ON THE TABLET AND PEN SETTINGS (WINDOWS XP) OR TABLET PC SETTINGS (WINDOWS VISTA) ICON AND SELECTING THE DESIRED...
... Dual Display Fujitsu Menu Utility None Table 3. Button Icon System State System is postlogon (Windows desktop is in pre-boot, the system screen orientation changes from portrait (vertical) to landscape (horizontal) or from landscape to portrait. LifeBook Security/Tablet PC Buttons THE ...SCREEN ORIENTATION DEFAULT CAN BE CHANGED BY GOING TO THE CONTROL PANEL AND DOUBLE-CLICKING ON THE TABLET AND PEN SETTINGS (WINDOWS XP) OR TABLET PC SETTINGS (WINDOWS VISTA) ICON AND SELECTING THE DESIRED...

T2020 User's Guide
Page 54
... THE CONTROL PANEL AND DOUBLE-CLICKING ON THE TABLET AND PEN SETTINGS (WINDOWS XP) OR TABLET PC SETTINGS (WINDOWS VISTA) ICON AND SELECTING THE DESIRED SETTINGS IN THE DISPLAY PROPERTIES. Function / Fujitsu Menu Utility Button The [Function] button works in display only, external display only, dual display. LifeBook Security/Tablet PC Buttons To launch different applications or cause...
... THE CONTROL PANEL AND DOUBLE-CLICKING ON THE TABLET AND PEN SETTINGS (WINDOWS XP) OR TABLET PC SETTINGS (WINDOWS VISTA) ICON AND SELECTING THE DESIRED SETTINGS IN THE DISPLAY PROPERTIES. Function / Fujitsu Menu Utility Button The [Function] button works in display only, external display only, dual display. LifeBook Security/Tablet PC Buttons To launch different applications or cause...

T2020 User's Guide
Page 55
...program, click on Launch an Application then browse to the location of the program. 5 Click [OK], then click [OK] again. LifeBook Security/Tablet PC Buttons Numbered Buttons Use these buttons to enter your notebook, the security panel application is pre-installed without any passwords. Windows XP: ...1 Double-click on the Tablet and Pen Settings icon in the Control Panel. 2 Select the Tablet Buttons tab and select the button you...
...program, click on Launch an Application then browse to the location of the program. 5 Click [OK], then click [OK] again. LifeBook Security/Tablet PC Buttons Numbered Buttons Use these buttons to enter your notebook, the security panel application is pre-installed without any passwords. Windows XP: ...1 Double-click on the Tablet and Pen Settings icon in the Control Panel. 2 Select the Tablet Buttons tab and select the button you...

T2020 User's Guide
Page 124
...; Avoid using the floppy disks in damp and dusty locations. • Never store a floppy disk near a magnet or magnetic field. • Do not use a felt pen. • If a media disc is subjected to a sudden change in temperature, cold to warm condensation may form on the label surface with a ballpoint... pen or pencil. Always use a pencil or an eraser on a disk or disk label. • Avoid storing the floppy disks in extremely hot or cold locations, ...
...; Avoid using the floppy disks in damp and dusty locations. • Never store a floppy disk near a magnet or magnetic field. • Do not use a felt pen. • If a media disc is subjected to a sudden change in temperature, cold to warm condensation may form on the label surface with a ballpoint... pen or pencil. Always use a pencil or an eraser on a disk or disk label. • Avoid storing the floppy disks in extremely hot or cold locations, ...

T2020 User's Guide
Page 194
... Panel operating 57 passwords 56 setting up 55 uninstalling 59 LifeBook Security/Tablet PC Buttons 20, 49 Lithium ion Battery Bay 28 Local Area Network (LAN) 18 M Make Factory Recovery DVD 114 Media Player care 125 Memory capacity 94 ... Jack 17, 25, 90 Microsoft Works 135 Mouse problems 101 MyRecovery 114 194 N NumLk 31 P PC Card Eject Button 22 PC Cards 84 installing 85 removing 85 slot 17, 22 Pen 25 Pen tether 47 Pen Tether Attachment Point 25 Pen/Pen Holder 25 Pointing Device 40 Port Replicator connector 29 problems 100 Post-logon button functions...
... Panel operating 57 passwords 56 setting up 55 uninstalling 59 LifeBook Security/Tablet PC Buttons 20, 49 Lithium ion Battery Bay 28 Local Area Network (LAN) 18 M Make Factory Recovery DVD 114 Media Player care 125 Memory capacity 94 ... Jack 17, 25, 90 Microsoft Works 135 Mouse problems 101 MyRecovery 114 194 N NumLk 31 P PC Card Eject Button 22 PC Cards 84 installing 85 removing 85 slot 17, 22 Pen 25 Pen tether 47 Pen Tether Attachment Point 25 Pen/Pen Holder 25 Pointing Device 40 Port Replicator connector 29 problems 100 Post-logon button functions...

