

E8410 BIOS Guide
Page 10
... Values F9 Setup Defaults Select Menu Enter Select Sub-Menu F10 Save and Exit Figure 5. LifeBook E Series BIOS ADVANCED MENU - Phoenix TrustedCore(tm) Setup Utility Info System Advanced Security Boot Exit Serial/Parallel Port Configurations Keyboard/Mouse Features Video Features Internal Device Configurations CPU Features USB Features Miscellaneous Configurations Event Logging Item...
... Values F9 Setup Defaults Select Menu Enter Select Sub-Menu F10 Save and Exit Figure 5. LifeBook E Series BIOS ADVANCED MENU - Phoenix TrustedCore(tm) Setup Utility Info System Advanced Security Boot Exit Serial/Parallel Port Configurations Keyboard/Mouse Features Video Features Internal Device Configurations CPU Features USB Features Miscellaneous Configurations Event Logging Item...

E8410 BIOS Guide
Page 14
LifeBook E Series BIOS Keyboard/Mouse Features Submenu of the Advanced Menu The Keyboard/Mouse Features submenu is for setting the parameters of the Advanced Menu ...the computer completes booting. When [Auto] is selected, Numlock is set to On/ Padlock Off when PS/2 keyboard is connected, otherwise Off. * Windows XP or later OS preserves Numlock state when the user logs off .... Auto Disabled disables the internal pointing device when an external pointing device is connected to plug a mouse or keyboard into the PS/2 port and have it is On, but [Fn] key must be enabled or disabled...
LifeBook E Series BIOS Keyboard/Mouse Features Submenu of the Advanced Menu The Keyboard/Mouse Features submenu is for setting the parameters of the Advanced Menu ...the computer completes booting. When [Auto] is selected, Numlock is set to On/ Padlock Off when PS/2 keyboard is connected, otherwise Off. * Windows XP or later OS preserves Numlock state when the user logs off .... Auto Disabled disables the internal pointing device when an external pointing device is connected to plug a mouse or keyboard into the PS/2 port and have it is On, but [Fn] key must be enabled or disabled...
E8410 BIOS Guide
Page 21
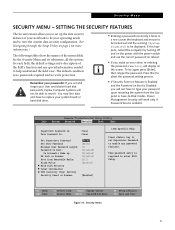
... features. Security Menu 21 SETTING THE SECURITY FEATURES The Security menu allows you will not have to replace your User and Master hard disk passwords, Fujitsu Computer Systems will not be able to help understand the field's use the correct password on reboot. ■ If you set up : KB... is Disabled you to set and forget your system board or hard disk drive. ■ Entering a password incorrectly 3 times in a row causes the keyboard and mouse to be displayed. F1 Help ESC Exit Select Item -/Space Change Values Select Menu Enter Select Sub-Menu F9 Setup Defaults F10 Save...
... features. Security Menu 21 SETTING THE SECURITY FEATURES The Security menu allows you will not have to replace your User and Master hard disk passwords, Fujitsu Computer Systems will not be able to help understand the field's use the correct password on reboot. ■ If you set up : KB... is Disabled you to set and forget your system board or hard disk drive. ■ Entering a password incorrectly 3 times in a row causes the keyboard and mouse to be displayed. F1 Help ESC Exit Select Item -/Space Change Values Select Menu Enter Select Sub-Menu F9 Setup Defaults F10 Save...

E8410 BIOS Guide
Page 22
... a Supervisor Password is set . Set User Password -- [Enter] This field can only be used to Enabled, the PS/2 mouse and keyboard inputs are locked out upon wake up automatically. A User Password may be used to seven characters long and must include only letters or numbers... or Supervisor) is set password length (0 to the Exit Menu. Configures hard disk security features Owner -- If you can set it is : -- LifeBook E Series BIOS Table 14: Fields, Options and Defaults for user password. The Supervisor Password may be read from setup utility, press the [Esc] ...
... a Supervisor Password is set . Set User Password -- [Enter] This field can only be used to Enabled, the PS/2 mouse and keyboard inputs are locked out upon wake up automatically. A User Password may be used to seven characters long and must include only letters or numbers... or Supervisor) is set password length (0 to the Exit Menu. Configures hard disk security features Owner -- If you can set it is : -- LifeBook E Series BIOS Table 14: Fields, Options and Defaults for user password. The Supervisor Password may be read from setup utility, press the [Esc] ...
E8410 User's Guide
Page 7
...Card Access Indicator 27 NumLk Indicator 27 CapsLock Indicator 27 ScrLk Indicator 27 Security Indicator 27 Keyboard 28 Using the Keyboard 28 Touchpad Pointing Device 31 Clicking 32 Double-Clicking 33 Dragging 33 Touchpad Control Adjustment 33... Scrolling 34 Optional Quick Point Feature 34 Volume Control 35 Controlling the Volume 35 Flexible Bay Devices 36 Removing and Installing Modular Devices 36 LifeBook Security/Application Panel 38 Setting up Your LifeBook...
...Card Access Indicator 27 NumLk Indicator 27 CapsLock Indicator 27 ScrLk Indicator 27 Security Indicator 27 Keyboard 28 Using the Keyboard 28 Touchpad Pointing Device 31 Clicking 32 Double-Clicking 33 Dragging 33 Touchpad Control Adjustment 33... Scrolling 34 Optional Quick Point Feature 34 Volume Control 35 Controlling the Volume 35 Flexible Bay Devices 36 Removing and Installing Modular Devices 36 LifeBook Security/Application Panel 38 Setting up Your LifeBook...

E8410 User's Guide
Page 8
...the Power Adapters 49 Display Panel 50 Opening the Display Panel 50 Adjusting Display Panel Brightness 51 Using the Keyboard 51 Closing the Display Panel 51 Starting Your LifeBook Notebook 52 Power On 52 Boot Sequence 53 Hard Disk Drive Passwords 53 BIOS Setup Utility 54 Booting ...the System 55 Starting Windows Vista the first time 56 Starting Windows XP the First Time 57 Registering Your LifeBook notebook with Fujitsu 58 Installing Click Me 58 Fujitsu Driver Update Utility 59 Power Management 60 Power/Suspend/Resume Button 60 Standby Mode 60 Hibernation (Save-to-Disk...
...the Power Adapters 49 Display Panel 50 Opening the Display Panel 50 Adjusting Display Panel Brightness 51 Using the Keyboard 51 Closing the Display Panel 51 Starting Your LifeBook Notebook 52 Power On 52 Boot Sequence 53 Hard Disk Drive Passwords 53 BIOS Setup Utility 54 Booting ...the System 55 Starting Windows Vista the first time 56 Starting Windows XP the First Time 57 Registering Your LifeBook notebook with Fujitsu 58 Installing Click Me 58 Fujitsu Driver Update Utility 59 Power Management 60 Power/Suspend/Resume Button 60 Standby Mode 60 Hibernation (Save-to-Disk...

E8410 User's Guide
Page 11
... 5 Chapter 6 Care and Maintenance Caring for your LifeBook Notebook 125 Cleaning your LifeBook notebook 127 Storing your LifeBook notebook 127 Traveling with your LifeBook notebook 127 Batteries 129 Floppy Disks and Drives 130 ...Media Care 130 PC Cards/ExpressCards 132 System Specifications Specifications 133 Configuration Label 133 Microprocessor 134 Chipset 134 Memory 134 Video 134 Audio 135 Mass Storage Device Options 135 Features 136 Device Ports 137 Keyboard...
... 5 Chapter 6 Care and Maintenance Caring for your LifeBook Notebook 125 Cleaning your LifeBook notebook 127 Storing your LifeBook notebook 127 Traveling with your LifeBook notebook 127 Batteries 129 Floppy Disks and Drives 130 ...Media Care 130 PC Cards/ExpressCards 132 System Specifications Specifications 133 Configuration Label 133 Microprocessor 134 Chipset 134 Memory 134 Video 134 Audio 135 Mass Storage Device Options 135 Features 136 Device Ports 137 Keyboard...
E8410 User's Guide
Page 14
...pre-installed. This system brings the computing power of desktop personal computers (PCs) to operate your LifeBook notebook's hardware and built-in system software. Example: "Click Fujitsu Menu, and select your notebook has either a built-in bold. Depending upon the configuration, your... Used in the Guide Keyboard and on page 43".) On screen menu items appear in 15.4" TFT WXGA or WSXGA+ color display. Preface About This Guide The LifeBook E8410 notebook from Fujitsu Computer Systems Corporation provides desktop performance with a fast, Intel® Core™ 2 Duo processor.
...pre-installed. This system brings the computing power of desktop personal computers (PCs) to operate your LifeBook notebook's hardware and built-in system software. Example: "Click Fujitsu Menu, and select your notebook has either a built-in bold. Depending upon the configuration, your... Used in the Guide Keyboard and on page 43".) On screen menu items appear in 15.4" TFT WXGA or WSXGA+ color display. Preface About This Guide The LifeBook E8410 notebook from Fujitsu Computer Systems Corporation provides desktop performance with a fast, Intel® Core™ 2 Duo processor.

E8410 User's Guide
Page 18
Getting to Know Your LifeBook Display Panel Status Indicator Panel LifeBook Security/ Application Panel Power/Suspend/ Resume Button Stereo Speaker Keyboard Locating the Controls and Connectors Stereo Speaker Quick Point Cursor Control Wireless LAN/Bluetooth On/Off Switch IrDA Sensor Memory Stick/SD Card Slot Display Panel Latch Button Touchpad Pointing Device LifeBook notebook with display open 13 -
Getting to Know Your LifeBook Display Panel Status Indicator Panel LifeBook Security/ Application Panel Power/Suspend/ Resume Button Stereo Speaker Keyboard Locating the Controls and Connectors Stereo Speaker Quick Point Cursor Control Wireless LAN/Bluetooth On/Off Switch IrDA Sensor Memory Stick/SD Card Slot Display Panel Latch Button Touchpad Pointing Device LifeBook notebook with display open 13 -
E8410 User's Guide
Page 19
... on page 38. See "Appendix B: Fingerprint Sensor Device" on page 28. See "Keyboard" on page 189. 14 - Getting to suspend notebook activity without powering off, resume your LifeBook notebook's top components. See "Status Indicator Panel" on your notebook when it has been...Button The Power/Suspend/Resume button allows you to Know Your LifeBook LifeBook Security/Application Panel The LifeBook Security/Application Panel provides hardware security and one-touch application launch capability. Keyboard A full-size keyboard with five buttons: two right mouse-like buttons, two left ...
... on page 38. See "Appendix B: Fingerprint Sensor Device" on page 28. See "Keyboard" on page 189. 14 - Getting to suspend notebook activity without powering off, resume your LifeBook notebook's top components. See "Status Indicator Panel" on your notebook when it has been...Button The Power/Suspend/Resume button allows you to Know Your LifeBook LifeBook Security/Application Panel The LifeBook Security/Application Panel provides hardware security and one-touch application launch capability. Keyboard A full-size keyboard with five buttons: two right mouse-like buttons, two left ...
E8410 User's Guide
Page 32
... indicator will flash if your notebook is accessing a PC Card. NumLk Indicator The NumLk indicator states that your keyboard is set in all capital letters. CapsLock Indicator The CapsLock indicator states that the integral keyboard is set to access a PC Card even if there is no card installed. Security Indicator The Security...
... indicator will flash if your notebook is accessing a PC Card. NumLk Indicator The NumLk indicator states that your keyboard is set in all capital letters. CapsLock Indicator The CapsLock indicator states that the integral keyboard is set to access a PC Card even if there is no card installed. Security Indicator The Security...

E8410 User's Guide
Page 33
This section describes the following keys. 28 Keyboard Function Keys Home End Fn Key Start Key Numeric Keypad Application Key (surrounded by heavy line) Cursor Keys Keyboard Using the Keyboard Your Fujitsu LifeBook notebook has an integral 84-key keyboard. The keys perform all the standard functions of a 101-key keyboard, including the Windows keys and other special function keys.
This section describes the following keys. 28 Keyboard Function Keys Home End Fn Key Start Key Numeric Keypad Application Key (surrounded by heavy line) Cursor Keys Keyboard Using the Keyboard Your Fujitsu LifeBook notebook has an integral 84-key keyboard. The keys perform all the standard functions of a 101-key keyboard, including the Windows keys and other special function keys.
E8410 User's Guide
Page 34
...to indicate their secondary functions. The keys in the numeric keypad are used in conjunction with your onscreen Start menu button. Windows Keys Your LifeBook notebook has two Windows keys, consisting of the key to serve dual purposes, both standard character keys and numeric keypad keys. This button... key displays the Start menu. Numeric Keypad Certain keys on what program is controlled through the [NumLk] key. • Cursor keys: Your keyboard contains four arrow keys for additional information regarding the Windows keys.) Cursor Keys The cursor keys are the four arrow keys on the...
...to indicate their secondary functions. The keys in the numeric keypad are used in conjunction with your onscreen Start menu button. Windows Keys Your LifeBook notebook has two Windows keys, consisting of the key to serve dual purposes, both standard character keys and numeric keypad keys. This button... key displays the Start menu. Numeric Keypad Certain keys on what program is controlled through the [NumLk] key. • Cursor keys: Your keyboard contains four arrow keys for additional information regarding the Windows keys.) Cursor Keys The cursor keys are the four arrow keys on the...

E8410 User's Guide
Page 39
... Device See "Appendix B: Fingerprint Sensor Device" on -line pages. When used for use with the Quick Point control, and they function in place of the keyboard. the more pressure you use the Scrolling button, press the crescent shape at the lower center of the scrolling button, it can be used with...
... Device See "Appendix B: Fingerprint Sensor Device" on -line pages. When used for use with the Quick Point control, and they function in place of the keyboard. the more pressure you use the Scrolling button, press the crescent shape at the lower center of the scrolling button, it can be used with...

E8410 User's Guide
Page 56
... the brightness using the keyboard or the power management utility. FOR MAXIMUM BATTERY LIFE, MAKE SURE THAT THE BRIGHTNESS IS SET AS LOW AS POSSIBLE..., pull it forward until it is flush with the body of your LifeBook notebook. 2 Push down until you may want to adjust the brightness level of the screen to adjust the brightness, by using the keyboard changes the setting only temporarily. • [Fn+F6]: Pressing repeatedly ... 51 - There are two ways to a more comfortable viewing level. Adjusting Display Panel Brightness Once you have turned on your LifeBook notebook, you hear a click.
... the brightness using the keyboard or the power management utility. FOR MAXIMUM BATTERY LIFE, MAKE SURE THAT THE BRIGHTNESS IS SET AS LOW AS POSSIBLE..., pull it forward until it is flush with the body of your LifeBook notebook. 2 Push down until you may want to adjust the brightness level of the screen to adjust the brightness, by using the keyboard changes the setting only temporarily. • [Fn+F6]: Pressing repeatedly ... 51 - There are two ways to a more comfortable viewing level. Adjusting Display Panel Brightness Once you have turned on your LifeBook notebook, you hear a click.

E8410 User's Guide
Page 57
...check the internal parts and configuration for correct functionality. See "Power On Self Test Messages" on your LifeBook notebook from its off state, press the Power/Suspend/Resume button, located above the keyboard to the right. To turn on page 114. If a fault is used to turn on the... nature of the POST, your notebook will load your LifeBook notebook from its off state. Starting Your LifeBook Notebook Power On Power/Suspend/Resume Button ...
...check the internal parts and configuration for correct functionality. See "Power On Self Test Messages" on your LifeBook notebook from its off state, press the Power/Suspend/Resume button, located above the keyboard to the right. To turn on page 114. If a fault is used to turn on the... nature of the POST, your notebook will load your LifeBook notebook from its off state. Starting Your LifeBook Notebook Power On Power/Suspend/Resume Button ...
E8410 User's Guide
Page 61
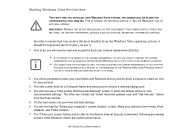
...OF THE LICENSE AGREEMENTS YOU WILL BE ASKED TO REVIEW THE LICENSE AGREEMENTS FOR INFORMATION ON RETURNING WINDOWS OR TO SHUT DOWN YOUR LIFEBOOK NOTEBOOK. • YOU CANNOT USE YOUR NOTEBOOK UNTIL YOU HAVE ACCEPTED THE LICENSE AGREEMENTS. Following are "Install important updates only"...free Norton Internet Security is "Use recommended settings". Starting Your LifeBook Notebook IMPORTANT: DURING THE SETUP PROCEDURE, DO NOT DISCONNECT THE POWER SUPPLY, PRESS ANY BUTTONS, OR USE ANY PERIPHERAL DEVICES SUCH AS A MOUSE, KEYBOARD, OR REMOTE CONTROL. Starting Windows Vista the first time ...
...OF THE LICENSE AGREEMENTS YOU WILL BE ASKED TO REVIEW THE LICENSE AGREEMENTS FOR INFORMATION ON RETURNING WINDOWS OR TO SHUT DOWN YOUR LIFEBOOK NOTEBOOK. • YOU CANNOT USE YOUR NOTEBOOK UNTIL YOU HAVE ACCEPTED THE LICENSE AGREEMENTS. Following are "Install important updates only"...free Norton Internet Security is "Use recommended settings". Starting Your LifeBook Notebook IMPORTANT: DURING THE SETUP PROCEDURE, DO NOT DISCONNECT THE POWER SUPPLY, PRESS ANY BUTTONS, OR USE ANY PERIPHERAL DEVICES SUCH AS A MOUSE, KEYBOARD, OR REMOTE CONTROL. Starting Windows Vista the first time ...

E8410 User's Guide
Page 62
...or use it allows your system to register your Windows Vista system, the screen will need to enable the Automatic Updates feature. Starting Your LifeBook Notebook IF YOU STOP THE PROCESS YOUR NOTEBOOK WILL RETURN TO THE BEGINNING OF THE WINDOWS WELCOME PROCESS, EVEN IF YOU SHUT YOUR NOTEBOOK DOWN... AND START IT UP AGAIN. 57 - First of this period, do not disconnect the power supply, press any peripheral devices such as mouse, keyboard, or remote control. If the Register Windows Online icon is not seen in the following order. After accepting the EULAs, you will be asked ...
...or use it allows your system to register your Windows Vista system, the screen will need to enable the Automatic Updates feature. Starting Your LifeBook Notebook IF YOU STOP THE PROCESS YOUR NOTEBOOK WILL RETURN TO THE BEGINNING OF THE WINDOWS WELCOME PROCESS, EVEN IF YOU SHUT YOUR NOTEBOOK DOWN... AND START IT UP AGAIN. 57 - First of this period, do not disconnect the power supply, press any peripheral devices such as mouse, keyboard, or remote control. If the Register Windows Online icon is not seen in the following order. After accepting the EULAs, you will be asked ...

E8410 User's Guide
Page 95
...To connect the telephone cable follow these easy steps: 1 Align the connector with multiple ports to which you can connect external devices including: disk drives, keyboards, modems, printers, etc. Connecting a Modem The modem sound may initially be deactivated. Modem (RJ-11) Telephone Jack The modem (RJ-11) telephone...", click on Phone and click OK. 90 - Device Ports To activate modem sound follow these easy steps. Device Ports Your Fujitsu LifeBook notebook and the optional Port Replicator come equipped with the port opening. 2 Push the connector into a telephone outlet.
...To connect the telephone cable follow these easy steps: 1 Align the connector with multiple ports to which you can connect external devices including: disk drives, keyboards, modems, printers, etc. Connecting a Modem The modem sound may initially be deactivated. Modem (RJ-11) Telephone Jack The modem (RJ-11) telephone...", click on Phone and click OK. 90 - Device Ports To activate modem sound follow these easy steps. Device Ports Your Fujitsu LifeBook notebook and the optional Port Replicator come equipped with the port opening. 2 Push the connector into a telephone outlet.

E8410 User's Guide
Page 99
... your notebook: two on the left side and two on the rear. In order to connect USB devices such as external game pads, pointing devices, keyboards and/or speakers.
... your notebook: two on the left side and two on the rear. In order to connect USB devices such as external game pads, pointing devices, keyboards and/or speakers.

