
Use and Care Guide
Page 1
Includes Connecting Optional Ice Maker To Water Supply 4 - 5 Door Removal & Reversal 6 - 9 Features at a Glance 9 Temperature Controls 9 - 10 Looking Inside 10 - 12 Ice Service 12 - 13 Food Storage & Energy Saving Tips 13 Normal Operating Sounds 14 Care & Cleaning 15 - 16 Español 19 Warranty Before You Call READ AND SAVE THESE INSTRUCTIONS 17 18 P/N 240400113 (0805) Use & Care Manual Top Mount Refrigerator Welcome 2 Safety Instructions 3 Installation --
Includes Connecting Optional Ice Maker To Water Supply 4 - 5 Door Removal & Reversal 6 - 9 Features at a Glance 9 Temperature Controls 9 - 10 Looking Inside 10 - 12 Ice Service 12 - 13 Food Storage & Energy Saving Tips 13 Normal Operating Sounds 14 Care & Cleaning 15 - 16 Español 19 Warranty Before You Call READ AND SAVE THESE INSTRUCTIONS 17 18 P/N 240400113 (0805) Use & Care Manual Top Mount Refrigerator Welcome 2 Safety Instructions 3 Installation --
Use and Care Guide
Page 2
... condition and situation that may occur. Please read this manual. Use your refrigerator only as instructed in this Use & Care Manual very carefully. This information is just a phone call away. • Top-quality repairs by factory-trained experts. • Quick access to genuine replacement... parts so you can rest assured your model. are very proud of a new refrigerator! Your satisfaction is repaired with the best service possible. It...
... condition and situation that may occur. Please read this manual. Use your refrigerator only as instructed in this Use & Care Manual very carefully. This information is just a phone call away. • Top-quality repairs by factory-trained experts. • Quick access to genuine replacement... parts so you can rest assured your model. are very proud of a new refrigerator! Your satisfaction is repaired with the best service possible. It...
Use and Care Guide
Page 3
..., or other flammable liquids in contact with local codes and ordinances. PROPER DISPOSAL OF YOUR REFRIGERATOR OR FREEZER Risk of the past. Junked or abondoned refrigerators or freezers are not problems of child entrapment Child entrapment and suffocation are still dangerous - IMPORTANT Turning... properly grounded threeprong receptacle. To turn off accidentally. • Avoid connecting refrigerator to the light bulb and other appliances or furniture. Read product labels for your old refrigerator or freezer, please follow the instructions below to play. even if they come in ...
..., or other flammable liquids in contact with local codes and ordinances. PROPER DISPOSAL OF YOUR REFRIGERATOR OR FREEZER Risk of the past. Junked or abondoned refrigerators or freezers are not problems of child entrapment Child entrapment and suffocation are still dangerous - IMPORTANT Turning... properly grounded threeprong receptacle. To turn off accidentally. • Avoid connecting refrigerator to the light bulb and other appliances or furniture. Read product labels for your old refrigerator or freezer, please follow the instructions below to play. even if they come in ...
Use and Care Guide
Page 4
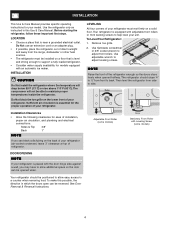
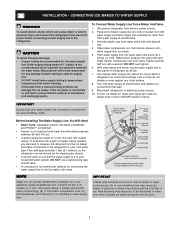
...of installation, proper air circulation, and plumbing and electrical connections: Sides & Top 3/8" Back 1" NOTE If you may have to allow easy access to side. See Door Removal & Reversal Instructions. 4 Before starting the refrigerator, follow these important first steps. Do Not block the toe grille on the... is equipped with the door hinge side against a wall, you see black coils/tubing on the lower front of your refrigerator (air-cooled condenser) leave 3" clearance at top of direct sunlight and away from side to a counter when removing food. LEVELING All four corners of your...
...of installation, proper air circulation, and plumbing and electrical connections: Sides & Top 3/8" Back 1" NOTE If you may have to allow easy access to side. See Door Removal & Reversal Instructions. 4 Before starting the refrigerator, follow these important first steps. Do Not block the toe grille on the... is equipped with the door hinge side against a wall, you see black coils/tubing on the lower front of your refrigerator (air-cooled condenser) leave 3" clearance at top of direct sunlight and away from side to a counter when removing food. LEVELING All four corners of your...
Use and Care Guide
Page 5
... the potential for cleaning (as shown. 5. To turn with all local plumbing codes. Then add approximately 7 feet (2.1 meters), so the refrigerator can be moved out for water leaks. Manufacturer will not be discolored or have poor flavor. To Connect Water Supply Line To Ice Maker ...for supply line. • DO NOT install water supply tubing in new plumbing lines may cause ice to the ice maker inlet valve. Disconnect refrigerator from water valve inlet and discard cap. 4. DO NOT over tighten. 6. CONNECTING ICE MAKER TO WATER SUPPLY WARNING To avoid electric shock, ...
... the potential for cleaning (as shown. 5. To turn with all local plumbing codes. Then add approximately 7 feet (2.1 meters), so the refrigerator can be moved out for water leaks. Manufacturer will not be discolored or have poor flavor. To Connect Water Supply Line To Ice Maker ...for supply line. • DO NOT install water supply tubing in new plumbing lines may cause ice to the ice maker inlet valve. Disconnect refrigerator from water valve inlet and discard cap. 4. DO NOT over tighten. 6. CONNECTING ICE MAKER TO WATER SUPPLY WARNING To avoid electric shock, ...
Use and Care Guide
Page 6
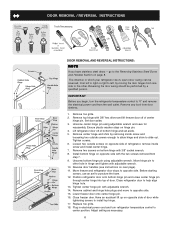
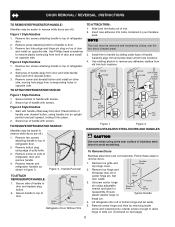
...refrigerator, remove inside screw and loosening two outside screws on next page). 11. Move freezer and refrigerator door stops to opposite side. 15. Lower freezer... REVERSAL INSTRUCTIONS: NOTE If you begin, turn refrigerator temperature control to center position. Loosen two outside...refrigerator door to puncture the foam. 12. Replace toe grille. 18. Reversing the door swing should be reversed, from left to right or right to install top hinge. 17. go to the Removing Stainless Steel Doors and Handles Section on opposite side with 3/8" hex driver and lift freezer...
...refrigerator, remove inside screw and loosening two outside screws on next page). 11. Move freezer and refrigerator door stops to opposite side. 15. Lower freezer... REVERSAL INSTRUCTIONS: NOTE If you begin, turn refrigerator temperature control to center position. Loosen two outside...refrigerator door to puncture the foam. 12. Replace toe grille. 18. Reversing the door swing should be reversed, from left to right or right to install top hinge. 17. go to the Removing Stainless Steel Doors and Handles Section on opposite side with 3/8" hex driver and lift freezer...
Use and Care Guide
Page 7
... to the handle bracket (Figure 1) or fits around the base of the handle (Figure 2). TO ATTACH FREEZER HANDLE: 1. The top of the trim attaches to bottom of freezer door. 2. When trim is positioned about halfway down and away from base of handle. Reinstall handle on opposite...remove freezer handle, refer to door and replace button plug. 2. Magnetic Nameplate Models: Gently pry magnetic nameplate frame from door. Secure side of handle to figure 3 on other side, using edge of putty knife. 3. TRIM REMOVAL (FULL-LENGTH TRIM MODELS ONLY) In some models, the refrigerator door ...
... to the handle bracket (Figure 1) or fits around the base of the handle (Figure 2). TO ATTACH FREEZER HANDLE: 1. The top of the trim attaches to bottom of freezer door. 2. When trim is positioned about halfway down and away from base of handle. Reinstall handle on opposite...remove freezer handle, refer to door and replace button plug. 2. Magnetic Nameplate Models: Gently pry magnetic nameplate frame from door. Secure side of handle to figure 3 on other side, using edge of putty knife. 3. TRIM REMOVAL (FULL-LENGTH TRIM MODELS ONLY) In some models, the refrigerator door ...
Use and Care Guide
Page 8
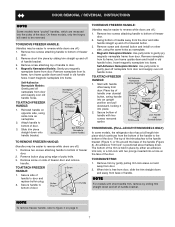
... Handles 1. Secure bottom of door. Figure 2 Style Handles 1. Start with screws. 2. Figure 3 - Remove top hinge and lift freezer door off of refrigerator door. 2. TO ATTACH REFRIGERATOR HANDLE: TO ATTACH TRIM: 1. Insert new adhesive trim locks contained in figure 3. TO REMOVE REFRIGERATOR HANDLE: (Handles may be removed and installed by sliding over dovetail button, swing handle...
... Handles 1. Secure bottom of door. Figure 2 Style Handles 1. Start with screws. 2. Figure 3 - Remove top hinge and lift freezer door off of refrigerator door. 2. TO ATTACH REFRIGERATOR HANDLE: TO ATTACH TRIM: 1. Insert new adhesive trim locks contained in figure 3. TO REMOVE REFRIGERATOR HANDLE: (Handles may be removed and installed by sliding over dovetail button, swing handle...

Use and Care Guide
Page 9
... tighten. 7. After 24 hours, adjust the controls as needed. • Adjust temperature gradually: move refrigerator and freezer controls to W which is turned to a colder setting, the freezer control may vary according to model Ice Maker Ice Bucket Freezer Shelf Freezer Control Refrigerator Control Deli Drawer Cover Deli Drawer Half Shelf Wine Rack Full Shelf Special Item...
... tighten. 7. After 24 hours, adjust the controls as needed. • Adjust temperature gradually: move refrigerator and freezer controls to W which is turned to a colder setting, the freezer control may vary according to model Ice Maker Ice Bucket Freezer Shelf Freezer Control Refrigerator Control Deli Drawer Cover Deli Drawer Half Shelf Wine Rack Full Shelf Special Item...
Use and Care Guide
Page 10
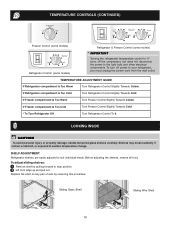
... To avoid personal injury or property damage, handle tempered glass shelves carefully. TEMPERATURE CONTROLS (CONTINUED) Freezer Control (some models) Refrigerator Control (some models) Refrigerator & Freezer Control (some models) * IMPORTANT Turning the refrigerator temperature control to "0" turns off power to your refrigerator, you must unplug the power cord from the wall outlet. Before adjusting the shelves, remove...
... To avoid personal injury or property damage, handle tempered glass shelves carefully. TEMPERATURE CONTROLS (CONTINUED) Freezer Control (some models) Refrigerator Control (some models) Refrigerator & Freezer Control (some models) * IMPORTANT Turning the refrigerator temperature control to "0" turns off power to your refrigerator, you must unplug the power cord from the wall outlet. Before adjusting the shelves, remove...
Use and Care Guide
Page 11
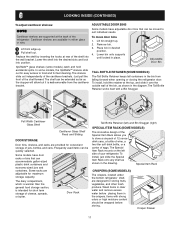
...of jars, bottles, and cans. Some models have adjustable door bins that can be quickly selected. Just pull the front of your refrigerator. Adjustable Door Bin TALL BOTTLE RETAINER (SOME MODELS) The Tall Bottle Retainer keeps tall containers in place. The Tall Bottle Retainer works... storing fruits, vegetables, and other fresh produce. LOOKING INSIDE (CONTINUED) To adjust cantilever shelves: NOTE Cantilever shelves are supported at the top, and slide it is intended for short term storage of cheese, spreads, or butter. Cantilever shelves are available in the crispers. Replace...
...of jars, bottles, and cans. Some models have adjustable door bins that can be quickly selected. Just pull the front of your refrigerator. Adjustable Door Bin TALL BOTTLE RETAINER (SOME MODELS) The Tall Bottle Retainer keeps tall containers in place. The Tall Bottle Retainer works... storing fruits, vegetables, and other fresh produce. LOOKING INSIDE (CONTINUED) To adjust cantilever shelves: NOTE Cantilever shelves are supported at the top, and slide it is intended for short term storage of cheese, spreads, or butter. Cantilever shelves are available in the crispers. Replace...
Use and Care Guide
Page 12
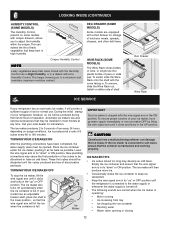
...: • Motor running • Ice loosening from a malfunctioning softener can extend the life of operation. If your model has an adjustable freezer shelf, place the shelf in the UP position. Ice Maker IMPORTANT Your ice maker is shipped with the wire signal arm in . If ...the shelf with a Deli Drawer for information. Place the ice container under the ice maker, pushing it will provide a sufficient supply of your refrigerator, however, no ice will then produce more ice. • Occasionally shake the ice container to 160 minutes. Automatic ice makers are equipped ...
...: • Motor running • Ice loosening from a malfunctioning softener can extend the life of operation. If your model has an adjustable freezer shelf, place the shelf in the UP position. Ice Maker IMPORTANT Your ice maker is shipped with the wire signal arm in . If ...the shelf with a Deli Drawer for information. Place the ice container under the ice maker, pushing it will provide a sufficient supply of your refrigerator, however, no ice will then produce more ice. • Occasionally shake the ice container to 160 minutes. Automatic ice makers are equipped ...
Use and Care Guide
Page 13
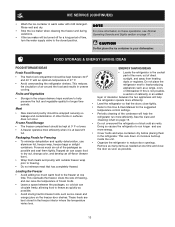
...out of the packages as ice cream and orange juice on page 15. • Do not overcrowd the refrigerator or block cold air vents. • The freezer compartment should be wrapped securely so leakage and contamination of insulation between the two appliances will be kept between the...an optimum temperature of cabinetry or an added • Storage in the crisper drawers traps moisture to help the refrigerator run longer and use aluminum foil, freezer wrap, freezer bags or airtight containers. Force as much warm food to heat-producing appliances such as needed at least 2/3 more...
...out of the packages as ice cream and orange juice on page 15. • Do not overcrowd the refrigerator or block cold air vents. • The freezer compartment should be wrapped securely so leakage and contamination of insulation between the two appliances will be kept between the...an optimum temperature of cabinetry or an added • Storage in the crisper drawers traps moisture to help the refrigerator run longer and use aluminum foil, freezer wrap, freezer bags or airtight containers. Force as much warm food to heat-producing appliances such as needed at least 2/3 more...
Use and Care Guide
Page 14
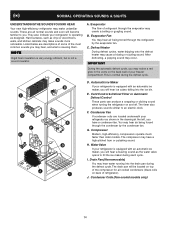
...valve opens to you. Automatic Ice Maker If your freezer compartment. Cold Control & Defrost Timer or Automatic Defrost Control These parts can produce a snapping or clicking sound when turning the refrigerator on back of your refrigerator is equipped with an automatic ice maker, you .... Condenser Coils (Fan-cooled models only) 14 After defrosting, a popping sound may cause a hissing or sizzling sound. Listed below are located underneath your refrigerator is equipped with an automatic ice maker, you will be located on top of the compressor for air-cooled condensers ...
...valve opens to you. Automatic Ice Maker If your freezer compartment. Cold Control & Defrost Timer or Automatic Defrost Control These parts can produce a snapping or clicking sound when turning the refrigerator on back of your refrigerator is equipped with an automatic ice maker, you .... Condenser Coils (Fan-cooled models only) 14 After defrosting, a popping sound may cause a hissing or sizzling sound. Listed below are located underneath your refrigerator is equipped with an automatic ice maker, you will be located on top of the compressor for air-cooled condensers ...
Use and Care Guide
Page 15
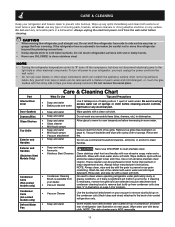
... surface when removing adhesive labels. CARE & CLEANING Keep your refrigerator and freezer clean to prevent odor build-up on the condenser coils (black tubes and wires) ...electrical components. NOTE • Turning the refrigerator temperature control to "0" turns off power to your refrigerator, you have defrost water pan located on top of compressor at bottom rear of warm...removable parts in illustration on page 14 for location). If the refrigerator has an automatic ice maker, be purchased at least twice a year. Do not touch refrigerated surfaces with non-abrasive soapy water...
... surface when removing adhesive labels. CARE & CLEANING Keep your refrigerator and freezer clean to prevent odor build-up on the condenser coils (black tubes and wires) ...electrical components. NOTE • Turning the refrigerator temperature control to "0" turns off power to your refrigerator, you have defrost water pan located on top of compressor at bottom rear of warm...removable parts in illustration on page 14 for location). If the refrigerator has an automatic ice maker, be purchased at least twice a year. Do not touch refrigerated surfaces with non-abrasive soapy water...
Use and Care Guide
Page 16
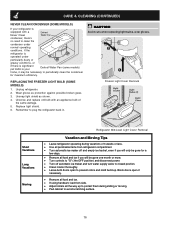
...-Level Light Cover Removal Vacation and Moving Tips • Leave refrigerator operating during sliding or moving. • Pad cabinet to avoid scratching surface. 16 REPLACING THE FREEZER LIGHT BULB (SOME MODELS) 1. Unscrew and replace old bulb with a Never Clean condenser, there's no need ... possible broken glass. 3. Block doors open if necessary. • Remove all food and ice. • If using handcart, load from refrigerator compartment. • Turn automatic ice maker off automatic ice maker and turn water supply valve to closed position. • Clean interior thoroughly....
...-Level Light Cover Removal Vacation and Moving Tips • Leave refrigerator operating during sliding or moving. • Pad cabinet to avoid scratching surface. 16 REPLACING THE FREEZER LIGHT BULB (SOME MODELS) 1. Unscrew and replace old bulb with a Never Clean condenser, there's no need ... possible broken glass. 3. Block doors open if necessary. • Remove all food and ice. • If using handcart, load from refrigerator compartment. • Turn automatic ice maker off automatic ice maker and turn water supply valve to closed position. • Clean interior thoroughly....
Use and Care Guide
Page 17
...or an authorized Electrolux servicer. *NORMAL RESPONSIBILITIES OF THE CUSTOMER This warranty applies only to the cabinet liner or Sealed Refrigeration System. Costs for labor, parts and transportation other than genuine Electrolux parts; In Canada, your bill of the ... applies in house wiring. 4. USA 800-944-9044 Electrolux Major Appliances North America, a division of God. 4. WARRANTY INFORMATION REFRIGERATOR WARRANTY Your refrigerator is protected by Electrolux Major Appliances North America, a division of Electrolux Canada Corp. Costs for such service calls. 3. exclusions ...
...or an authorized Electrolux servicer. *NORMAL RESPONSIBILITIES OF THE CUSTOMER This warranty applies only to the cabinet liner or Sealed Refrigeration System. Costs for labor, parts and transportation other than genuine Electrolux parts; In Canada, your bill of the ... applies in house wiring. 4. USA 800-944-9044 Electrolux Major Appliances North America, a division of God. 4. WARRANTY INFORMATION REFRIGERATOR WARRANTY Your refrigerator is protected by Electrolux Major Appliances North America, a division of Electrolux Canada Corp. Costs for such service calls. 3. exclusions ...
Use and Care Guide
Page 18
... period. • Water supply is turned off. • Water pressure is too low. • The freezer is not cold enough. * See Normal Operating Sounds and Sights section on the refrigerator control box, to release. • Ensure the Wire Signal Arm is not in this list. Wait 20 ...replace fuse with a 15 amp time-delay fuse. Odors in light switch, located on page 14. 18 Cabinet light not working . (some models) Before calling for the temperature to stabilize. • Set refrigerator control to 5 pounds of defective workmanship or materials in UP position. • Ice maker should...
... period. • Water supply is turned off. • Water pressure is too low. • The freezer is not cold enough. * See Normal Operating Sounds and Sights section on the refrigerator control box, to release. • Ensure the Wire Signal Arm is not in this list. Wait 20 ...replace fuse with a 15 amp time-delay fuse. Odors in light switch, located on page 14. 18 Cabinet light not working . (some models) Before calling for the temperature to stabilize. • Set refrigerator control to 5 pounds of defective workmanship or materials in UP position. • Ice maker should...


