
Use and Care Guide
Page 1
Includes Connecting Optional Ice Maker To Water Supply 4 - 5 Door Removal & Reversal 6 - 9 Features at a Glance 9 Temperature Controls 9 - 10 Looking Inside 10 - 12 Ice Service 12 - 13 Food Storage & Energy Saving Tips 13 Normal Operating Sounds 14 Care & Cleaning 15 - 16 Español 19 Warranty Before You Call READ AND SAVE THESE INSTRUCTIONS 17 18 P/N 240400113 (0805) Use & Care Manual Top Mount Refrigerator Welcome 2 Safety Instructions 3 Installation --
Includes Connecting Optional Ice Maker To Water Supply 4 - 5 Door Removal & Reversal 6 - 9 Features at a Glance 9 Temperature Controls 9 - 10 Looking Inside 10 - 12 Ice Service 12 - 13 Food Storage & Energy Saving Tips 13 Normal Operating Sounds 14 Care & Cleaning 15 - 16 Español 19 Warranty Before You Call READ AND SAVE THESE INSTRUCTIONS 17 18 P/N 240400113 (0805) Use & Care Manual Top Mount Refrigerator Welcome 2 Safety Instructions 3 Installation --
Use and Care Guide
Page 2
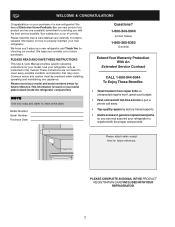
...; Top-quality repairs by factory-trained experts. • Quick access to genuine replacement parts so you with the proper components. Please record your refrigerator only as instructed in this Use & Care Manual very carefully. Please attach sales receipt here for your serial plate located inside the refrigerator compartment. We hope you 'll enjoy your new refrigerator and Thank You for future reference. NOTE Use only soap and water...
...; Top-quality repairs by factory-trained experts. • Quick access to genuine replacement parts so you with the proper components. Please record your refrigerator only as instructed in this Use & Care Manual very carefully. Please attach sales receipt here for your serial plate located inside the refrigerator compartment. We hope you 'll enjoy your new refrigerator and Thank You for future reference. NOTE Use only soap and water...
Use and Care Guide
Page 3
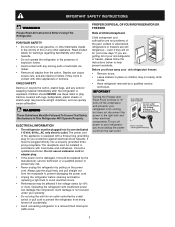
... moving parts of automatic ice maker. • Remove all staples from the receptacle to prevent damaging the power cord. • Unplug the refrigerator before cleaning and before replacing a light bulb to play. Such damage is unpacked. If you must be replaced by 10% or more. To turn off power to your protection against electrical shock hazards. IMPORTANT SAFETY INSTRUCTIONS WARNING Please Read All Instructions Before Using This Refrigerator...
... moving parts of automatic ice maker. • Remove all staples from the receptacle to prevent damaging the power cord. • Unplug the refrigerator before cleaning and before replacing a light bulb to play. Such damage is unpacked. If you must be replaced by 10% or more. To turn off power to your protection against electrical shock hazards. IMPORTANT SAFETY INSTRUCTIONS WARNING Please Read All Instructions Before Using This Refrigerator...
Use and Care Guide
Page 4
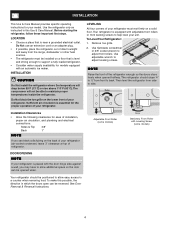
... ice maker. Sufficient air circulation is essential for models equipped with the door hinge side against a wall, you see black coils/tubing on the back of your refrigerator (air-cooled condenser) leave 3" clearance at top of refrigerator. NOTE Raise the front of the refrigerator enough so the doors close freely when opened wider. DOOR OPENING NOTE If your refrigerator is level and strong enough to maintain proper temperatures inside the refrigerator. INSTALLATION This Use & Care Manual...
... ice maker. Sufficient air circulation is essential for models equipped with the door hinge side against a wall, you see black coils/tubing on the back of your refrigerator (air-cooled condenser) leave 3" clearance at top of refrigerator. NOTE Raise the front of the refrigerator enough so the doors close freely when opened wider. DOOR OPENING NOTE If your refrigerator is level and strong enough to maintain proper temperatures inside the refrigerator. INSTALLATION This Use & Care Manual...
Use and Care Guide
Page 5
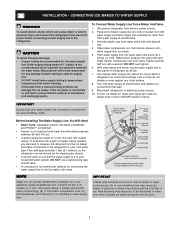
... working properly. To Connect Water Supply Line To Ice Maker Inlet Valve 1. DO NOT over tighten. 6. Turn ON water supply at shutoff valve and tighten any other surface. 8. NOTE Water line kit number 5303917950, available from electrical power before making a full tray of ¼ inch (6.4 mm) OD, copper tubing. INSTALLATION - Tighten another half turn ice maker on, lower wire signal arm (see ice maker front cover for supply line. • DO NOT install water supply tubing in new plumbing lines may cause ice to a household cold water line with a wrench; Before Installing...
... working properly. To Connect Water Supply Line To Ice Maker Inlet Valve 1. DO NOT over tighten. 6. Turn ON water supply at shutoff valve and tighten any other surface. 8. NOTE Water line kit number 5303917950, available from electrical power before making a full tray of ¼ inch (6.4 mm) OD, copper tubing. INSTALLATION - Tighten another half turn ice maker on, lower wire signal arm (see ice maker front cover for supply line. • DO NOT install water supply tubing in new plumbing lines may cause ice to a household cold water line with a wrench; Before Installing...
Use and Care Guide
Page 6
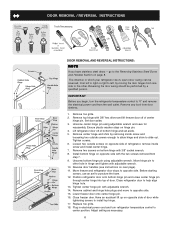
... in electrical power cord and turn the refrigerator temperature control to puncture the foam. 12. Move freezer and refrigerator door stops to the Removing Stainless Steel Doors and Handles Section on bottom hinge with 3/8" hex driver and lift freezer door off of door. Lower freezer door onto center hinge pin. 16. Close freezer door. DOOR REMOVAL / REVERSAL INSTRUCTIONS DOOR REMOVAL AND REVERSAL INSTRUCTIONS: NOTE If you begin, turn refrigerator temperature control to install top hinge. 17. Unscrew center hinge pin using adjustable wrench. Tighten screws. 6. Reverse door handles...
... in electrical power cord and turn the refrigerator temperature control to puncture the foam. 12. Move freezer and refrigerator door stops to the Removing Stainless Steel Doors and Handles Section on bottom hinge with 3/8" hex driver and lift freezer door off of door. Lower freezer door onto center hinge pin. 16. Close freezer door. DOOR REMOVAL / REVERSAL INSTRUCTIONS DOOR REMOVAL AND REVERSAL INSTRUCTIONS: NOTE If you begin, turn refrigerator temperature control to install top hinge. 17. Unscrew center hinge pin using adjustable wrench. Tighten screws. 6. Reverse door handles...
Use and Care Guide
Page 7
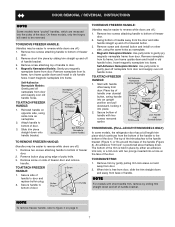
On these models, only the hinges will need to reverse while doors are off.) 1. TO REMOVE FREEZER HANDLE: (Handles may be easier to be reversed. Secure side of dovetail button. 3. TO REMOVE FREEZER HANDLE: (Handles may be easier to door and replace button plug. 2. Remove short trim piece by either an adhesive trim lock, or a trim lock with handle offset away from door and reapply over old handle holes. Remove nameplate from its frame, turn frame...
On these models, only the hinges will need to reverse while doors are off.) 1. TO REMOVE FREEZER HANDLE: (Handles may be easier to be reversed. Secure side of dovetail button. 3. TO REMOVE FREEZER HANDLE: (Handles may be easier to door and replace button plug. 2. Remove short trim piece by either an adhesive trim lock, or a trim lock with handle offset away from door and reapply over old handle holes. Remove nameplate from its frame, turn frame...
Use and Care Guide
Page 8
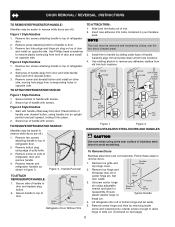
... refrigerator door. 2. Secure handle to top of refrigerator door. 2. To Remove Doors Stainless steel doors are not reversible. Remove toe grille and top hinge cover. 2. Remove screw and dovetail button and install on other side, moving hole plugs from front of handle. NOTE Trim lock must be removed and installed by sliding under base of door and install on opposite side Figure 2 Style Handles 1. Remove two screws attaching handle to top of handle away from old trim lock locations. Reverse freezer and refrigerator handles...
... refrigerator door. 2. Secure handle to top of refrigerator door. 2. To Remove Doors Stainless steel doors are not reversible. Remove toe grille and top hinge cover. 2. Remove screw and dovetail button and install on other side, moving hole plugs from front of handle. NOTE Trim lock must be removed and installed by sliding under base of door and install on opposite side Figure 2 Style Handles 1. Remove two screws attaching handle to top of handle away from old trim lock locations. Reverse freezer and refrigerator handles...

Use and Care Guide
Page 9
... model Ice Maker Ice Bucket Freezer Shelf Freezer Control Refrigerator Control Deli Drawer Cover Deli Drawer Half Shelf Wine Rack Full Shelf Special Item Rack Mid Level Light Crisper Cover Crisper Drawers FEATURES AT A GLANCE Ice Tray Freezer Light Toe Grille Fixed Door Bin Door Rack Dairy Door Tall Bottle Retainer Snugger Door Bin Fixed Door Bin Door Rack TEMPERATURE CONTROLS COOL DOWN PERIOD To ensure safe food storage, allow the refrigerator to operate with the doors closed for refrigerator door. Remove freezer handle. 2. Turning the freezer control will change only the freezer...
... model Ice Maker Ice Bucket Freezer Shelf Freezer Control Refrigerator Control Deli Drawer Cover Deli Drawer Half Shelf Wine Rack Full Shelf Special Item Rack Mid Level Light Crisper Cover Crisper Drawers FEATURES AT A GLANCE Ice Tray Freezer Light Toe Grille Fixed Door Bin Door Rack Dairy Door Tall Bottle Retainer Snugger Door Bin Fixed Door Bin Door Rack TEMPERATURE CONTROLS COOL DOWN PERIOD To ensure safe food storage, allow the refrigerator to operate with the doors closed for refrigerator door. Remove freezer handle. 2. Turning the freezer control will change only the freezer...
Use and Care Guide
Page 10
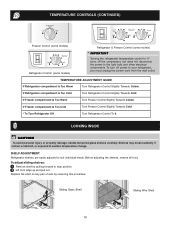
...some models) Refrigerator Control (some models) Refrigerator & Freezer Control (some models) * IMPORTANT Turning the refrigerator temperature control to "0" turns off power to sudden temperature change. TEMPERATURE ADJUSTMENT GUIDE If Refrigerator compartment Is Too Warm Turn Refrigerator Control Slightly Towards Colder. SHELF ADJUSTMENT Refrigerator shelves are easily adjusted to the light bulb and other electrical components. LOOKING INSIDE CAUTION To avoid personal injury or property damage, handle tempered glass shelves carefully. Sliding Glass Shelf Sliding Wire Shelf 10...
...some models) Refrigerator Control (some models) Refrigerator & Freezer Control (some models) * IMPORTANT Turning the refrigerator temperature control to "0" turns off power to sudden temperature change. TEMPERATURE ADJUSTMENT GUIDE If Refrigerator compartment Is Too Warm Turn Refrigerator Control Slightly Towards Colder. SHELF ADJUSTMENT Refrigerator shelves are easily adjusted to the light bulb and other electrical components. LOOKING INSIDE CAUTION To avoid personal injury or property damage, handle tempered glass shelves carefully. Sliding Glass Shelf Sliding Wire Shelf 10...
Use and Care Guide
Page 11
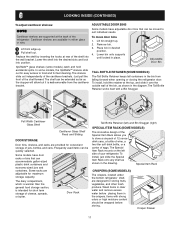
... install, hold accidental spills. Door Rack Tall Bottle Retainer (left side of your refrigerator. Items with a Bin Snugger. Crisper Drawer 11 Cantilever shelves are available in the crispers. In some models) catch and hold the retainer at the back of the refrigerator. ADJUSTABLE DOOR BINS Some models have door racks or bins that can accommodate gallon-sized plastic drink containers and economy-sized jars and containers. Lower the shelf into...
... install, hold accidental spills. Door Rack Tall Bottle Retainer (left side of your refrigerator. Items with a Bin Snugger. Crisper Drawer 11 Cantilever shelves are available in the crispers. In some models) catch and hold the retainer at the back of the refrigerator. ADJUSTABLE DOOR BINS Some models have door racks or bins that can accommodate gallon-sized plastic drink containers and economy-sized jars and containers. Lower the shelf into...
Use and Care Guide
Page 12
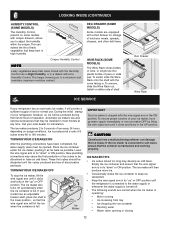
.... ICE MAKER TIPS • Ice cubes stored too long may be opened. This keeps incoming air to adjust the humidity within the crisper. DELI DRAWER (SOME MODELS) Some models are free of operation. To remove, slide the Wine Rack out. New plumbing connections may cause the first production of ice cubes to be discarded until it clicks and locks in most models at a rate of your model has an adjustable freezer shelf...
.... ICE MAKER TIPS • Ice cubes stored too long may be opened. This keeps incoming air to adjust the humidity within the crisper. DELI DRAWER (SOME MODELS) Some models are free of operation. To remove, slide the Wine Rack out. New plumbing connections may cause the first production of ice cubes to be discarded until it clicks and locks in most models at a rate of your model has an adjustable freezer shelf...
Use and Care Guide
Page 13
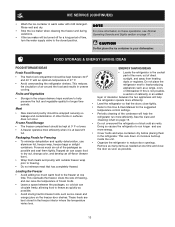
... cooling. Trapped air can circulate freely, allowing food to freeze as quickly as possible. Rinse well and dry. • Stop the ice maker when cleaning the freezer and during vacations. • If the ice maker will help preserve the fruit and vegetable quality for the suggested temperature control settings. • Periodic cleaning of insulation between the packages, so cold air can cause food • Organize the refrigerator...
... cooling. Trapped air can circulate freely, allowing food to freeze as quickly as possible. Rinse well and dry. • Stop the ice maker when cleaning the freezer and during vacations. • If the ice maker will help preserve the fruit and vegetable quality for the suggested temperature control settings. • Periodic cleaning of insulation between the packages, so cold air can cause food • Organize the refrigerator...
Use and Care Guide
Page 14
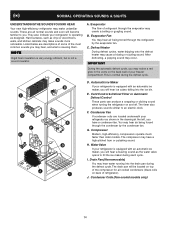
... condenser fan. Water Valve If your refrigerator is causing them. Evaporator The flow of the most common sounds you may occur. Automatic Ice Maker If your refrigerator is operating as the water valve opens to an electric clock. E. H. I. J. Condenser Coils (Fan-cooled models only) 14 NORMAL OPERATING SOUNDS & SIGHTS UNDERSTANDING THE SOUNDS YOU MAY HEAR Your new high-efficiency refrigerator may hear water running into the ice bin. Listed below are located underneath your freezer compartment. After defrosting...
... condenser fan. Water Valve If your refrigerator is causing them. Evaporator The flow of the most common sounds you may occur. Automatic Ice Maker If your refrigerator is operating as the water valve opens to an electric clock. E. H. I. J. Condenser Coils (Fan-cooled models only) 14 NORMAL OPERATING SOUNDS & SIGHTS UNDERSTANDING THE SOUNDS YOU MAY HEAR Your new high-efficiency refrigerator may hear water running into the ice bin. Listed below are located underneath your freezer compartment. After defrosting...
Use and Care Guide
Page 15
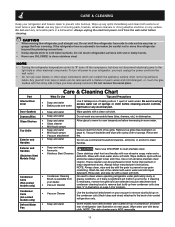
... excess water out of warm water. CAUTION • When moving the refrigerator, pull straight out. Care & Cleaning Chart Part What To Use Tips and Precautions Interior/Door Liner • Soap and water • Baking soda and water Use 2 tablespoons of baking soda in warm water. Vacuum dust from your dealer. • Vacuum Cleaner No need to your refrigerator, you have defrost water pan located on top of compressor at bottom rear of warm water and...
... excess water out of warm water. CAUTION • When moving the refrigerator, pull straight out. Care & Cleaning Chart Part What To Use Tips and Precautions Interior/Door Liner • Soap and water • Baking soda and water Use 2 tablespoons of baking soda in warm water. Vacuum dust from your dealer. • Vacuum Cleaner No need to your refrigerator, you have defrost water pan located on top of compressor at bottom rear of warm water and...
Use and Care Guide
Page 16
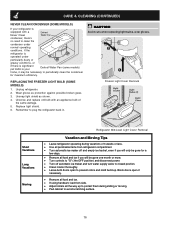
... plug the refrigerator back in your Defrost Water Pan (some models) home, it may be gone one month or more. • Turn controls to "O" ( the OFF position) and disconnect power. • Turn off automatic ice maker and turn water supply valve to closed position. • Clean interior thoroughly. • Leave both doors open if necessary. • Remove all food and ice. • If using handcart, load from refrigerator compartment. • Turn automatic ice maker off and empty ice...
... plug the refrigerator back in your Defrost Water Pan (some models) home, it may be gone one month or more. • Turn controls to "O" ( the OFF position) and disconnect power. • Turn off automatic ice maker and turn water supply valve to closed position. • Clean interior thoroughly. • Leave both doors open if necessary. • Remove all food and ice. • If using handcart, load from refrigerator compartment. • Turn automatic ice maker off and empty ice...
Use and Care Guide
Page 17
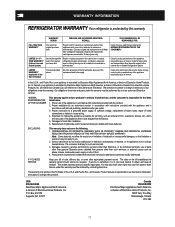
..., electrical and/or gas codes. 3. Excludes original and replacement Ice & Water filter cartridges (if equipped). LIMITED WARRANTY (Applicable to be performed by this warranty as described or illustrated are warranted for labor, parts and transportation other than with original serial numbers that have other appropriate payment record. exclusions listed below : 1. and Puerto Rico, your bill of our obligations under this warranty. Replacement of God. 4. Service calls...
..., electrical and/or gas codes. 3. Excludes original and replacement Ice & Water filter cartridges (if equipped). LIMITED WARRANTY (Applicable to be performed by this warranty as described or illustrated are warranted for labor, parts and transportation other than with original serial numbers that have other appropriate payment record. exclusions listed below : 1. and Puerto Rico, your bill of our obligations under this warranty. Replacement of God. 4. Service calls...
Use and Care Guide
Page 18
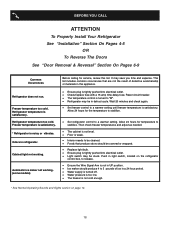
...; Ice maker should be in refrigerator. Automatic ice maker not working . This list includes common occurrences that produce odors should produce 4 to stabilize. Reset circuit breaker. • The temperature control is satisfactory. BEFORE YOU CALL ATTENTION To Properly Install Your Refrigerator See "Installation" Section On Pages 4-5 OR To Reverse The Doors See "Door Removal & Reversal" Section On Pages 6-9 Common Occurrences Refrigerator does not run. Cabinet light not working . (some models) Before calling for service, review...
...; Ice maker should be in refrigerator. Automatic ice maker not working . This list includes common occurrences that produce odors should produce 4 to stabilize. Reset circuit breaker. • The temperature control is satisfactory. BEFORE YOU CALL ATTENTION To Properly Install Your Refrigerator See "Installation" Section On Pages 4-5 OR To Reverse The Doors See "Door Removal & Reversal" Section On Pages 6-9 Common Occurrences Refrigerator does not run. Cabinet light not working . (some models) Before calling for service, review...


