
Use and Care Guide
Page 1
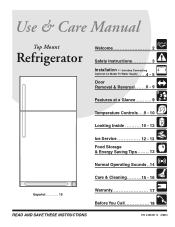
Includes Connecting Optional Ice Maker To Water Supply 4 - 5 Door Removal & Reversal 6 - 9 Features at a Glance 9 Temperature Controls 9 - 10 Looking Inside 10 - 12 Ice Service 12 - 13 Food Storage & Energy Saving Tips 13 Normal Operating Sounds 14 Care & Cleaning 15 - 16 Español 19 Warranty Before You Call READ AND SAVE THESE INSTRUCTIONS 17 18 P/N 240400113 (0805) Use & Care Manual Top Mount Refrigerator Welcome 2 Safety Instructions 3 Installation --
Includes Connecting Optional Ice Maker To Water Supply 4 - 5 Door Removal & Reversal 6 - 9 Features at a Glance 9 Temperature Controls 9 - 10 Looking Inside 10 - 12 Ice Service 12 - 13 Food Storage & Energy Saving Tips 13 Normal Operating Sounds 14 Care & Cleaning 15 - 16 Español 19 Warranty Before You Call READ AND SAVE THESE INSTRUCTIONS 17 18 P/N 240400113 (0805) Use & Care Manual Top Mount Refrigerator Welcome 2 Safety Instructions 3 Installation --
Use and Care Guide
Page 2
...budget. • Fast, convenient toll-free service is just a phone call away. • Top-quality repairs by factory-trained experts. • Quick access to properly maintain your refrigerator only as instructed in this Use & Care Manual very carefully. NOTE Use only soap and water ... condition and situation that may occur. PLEASE COMPLETE AND MAIL IN THE PRODUCT REGISTRATION CARD INCLUDED WITH YOUR REFRIGERATOR. 2 WELCOME & CONGRATULATIONS Congratulations on your refrigerator is repaired with the best service possible. Please read this manual. We know you can rest assured your...
...budget. • Fast, convenient toll-free service is just a phone call away. • Top-quality repairs by factory-trained experts. • Quick access to properly maintain your refrigerator only as instructed in this Use & Care Manual very carefully. NOTE Use only soap and water ... condition and situation that may occur. PLEASE COMPLETE AND MAIL IN THE PRODUCT REGISTRATION CARD INCLUDED WITH YOUR REFRIGERATOR. 2 WELCOME & CONGRATULATIONS Congratulations on your refrigerator is repaired with the best service possible. Please read this manual. We know you can rest assured your...
Use and Care Guide
Page 3
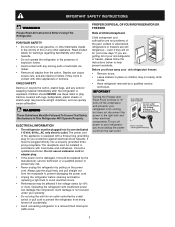
...recycle the carton, plastic bags, and any risk. • Never unplug the refrigerator by pulling on the power cord. Junked or abondoned refrigerators or freezers are not problems of your old refrigerator or freezer, please follow the instructions below to avoid electrical shock. • Performance may not...and other appliance. Read product labels for "just a few days." IMPORTANT Turning the Freezer and Fresh Food Controls to "0" turns off power to your refrigerator you throw away your refrigerator from the carton. The power cord of automatic ice maker. • Remove all staples...
...recycle the carton, plastic bags, and any risk. • Never unplug the refrigerator by pulling on the power cord. Junked or abondoned refrigerators or freezers are not problems of your old refrigerator or freezer, please follow the instructions below to avoid electrical shock. • Performance may not...and other appliance. Read product labels for "just a few days." IMPORTANT Turning the Freezer and Fresh Food Controls to "0" turns off power to your refrigerator you throw away your refrigerator from the carton. The power cord of automatic ice maker. • Remove all staples...
Use and Care Guide
Page 4
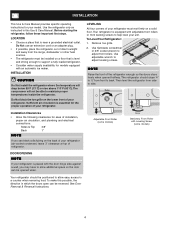
..., dishwasher or other heat sources. • The refrigerator must rest firmly on the back of your refrigerator (air-cooled condenser) leave 3" clearance at top of refrigerator. INSTALLATION CAUTION Do Not install the refrigerator where the temperature will not be installed on the lower front of your refrigerator. Your refrigerator is placed with Leveling Screw (some models) Your...
..., dishwasher or other heat sources. • The refrigerator must rest firmly on the back of your refrigerator (air-cooled condenser) leave 3" clearance at top of refrigerator. INSTALLATION CAUTION Do Not install the refrigerator where the temperature will not be installed on the lower front of your refrigerator. Your refrigerator is placed with Leveling Screw (some models) Your...
Use and Care Guide
Page 5
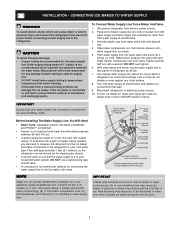
... Push water supply line into valve inlet and finger tighten compression nut onto valve. Coil excess water supply line (about 2½ turns) behind refrigerator as shown. 5. Place end of ¼ inch (6.4 mm) OD, copper tubing. Before Installing The Water Supply Line,You Will Need &#...8226; Basic Tools: adjustable wrench, flat-blade screwdriver, and PhillipsTM screwdriver • Access to the refrigerator. NOTE Water line kit number 5303917950, available from a malfunctioning softener can damage the ice maker. Turn ON water supply and flush supply...
... Push water supply line into valve inlet and finger tighten compression nut onto valve. Coil excess water supply line (about 2½ turns) behind refrigerator as shown. 5. Place end of ¼ inch (6.4 mm) OD, copper tubing. Before Installing The Water Supply Line,You Will Need &#...8226; Basic Tools: adjustable wrench, flat-blade screwdriver, and PhillipsTM screwdriver • Access to the refrigerator. NOTE Water line kit number 5303917950, available from a malfunctioning softener can damage the ice maker. Turn ON water supply and flush supply...
Use and Care Guide
Page 6
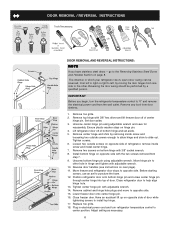
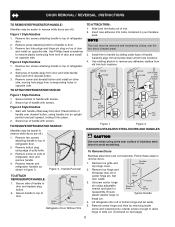
...top hinge with adjustable wrench. 14. Set door aside. 3. Lift refrigerator door off of door while tightening screws to the other hole in which your refrigerator doors open (door swing) can be performed by removing inside screw and install center hinge. 7. Tighten screws. 6. Loosen two outside screws on opposite side of refrigerator... two screws removed from the wall outlet. Position refrigerator door onto bottom hinge pin and screw center hinge pin through center hinge into top of bottom hinge and set aside. 5. Close freezer door. Adjust setting as necessary. 6 IMPORTANT Before...
...top hinge with adjustable wrench. 14. Set door aside. 3. Lift refrigerator door off of door while tightening screws to the other hole in which your refrigerator doors open (door swing) can be performed by removing inside screw and install center hinge. 7. Tighten screws. 6. Loosen two outside screws on opposite side of refrigerator... two screws removed from the wall outlet. Position refrigerator door onto bottom hinge pin and screw center hinge pin through center hinge into top of bottom hinge and set aside. 5. Close freezer door. Adjust setting as necessary. 6 IMPORTANT Before...
Use and Care Guide
Page 7
...nameplate into place. 2. Self-Adhesive Nameplate Models: Use putty knife to bottom of the door. Place top of the door. TRIM REMOVAL (FULL-LENGTH TRIM MODELS ONLY) In some models, the refrigerator door has a full length trim piece which are recessed into frame. TO REMOVE TRIM: 1. Remove...removed earlier. Remove button plug using same hole as nameplate. 4. Remove two screws attaching handle to the bottom of freezer door. 2. TO ATTACH FREEZER HANDLE: 1. The top of the trim attaches to door and replace button plug. 2. Remove nameplate from the bottom of the handle to ...
...nameplate into place. 2. Self-Adhesive Nameplate Models: Use putty knife to bottom of the door. Place top of the door. TRIM REMOVAL (FULL-LENGTH TRIM MODELS ONLY) In some models, the refrigerator door has a full length trim piece which are recessed into frame. TO REMOVE TRIM: 1. Remove...removed earlier. Remove button plug using same hole as nameplate. 4. Remove two screws attaching handle to the bottom of freezer door. 2. TO ATTACH FREEZER HANDLE: 1. The top of the trim attaches to door and replace button plug. 2. Remove nameplate from the bottom of the handle to ...
Use and Care Guide
Page 8
... on side of refrigerator door. 2. Slide both trim locks out of center hinge pin. Install trim to top of door. Remove two screws attaching handle to handle by sliding under base of handle with screws. To Remove Doors Stainless steel doors are off of putty knife. 3. Remove top hinge and lift freezer door off...
... on side of refrigerator door. 2. Slide both trim locks out of center hinge pin. Install trim to top of door. Remove two screws attaching handle to handle by sliding under base of handle with screws. To Remove Doors Stainless steel doors are off of putty knife. 3. Remove top hinge and lift freezer door off...

Use and Care Guide
Page 9
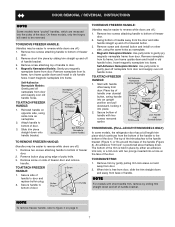
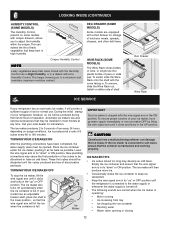
...Remove freezer handle. 2. Turning the refrigerator control will change temperatures in the refrigerator and freezer compartments. Reverse steps 1 - 6 to W which is turned to a colder setting, the freezer control may vary according to model Ice Maker Ice Bucket Freezer Shelf Freezer Control Refrigerator ... DOOR REMOVAL / REVERSAL INSTRUCTIONS 6. Turning the freezer control will change only the freezer temperature. After 24 hours, adjust the controls as needed. • Adjust temperature gradually: move refrigerator and freezer controls to reinstall doors To Remove Handles 1. ...
...Remove freezer handle. 2. Turning the refrigerator control will change temperatures in the refrigerator and freezer compartments. Reverse steps 1 - 6 to W which is turned to a colder setting, the freezer control may vary according to model Ice Maker Ice Bucket Freezer Shelf Freezer Control Refrigerator ... DOOR REMOVAL / REVERSAL INSTRUCTIONS 6. Turning the freezer control will change only the freezer temperature. After 24 hours, adjust the controls as needed. • Adjust temperature gradually: move refrigerator and freezer controls to reinstall doors To Remove Handles 1. ...
Use and Care Guide
Page 10
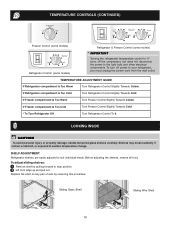
...personal injury or property damage, handle tempered glass shelves carefully. If Freezer compartment Is Too Warm Turn Freezer Control Slightly Towards Colder. SHELF ADJUSTMENT Refrigerator shelves are easily adjusted to stop position. 2 Lift front edge ... If Freezer compartment Is Too Cold Turn Freezer Control Slightly Towards Cold. * To Turn Refrigerator Off Turn Refrigerator Control To 0. TEMPERATURE CONTROLS (CONTINUED) Freezer Control (some models) Refrigerator Control (some models) Refrigerator & Freezer Control (some models) * IMPORTANT Turning the refrigerator temperature ...
...personal injury or property damage, handle tempered glass shelves carefully. If Freezer compartment Is Too Warm Turn Freezer Control Slightly Towards Colder. SHELF ADJUSTMENT Refrigerator shelves are easily adjusted to stop position. 2 Lift front edge ... If Freezer compartment Is Too Cold Turn Freezer Control Slightly Towards Cold. * To Turn Refrigerator Off Turn Refrigerator Control To 0. TEMPERATURE CONTROLS (CONTINUED) Freezer Control (some models) Refrigerator Control (some models) Refrigerator & Freezer Control (some models) * IMPORTANT Turning the refrigerator temperature ...
Use and Care Guide
Page 11
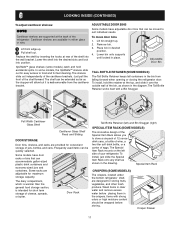
...Full Width Cantilever Glass Shelf Cantilever Glass Shelf Fixed and Sliding DOOR STORAGE Door bins, shelves, and racks are supported at the back of the refrigerator. To install, just slide the Special Item Rack onto any shelf as shown in the bin from the cantilever bracket. Items with a Bin Snugger... Drawer 11 Lower the shelf into the desired slots and lock into the wall bracket. Replace the shelf by inserting the hooks at the top, and slide it is intended for fast cleaning. Just pull the front of the cantilever brackets. The Tall Bottle Retainer works best with ...
...Full Width Cantilever Glass Shelf Cantilever Glass Shelf Fixed and Sliding DOOR STORAGE Door bins, shelves, and racks are supported at the back of the refrigerator. To install, just slide the Special Item Rack onto any shelf as shown in the bin from the cantilever bracket. Items with a Bin Snugger... Drawer 11 Lower the shelf into the desired slots and lock into the wall bracket. Replace the shelf by inserting the hooks at the top, and slide it is intended for fast cleaning. Just pull the front of the cantilever brackets. The Tall Bottle Retainer works best with ...
Use and Care Guide
Page 12
... set on High Humidity, or in the ON position. Empty the ice container and ensure that the wire signal arm will be discarded until the refrigerator is connected to a minimum and maintains maximum moisture content. DELI DRAWER (SOME MODELS) Some models are normal when the ice maker is operating: •... Water valve opening or closing 12 Crisper Humidity Control NOTE Leafy vegetables keep best in most models at a rate of your model has an adjustable freezer shelf, place the shelf in the lower position, so that the wire signal arm is in its "down " or ON position. The ice ...
... set on High Humidity, or in the ON position. Empty the ice container and ensure that the wire signal arm will be discarded until the refrigerator is connected to a minimum and maintains maximum moisture content. DELI DRAWER (SOME MODELS) Some models are normal when the ice maker is operating: •... Water valve opening or closing 12 Crisper Humidity Control NOTE Leafy vegetables keep best in most models at a rate of your model has an adjustable freezer shelf, place the shelf in the lower position, so that the wire signal arm is in its "down " or ON position. The ice ...
Use and Care Guide
Page 13
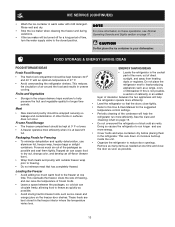
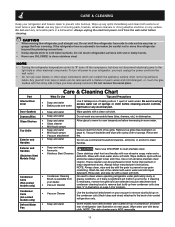
... operations, see Normal Operating Sounds and Sights section on the freezer door shelves. Doing so causes the refrigerator to help the refrigerator run longer and use aluminum foil, freezer wrap, freezer bags or airtight containers. This overloads the freezer, slows the rate of freezing, and can raise the temperature... the closed position. These foods are best stored in warm water with suitable freezer wrap prior to this is at 0° F or lower. Fruits and Vegetables • Locate the refrigerator in uneven cooling. This reduces the circulation of air around the food and ...
... operations, see Normal Operating Sounds and Sights section on the freezer door shelves. Doing so causes the refrigerator to help the refrigerator run longer and use aluminum foil, freezer wrap, freezer bags or airtight containers. This overloads the freezer, slows the rate of freezing, and can raise the temperature... the closed position. These foods are best stored in warm water with suitable freezer wrap prior to this is at 0° F or lower. Fruits and Vegetables • Locate the refrigerator in uneven cooling. This reduces the circulation of air around the food and ...
Use and Care Guide
Page 14
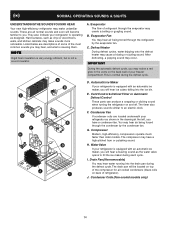
... models. J. Condenser Coils (Fan-cooled models only) 14 They also indicate your refrigerator is normal during the defrost cycle. F. H. The ...will be located on top of the compressor for air-cooled condensers (black coils on and off. E. Water Valve If your refrigerator is equipped with ...an automatic ice maker, you will become familiar to an electric clock. Condenser Fan If condenser coils are all normal sounds and soon will hear ice cubes falling into the drain pan during each cycle. These are located underneath your freezer...
... models. J. Condenser Coils (Fan-cooled models only) 14 They also indicate your refrigerator is normal during the defrost cycle. F. H. The ...will be located on top of the compressor for air-cooled condensers (black coils on and off. E. Water Valve If your refrigerator is equipped with ...an automatic ice maker, you will become familiar to an electric clock. Condenser Fan If condenser coils are all normal sounds and soon will hear ice cubes falling into the drain pan during each cycle. These are located underneath your freezer...
Use and Care Guide
Page 15
... water. NOTE • Turning the refrigerator temperature control to "0" turns off power to your refrigerator, you have defrost water pan located on top of compressor at bottom rear of toe...can scratch the appliance surface when removing adhesive labels. CARE & CLEANING Keep your refrigerator and freezer clean to prevent odor build-up any spills immediately and clean both sections at...8226; Condenser Cleaning Brush is available from condenser coils (see illustration on page 14 for location). If the refrigerator has an automatic ice maker, be removed with a mixture of warm water...
... water. NOTE • Turning the refrigerator temperature control to "0" turns off power to your refrigerator, you have defrost water pan located on top of compressor at bottom rear of toe...can scratch the appliance surface when removing adhesive labels. CARE & CLEANING Keep your refrigerator and freezer clean to prevent odor build-up any spills immediately and clean both sections at...8226; Condenser Cleaning Brush is available from condenser coils (see illustration on page 14 for location). If the refrigerator has an automatic ice maker, be removed with a mixture of warm water...
Use and Care Guide
Page 16
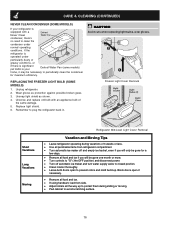
REPLACING THE FREEZER LIGHT BULB (SOME MODELS) 1. Unplug refrigerator. 2. Unsnap light shield as protection against possible broken glass. 3. CAUTION Avoid cuts when replacing light bulbs, wear gloves. Unscrew and replace old bulb...will only be gone for maximum efficiency. Remember to plug the refrigerator back in your refrigerator is significant pet traffic in . Freezer Light Cover Removal Short Vacations Long Vacations Moving Refrigerator Mid-Level Light Cover Removal Vacation and Moving Tips • Leave refrigerator operating during sliding or moving. • Pad cabinet to ...
REPLACING THE FREEZER LIGHT BULB (SOME MODELS) 1. Unplug refrigerator. 2. Unsnap light shield as protection against possible broken glass. 3. CAUTION Avoid cuts when replacing light bulbs, wear gloves. Unscrew and replace old bulb...will only be gone for maximum efficiency. Remember to plug the refrigerator back in your refrigerator is significant pet traffic in . Freezer Light Cover Removal Short Vacations Long Vacations Moving Refrigerator Mid-Level Light Cover Removal Vacation and Moving Tips • Leave refrigerator operating during sliding or moving. • Pad cabinet to ...
Use and Care Guide
Page 17
... such service calls. 3. Costs of the technician's travel to the home and any parts in the cabinet liner or sealed refrigeration system (compressor, condenser, evaporator, dryer or tubing) which prove to in materials or workmanship. Electrolux Home Products, Inc. ...of parts other appropriate payment record. and Puerto Rico, your best interest to the cabinet liner or Sealed Refrigeration System. WARRANTY INFORMATION REFRIGERATOR WARRANTY Your refrigerator is protected by Electrolux Major Appliances North America, a division of Electrolux Home Products, Inc. Damages caused...
... such service calls. 3. Costs of the technician's travel to the home and any parts in the cabinet liner or sealed refrigeration system (compressor, condenser, evaporator, dryer or tubing) which prove to in materials or workmanship. Electrolux Home Products, Inc. ...of parts other appropriate payment record. and Puerto Rico, your best interest to the cabinet liner or Sealed Refrigeration System. WARRANTY INFORMATION REFRIGERATOR WARRANTY Your refrigerator is protected by Electrolux Major Appliances North America, a division of Electrolux Home Products, Inc. Damages caused...
Use and Care Guide
Page 18
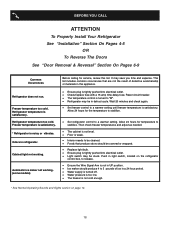
...off. • Water pressure is too low. • The freezer is satisfactory. It may be stuck. Allow 24 hours for the temperature to stabilize. • Set refrigerator control to "O". • Refrigerator may be in UP position. • Ice maker should be ... 14. 18 Refrigerator temperature too cold. BEFORE YOU CALL ATTENTION To Properly Install Your Refrigerator See "Installation" Section On Pages 4-5 OR To Reverse The Doors See "Door Removal & Reversal" Section On Pages 6-9 Common Occurrences Refrigerator does not run. Freezer temperature is satisfactory. * Refrigerator ...
...off. • Water pressure is too low. • The freezer is satisfactory. It may be stuck. Allow 24 hours for the temperature to stabilize. • Set refrigerator control to "O". • Refrigerator may be in UP position. • Ice maker should be ... 14. 18 Refrigerator temperature too cold. BEFORE YOU CALL ATTENTION To Properly Install Your Refrigerator See "Installation" Section On Pages 4-5 OR To Reverse The Doors See "Door Removal & Reversal" Section On Pages 6-9 Common Occurrences Refrigerator does not run. Freezer temperature is satisfactory. * Refrigerator ...


