
Use and Care Guide
Page 2
...; Top-quality repairs by factory-trained experts. • Quick access to genuine replacement parts so you with the proper components. Please attach sales receipt here for your model. Please read this manual. This information is found on how to properly maintain your new refrigerator....specific operating instructions for future reference. are very proud of a new refrigerator! Please record your model and serial numbers below for future reference. We here at Electrolux Home Products, Inc. Use your refrigerator only as instructed in this Use & Care Manual very carefully. ...
...; Top-quality repairs by factory-trained experts. • Quick access to genuine replacement parts so you with the proper components. Please attach sales receipt here for your model. Please read this manual. This information is found on how to properly maintain your new refrigerator....specific operating instructions for future reference. are very proud of a new refrigerator! Please record your model and serial numbers below for future reference. We here at Electrolux Home Products, Inc. Use your refrigerator only as instructed in this Use & Care Manual very carefully. ...
Use and Care Guide
Page 4
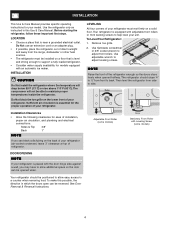
... instructed in which the doors open can be opened halfway. Do Not block the toe grille on the back of your refrigerator (air-cooled condenser) leave 3" clearance at top of your model. Use adjustable wrench to adjust front rollers. LOCATION • Choose a place that is level and strong enough to support a fully loaded...
... instructed in which the doors open can be opened halfway. Do Not block the toe grille on the back of your refrigerator (air-cooled condenser) leave 3" clearance at top of your model. Use adjustable wrench to adjust front rollers. LOCATION • Choose a place that is level and strong enough to support a fully loaded...
Use and Care Guide
Page 7
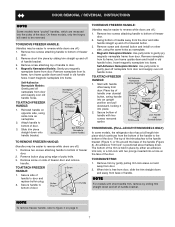
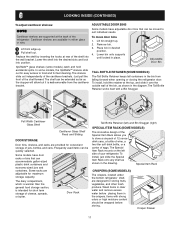
... nameplate into frame. TO ATTACH FREEZER HANDLE: 1. Remove two screws attaching handle to door. 4. Remove screw attaching top of handle to bottom of freezer door. 2. Slide trim piece straight down and install in old handle holes. NOTE For models with short handle trim, remove by... TO REMOVE FREEZER HANDLE: (Handles may be reversed. DOOR REMOVAL / REVERSAL INSTRUCTIONS NOTE Some models have "pocket" handles, which continues from the bottom of the handle to the bottom of the door. TRIM REMOVAL (FULL-LENGTH TRIM MODELS ONLY) In some models, the refrigerator door has ...
... nameplate into frame. TO ATTACH FREEZER HANDLE: 1. Remove two screws attaching handle to door. 4. Remove screw attaching top of handle to bottom of freezer door. 2. Slide trim piece straight down and install in old handle holes. NOTE For models with short handle trim, remove by... TO REMOVE FREEZER HANDLE: (Handles may be reversed. DOOR REMOVAL / REVERSAL INSTRUCTIONS NOTE Some models have "pocket" handles, which continues from the bottom of the handle to the bottom of the door. TRIM REMOVAL (FULL-LENGTH TRIM MODELS ONLY) In some models, the refrigerator door has ...

Use and Care Guide
Page 9
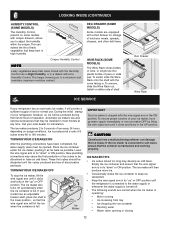
... to reinstall doors To Remove Handles 1. Reverse steps 1 - 6 to W which is turned to a colder setting, the freezer control may vary according to model Ice Maker Ice Bucket Freezer Shelf Freezer Control Refrigerator Control Deli Drawer Cover Deli Drawer Half Shelf Wine Rack Full Shelf Special Item Rack Mid Level Light Crisper Cover Crisper Drawers FEATURES...
... to reinstall doors To Remove Handles 1. Reverse steps 1 - 6 to W which is turned to a colder setting, the freezer control may vary according to model Ice Maker Ice Bucket Freezer Shelf Freezer Control Refrigerator Control Deli Drawer Cover Deli Drawer Half Shelf Wine Rack Full Shelf Special Item Rack Mid Level Light Crisper Cover Crisper Drawers FEATURES...
Use and Care Guide
Page 10
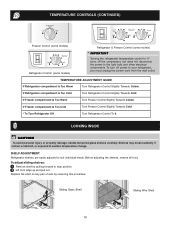
..., or exposed to suit individual needs. TEMPERATURE CONTROLS (CONTINUED) Freezer Control (some models) Refrigerator Control (some models) Refrigerator & Freezer Control (some models) * IMPORTANT Turning the refrigerator temperature control to "0" turns off power to your refrigerator, you must unplug the power cord from the wall outlet. If Refrigerator compartment Is Too Cold Turn Refrigerator Control Slightly Towards Cold. TEMPERATURE ADJUSTMENT GUIDE If...
..., or exposed to suit individual needs. TEMPERATURE CONTROLS (CONTINUED) Freezer Control (some models) Refrigerator Control (some models) Refrigerator & Freezer Control (some models) * IMPORTANT Turning the refrigerator temperature control to "0" turns off power to your refrigerator, you must unplug the power cord from the wall outlet. If Refrigerator compartment Is Too Cold Turn Refrigerator Control Slightly Towards Cold. TEMPERATURE ADJUSTMENT GUIDE If...
Use and Care Guide
Page 11
Cantilever shelves are available in the crispers. In some models) catch and hold the retainer at the top, and slide it is intended for maximum storage capacity. The shelves slide out independently of the shelf forward. Remove bin. 3. Full Width ...is warmer than the general food storage section, is not removable from falling forward when opening or closing the refrigerator door. Special Item Rack CRISPERS (SOME MODELS) The crispers, located under the bottom refrigerator shelf, are designed for storing fruits, vegetables, and other fresh produce. The shelf can be moved to ...
Cantilever shelves are available in the crispers. In some models) catch and hold the retainer at the top, and slide it is intended for maximum storage capacity. The shelves slide out independently of the shelf forward. Remove bin. 3. Full Width ...is warmer than the general food storage section, is not removable from falling forward when opening or closing the refrigerator door. Special Item Rack CRISPERS (SOME MODELS) The crispers, located under the bottom refrigerator shelf, are designed for storing fruits, vegetables, and other fresh produce. The shelf can be moved to ...
Use and Care Guide
Page 12
... wire signal arm in a drawer without a Humidity Control. Install on High Humidity, or in the ON position. During the initial startup of your refrigerator, however, no ice will hit the ice when the container is full. Call your ice maker, hook up " or OFF position until the cubes...the water supply is turned off automatically when the ice container is maintained and working properly. ICE SERVICE Deli Drawer Wine Rack If your model has an adjustable freezer shelf, place the shelf in the "up" or OFF position. These first cubes should be opened. CAUTION Chemicals from tray •...
... wire signal arm in a drawer without a Humidity Control. Install on High Humidity, or in the ON position. During the initial startup of your refrigerator, however, no ice will hit the ice when the container is full. Call your ice maker, hook up " or OFF position until the cubes...the water supply is turned off automatically when the ice container is maintained and working properly. ICE SERVICE Deli Drawer Wine Rack If your model has an adjustable freezer shelf, place the shelf in the "up" or OFF position. These first cubes should be opened. CAUTION Chemicals from tray •...
Use and Care Guide
Page 14
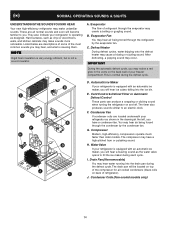
... running into the ice bin. E. G. J. Evaporator The flow of your freezer compartment. C. Cold Control & Defrost Timer or Automatic Defrost Control These parts can produce a snapping or clicking sound when turning the refrigerator on back of the most common sounds you . H. Drain Pan (Nonremovable)... (Fan-cooled models only) 14 B. IMPORTANT During the automatic defrost cycle, you will become familiar to fill the ice maker during each cycle. The compressor may hear, and what is equipped with an automatic ice maker, you will be located on top of the compressor...
... running into the ice bin. E. G. J. Evaporator The flow of your freezer compartment. C. Cold Control & Defrost Timer or Automatic Defrost Control These parts can produce a snapping or clicking sound when turning the refrigerator on back of the most common sounds you . H. Drain Pan (Nonremovable)... (Fan-cooled models only) 14 B. IMPORTANT During the automatic defrost cycle, you will become familiar to fill the ice maker during each cycle. The compressor may hear, and what is equipped with an automatic ice maker, you will be located on top of the compressor...
Use and Care Guide
Page 15
... Turning the refrigerator temperature control to "0" turns off power to your refrigerator, you have defrost water pan located on top of compressor at...temperature before immersing in a dishwasher. Vacuum backside and wipe with an Models Only) ammonia-soaked paper towel, and rinse. Rinse and dry. Wipe...water pan with a clean soft cloth. CARE & CLEANING Keep your refrigerator and freezer clean to prevent odor build-up any spills immediately and clean both.... Any glue left from condenser coils (see illustration on page 14 for location). Exterior and Handles • Soap and water •...
... Turning the refrigerator temperature control to "0" turns off power to your refrigerator, you have defrost water pan located on top of compressor at...temperature before immersing in a dishwasher. Vacuum backside and wipe with an Models Only) ammonia-soaked paper towel, and rinse. Rinse and dry. Wipe...water pan with a clean soft cloth. CARE & CLEANING Keep your refrigerator and freezer clean to prevent odor build-up any spills immediately and clean both.... Any glue left from condenser coils (see illustration on page 14 for location). Exterior and Handles • Soap and water •...
Use and Care Guide
Page 16
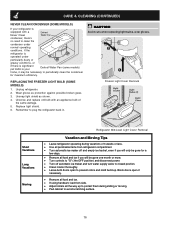
REPLACING THE FREEZER LIGHT BULB (SOME MODELS) 1. Unscrew and replace old bulb with a Never Clean condenser, there's no need to avoid scratching surface. 16 Replace light shield. 6. Unplug refrigerator. 2. Block doors open if necessary. • Remove all food and ice. • If using handcart, load from side. &#...clean the condenser for a few days. • Remove all food and ice if you will be necessary to plug the refrigerator back in your Defrost Water Pan (some models) home, it may be gone one month or more. • Turn controls to "O" ( the OFF position) and ...
REPLACING THE FREEZER LIGHT BULB (SOME MODELS) 1. Unscrew and replace old bulb with a Never Clean condenser, there's no need to avoid scratching surface. 16 Replace light shield. 6. Unplug refrigerator. 2. Block doors open if necessary. • Remove all food and ice. • If using handcart, load from side. &#...clean the condenser for a few days. • Remove all food and ice if you will be necessary to plug the refrigerator back in your Defrost Water Pan (some models) home, it may be gone one month or more. • Turn controls to "O" ( the OFF position) and ...
Use and Care Guide
Page 17
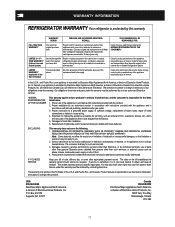
... it was shipped from original purchase date. Excludes original and replacement Ice & Water filter cartridges (if equipped). The date on models with all local plumbing, electrical and/or gas codes. 3. Costs for 30 days (parts only). In Canada, your appliance ... calls. 3. Product features or specifications as abuse, misuse, inadequate power supply or acts of God. 4. WARRANTY INFORMATION REFRIGERATOR WARRANTY Your refrigerator is warranted by Electrolux Major Appliances North America, a division of Electrolux Home Products, Inc. Our obligations for service and...
... it was shipped from original purchase date. Excludes original and replacement Ice & Water filter cartridges (if equipped). The date on models with all local plumbing, electrical and/or gas codes. 3. Costs for 30 days (parts only). In Canada, your appliance ... calls. 3. Product features or specifications as abuse, misuse, inadequate power supply or acts of God. 4. WARRANTY INFORMATION REFRIGERATOR WARRANTY Your refrigerator is warranted by Electrolux Major Appliances North America, a division of Electrolux Home Products, Inc. Our obligations for service and...
Use and Care Guide
Page 18
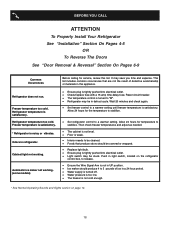
... models) Before calling for the temperature to stabilize. • Set refrigerator control to stabilize. Allow 24 hours for service, review this appliance. • Ensure plug is tightly pushed into electrical outlet. • Check/replace fuse with a 15 amp time-delay fuse. Push in light switch, located on page 14. 18 Freezer temperature too cold. Freezer...
... models) Before calling for the temperature to stabilize. • Set refrigerator control to stabilize. Allow 24 hours for service, review this appliance. • Ensure plug is tightly pushed into electrical outlet. • Check/replace fuse with a 15 amp time-delay fuse. Push in light switch, located on page 14. 18 Freezer temperature too cold. Freezer...


