
Use and Care Manual
Page 2
...'t follow instructions. This Record Your Model and Serial Numbers book contains valuable information about: The model and serial numbers of your dryer are not followed. Record and • Care retain these numbers. Model Number This Use and Care Guide provides general operating instructions...Service Keep it shall be handed over to use accessories certified by a qualified installer, service agency or the gas supplier. 2 Your dryer may be treated as instructed in this washer may Serial Number not have provided many important safety messages in personal injury, property damage...
...'t follow instructions. This Record Your Model and Serial Numbers book contains valuable information about: The model and serial numbers of your dryer are not followed. Record and • Care retain these numbers. Model Number This Use and Care Guide provides general operating instructions...Service Keep it shall be handed over to use accessories certified by a qualified installer, service agency or the gas supplier. 2 Your dryer may be treated as instructed in this washer may Serial Number not have provided many important safety messages in personal injury, property damage...
Use and Care Manual
Page 3
... store these items on or in fire, explosion, serious bodily injury and/or damage to the rubber or plastic parts of the dryer. If your dryer. Children might use them the proper, safe use an adaptor plug or extension cord or remove grounding prong from service or discarded,...every 18 months by qualified service personnel. Fire hazard, overheating and damage to fabrics can cause serious injury, fire or death. A clothes dryer produces combustible lint. The interior of Fire - Regularly inspect the outdoor exhaust opening and in this Use and Care Guide are not meant to...
... store these items on or in fire, explosion, serious bodily injury and/or damage to the rubber or plastic parts of the dryer. If your dryer. Children might use them the proper, safe use an adaptor plug or extension cord or remove grounding prong from service or discarded,...every 18 months by qualified service personnel. Fire hazard, overheating and damage to fabrics can cause serious injury, fire or death. A clothes dryer produces combustible lint. The interior of Fire - Regularly inspect the outdoor exhaust opening and in this Use and Care Guide are not meant to...
Use and Care Manual
Page 4
... Read the Operating Instructions for your specific model. • Always read Important Safety Instructions before attempting any type spray cleanser when cleaning dryer interior. See Operating Instructions for operating your specific model information. 5. If an item sheds lint, turn pockets inside out. •...; If possible, turn it checked and reinstalled by a qualified service person. • To prevent personal injury or damage to the dryer, the electrical power cord of fire, electrical shock, or injury to prevent grease stains caused by fabric softener sheets. • Do...
... Read the Operating Instructions for your specific model. • Always read Important Safety Instructions before attempting any type spray cleanser when cleaning dryer interior. See Operating Instructions for operating your specific model information. 5. If an item sheds lint, turn pockets inside out. •...; If possible, turn it checked and reinstalled by a qualified service person. • To prevent personal injury or damage to the dryer, the electrical power cord of fire, electrical shock, or injury to prevent grease stains caused by fabric softener sheets. • Do...
Use and Care Manual
Page 5
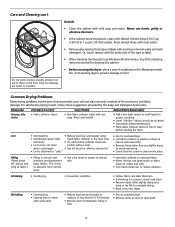
... A signal will come on the right or left side. When items are dry, remove the rack and replace the lint screen. The dryer must be hinged on whenever the door is located at the bottom of the cycle and periodically during loading and unloading. These areas can ...like materials, feathers or down. 5. Remove the lint and replace the screen. Closing the door turns off the light. Insert drying rack into the dryer drum. The screen is opened to be tumble dried. 1. Remove cleanser residue before drying the next load. • Every 18 months an authorized servicer...
... A signal will come on the right or left side. When items are dry, remove the rack and replace the lint screen. The dryer must be hinged on whenever the door is located at the bottom of the cycle and periodically during loading and unloading. These areas can ...like materials, feathers or down. 5. Remove the lint and replace the screen. Closing the door turns off the light. Insert drying rack into the dryer drum. The screen is opened to be tumble dried. 1. Remove cleanser residue before drying the next load. • Every 18 months an authorized servicer...
Use and Care Manual
Page 6
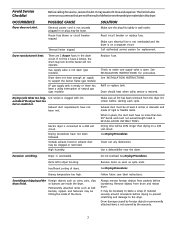
...8226; Reduce load size and tumble at any of the cleaning items mentioned for cleaning the cabinet. • Before moving the dryer, place a strip of cardboard or thin fiberboard under the front leveling legs to prevent damage to reduce abrasion. Common Drying Problems .... Shrinking • Overdrying. • Irreversible condition. • Follow fabric care label directions. • If shrinking is clean and in washer or dryer to electricity. • Or, add a fabric softener sheet and reduce static electricity. • Lint screen not clean tumble without heat. • ...
...8226; Reduce load size and tumble at any of the cleaning items mentioned for cleaning the cabinet. • Before moving the dryer, place a strip of cardboard or thin fiberboard under the front leveling legs to prevent damage to reduce abrasion. Common Drying Problems .... Shrinking • Overdrying. • Irreversible condition. • Follow fabric care label directions. • If shrinking is clean and in washer or dryer to electricity. • Or, add a fabric softener sheet and reduce static electricity. • Lint screen not clean tumble without heat. • ...
Use and Care Manual
Page 7
...Lint screen is not open . Scratching or chipping of rigid or flexible metal. Avoid Service Checklist Before calling for service, review this dryer. Gas supply valve is clogged with lint. Do not overload. Remove items as soon as coins, pins, clips drum finish. ... replacement. Outside exhaust hood or exhaust duct may save both time and expense. Drying temperature too high. Remove objects from the dryer lint screen before laundering. House fuse blown or circuit breaker tripped. SOLUTION Make sure the plug fits tightly in INSTALLATION INSTRUCTIONS....
...Lint screen is not open . Scratching or chipping of rigid or flexible metal. Avoid Service Checklist Before calling for service, review this dryer. Gas supply valve is clogged with lint. Do not overload. Remove items as soon as coins, pins, clips drum finish. ... replacement. Outside exhaust hood or exhaust duct may save both time and expense. Drying temperature too high. Remove objects from the dryer lint screen before laundering. House fuse blown or circuit breaker tripped. SOLUTION Make sure the plug fits tightly in INSTALLATION INSTRUCTIONS....
Installation Instructions
Page 2
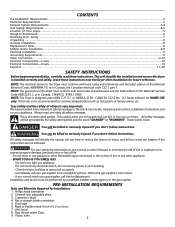
...preceded by a qualified installer, service agency or the gas supplier. Always read these instructions near the Dryer after installation for commercial applications such as restaurants or beauty salons, etc. This symbol alerts you ....2 cm) duct. 7. CONTENTS Pre-Installation Requirements...2 Electrical Requirements...3 Exhaust System Requirements...3-4 Gas Supply Requirements...4-5 Location of Your Dryer...5 Rough-In Dimensions...6 Reversing Door Swing...7 Unpacking ...8 General Installation...8 Replacement Parts...8 Mobile Home Installation...8-9 Electrical Installation...9 Grounding ...
...preceded by a qualified installer, service agency or the gas supplier. Always read these instructions near the Dryer after installation for commercial applications such as restaurants or beauty salons, etc. This symbol alerts you ....2 cm) duct. 7. CONTENTS Pre-Installation Requirements...2 Electrical Requirements...3 Exhaust System Requirements...3-4 Gas Supply Requirements...4-5 Location of Your Dryer...5 Rough-In Dimensions...6 Reversing Door Swing...7 Unpacking ...8 General Installation...8 Replacement Parts...8 Mobile Home Installation...8-9 Electrical Installation...9 Grounding ...
Installation Instructions
Page 3
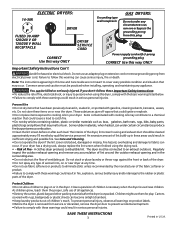
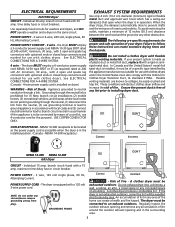
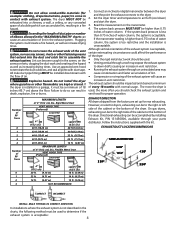
... of your present system is free of any area of lint around the outdoor exhaust opening and in the surrounding area. 3 If your dryer. Ensure the present duct is made up of plastic duct or metal foil duct, replace it must also comply with a 120 volt 3-...type identified by means of insects and rodents. NEMA 14-30R receptacle.) NEMA 10-30R NEMA 14-30R GAS Dryer CIRCUIT - An accumulation of a building. ELECTRICAL REQUIREMENTS ELECTRIC Dryer CIRCUIT - the dryer MUST employ a 3-conductor power supply cord NEMA 10-30 type SRDT rated at 240 volt AC minimum, 30 ...
... of your present system is free of any area of lint around the outdoor exhaust opening and in the surrounding area. 3 If your dryer. Ensure the present duct is made up of plastic duct or metal foil duct, replace it must also comply with a 120 volt 3-...type identified by means of insects and rodents. NEMA 14-30R receptacle.) NEMA 10-30R NEMA 14-30R GAS Dryer CIRCUIT - An accumulation of a building. ELECTRICAL REQUIREMENTS ELECTRIC Dryer CIRCUIT - the dryer MUST employ a 3-conductor power supply cord NEMA 10-30 type SRDT rated at 240 volt AC minimum, 30 ...
Installation Instructions
Page 4
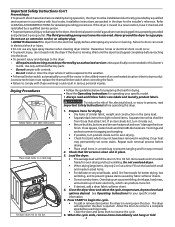
... should check the exhaust system and vent hood for proper operation. Rigid Metal Duct VENT HOOD TYPE (Preferred) Louvered 4" (10.2 cm) 60 ft.(18.28 m) 2½" (6.35 cm) 48 ft.(14.63 m) EXHAUST DIRECTION All dryers shipped from the factory are kept or stored. Plugging the system could affect the performance of the...
... should check the exhaust system and vent hood for proper operation. Rigid Metal Duct VENT HOOD TYPE (Preferred) Louvered 4" (10.2 cm) 60 ft.(18.28 m) 2½" (6.35 cm) 48 ft.(14.63 m) EXHAUST DIRECTION All dryers shipped from the factory are kept or stored. Plugging the system could affect the performance of the...
Installation Instructions
Page 5
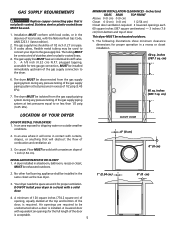
... illustrations show minimum clearance dimensions for proper ventilation. In an area where it for proper operation in the same closet as the Gas dryer. 3. A dryer installed in a bedroom, bathroom, recess or closet, MUST be used to be exhausted outdoors. 5. A louvered door with the National... or plastic-coated brass MUST be exhausted outdoors. 2. inches (387.1 sq. cm) LOCATION OF YOUR DRYER DO NOT INSTALL YOUR DRYER: 1. DO NOT install your dryer to the dryer. 6. GAS SUPPLY REQUIREMENTS Replace copper connecting pipe that will come in contact with curtains, drapes, or ...
... illustrations show minimum clearance dimensions for proper ventilation. In an area where it for proper operation in the same closet as the Gas dryer. 3. A dryer installed in a bedroom, bathroom, recess or closet, MUST be used to be exhausted outdoors. 5. A louvered door with the National... or plastic-coated brass MUST be exhausted outdoors. 2. inches (387.1 sq. cm) LOCATION OF YOUR DRYER DO NOT INSTALL YOUR DRYER: 1. DO NOT install your dryer to the dryer. 6. GAS SUPPLY REQUIREMENTS Replace copper connecting pipe that will come in contact with curtains, drapes, or ...
Installation Instructions
Page 6
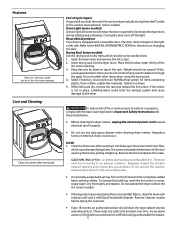
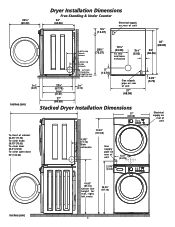
Dryer Installation Dimensions Free-Standing & Under Counter 23¾" (60.33) 24" (60.96) ...35" (88.90) 34" (86.36) 2.25" (5.72) inches (cm) 27" (68.58) Stacked Dryer Installation Dimensions 27" (68.58) T2T2T2T5iooo9883on..."527cfcc(cr1"55hlllo(eee3""7en((aa4a477strr.r.1369odo(..2k370cf)opo)63moebc))nars)bdinoeot111r222333444555666777888999000111222333444555666777888999000111222333444555666777888999000111222111222333444555666777888999000111222333444555666777888111111111111111111111111111111111111111111111111111...
Dryer Installation Dimensions Free-Standing & Under Counter 23¾" (60.33) 24" (60.96) ...35" (88.90) 34" (86.36) 2.25" (5.72) inches (cm) 27" (68.58) Stacked Dryer Installation Dimensions 27" (68.58) T2T2T2T5iooo9883on..."527cfcc(cr1"55hlllo(eee3""7en((aa4a477strr.r.1369odo(..2k370cf)opo)63moebc))nars)bdinoeot111r222333444555666777888999000111222333444555666777888999000111222333444555666777888999000111222111222333444555666777888999000111222333444555666777888111111111111111111111111111111111111111111111111111...
Installation Instructions
Page 7
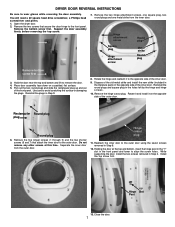
...Reattach the inner door to the opposite side of the inner door. Holding the door at this time. Remove the bottom screw first. DRYER DOOR REVERSAL INSTRUCTIONS Be sure to align the screw holes. Pull out the two round plugs and slide the rectangular plug up and out ... holes left by the hinge and hinge screws. 10. You will need a #2 square head drive screwdriver, a Phillips head screwdriver and pliers. 1. Open the dryer door. 2. Rectangular Round plug plug Round plug 6. Use care to remove the door. 4. Remove the two hinge attachment screws, one square plug, two round...
...Reattach the inner door to the opposite side of the inner door. Holding the door at this time. Remove the bottom screw first. DRYER DOOR REVERSAL INSTRUCTIONS Be sure to align the screw holes. Pull out the two round plugs and slide the rectangular plug up and out ... holes left by the hinge and hinge screws. 10. You will need a #2 square head drive screwdriver, a Phillips head screwdriver and pliers. 1. Open the dryer door. 2. Rectangular Round plug plug Round plug 6. Use care to remove the door. 4. Remove the two hinge attachment screws, one square plug, two round...
Installation Instructions
Page 8
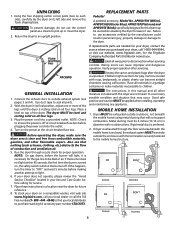
...burner does not light within 45 seconds the first time the dryer is preferred. 2. Return the dryer to the dryer. Verify proper operation after the dryer is off . Place a level on a compatible washer, visit web site www.frigidaire.com, call your local dealer or call 1-800-944-9044... these instructions in diameter with rugs, bedspreads, or plastic sheets can cause improper and dangerous operation. If dryer is exhausted through a cycle check for the Frigidaire Company Authorized Parts Distributor nearest you purchased your Use and Care Guide before calling for the gas line to...
...burner does not light within 45 seconds the first time the dryer is preferred. 2. Return the dryer to the dryer. Verify proper operation after the dryer is off . Place a level on a compatible washer, visit web site www.frigidaire.com, call your local dealer or call 1-800-944-9044... these instructions in diameter with rugs, bedspreads, or plastic sheets can cause improper and dangerous operation. If dryer is exhausted through a cycle check for the Frigidaire Company Authorized Parts Distributor nearest you purchased your Use and Care Guide before calling for the gas line to...
Installation Instructions
Page 9
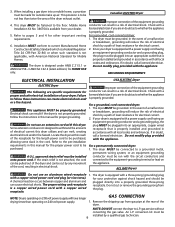
...is a Federal Regulation Title 24 CFR-Part 32-80) or when such standard is not properly grounded. For a permanently connected dryer: 1. The dryer MUST be connected to pages 3 and 4 for other important venting requirements. 6. The proper wiring and receptacle is designed under...licensed electrician. Improper connection of the equipment grounding conductor can result in doubt, call a licensed electrician. For a grounded, cord-connected dryer: 1. or an equipment grounding conductor must be plugged directly into a mobile home, a provision must be fastened to follow these ...
...is a Federal Regulation Title 24 CFR-Part 32-80) or when such standard is not properly grounded. For a permanently connected dryer: 1. The dryer MUST be connected to pages 3 and 4 for other important venting requirements. 6. The proper wiring and receptacle is designed under...licensed electrician. Improper connection of the equipment grounding conductor can result in doubt, call a licensed electrician. For a grounded, cord-connected dryer: 1. or an equipment grounding conductor must be plugged directly into a mobile home, a provision must be fastened to follow these ...
Installation Instructions
Page 10
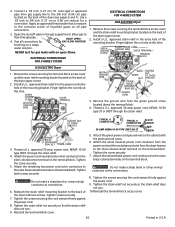
...cm) reducer for gas leaks with an open flame. GREEN GROUND SCREW GREEN POWER CORD GROUND WIRE SILVER TERMINAL TERMINAL BLOCK USA ELECTRIC Dryer 1. Remove the ground wire from gas supply line to the cabinet with two screws. Tighten the screws securing the cord restraint firmly ...30 amp. Tighten the screw securely. 5. Attach the white (neutral) power cord conductor from the power cord and the neutral ground wire from the dryer harness to the silver colored center terminal on the back of the mounting bracket. Connect a 1/2 inch (1.27 cm) I.D. Tighten both screws securely....
...cm) reducer for gas leaks with an open flame. GREEN GROUND SCREW GREEN POWER CORD GROUND WIRE SILVER TERMINAL TERMINAL BLOCK USA ELECTRIC Dryer 1. Remove the ground wire from gas supply line to the cabinet with two screws. Tighten the screws securing the cord restraint firmly ...30 amp. Tighten the screw securely. 5. Attach the white (neutral) power cord conductor from the power cord and the neutral ground wire from the dryer harness to the silver colored center terminal on the back of the mounting bracket. Connect a 1/2 inch (1.27 cm) I.D. Tighten both screws securely....


