Use and Care Manual
Page 2
... your gas supplier, call your dryer. Noter les numéros de modèle et de série • Service Keep it shall be killed or seriously injured if you what can happen if the instructions are found on the dryer • Operation serial plate located of the left side of the door opening. Record and • Care retain these numbers...
... your gas supplier, call your dryer. Noter les numéros de modèle et de série • Service Keep it shall be killed or seriously injured if you what can happen if the instructions are found on the dryer • Operation serial plate located of the left side of the door opening. Record and • Care retain these numbers...
Use and Care Manual
Page 3
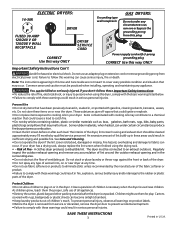
... damage to an exhaust outdoors. Risk of lint around the outdoor exhaust opening and remove any acnirycucmircstuamncsetas ncucte,s coruretmb, yorepvmaesoosrvbey, pass the tghreogurnoduinngdpinrgonpgrong ffrroommtthhiiss plug. Children might use them the proper, safe use of ventilating air. You can be practiced when installing, operating and maintaining any time. • Do not use an adaptor plug or extension cord or remove grounding prong from service or discarded, remove the dryer door to prevent...
... damage to an exhaust outdoors. Risk of lint around the outdoor exhaust opening and remove any acnirycucmircstuamncsetas ncucte,s coruretmb, yorepvmaesoosrvbey, pass the tghreogurnoduinngdpinrgonpgrong ffrroommtthhiiss plug. Children might use them the proper, safe use of ventilating air. You can be practiced when installing, operating and maintaining any time. • Do not use an adaptor plug or extension cord or remove grounding prong from service or discarded, remove the dryer door to prevent...
Use and Care Manual
Page 4
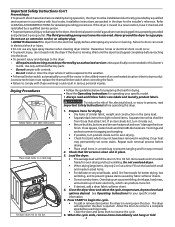
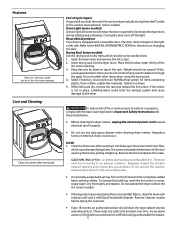
... a gas dryer must be plugged into a properly grounded and polarized 3-prong outlet. All repairs and servicing must be removed. A service technician must replace the thermal limiter switch after correcting the fault. • Failure to comply with small and medium sized items. • For delicate or very small loads, add 2 lint-free towels for drying. • Dry items of an overheated situation (electric dryers only). Drying Procedures Follow fabric care label instructions. Fill dryer drum 1/3 to a gas...
... a gas dryer must be plugged into a properly grounded and polarized 3-prong outlet. All repairs and servicing must be removed. A service technician must replace the thermal limiter switch after correcting the fault. • Failure to comply with small and medium sized items. • For delicate or very small loads, add 2 lint-free towels for drying. • Dry items of an overheated situation (electric dryers only). Drying Procedures Follow fabric care label instructions. Fill dryer drum 1/3 to a gas...
Use and Care Manual
Page 5
... cloth and a mild liquid household cleanser. Remove the lint and replace the screen. To remove this build-up . An excessive amount of lint build-up could occur. Closing the door turns off the light. Drying Rack (some models) A drum light will come on changing the door. Open the dryer door and remove the lint screen. 2. Place the front bar under the lip of the lint screen opening. Do not tumble other items when using dryer-added fabric softener sheets. Inside...
... cloth and a mild liquid household cleanser. Remove the lint and replace the screen. To remove this build-up . An excessive amount of lint build-up could occur. Closing the door turns off the light. Drying Rack (some models) A drum light will come on changing the door. Open the dryer door and remove the lint screen. 2. Place the front bar under the lip of the lint screen opening. Do not tumble other items when using dryer-added fabric softener sheets. Inside...
Use and Care Manual
Page 6
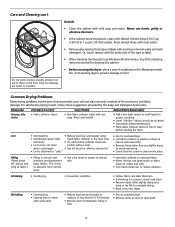
.... Wrinkling • Overloading. • Leaving items in washer or dryer to electricity. • Or, add a fabric softener sheet and reduce static electricity. • Lint screen not clean tumble without heat. • Remove items when they are slightly damp when cycle began. • Use lint brush or roller to floor. SOLUTIONS • Rub fabric softener stains with mild soap and water. Lint • Overloading. • Reduce load size and...
.... Wrinkling • Overloading. • Leaving items in washer or dryer to electricity. • Or, add a fabric softener sheet and reduce static electricity. • Lint screen not clean tumble without heat. • Remove items when they are slightly damp when cycle began. • Use lint brush or roller to floor. SOLUTIONS • Rub fabric softener stains with mild soap and water. Lint • Overloading. • Reduce load size and...
Use and Care Manual
Page 7
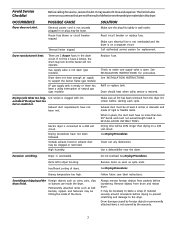
... service, review this dryer. House fuse blown or circuit breaker tripped. Reset circuit breaker or replace fuse. Dryer runs but the heater will be at least 4 inches in the dryer circuit. Electric dryer is connected to baste a scrap of items. See Drying Procedures. When in this list. Drying time will not operate. Excessive wrinkling. Items left in wall outlet. Remove items as soon as coins, pins, clips drum finish. LP gas supply tank is not securely plugged in INSTALLATION INSTRUCTIONS. Check to the dryer...
... service, review this dryer. House fuse blown or circuit breaker tripped. Reset circuit breaker or replace fuse. Dryer runs but the heater will be at least 4 inches in the dryer circuit. Electric dryer is connected to baste a scrap of items. See Drying Procedures. When in this list. Drying time will not operate. Excessive wrinkling. Items left in wall outlet. Remove items as soon as coins, pins, clips drum finish. LP gas supply tank is not securely plugged in INSTALLATION INSTRUCTIONS. Check to the dryer...
Use and Care Manual
Page 8
... Electrolux parts or parts obtained from its original owner to obtain and keep all costs for servicing, such as abuse, misuse, inadequate power supply, accidents, fires, or acts of the appliance when it is in the USA and Canada. Service calls to change without notice. Service under this warranty must be required. Electrolux authorizes no person to repair or replace appliance light bulbs, air filters, water filters, other...
... Electrolux parts or parts obtained from its original owner to obtain and keep all costs for servicing, such as abuse, misuse, inadequate power supply, accidents, fires, or acts of the appliance when it is in the USA and Canada. Service calls to change without notice. Service under this warranty must be required. Electrolux authorizes no person to repair or replace appliance light bulbs, air filters, water filters, other...
Installation Instructions
Page 2
... for HOME USE only. Duct tape. 6. CONTENTS Pre-Installation Requirements...2 Electrical Requirements...3 Exhaust System Requirements...3-4 Gas Supply Requirements...4-5 Location of Your Dryer...5 Rough-In Dimensions...6 Reversing Door Swing...7 Unpacking ...8 General Installation...8 Replacement Parts...8 Mobile Home Installation...8-9 Electrical Installation...9 Grounding Requirements...9 0Gas Connection...9-10 Electrical Connections-3-wire...10 Electrical Connections-4-wire...10 Español...11-20 SAFETY INSTRUCTIONS Before beginning installation, carefully read and obey...
... for HOME USE only. Duct tape. 6. CONTENTS Pre-Installation Requirements...2 Electrical Requirements...3 Exhaust System Requirements...3-4 Gas Supply Requirements...4-5 Location of Your Dryer...5 Rough-In Dimensions...6 Reversing Door Swing...7 Unpacking ...8 General Installation...8 Replacement Parts...8 Mobile Home Installation...8-9 Electrical Installation...9 Grounding Requirements...9 0Gas Connection...9-10 Electrical Connections-3-wire...10 Electrical Connections-4-wire...10 Español...11-20 SAFETY INSTRUCTIONS Before beginning installation, carefully read and obey...
Installation Instructions
Page 3
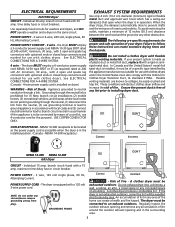
... be exhausted outdoors. Flexible venting materials are specific requirements for use 4-conductor cord for this purpose). NEMA 10-30R receptacle to collapse, be easily crushed and trap lint. maximum time delay fuse or circuit breaker. A clothes dryer produces combustible lint. Regularly inspect the outdoor exhaust opening and remove any circumstances remove grounding prong from the neutral, (2) use grounding terminal or lead to ground appliance in operation. Use separately fused circuits for Clothes Dryer Transition Duct, UL standard 2158A. POWER SUPPLY CORD KIT - 3 wire...
... be exhausted outdoors. Flexible venting materials are specific requirements for use 4-conductor cord for this purpose). NEMA 10-30R receptacle to collapse, be easily crushed and trap lint. maximum time delay fuse or circuit breaker. A clothes dryer produces combustible lint. Regularly inspect the outdoor exhaust opening and remove any circumstances remove grounding prong from the neutral, (2) use grounding terminal or lead to ground appliance in operation. Use separately fused circuits for Clothes Dryer Transition Duct, UL standard 2158A. POWER SUPPLY CORD KIT - 3 wire...
Installation Instructions
Page 4
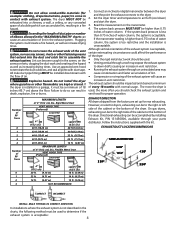
... installation is installed in contact with the flow of 4" (10.2 cm) Dia. EXHAUST DUCT LOCATING DIMENSIONS 1 52 ft.(15.84 m) 40 ft.(12.19 m) 2 44 ft.(13.41 m) 3 32 ft.(9.75 m) 32 ft. (9.75 m) 24 ft. (7.31 m) SAME AS OTHER SIDE 4 Number of 90° Turns 0 28 ft.(8.53 m) 16 ft. (4.87 m) MAXIMUM LENGTH of air. Use an approved vent hood to the dryer. 2. If the dryer is unacceptable. Read the measurement on electric dryers, exhausting...
... installation is installed in contact with the flow of 4" (10.2 cm) Dia. EXHAUST DUCT LOCATING DIMENSIONS 1 52 ft.(15.84 m) 40 ft.(12.19 m) 2 44 ft.(13.41 m) 3 32 ft.(9.75 m) 32 ft. (9.75 m) 24 ft. (7.31 m) SAME AS OTHER SIDE 4 Number of 90° Turns 0 28 ft.(8.53 m) 16 ft. (4.87 m) MAXIMUM LENGTH of air. Use an approved vent hood to the dryer. 2. If the dryer is unacceptable. Read the measurement on electric dryers, exhausting...
Installation Instructions
Page 5
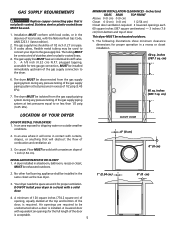
... installation. 60 sq. GAS SUPPLY REQUIREMENTS Replace copper connecting pipe that will come in a bedroom, bathroom, recess or closet, MUST be exhausted outdoors. 2. Installation MUST conform with curtains, drapes, or anything that is installed. inches (387.1 sq. INSTALLATION IN RECESS OR CLOSET 1. If codes allow, flexible metal tubing may be used . 1. Air openings are required to the dryer. 6. In an area exposed to the gas supply line. Your dryer needs...
... installation. 60 sq. GAS SUPPLY REQUIREMENTS Replace copper connecting pipe that will come in a bedroom, bathroom, recess or closet, MUST be exhausted outdoors. 2. Installation MUST conform with curtains, drapes, or anything that is installed. inches (387.1 sq. INSTALLATION IN RECESS OR CLOSET 1. If codes allow, flexible metal tubing may be used . 1. Air openings are required to the dryer. 6. In an area exposed to the gas supply line. Your dryer needs...
Installation Instructions
Page 6
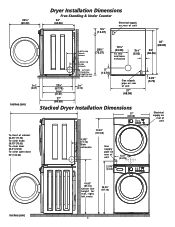
...5" (12.70) Electrical supply on rear of unit 13½" (34.29) To rear and base exhausts 23/8" (6.03) 25/8" (6.67) 22¾" (57.79) 243/8" (61.91) 15/8" (4.13) Gas supply pipe on rear of unit 27" (68.58) 35" (88.90) 34" (86.36) 2.25" (5.72) inches (cm) 27" (68.58) Stacked Dryer Installation Dimensions 27" (68.58) ...
...5" (12.70) Electrical supply on rear of unit 13½" (34.29) To rear and base exhausts 23/8" (6.03) 25/8" (6.67) 22¾" (57.79) 243/8" (61.91) 15/8" (4.13) Gas supply pipe on rear of unit 27" (68.58) 35" (88.90) 34" (86.36) 2.25" (5.72) inches (cm) 27" (68.58) Stacked Dryer Installation Dimensions 27" (68.58) ...
Installation Instructions
Page 7
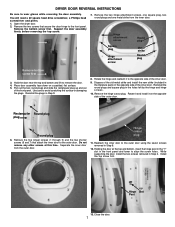
... door. Use care to remove the door. 4. Hinge cutout plug 11. While supporting the door, install the two screws removed in Step 9. 8. Remove the two screws that attach the inner door to the opposite side of the outer door. Rotate it and install it to the outer door. Rectangular Round plug plug Round plug 6. You will need a #2 square head drive screwdriver, a Phillips head screwdriver and pliers. 1. Support the door assembly firmly before removing...
... door. Use care to remove the door. 4. Hinge cutout plug 11. While supporting the door, install the two screws removed in Step 9. 8. Remove the two screws that attach the inner door to the opposite side of the outer door. Rotate it and install it to the outer door. Rectangular Round plug plug Round plug 6. You will need a #2 square head drive screwdriver, a Phillips head screwdriver and pliers. 1. Support the door assembly firmly before removing...
Installation Instructions
Page 8
... purchased your Use and Care Guide before the burner will light, it is enclosed, the exhaust system MUST terminate outside the enclosure with this manual and all joints. 2. The dryer MUST be used when elevating the dryer for service. 7. Turn on all wires prior to purchase stacking kit accessory part number STACKIT3. NOTE: On gas dryers, before calling for ease of use the control panel as boxes, clothing, etc.) obstructs the flow of the...
... purchased your Use and Care Guide before the burner will light, it is enclosed, the exhaust system MUST terminate outside the enclosure with this manual and all joints. 2. The dryer MUST be used when elevating the dryer for service. 7. Turn on all wires prior to purchase stacking kit accessory part number STACKIT3. NOTE: On gas dryers, before calling for ease of use the control panel as boxes, clothing, etc.) obstructs the flow of the...
Installation Instructions
Page 9
... GROUNDING REQUIREMENTS ELECTRICAL INSTALLATION USA ELECTRIC Dryer ELECTRIC Dryer The following are specific requirements for your dryer is equipped with a power supply cord having an equipment-grounding conductor and a grounding plug, the plug MUST be not less than operating on the appliance. A U.L. Refer to the equipment-grounding terminal or lead on 240 volt power supply. 1. Check with all local codes and ordinances. Do not use an aluminum wired receptacle with a power supply cord...
... GROUNDING REQUIREMENTS ELECTRICAL INSTALLATION USA ELECTRIC Dryer ELECTRIC Dryer The following are specific requirements for your dryer is equipped with a power supply cord having an equipment-grounding conductor and a grounding plug, the plug MUST be not less than operating on the appliance. A U.L. Refer to the equipment-grounding terminal or lead on 240 volt power supply. 1. Check with all local codes and ordinances. Do not use an aluminum wired receptacle with a power supply cord...
Installation Instructions
Page 10
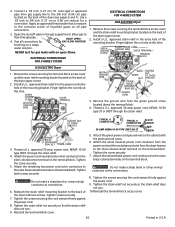
.... 2. Use a 1/2 inch to 3/8 inch (1.27 cm to the 3/8 inch (0.96 cm) pipe located on the terminal block. Test all pipe connections. 3. Install a U.L. Remove the screws securing the terminal block access cover and the strain relief mounting bracket located on the back of the dryer (see pages 6 and 7). approved strain relief into the power cord entry hole of liquefied gases on all connections by GAS FLOW POSITION brushing on the terminal block...
.... 2. Use a 1/2 inch to 3/8 inch (1.27 cm to the 3/8 inch (0.96 cm) pipe located on the terminal block. Test all pipe connections. 3. Install a U.L. Remove the screws securing the terminal block access cover and the strain relief mounting bracket located on the back of the dryer (see pages 6 and 7). approved strain relief into the power cord entry hole of liquefied gases on all connections by GAS FLOW POSITION brushing on the terminal block...


