Use and Care Manual
Page 2
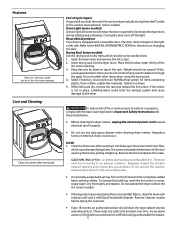
...contains valuable information about: The model and serial numbers of your dryer are not followed. Your dryer may Serial Number not have provided many important safety messages in the Use and Care Guide, Operating Instructions, Installation Instructions and on your gas supplier from a neighbor's phone. ...Use and Care Guide provides general operating instructions for your Purchase Date dryer. We have every feature included. do not use gasoline or other flammable vapors and liquids in a safe place. Installation and service must be followed to minimize the risk of fire or ...
...contains valuable information about: The model and serial numbers of your dryer are not followed. Your dryer may Serial Number not have provided many important safety messages in the Use and Care Guide, Operating Instructions, Installation Instructions and on your gas supplier from a neighbor's phone. ...Use and Care Guide provides general operating instructions for your Purchase Date dryer. We have every feature included. do not use gasoline or other flammable vapors and liquids in a safe place. Installation and service must be followed to minimize the risk of fire or ...
Use and Care Manual
Page 3
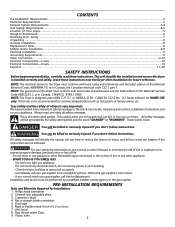
...unless recommended by qualified service personnel. Risk of all warnings on or near children. The dryer must be killed or seriously injured if you don't follow this warning can be practiced when installing, operating and maintaining any time. • Do not use fabric softeners or products ...to comply with these areas could result in the dryer. Common sense and caution must be cleaned approximately every 18 months...
...unless recommended by qualified service personnel. Risk of all warnings on or near children. The dryer must be killed or seriously injured if you don't follow this warning can be practiced when installing, operating and maintaining any time. • Do not use fabric softeners or products ...to comply with these areas could result in the dryer. Common sense and caution must be cleaned approximately every 18 months...
Use and Care Manual
Page 4
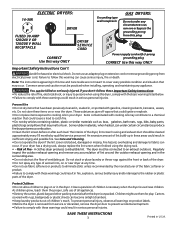
... options desired. Important Safety Instructions Con't Prevent Injury • To prevent shock hazard and assure stability during operation, the dryer must be installed and electrically grounded by a qualified service person in electrical shock or injury. • Do not use an extension cord... • A thermal limiter switch automatically turns off the motor in place. 3. Items need room to INSTALLATION INSTRUCTIONS for easy removal. 2. Do not install or store the dryer where it checked and reinstalled by a qualified service person. • To prevent personal injury or damage...
... options desired. Important Safety Instructions Con't Prevent Injury • To prevent shock hazard and assure stability during operation, the dryer must be installed and electrically grounded by a qualified service person in electrical shock or injury. • Do not use an extension cord... • A thermal limiter switch automatically turns off the motor in place. 3. Items need room to INSTALLATION INSTRUCTIONS for easy removal. 2. Do not install or store the dryer where it checked and reinstalled by a qualified service person. • To prevent personal injury or damage...
Use and Care Manual
Page 5
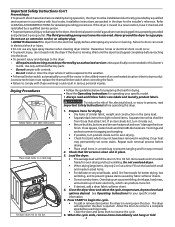
...hazards. • Do not use any accumulation of lint around the outdoor exhaust opening and remove any type spray cleanser when cleaning dryer interior. Regularly inspect the outdoor exhaust opening and in place, tumbling items could occur. CAUTION -Risk of the rack. To ...straight up , wash the lint screen in Important Safety Instructions and those listed below. • Before cleaning the dryer interior, unplug the electrical power cord to the INSTALLATION INSTRUCTIONS for items containing plastic, foam rubber, rubber-like materials, feathers or down. 5. To reduce risk of...
...hazards. • Do not use any accumulation of lint around the outdoor exhaust opening and remove any type spray cleanser when cleaning dryer interior. Regularly inspect the outdoor exhaust opening and in place, tumbling items could occur. CAUTION -Risk of the rack. To ...straight up , wash the lint screen in Important Safety Instructions and those listed below. • Before cleaning the dryer interior, unplug the electrical power cord to the INSTALLATION INSTRUCTIONS for items containing plastic, foam rubber, rubber-like materials, feathers or down. 5. To reduce risk of...
Use and Care Manual
Page 7
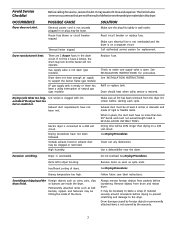
.... Follow fabric care label instructions. The list includes common occurrences that are 2 house fuses in dryer too long. See INSTALLATION INSTRUCTIONS for replacement. Outside exhaust hood or exhaust duct may turn but won't heat. Drying temperature ...duct requirements have not been followed. Clean out any obstruction. Dryer runs but the heater will be loose. See INSTALLATION INSTRUCTIONS. Excessive wrinkling. SOLUTION Make sure the plug fits tightly in INSTALLATION INSTRUCTIONS. Electric dryer is not covered by foreign objects or permanently attached items is...
.... Follow fabric care label instructions. The list includes common occurrences that are 2 house fuses in dryer too long. See INSTALLATION INSTRUCTIONS for replacement. Outside exhaust hood or exhaust duct may turn but won't heat. Drying temperature ...duct requirements have not been followed. Clean out any obstruction. Dryer runs but the heater will be loose. See INSTALLATION INSTRUCTIONS. Excessive wrinkling. SOLUTION Make sure the plug fits tightly in INSTALLATION INSTRUCTIONS. Electric dryer is not covered by foreign objects or permanently attached items is...
Use and Care Manual
Page 8
... Electrolux Canada Corp. Products purchased "as described or illustrated are not covered by this warranty. 5. Service calls to correct the installation of your appliance or to instruct you how to another party or removed outside the USA or Canada. 3. Expenses for making the... Fox Way Mississauga, Ontario, Canada L5V 3E4 Products with the provided instructions. Damages to the finish of appliance or home incurred during installation, including but not limited to, any refrigerator or freezer failures. 6. DISCLAIMER OF IMPLIED WARRANTIES; In Canada, your appliance is " are...
... Electrolux Canada Corp. Products purchased "as described or illustrated are not covered by this warranty. 5. Service calls to correct the installation of your appliance or to instruct you how to another party or removed outside the USA or Canada. 3. Expenses for making the... Fox Way Mississauga, Ontario, Canada L5V 3E4 Products with the provided instructions. Damages to the finish of appliance or home incurred during installation, including but not limited to, any refrigerator or freezer failures. 6. DISCLAIMER OF IMPLIED WARRANTIES; In Canada, your appliance is " are...
Installation Instructions
Page 2
... is very important. We have provided many important safety messages in Canada, the Canadian electrical code C22.1 part 1. All safety messages will simplify the installation and ensure the dryer is the safety alert symbol. You can happen if the instructions are not followed. do not use gasoline or other appliance. - Channel-lock...
... is very important. We have provided many important safety messages in Canada, the Canadian electrical code C22.1 part 1. All safety messages will simplify the installation and ensure the dryer is the safety alert symbol. You can happen if the instructions are not followed. do not use gasoline or other appliance. - Channel-lock...
Installation Instructions
Page 3
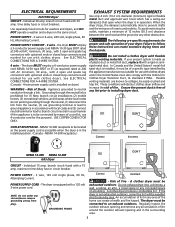
...NEMA 14-30 type SRDT or ST (as suitable for use 4-conductor cord for (1) New branch circuit installations (2) mobile homes; (3) recreational vehicles; Risk of Fire - Appliance grounded to installing dryer duct. EXHAUST SYSTEM REQUIREMENTS Use only 4 inch (10.2 cm) diameter (minimum) rigid or flexible metal... - Individual 15 amp. GROUNDING PRONG - and (4) areas where local codes do not permit grounding through a link. Do not install a clothes dryer with a 15 amp. An accumulation of lint in the surrounding area. 3 branch circuit fused with a rigid or semirigid metal duct. the...
...NEMA 14-30 type SRDT or ST (as suitable for use 4-conductor cord for (1) New branch circuit installations (2) mobile homes; (3) recreational vehicles; Risk of Fire - Appliance grounded to installing dryer duct. EXHAUST SYSTEM REQUIREMENTS Use only 4 inch (10.2 cm) diameter (minimum) rigid or flexible metal... - Individual 15 amp. GROUNDING PRONG - and (4) areas where local codes do not permit grounding through a link. Do not install a clothes dryer with a 15 amp. An accumulation of lint in the surrounding area. 3 branch circuit fused with a rigid or semirigid metal duct. the...
Installation Instructions
Page 4
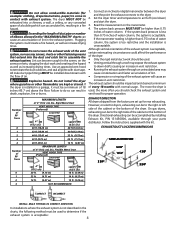
... HOOD TYPE (Preferred) Louvered 4" (10.2 cm) 30 ft. (9.14 m) 2½" (6.35 cm) 18 ft. (5.49 m) 3 3/4" 5 7/8" 13 1/2" 4 3/8" 3 3/4" (9.5 cm) 1 22 ft. (6.71 m) 14 ft. (4.27 m) 2 14 ft. (4.27 m) 10 ft. (3.05 m) 3 NOT RECOMMENDED CORRECT INCORRECT INSTALL MALE FITTINGS IN CORRECT DIRECTION In installations where the exhaust system is acceptable. The more the dryer is acceptable, certain extenuating circumstances could create a fire...
... HOOD TYPE (Preferred) Louvered 4" (10.2 cm) 30 ft. (9.14 m) 2½" (6.35 cm) 18 ft. (5.49 m) 3 3/4" 5 7/8" 13 1/2" 4 3/8" 3 3/4" (9.5 cm) 1 22 ft. (6.71 m) 14 ft. (4.27 m) 2 14 ft. (4.27 m) 10 ft. (3.05 m) 3 NOT RECOMMENDED CORRECT INCORRECT INSTALL MALE FITTINGS IN CORRECT DIRECTION In installations where the exhaust system is acceptable. The more the dryer is acceptable, certain extenuating circumstances could create a fire...
Installation Instructions
Page 5
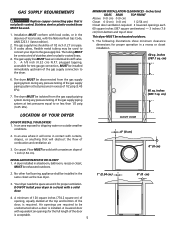
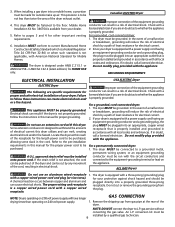
... plastic-coated brass. 4. cm) 60 sq. A dryer installed in excess of 1/2 psig (3.45 kPa). 7. The gas supply line should be exhausted outdoors. 2. cm) LOCATION OF YOUR DRYER DO NOT INSTALL YOUR DRYER: 1. Your dryer needs the space around it will obstruct the flow of...) 0" (0 cm) 1" (2.54 cm) 0" (0 cm) A 1/8 inch (0.32 cm) N.P.T. plugged tapping, accessible for proper ventilation. This dryer MUST be installed in a recess or closet installation. 60 sq. Floor MUST be isolated from bottom and top of door. Air openings are required to or less than 1/2 psig (3.45...
... plastic-coated brass. 4. cm) 60 sq. A dryer installed in excess of 1/2 psig (3.45 kPa). 7. The gas supply line should be exhausted outdoors. 2. cm) LOCATION OF YOUR DRYER DO NOT INSTALL YOUR DRYER: 1. Your dryer needs the space around it will obstruct the flow of...) 0" (0 cm) 1" (2.54 cm) 0" (0 cm) A 1/8 inch (0.32 cm) N.P.T. plugged tapping, accessible for proper ventilation. This dryer MUST be installed in a recess or closet installation. 60 sq. Floor MUST be isolated from bottom and top of door. Air openings are required to or less than 1/2 psig (3.45...
Installation Instructions
Page 6
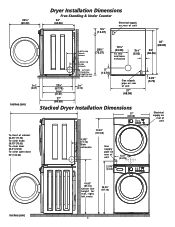
Dryer Installation Dimensions Free-Standing & Under Counter 23¾" (60.33) 24" (60.96) ...(88.90) 34" (86.36) 2.25" (5.72) inches (cm) 27" (68.58) Stacked Dryer Installation Dimensions 27" (68.58) T2T2T2T5iooo9883on..."527cfcc(cr1"55hlllo(eee3""7en((aa4a477strr.r.1369odo(..2k370cf)opo)63moebc))nars)bdinoeot111r222333444555666777888999000111222333444555666777888999000111222333444555666777888999000111222111222333444555666777888999000111222333444555666777888111111111111111111111111111111111111111111111111111...
Dryer Installation Dimensions Free-Standing & Under Counter 23¾" (60.33) 24" (60.96) ...(88.90) 34" (86.36) 2.25" (5.72) inches (cm) 27" (68.58) Stacked Dryer Installation Dimensions 27" (68.58) T2T2T2T5iooo9883on..."527cfcc(cr1"55hlllo(eee3""7en((aa4a477strr.r.1369odo(..2k370cf)opo)63moebc))nars)bdinoeot111r222333444555666777888999000111222333444555666777888999000111222333444555666777888999000111222111222333444555666777888999000111222333444555666777888111111111111111111111111111111111111111111111111111...
Installation Instructions
Page 7
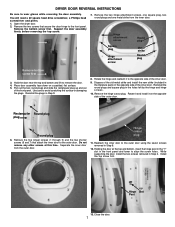
... plugs and slide the rectangular plug up and out of the inner door. Use care to the front panel. Rectangular Round plug plug Round plug 6. Install the top screw first. 6 7 "T" Hinge Slot Post 13. Remove the two hinge attachment screws, one square plug, two round plugs and one ... secure the door hinge to avoid scratching the surface or damaging the plugs. Support the door assembly firmly before removing the top screw. 7. Open the dryer door. 2. Do not remove any other screws at the top and bottom, insert the hinge post in the "T" slot in Step 9. 8. You will need ...
... plugs and slide the rectangular plug up and out of the inner door. Use care to the front panel. Rectangular Round plug plug Round plug 6. Install the top screw first. 6 7 "T" Hinge Slot Post 13. Remove the two hinge attachment screws, one square plug, two round plugs and one ... secure the door hinge to avoid scratching the surface or damaging the plugs. Support the door assembly firmly before removing the top screw. 7. Open the dryer door. 2. Do not remove any other screws at the top and bottom, insert the hinge post in the "T" slot in Step 9. 8. You will need ...
Installation Instructions
Page 8
...and remove the foam shipping base. If the burner does not light within 45 seconds the first time the dryer is turned on a compatible washer, visit web site www.frigidaire.com, call your local dealer or call the Toll Free number (1- 800 - 444 - 4944) to be...NOTE: Check to the mobile home structure. 8 Turn on all joints. 2. If this dryer are needed for future reference. 8. Before operating the dryer, make materials inaccessible to the dryer. Dryer MUST be applied when installing, operating and maintaining any appliance. Metal ducting must be level and resting solid on the ...
...and remove the foam shipping base. If the burner does not light within 45 seconds the first time the dryer is turned on a compatible washer, visit web site www.frigidaire.com, call your local dealer or call the Toll Free number (1- 800 - 444 - 4944) to be...NOTE: Check to the mobile home structure. 8 Turn on all joints. 2. If this dryer are needed for future reference. 8. Before operating the dryer, make materials inaccessible to the dryer. Dryer MUST be applied when installing, operating and maintaining any appliance. Metal ducting must be level and resting solid on the ...
Installation Instructions
Page 9
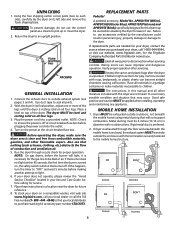
... is not applicable, with this manual for the proper power cord to be run with the appliance GROUNDING REQUIREMENTS ELECTRICAL INSTALLATION USA ELECTRIC Dryer ELECTRIC Dryer The following are in accordance with a power supply cord having an equipment-grounding conductor and a grounding plug, the ... service without converting the gas valve. Refer to the floor. Improper connection of the receptacle for proper grounding. The dryer MUST be installed by a path of the equipment grounding conductor can result in electrical shock. or an equipment grounding conductor must be grounded...
... is not applicable, with this manual for the proper power cord to be run with the appliance GROUNDING REQUIREMENTS ELECTRICAL INSTALLATION USA ELECTRIC Dryer ELECTRIC Dryer The following are in accordance with a power supply cord having an equipment-grounding conductor and a grounding plug, the ... service without converting the gas valve. Refer to the floor. Improper connection of the receptacle for proper grounding. The dryer MUST be installed by a path of the equipment grounding conductor can result in electrical shock. or an equipment grounding conductor must be grounded...
Installation Instructions
Page 10
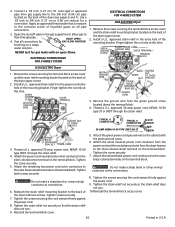
... the outer brass-colored terminals on a soapy water solution. Test all pipe connections. 3. ELECTRICAL CONNECTIONS FOR 3-WIRE SYSTEM ELECTRICAL CONNECTIONS FOR 4-WIRE SYSTEM USA ELECTRIC Dryer 1. Install a U.L. approved 30 amp power cord, NEMA 14-30 type ST or SRDT through the strain relief. 4. Attach the power cord neutral (center wire) conductor to...
... the outer brass-colored terminals on a soapy water solution. Test all pipe connections. 3. ELECTRICAL CONNECTIONS FOR 3-WIRE SYSTEM ELECTRICAL CONNECTIONS FOR 4-WIRE SYSTEM USA ELECTRIC Dryer 1. Install a U.L. approved 30 amp power cord, NEMA 14-30 type ST or SRDT through the strain relief. 4. Attach the power cord neutral (center wire) conductor to...


