
English manual
Page 5
Table of Contents Chapter 4 Directions for Bundled Software FOX ONE 50 FOX LiveUpdate 57 FOX LOGO 64 FOX DMI 65 Chapter 5 RAID Configuration Introduction 67 Installing Serial ATA Hard Disks 68 BIOS Configuration 68 RAID BIOS Configuration 68 Creating a RAID Driver Floppy Disk 74 Install OS on HDD with RAID set 74 Appendix CrossFireTM Technology 76
Table of Contents Chapter 4 Directions for Bundled Software FOX ONE 50 FOX LiveUpdate 57 FOX LOGO 64 FOX DMI 65 Chapter 5 RAID Configuration Introduction 67 Installing Serial ATA Hard Disks 68 BIOS Configuration 68 RAID BIOS Configuration 68 Creating a RAID Driver Floppy Disk 74 Install OS on HDD with RAID set 74 Appendix CrossFireTM Technology 76

English manual
Page 10
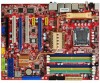
... Introduction Storage IEEE 1394a USB 2.0 Ports Gigabit LAN Supported by JMicron® JMB363 -2 x Ultra DMA 133/100/66 devices -2 x eSATA devices -RAID 0, 1, JBOD configuration Supported by ICH9R -6 x SATA devices -RAID 0, RAID 1, RAID 5, RAID 0+1 configuration with Intel® Matrix Storage Technology 2 x IEEE 1394a(one rear panel port, the other onboard connector ) 400Mb/s data transfer rate Supports...
... Introduction Storage IEEE 1394a USB 2.0 Ports Gigabit LAN Supported by JMicron® JMB363 -2 x Ultra DMA 133/100/66 devices -2 x eSATA devices -RAID 0, 1, JBOD configuration Supported by ICH9R -6 x SATA devices -RAID 0, RAID 1, RAID 5, RAID 0+1 configuration with Intel® Matrix Storage Technology 2 x IEEE 1394a(one rear panel port, the other onboard connector ) 400Mb/s data transfer rate Supports...

English manual
Page 22
... connector supports the provided Ultra DMA 133/100/66 IDE hard disk ribbon cable and you must configure the second drive as a disk array through RAID controller. Empty Front Panel Connector Hard Disk LED Connector (HD_LED) The connector connects to use 4-pin power supply, you use 8-pin ATX 12V power supply...
... connector supports the provided Ultra DMA 133/100/66 IDE hard disk ribbon cable and you must configure the second drive as a disk array through RAID controller. Empty Front Panel Connector Hard Disk LED Connector (HD_LED) The connector connects to use 4-pin power supply, you use 8-pin ATX 12V power supply...

English manual
Page 72
This chapter provides the following information: v Introduction v Installing Serial ATA Hard Disks v BIOS Configuration v RAID BIOS Configuration v Creating a RAID Driver Floppy Disk v Install OS on HDD with RAID set 66 Chapter 5 RAID Configuration 5 Chapter This chapter will introduce Intel® RAID Configurations .
This chapter provides the following information: v Introduction v Installing Serial ATA Hard Disks v BIOS Configuration v RAID BIOS Configuration v Creating a RAID Driver Floppy Disk v Install OS on HDD with RAID set 66 Chapter 5 RAID Configuration 5 Chapter This chapter will introduce Intel® RAID Configurations .

English manual
Page 73
... performance or data fault tolerance. RAID 0 (Striping) RAID 0 reads and writes sectors of data in parallel. RAID 10 (0+1) RAID 10 is one of the most popular implementations of RAID. Intel® Matrix Storage The Intel® Matrix Storage technology supports RAID 0 ,RAID 1, RAID 5, and RAID 10 (0+1) functions. The advantage of... block size can be set from 4KB to function. This configuration provides optimal speed and reliability, but you to combine two RAID functions to replace a failed drive that is equal to the fault tolerance, if any disk member fails, it affects the ...
... performance or data fault tolerance. RAID 0 (Striping) RAID 0 reads and writes sectors of data in parallel. RAID 10 (0+1) RAID 10 is one of the most popular implementations of RAID. Intel® Matrix Storage The Intel® Matrix Storage technology supports RAID 0 ,RAID 1, RAID 5, and RAID 10 (0+1) functions. The advantage of... block size can be set from 4KB to function. This configuration provides optimal speed and reliability, but you to combine two RAID functions to replace a failed drive that is equal to the fault tolerance, if any disk member fails, it affects the ...

English manual
Page 74
...Switch the "SATA Mode" option to the practical screen. Note: The RAID BIOS Setup pictures shown in this chapter are for reference noly, please refer to [RAID]. 4. Creating RAID 0 1. Select "1.Create RAID Volume" from the utility main menu and press . Press to display the... configuration items. 3. RAID BIOS Configuration Enter RAID BIOS Setup Enter the Intel® Matrix Storage Manager ...
...Switch the "SATA Mode" option to the practical screen. Note: The RAID BIOS Setup pictures shown in this chapter are for reference noly, please refer to [RAID]. 4. Creating RAID 0 1. Select "1.Create RAID Volume" from the utility main menu and press . Press to display the... configuration items. 3. RAID BIOS Configuration Enter RAID BIOS Setup Enter the Intel® Matrix Storage Manager ...

English manual
Page 75
...value is 128KB. 16K_Best for sequential transfer 64K_Good general purpose strip size 128K_Best performance for the RAID 0 according to the [DISK/VOLUME INFORMATION] and press to display the [SELECT DISKS] screen shown as RAID 0 from 4KB to finish the selection. 6. Some suggested selections are listed below : 5....as below . The available values range from the list, then press key to confirm, and key to 128KB. Chapter 5 RAID Configuration 2. Press to switch to "RAID Level" item, and then use Up or Down arrow key to select RAID0 (Stripe), press to select desired strip size...
...value is 128KB. 16K_Best for sequential transfer 64K_Good general purpose strip size 128K_Best performance for the RAID 0 according to the [DISK/VOLUME INFORMATION] and press to display the [SELECT DISKS] screen shown as RAID 0 from 4KB to finish the selection. 6. Some suggested selections are listed below : 5....as below . The available values range from the list, then press key to confirm, and key to 128KB. Chapter 5 RAID Configuration 2. Press to switch to "RAID Level" item, and then use Up or Down arrow key to select RAID0 (Stripe), press to select desired strip size...

English manual
Page 76
... the selected hard disk when you press to confirm. 70 Press to return to the main menu. Key in the RAID volume "Capacity" value, then Press . Creating RAID 1 1. The default value indicates the maximum capacity. 8. Attention: You will appear as below: Press to create the... volume and return to the "Create RAID Volume" menu. Chapter 5 RAID Configuration 7. key in a name for the RAID 1 according to the [DISK/VOLUME INFORMATION] and press to create the volume. Select "1.Create RAID Volume" from the utility main menu and press . 2.
... the selected hard disk when you press to confirm. 70 Press to return to the main menu. Key in the RAID volume "Capacity" value, then Press . Creating RAID 1 1. The default value indicates the maximum capacity. 8. Attention: You will appear as below: Press to create the... volume and return to the "Create RAID Volume" menu. Chapter 5 RAID Configuration 7. key in a name for the RAID 1 according to the [DISK/VOLUME INFORMATION] and press to create the volume. Select "1.Create RAID Volume" from the utility main menu and press . 2.

English manual
Page 77
...choose the hard disks that you want to confirm. 4. Press to switch to "RAID Level" item, and then use Up or Down arrow key to select RAID10 (RAID 0+1), press to configure as RAID 1. 5. key in a name for the RAID 10 according to the [DISK/VOLUME INFORMATION] and press to the main menu...." menu. The default value is 64KB. 16K_Best for sequential transfer 64K_Good general purpose strip size 128K_Best performance for RAID10. Chapter 5 RAID Configuration 3. Select "Disks" item and press to choose the hard disks that you want to configure as below: Press to create the volume ...
...choose the hard disks that you want to confirm. 4. Press to switch to "RAID Level" item, and then use Up or Down arrow key to select RAID10 (RAID 0+1), press to configure as RAID 1. 5. key in a name for the RAID 10 according to the [DISK/VOLUME INFORMATION] and press to the main menu...." menu. The default value is 64KB. 16K_Best for sequential transfer 64K_Good general purpose strip size 128K_Best performance for RAID10. Chapter 5 RAID Configuration 3. Select "Disks" item and press to choose the hard disks that you want to configure as below: Press to create the volume ...

English manual
Page 78
...Press , a warning message will appear as below : Press to create the volume and return to configure as RAID 10. 5. Attention: You will appear as below : 72 Press to switch to "RAID Level" item, and then use Up or Down arrow keys to select RAID5 (Parity), press to 128KB....Create Volume" and Press , a warning message will lost all data on the selected hard disk when you want to the main menu. Chapter 5 RAID Configuration 6. Creating RAID 5 (Parity) 1. The available values range from the utility main menu and press . 2. The default value is 64KB. 16K_Best for sequential transfer...
...Press , a warning message will appear as below : Press to create the volume and return to configure as RAID 10. 5. Attention: You will appear as below : 72 Press to switch to "RAID Level" item, and then use Up or Down arrow keys to select RAID5 (Parity), press to 128KB....Create Volume" and Press , a warning message will lost all data on the selected hard disk when you want to the main menu. Chapter 5 RAID Configuration 6. Creating RAID 5 (Parity) 1. The available values range from the utility main menu and press . 2. The default value is 64KB. 16K_Best for sequential transfer...

English manual
Page 79
... the selected hard disk when you press to create the volume. Select "3. Press to reset and press to the "Create RAID Volume" menu. Select "2. Delete RAID Volume" in main menu and press to reset the RAID setting and delet all data on the drive. Attention: You will lost all data on selected? (Y/N): 2. Reset... RAID 1. Press to return to cancel the operation. 73 The following message appears: Are you sure you want to delete and press , the screen appears as ...
... the selected hard disk when you press to create the volume. Select "3. Press to reset and press to the "Create RAID Volume" menu. Select "2. Delete RAID Volume" in main menu and press to reset the RAID setting and delet all data on the drive. Attention: You will lost all data on selected? (Y/N): 2. Reset... RAID 1. Press to return to cancel the operation. 73 The following message appears: Are you sure you want to delete and press , the screen appears as ...

English manual
Page 80
... the drive floppy creating. Click on HDD with the motherboard package, if it own. Directory: \Driver\IMSM\floppy32(32bit) \Driver\IMSM\floppy64(64bit) Note: The RAID driver Floppy Disk has no use for W indows Vista which has in main menu and press , The following picture appears, press , then insert the... RAID driver FDD to "CDROM", save changes and exit the BIOS setup. 3. Set the "First Boot Device" to the floppy disk drive. 74 Insert a formatted FDD...
... the drive floppy creating. Click on HDD with the motherboard package, if it own. Directory: \Driver\IMSM\floppy32(32bit) \Driver\IMSM\floppy64(64bit) Note: The RAID driver Floppy Disk has no use for W indows Vista which has in main menu and press , The following picture appears, press , then insert the... RAID driver FDD to "CDROM", save changes and exit the BIOS setup. 3. Set the "First Boot Device" to the floppy disk drive. 74 Insert a formatted FDD...

English manual
Page 81
Make sure the floppy disk drive works normally. 2. Formatting will erase ALL data on your floppy disk, so please take care. 75 W hen the following picture appears, press and then follow the screen message to complete the OS installation. Attention: 1. Chapter 5 RAID Configuration 5.
Make sure the floppy disk drive works normally. 2. Formatting will erase ALL data on your floppy disk, so please take care. 75 W hen the following picture appears, press and then follow the screen message to complete the OS installation. Attention: 1. Chapter 5 RAID Configuration 5.