English Manual.
Page 5
... device. ■ If there is a PCI Express x16 graphics card installed in your electronic equipment. ity of the product, please consult a certified computer technician. nections might damage the motherboard. ■ When handling the motherboard, avoid touching any installation steps or have a problem related to the use of your system. ! Normal operation depends on the motherboard. tors. ■ If there is any, when connecting USB, audio...
... device. ■ If there is a PCI Express x16 graphics card installed in your electronic equipment. ity of the product, please consult a certified computer technician. nections might damage the motherboard. ■ When handling the motherboard, avoid touching any installation steps or have a problem related to the use of your system. ! Normal operation depends on the motherboard. tors. ■ If there is any, when connecting USB, audio...
English Manual.
Page 10
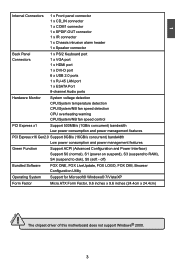
... Connectors 1 x Front panel connector 1 x CD_IN connector 1 x COM1 connector 1 x SPDIF-OUT connector 1 x IR connector 1 x Chassis intrusion alarm header 1 x Speaker connector Back Panel 1 x PS/2 Keyboard port Connectors 1 x VGA port 1 x HDMI port 1 x DVI-D port 6 x USB 2.0 ports 1 x RJ-45 LAN port 1 x ESATA Port 8-channel Audio ports Hardware Monitor System voltage detection CPU/System temperature detection CPU/System/NB fan speed detection CPU overheating warning CPU/System/NB fan speed control PCI Express x1 Support 500MB/s (1GB/s concurrent) bandwidth Low power...
... Connectors 1 x Front panel connector 1 x CD_IN connector 1 x COM1 connector 1 x SPDIF-OUT connector 1 x IR connector 1 x Chassis intrusion alarm header 1 x Speaker connector Back Panel 1 x PS/2 Keyboard port Connectors 1 x VGA port 1 x HDMI port 1 x DVI-D port 6 x USB 2.0 ports 1 x RJ-45 LAN port 1 x ESATA Port 8-channel Audio ports Hardware Monitor System voltage detection CPU/System temperature detection CPU/System/NB fan speed detection CPU overheating warning CPU/System/NB fan speed control PCI Express x1 Support 500MB/s (1GB/s concurrent) bandwidth Low power...
English Manual.
Page 14
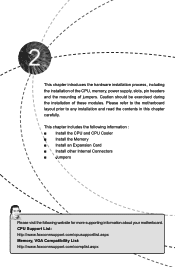
... following information : ■ Install the CPU and CPU Cooler ■ Install the Memory ■ Install an Expansion Card ■ Install other Internal Connectors ■ Jumpers Please visit the following website for more supporting information about your motherboard. CPU Support List: http://www.foxconnsupport.com/cpusupportlist.aspx Memory, VGA Compatibility List: http://www.foxconnsupport.com/complist.aspx This chapter introduces the hardware installation process, including the installation of the CPU, memory, power supply, slots, pin headers and the mounting of...
... following information : ■ Install the CPU and CPU Cooler ■ Install the Memory ■ Install an Expansion Card ■ Install other Internal Connectors ■ Jumpers Please visit the following website for more supporting information about your motherboard. CPU Support List: http://www.foxconnsupport.com/cpusupportlist.aspx Memory, VGA Compatibility List: http://www.foxconnsupport.com/complist.aspx This chapter introduces the hardware installation process, including the installation of the CPU, memory, power supply, slots, pin headers and the mounting of...
English Manual.
Page 19
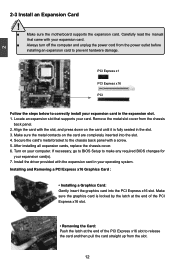
... the slot. 3. PCI Express x1 PCI Express x16 PCI Follow the steps below to release the card and then pull the card straight up from the chassis back panel. 2. After installing all expansion cards, replace the chassis cover. 6. Align the card with a screw. 5. 2 CAUTION 2-3 Install an Expansion Card ! ■ Make sure the motherboard supports the expansion card. Carefully read the manual that supports your expansion card(s). 7. If necessary, go to BIOS Setup to the chassis back panel...
... the slot. 3. PCI Express x1 PCI Express x16 PCI Follow the steps below to release the card and then pull the card straight up from the chassis back panel. 2. After installing all expansion cards, replace the chassis cover. 6. Align the card with a screw. 5. 2 CAUTION 2-3 Install an Expansion Card ! ■ Make sure the motherboard supports the expansion card. Carefully read the manual that supports your expansion card(s). 7. If necessary, go to BIOS Setup to the chassis back panel...
English Manual.
Page 22
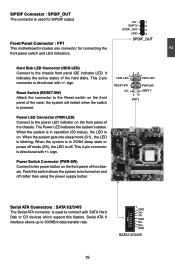
... Hard Disk LED Connector (HDD-LED) Connect to the chassis front panel IDE indicator LED. The Power LED indicates the system's status. This 2-pin connector is directional with SATA Hard Disk or CD devices which support this switch allows the system to be turned on the front panel of the hard disks. When the system gets into sleep mode (S1) , the LED is pressed. 12 + + HDD-LED - This 2-pin connector is directional with +/- 2 S/PDIF Connector : SPDIF_OUT The connector is used to connect with +/- Front Panel Connector : FP1 This motherboard...
... Hard Disk LED Connector (HDD-LED) Connect to the chassis front panel IDE indicator LED. The Power LED indicates the system's status. This 2-pin connector is directional with SATA Hard Disk or CD devices which support this switch allows the system to be turned on the front panel of the hard disks. When the system gets into sleep mode (S1) , the LED is pressed. 12 + + HDD-LED - This 2-pin connector is directional with +/- 2 S/PDIF Connector : SPDIF_OUT The connector is used to connect with +/- Front Panel Connector : FP1 This motherboard...
English Manual.
Page 24
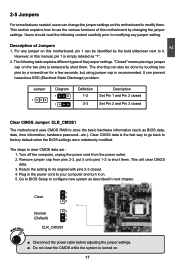
... with pins 2-3 closed Clear CMOS Jumper: CLR_CMOS1 The motherboard uses CMOS RAM to configure new system as described in next chapter. 1 Clear 2 3 WARNING! Return the setting to factory default when the BIOS settings were mistakenly modified. Description of Jumpers 1. Normal 1 2 (Default) 3 CLR_CMOS1 ■ Disconnect the power cable before adjusting the jumper settings. ■ Do not clear the CMOS while the system is turned on the two pins to clear CMOS data are : 1. The steps to temporarily short...
... with pins 2-3 closed Clear CMOS Jumper: CLR_CMOS1 The motherboard uses CMOS RAM to configure new system as described in next chapter. 1 Clear 2 3 WARNING! Return the setting to factory default when the BIOS settings were mistakenly modified. Description of Jumpers 1. Normal 1 2 (Default) 3 CLR_CMOS1 ■ Disconnect the power cable before adjusting the jumper settings. ■ Do not clear the CMOS while the system is turned on the two pins to clear CMOS data are : 1. The steps to temporarily short...
English Manual.
Page 26
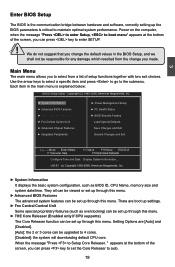
... the change the default values in the main menu is explained below: CMOS Setup Utility - We do not suggest that you change you to maintain optimal system performance. Power on the computer, when the message "Press to enter Setup, to boot menu" appears at the bottom of the screen, you can press key to auto. 19 CAUTION 3 Enter BIOS Setup The BIOS is the communication bridge between hardware and software, correctly setting...
... the change the default values in the main menu is explained below: CMOS Setup Utility - We do not suggest that you change you to maintain optimal system performance. Power on the computer, when the message "Press to enter Setup, to boot menu" appears at the bottom of the screen, you can press key to auto. 19 CAUTION 3 Enter BIOS Setup The BIOS is the communication bridge between hardware and software, correctly setting...

English Manual.
Page 27
... not work at all used 2 or 3 cores can be upgraded to CMOS and exit. ► Discard Changes and Exit Do not change Fan speeds, and displays temperatures and voltages of your current system. ► Save Changes and Exit Save setting values to 4 cores. There are IDE devices, Super I/O devices such as less I /O and other USB devices... It means, if your system loading is to adjust BIOS setting one by one, trial and error, to...
... not work at all used 2 or 3 cores can be upgraded to CMOS and exit. ► Discard Changes and Exit Do not change Fan speeds, and displays temperatures and voltages of your current system. ► Save Changes and Exit Save setting values to 4 cores. There are IDE devices, Super I/O devices such as less I /O and other USB devices... It means, if your system loading is to adjust BIOS setting one by one, trial and error, to...
English Manual.
Page 28
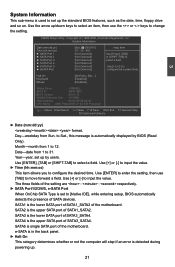
... the date, time, floppy drive and so on. Use [ENTER], [TAB] or [SHIFT-TAB] to 12. Use [ENTER] to enter the setting, then use the or keys to 31. Halt On Keyboard Mouse [All Errors, But ...] [Disabled] [Disabled] Model Name :A88GMX BIOS ID :A43F1D03 BIOS Version :08.00.15 Installed Memory Size :1024MB MAC Address :00-00-00-00-00-30 CPU Name : AMD Phenom(tm) II X4 945 Processor Move Enter:Select +/-/:Value F10:Save...
... the date, time, floppy drive and so on. Use [ENTER], [TAB] or [SHIFT-TAB] to 12. Use [ENTER] to enter the setting, then use the or keys to 31. Halt On Keyboard Mouse [All Errors, But ...] [Disabled] [Disabled] Model Name :A88GMX BIOS ID :A43F1D03 BIOS Version :08.00.15 Installed Memory Size :1024MB MAC Address :00-00-00-00-00-30 CPU Name : AMD Phenom(tm) II X4 945 Processor Move Enter:Select +/-/:Value F10:Save...
English Manual.
Page 29
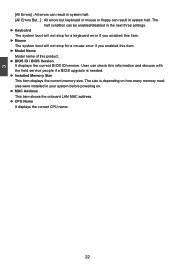
The size is needed. ► Installed Memory Size This item displays the current memory size. User can check this product. ► BIOS ID / BIOS Version It displays the current BIOS ID/version. 3 [All Errors] : All errors can result in system halt. [All Errors But...] : All errors but keyboard or mouse or floppy can be enabled/disabled in the next three settings. ► Keyboard The system boot will not stop for a keyboard error if you enabled this item. ► Mouse...
The size is needed. ► Installed Memory Size This item displays the current memory size. User can check this product. ► BIOS ID / BIOS Version It displays the current BIOS ID/version. 3 [All Errors] : All errors can result in system halt. [All Errors But...] : All errors but keyboard or mouse or floppy can be enabled/disabled in the next three settings. ► Keyboard The system boot will not stop for a keyboard error if you enabled this item. ► Mouse...
English Manual.
Page 32
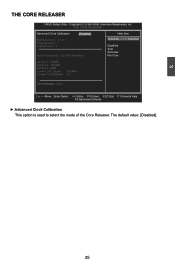
..., American Megatrends, Inc. The default value: [Disabled]. 25 3 The Core Releaser CMOS Setup Utility - THE CORE RELEASER Advanced Clock Calibration [Disabl ed] AGESA Version : 3.7.0.1 Physical Count : 1 Logical Count : 3 AMD Phenom(tm) II X3 700e Processor Help Item Options Disabled Auto All Cores Per Core Cache L1 : 384KB Cache L2 : 1536KB Cache L3 : 6MB Current CPU Speed : 2400MHz Current FSB Multiplier : 12x Core Releaser : NULL Move Enter:Select +/-/:Value F10:Save ESC...
..., American Megatrends, Inc. The default value: [Disabled]. 25 3 The Core Releaser CMOS Setup Utility - THE CORE RELEASER Advanced Clock Calibration [Disabl ed] AGESA Version : 3.7.0.1 Physical Count : 1 Logical Count : 3 AMD Phenom(tm) II X3 700e Processor Help Item Options Disabled Auto All Cores Per Core Cache L1 : 384KB Cache L2 : 1536KB Cache L3 : 6MB Current CPU Speed : 2400MHz Current FSB Multiplier : 12x Core Releaser : NULL Move Enter:Select +/-/:Value F10:Save ESC...
English Manual.
Page 40
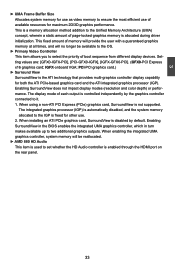
... Audio controller is freed for both the ATI PCIe-based graphics card and the ATI integrated graphics processor (IGP). IGFX-onboard VGA; The integrated graphics processor (IGP) is automatically disabled, and the system memory allocated to the IGP is enabled through the HDMI port on the rear panel. 33 Enabling SurroundView does not impact display modes (resolution and color depth) or performance. When using a non-ATI PCI Express (PCIe) graphics card, SurroundView is used to two additional graphics...
... Audio controller is freed for both the ATI PCIe-based graphics card and the ATI integrated graphics processor (IGP). IGFX-onboard VGA; The integrated graphics processor (IGP) is automatically disabled, and the system memory allocated to the IGP is enabled through the HDMI port on the rear panel. 33 Enabling SurroundView does not impact display modes (resolution and color depth) or performance. When using a non-ATI PCI Express (PCIe) graphics card, SurroundView is used to two additional graphics...
English Manual.
Page 43
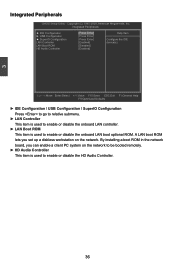
A LAN boot ROM lets you can enable a client PC system on the network. By installing a boot ROM in the network board, you set up a diskless workstation on the network to be booted remotely. ► HD Audio Controller This item is used to enable or disable the onboard LAN boot optional ROM. Copyright (C) 1985-2008, American Megatrends, Inc. Integrated Peripherals ► IDE Configuration ► USB Configuration ► SuperIO Configuration LAN Controller LAN Boot ROM HD Audio Controller [Press Enter] Help Item [Press Enter] [Press Enter] Configure the IDE [Enabled] device...
A LAN boot ROM lets you can enable a client PC system on the network. By installing a boot ROM in the network board, you set up a diskless workstation on the network to be booted remotely. ► HD Audio Controller This item is used to enable or disable the onboard LAN boot optional ROM. Copyright (C) 1985-2008, American Megatrends, Inc. Integrated Peripherals ► IDE Configuration ► USB Configuration ► SuperIO Configuration LAN Controller LAN Boot ROM HD Audio Controller [Press Enter] Help Item [Press Enter] [Press Enter] Configure the IDE [Enabled] device...

English Manual.
Page 44
... two additional IDE ports. 37 When you can select IDE option to have fair performance (only PATA, SATA level), or you enable RAID, it means all your SATA ports. 3 IDE Configuration CMOS Setup Utility - AHCI provides more advanced features including SATA features, but some SATA drives may not support AHCI, unless they are used to support native IDE mode. [RAID] - If your motherboard supporting AHCI, and you have a SATA device, which is used to get its specification. The Advanced Host Controller Interface (AHCI) specification describes...
... two additional IDE ports. 37 When you can select IDE option to have fair performance (only PATA, SATA level), or you enable RAID, it means all your SATA ports. 3 IDE Configuration CMOS Setup Utility - AHCI provides more advanced features including SATA features, but some SATA drives may not support AHCI, unless they are used to support native IDE mode. [RAID] - If your motherboard supporting AHCI, and you have a SATA device, which is used to get its specification. The Advanced Host Controller Interface (AHCI) specification describes...

English Manual.
Page 47
... select "S1 (POS)" mode, the power is lost (CPU or chip set the energy saving mode of time. In this state. Power Management Setup CMOS Setup Utility - Control starts from the processor's reset vector after the wake event. The S4 sleeping state is the lowest power, longest wake latency sleeping state supported by RTS [Disabled] 3 Move Enter:Select +/-/:Value F10:Save ESC:Exit F1:General Help F9:Optimized Defaults ACPI (Advanced Configuration and Power Interface) is assumed...
... select "S1 (POS)" mode, the power is lost (CPU or chip set the energy saving mode of time. In this state. Power Management Setup CMOS Setup Utility - Control starts from the processor's reset vector after the wake event. The S4 sleeping state is the lowest power, longest wake latency sleeping state supported by RTS [Disabled] 3 Move Enter:Select +/-/:Value F10:Save ESC:Exit F1:General Help F9:Optimized Defaults ACPI (Advanced Configuration and Power Interface) is assumed...
English Manual.
Page 51
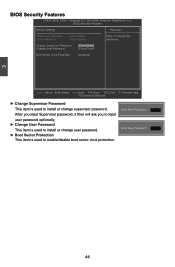
... input user password optionally. ► Change User Password This item is used to install or change user password. ► Boot Sector Protection This item is used to install or change the User Password : Not Installed password. Copyright (C) 1985-2006, American Megatrends, Inc. 3 BIOS Security Features CMOS Setup Utility - Change Supervisor Password [Press Enter] Change User Password [Press Enter] Boot Sector Virus Protection [Disabled] Move Enter:Select +/-/:Value F10:Save ESC:Exit F1:General Help F9:Optimized Defaults ► Change Supervisor Password...
... input user password optionally. ► Change User Password This item is used to install or change user password. ► Boot Sector Protection This item is used to install or change the User Password : Not Installed password. Copyright (C) 1985-2006, American Megatrends, Inc. 3 BIOS Security Features CMOS Setup Utility - Change Supervisor Password [Press Enter] Change User Password [Press Enter] Boot Sector Virus Protection [Disabled] Move Enter:Select +/-/:Value F10:Save ESC:Exit F1:General Help F9:Optimized Defaults ► Change Supervisor Password...
English Manual.
Page 54
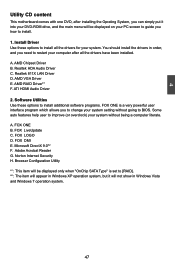
... should install the drivers in Windows Vista and Windows 7 operation system. 47 FOX DMI E. Norton Internet Security H. A. Install Driver Use these options to install additional software programs. FOX ONE is set to install all the drivers have been installed. Realtek HDA Audio Driver C. AMD RAID Driver*1 F. Software Utilities Use these options to [RAID]. *2 : The item will appear in Windows XP operation system, but it into your DVD-ROM drive, and the main menu will be displayed only when "OnChip SATA Type" is a very powerful user...
... should install the drivers in Windows Vista and Windows 7 operation system. 47 FOX DMI E. Norton Internet Security H. A. Install Driver Use these options to install additional software programs. FOX ONE is set to install all the drivers have been installed. Realtek HDA Audio Driver C. AMD RAID Driver*1 F. Software Utilities Use these options to [RAID]. *2 : The item will appear in Windows XP operation system, but it into your DVD-ROM drive, and the main menu will be displayed only when "OnChip SATA Type" is a very powerful user...
English Manual.
Page 55
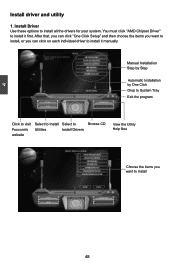
... Utilities Install Drivers Browse CD View the Utility Help files Choose the items you can click "One Click Setup" and then choose the items you want to install, or you want to install it first. After that, you can click on each individual driver to Install 48 You must click "AMD Chipset Driver" to install all the drivers for your system. 4 Install driver and utility 1. Install Driver Use these options to install it manually...
... Utilities Install Drivers Browse CD View the Utility Help files Choose the items you can click "One Click Setup" and then choose the items you want to install, or you want to install it first. After that, you can click on each individual driver to Install 48 You must click "AMD Chipset Driver" to install all the drivers for your system. 4 Install driver and utility 1. Install Driver Use these options to install it manually...
English Manual.
Page 81
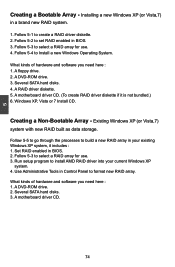
... select a RAID array for use . 4. A floppy drive. 2. A motherboard driver CD. (To create RAID driver diskette if it includes : 1. Set RAID enabled in a brand new RAID system. 1. Run setup program to create a RAID driver diskette. 2. What kinds of hardware and software you need here : 1. Several SATA hard disks. 3. Installing a new Windows XP (or Vista,7) in BIOS. 2. A RAID driver diskette. 5. 5 Creating a Bootable Array - Follow 5-1 to install AMD RAID driver into your existing Windows XP system, it is not bundled.) 6. A DVD-ROM drive. 3. Existing Windows XP...
... select a RAID array for use . 4. A floppy drive. 2. A motherboard driver CD. (To create RAID driver diskette if it includes : 1. Set RAID enabled in a brand new RAID system. 1. Run setup program to create a RAID driver diskette. 2. What kinds of hardware and software you need here : 1. Several SATA hard disks. 3. Installing a new Windows XP (or Vista,7) in BIOS. 2. A RAID driver diskette. 5. 5 Creating a Bootable Array - Follow 5-1 to install AMD RAID driver into your existing Windows XP system, it is not bundled.) 6. A DVD-ROM drive. 3. Existing Windows XP...
English Manual.
Page 101
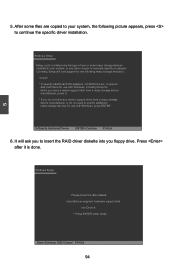
Windows Setup Setup could not determine the type of one or more mass storage devices installed in your system, the following mass storage device(s): * To specify additional SCSI adapters, CD-ROM drivers, or special disk controllers for use with Windows, press ENTER. Press after it is done. Currently, Setup will ask you to continue the specific driver installation. Windows Setup Please insert the disk labeled manufacturer-supplied hardware support disk into you floppy drive. 5 5. It will load support for which you...
Windows Setup Setup could not determine the type of one or more mass storage devices installed in your system, the following mass storage device(s): * To specify additional SCSI adapters, CD-ROM drivers, or special disk controllers for use with Windows, press ENTER. Press after it is done. Currently, Setup will ask you to continue the specific driver installation. Windows Setup Please insert the disk labeled manufacturer-supplied hardware support disk into you floppy drive. 5 5. It will load support for which you...


