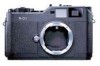
Product Support Bulletin(s)
Page 1
... change . This function records a picture simultaneously in full release mode. ! This setting allows the picture to 3. Noise reduction for long exposure time. Auto white balance shot color change . Noise reduction when shooting with PRINT Image Matching 3. ! RAW: from 2 to be displayed on a shot taken under the same file number. ! "Adobe RGB" is taken. ! The Noise Reduction setting is in two different files (Jpeg (H) and RAW) under incandescent lighting is performed. ! Compatible with the ISO1600 set-up default value change. LCD display playback time's shutter...
... change . This function records a picture simultaneously in full release mode. ! This setting allows the picture to 3. Noise reduction for long exposure time. Auto white balance shot color change . Noise reduction when shooting with PRINT Image Matching 3. ! RAW: from 2 to be displayed on a shot taken under the same file number. ! "Adobe RGB" is taken. ! The Noise Reduction setting is in two different files (Jpeg (H) and RAW) under incandescent lighting is performed. ! Compatible with the ISO1600 set-up default value change. LCD display playback time's shutter...
Product Support Bulletin(s)
Page 3
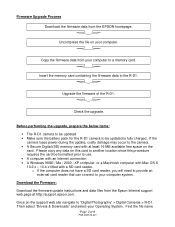
... charged. Download the Firmware: Download the firmware update instructions and data files from the EPSON homepage. Please copy any data on this card to another location since this procedure requires the card be formatted prior to your computer to be updated • Make sure the battery pack for the R-D1 camera to a memory card. o If the computer does not have a SD card reader, you will need to provide an external card reader that can connect to use...
... charged. Download the Firmware: Download the firmware update instructions and data files from the EPSON homepage. Please copy any data on this card to another location since this procedure requires the card be formatted prior to your computer to be updated • Make sure the battery pack for the R-D1 camera to a memory card. o If the computer does not have a SD card reader, you will need to provide an external card reader that can connect to use...
Product Support Bulletin(s)
Page 10
... blower inside your camera's warranty, even if it . Insert a fully charged battery into the camera, then turn the power switch to the on Cleaning the CCD Sensor for the Epson R-D1 Digital Rangefinder Camera. It may scratch or damage the surface of the CCD sensor and affect the quality of hand blowers for cleaning the CCD. Operate the shutter charge lever to use air compressors or...
... blower inside your camera's warranty, even if it . Insert a fully charged battery into the camera, then turn the power switch to the on Cleaning the CCD Sensor for the Epson R-D1 Digital Rangefinder Camera. It may scratch or damage the surface of the CCD sensor and affect the quality of hand blowers for cleaning the CCD. Operate the shutter charge lever to use air compressors or...
User Manual
Page 3
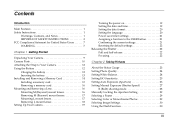
... Power save timer settings 21 Assigning a function to the USER button 21 Confirming the current settings 21 Resetting the default settings 22 Releasing the Shutter 22 Full and half-release 22 Focusing 22 Chapter 2 Taking Pictures About the Status Gauge 23 Setting Photo Quality 24 Setting White Balance 24 Setting ISO Sensitivity 25 Setting Auto Exposure (Aperture 26 Setting Manual Exposure (Shutter Speed 27 B (Bulb) shooting mode 28 Manually Locking the Aperture Setting 29 Selecting a Frame 29 Selecting Color or Monochrome Photos 29 Selecting Image Settings 30 Using the Flash...
... Power save timer settings 21 Assigning a function to the USER button 21 Confirming the current settings 21 Resetting the default settings 22 Releasing the Shutter 22 Full and half-release 22 Focusing 22 Chapter 2 Taking Pictures About the Status Gauge 23 Setting Photo Quality 24 Setting White Balance 24 Setting ISO Sensitivity 25 Setting Auto Exposure (Aperture 26 Setting Manual Exposure (Shutter Speed 27 B (Bulb) shooting mode 28 Manually Locking the Aperture Setting 29 Selecting a Frame 29 Selecting Color or Monochrome Photos 29 Selecting Image Settings 30 Using the Flash...

User Manual
Page 6
... give off immediately. Follow all of data on this product with a bright rangefinder. ❏ Supports CCD-RAW data, saved in the user documentation. Although this product. ❏ Do not insert objects into place. Safety Instructions Read all warnings and instructions marked on the HDD. Data can damage it. ❏ Protect the camera from rapid temperature change. ❏ Never spill liquid onto this...
... give off immediately. Follow all of data on this product with a bright rangefinder. ❏ Supports CCD-RAW data, saved in the user documentation. Although this product. ❏ Do not insert objects into place. Safety Instructions Read all warnings and instructions marked on the HDD. Data can damage it. ❏ Protect the camera from rapid temperature change. ❏ Never spill liquid onto this...

User Manual
Page 16
... Indicates the following statuses of remaining photos, photo quality, remaining battery power, and white balance settings). Unlocks the shutter speed dial. 11 Getting Started X contact Lens release button AE-lock button Photo quality/WB lever SD card access LED LCD button MENU button ENTER button CANCEL button USER button LCD display Shutter button Used to display the optimal shutter speed (i.e., optimal exposure value) in the viewfinder. Winds up and rotate it . Defines the selected item or settings (available in playback mode or Power Save Timer mode returns the camera...
... Indicates the following statuses of remaining photos, photo quality, remaining battery power, and white balance settings). Unlocks the shutter speed dial. 11 Getting Started X contact Lens release button AE-lock button Photo quality/WB lever SD card access LED LCD button MENU button ENTER button CANCEL button USER button LCD display Shutter button Used to display the optimal shutter speed (i.e., optimal exposure value) in the viewfinder. Winds up and rotate it . Defines the selected item or settings (available in playback mode or Power Save Timer mode returns the camera...

User Manual
Page 24
... image is displayed on the top of remaining photos, photo quality, remaining battery power, and white balance settings) is set the date and time. 1. For details, see "How to Use the LCD Display" on the LCD monitor. Turn the power switch on position. The Time and Date screen is taken. Note: ❏ If you remove the battery from the camera, the date and time settings will be erased approximately two days after the time the camera was last used. ❏ After changing the battery, make...
... image is displayed on the top of remaining photos, photo quality, remaining battery power, and white balance settings) is set the date and time. 1. For details, see "How to Use the LCD Display" on the LCD monitor. Turn the power switch on position. The Time and Date screen is taken. Note: ❏ If you remove the battery from the camera, the date and time settings will be erased approximately two days after the time the camera was last used. ❏ After changing the battery, make...
User Manual
Page 31
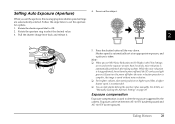
... aperture for a photo. 2 1. Setting Auto Exposure (Aperture) 4. While the noise reduction is being performed, do not turn the power off until the SD card access light 2 goes out. Shutter speed is automatically set at more than 2 seconds, noise reduction is taken. 2 Note: ❏ When you set between AE -2.0 EV (underexposure) and AE +2.0 EV (overexposure). 2 Taking Pictures 26 Exposure compensation 2 Exposure compensation is used to Hi (High) in the Film Settings screen...
... aperture for a photo. 2 1. Setting Auto Exposure (Aperture) 4. While the noise reduction is being performed, do not turn the power off until the SD card access light 2 goes out. Shutter speed is automatically set at more than 2 seconds, noise reduction is taken. 2 Note: ❏ When you set between AE -2.0 EV (underexposure) and AE +2.0 EV (overexposure). 2 Taking Pictures 26 Exposure compensation 2 Exposure compensation is used to Hi (High) in the Film Settings screen...

User Manual
Page 33
... Settings screen and set the shutter speed at a high value, you turn the power off before the noise reduction procedure is complete, the image is 2 automatically performed after taking photos in B shooting mode, use a tripod or cable release to Hi (High) in low light conditions. Rotate the shutter speed dial to select the desired value. 2 3. Both the optimal shutter speed (optimal exposure) and current shutter speed are displayed in the illustration below. 2 2 2 2 Taking Pictures 28 Focus...
... Settings screen and set the shutter speed at a high value, you turn the power off before the noise reduction procedure is complete, the image is 2 automatically performed after taking photos in B shooting mode, use a tripod or cable release to Hi (High) in low light conditions. Rotate the shutter speed dial to select the desired value. 2 3. Both the optimal shutter speed (optimal exposure) and current shutter speed are displayed in the illustration below. 2 2 2 2 Taking Pictures 28 Focus...
User Manual
Page 34
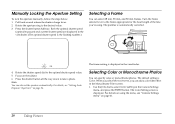
... the flashing number.) Selecting a Frame You can add a color filter effect in the Monochrome Filter screen. 1. The parallax is displayed. DUMMY 60 250 4. Press the shutter button all the way down to the desired value. 3. When you select Monochrome, you 're using the menu, see "Setting Auto Exposure (Aperture)" on page 41. 29 Taking Pictures The Color Setting screen is automatically corrected. Rotate the aperture ring to take a photo. Rotate the shutter speed...
... the flashing number.) Selecting a Frame You can add a color filter effect in the Monochrome Filter screen. 1. The parallax is displayed. DUMMY 60 250 4. Press the shutter button all the way down to the desired value. 3. When you select Monochrome, you 're using the menu, see "Setting Auto Exposure (Aperture)" on page 41. 29 Taking Pictures The Color Setting screen is automatically corrected. Rotate the aperture ring to take a photo. Rotate the shutter speed...

User Manual
Page 42
... do not take the card out of the camera. Note: ❏ When you format an SD memory card, all memory cards in the unraised position. ❏ You cannot delete a locked image (displayed with the lock ( ) icon). The SD card is displayed. 3. Deleting Images In playback mode, you want to delete, and press the MENU button. Press the MENU button in the Camera Settings menu and press the ENTER button. The Delete menu is write-protected." Note: ❏ You cannot delete a locked images (displayed with the lock ( ) icon). Use the JOG...
... do not take the card out of the camera. Note: ❏ When you format an SD memory card, all memory cards in the unraised position. ❏ You cannot delete a locked image (displayed with the lock ( ) icon). The SD card is displayed. 3. Deleting Images In playback mode, you want to delete, and press the MENU button. Press the MENU button in the Camera Settings menu and press the ENTER button. The Delete menu is write-protected." Note: ❏ You cannot delete a locked images (displayed with the lock ( ) icon). Use the JOG...
User Manual
Page 52
... cannot solve the problem using the troubleshooting information in North America If you can reach Epson Support at product documentation, and receive technical advice through e-mail. Contacting Customer Support If your Epson product is not operating properly and you can download drivers and other after-sales services, users are Telephone Services available 24 hours a day, seven days a week. Epson provides technical assistance 24 hours a day...
... cannot solve the problem using the troubleshooting information in North America If you can reach Epson Support at product documentation, and receive technical advice through e-mail. Contacting Customer Support If your Epson product is not operating properly and you can download drivers and other after-sales services, users are Telephone Services available 24 hours a day, seven days a week. Epson provides technical assistance 24 hours a day...

User Manual
Page 56
... through shutter speed dial (optimal shutter speed is the flashing number on metered value. Displayed shutter speed: 1/2000 to 1 sec, bulb Internal clock Internal clock: Records the shooting date on the photo (YYYY/MM/DD, H/M/S) Contains a capacitor for one minute before turning off for clock back-up (24 hours without battery) Power supply Type of battery: Model: Output voltage: Capacity: Li-ion battery EU-85 3.7 V 1500 mAh Battery service life: Number of shots possible Under shooting...
... through shutter speed dial (optimal shutter speed is the flashing number on metered value. Displayed shutter speed: 1/2000 to 1 sec, bulb Internal clock Internal clock: Records the shooting date on the photo (YYYY/MM/DD, H/M/S) Contains a capacitor for one minute before turning off for clock back-up (24 hours without battery) Power supply Type of battery: Model: Output voltage: Capacity: Li-ion battery EU-85 3.7 V 1500 mAh Battery service life: Number of shots possible Under shooting...

User Manual
Page 58
... ENTER button, 10, 11 LCD button, 11, 33, 40 lens release button, 11 lock-release button, 28 MENU button, 11, 40 shutter button, 11 USER button, 11 C Cable release, 28 Calibration Needle Indicator, 31 Camera Settings menu, 41 CANCEL button, 10 Color setting color, 29 monochrome, 29 Compression ratio, 24 Contacting EPSON, 47 Current settings, 21 Customer support, 47 D Date and time settings, 19 Date format, 20 Default settings, 22 Delete deleting all images, 37 deleting an image, 37 Display icons, 33 Display style, 33 4-photo display, 35 detailed information display, 35 Framing guide display...
... ENTER button, 10, 11 LCD button, 11, 33, 40 lens release button, 11 lock-release button, 28 MENU button, 11, 40 shutter button, 11 USER button, 11 C Cable release, 28 Calibration Needle Indicator, 31 Camera Settings menu, 41 CANCEL button, 10 Color setting color, 29 monochrome, 29 Compression ratio, 24 Contacting EPSON, 47 Current settings, 21 Customer support, 47 D Date and time settings, 19 Date format, 20 Default settings, 22 Delete deleting all images, 37 deleting an image, 37 Display icons, 33 Display style, 33 4-photo display, 35 detailed information display, 35 Framing guide display...

User Manual - Addendum - firmware version 2.0 upgrade features.
Page 35
... RAW data for details. (Initialize Settings) (Long Exp Noise Reduction) Resets the current settings (except date and time) to best 4 suit the shooting subject or environment. You can be printed with a long exposure. Select Adobe RGB if you to quickly switch film profiles to their default settings as shown below. Setting Description (Format SD Card) Formats the memory card. Setting (Film Setting) Description Allows you have a printer that appears in RAW mode. Adobe...
... RAW data for details. (Initialize Settings) (Long Exp Noise Reduction) Resets the current settings (except date and time) to best 4 suit the shooting subject or environment. You can be printed with a long exposure. Select Adobe RGB if you to quickly switch film profiles to their default settings as shown below. Setting Description (Format SD Card) Formats the memory card. Setting (Film Setting) Description Allows you have a printer that appears in RAW mode. Adobe...

User Manual - Addendum - firmware version 2.0 upgrade features.
Page 36
... shots), R (image quality), E (remaining battery power), and A (white balance). Repeat this function with a near-empty battery. For the pixels that cannot be incorrectly calibrated. Basic Setup Menu Setting Description Time and Date Sets the current date and time (year, month, day, hours and minutes). On (default): sequential numbers continue even if the memory card is turned off if you release the shutter. Otherwise, correct pixels may be corrected with a sequential number (as part of the LCD...
... shots), R (image quality), E (remaining battery power), and A (white balance). Repeat this function with a near-empty battery. For the pixels that cannot be incorrectly calibrated. Basic Setup Menu Setting Description Time and Date Sets the current date and time (year, month, day, hours and minutes). On (default): sequential numbers continue even if the memory card is turned off if you release the shutter. Otherwise, correct pixels may be corrected with a sequential number (as part of the LCD...

User Manual - Addendum - firmware version 2.0 upgrade features.
Page 40
... a sub folder. Using EPSON RAW Plug-In For Windows 1. Then select the RAW file. ❏ You cannot select a RAW file from the Format drop-down list. For Macintosh Start Adobe Photoshop and open and process them while they are still on Your Computer Finding More Information For more information about the bundled software, see the online help. 40 Opening RAW Images on the memory card will take...
... a sub folder. Using EPSON RAW Plug-In For Windows 1. Then select the RAW file. ❏ You cannot select a RAW file from the Format drop-down list. For Macintosh Start Adobe Photoshop and open and process them while they are still on Your Computer Finding More Information For more information about the bundled software, see the online help. 40 Opening RAW Images on the memory card will take...
User Manual - Addendum - firmware version 2.0 upgrade features.
Page 45
... common problems. You can download documentation, get FAQs and troubleshooting advice, or e-mail Epson with your questions. 6 Speak to 6 PM, Pacific Time, Monday through Friday. 6 Toll or long distance charges may apply. 6 6 Maintenance and Troubleshooting 45 sales) or www.epson.ca (Canadian sales). 6 Visit Epson's support website for support, please have the following 6 information ready: ❏ Product name (Epson Rangefinder Digital Camera R-D1) 6 ❏ Product serial number...
... common problems. You can download documentation, get FAQs and troubleshooting advice, or e-mail Epson with your questions. 6 Speak to 6 PM, Pacific Time, Monday through Friday. 6 Toll or long distance charges may apply. 6 6 Maintenance and Troubleshooting 45 sales) or www.epson.ca (Canadian sales). 6 Visit Epson's support website for support, please have the following 6 information ready: ❏ Product name (Epson Rangefinder Digital Camera R-D1) 6 ❏ Product serial number...

User Manual - Addendum - firmware version 2.0 upgrade features.
Page 46
...) External interfaces: Lens-interchangeable rangefinder digital camera Height: 88.5 mm (3.54 in.) Width: 142 mm (5.68 in.) Depth: 39.5 mm (1.58 in.) Approx. 560 g (1.2 lb) Operating: 5 to 35°C Storage: -20 to 60°C Operating: 30 to 80% Storage: 10 to 80% Memory card slot (for SD memory card up to 2 GB) X-sync contact (for external flash unit) Image Format Recording format: File type: Image size/ typical file size: RAW...
...) External interfaces: Lens-interchangeable rangefinder digital camera Height: 88.5 mm (3.54 in.) Width: 142 mm (5.68 in.) Depth: 39.5 mm (1.58 in.) Approx. 560 g (1.2 lb) Operating: 5 to 35°C Storage: -20 to 60°C Operating: 30 to 80% Storage: 10 to 80% Memory card slot (for SD memory card up to 2 GB) X-sync contact (for external flash unit) Image Format Recording format: File type: Image size/ typical file size: RAW...

User Manual - Addendum - firmware version 2.0 upgrade features.
Page 54
... lens, 15 release button, 7 removing M-mount lens, 16 M memory card access light, 9 formatting, 42 inserting, 14 removing, 14 slot, 9 slot cover, 9 write protecting, 14, 42 O option, flash, 23 optional accessory, 48 P power on/off, 18 power switch, 8 PRINT image matching, 47 R rangefinder eyepiece, 9 rangefinder window, 7 S SD memory card, formatting, 42 setting aperture, 23 white balance, 19 shutter charge lever, 8, 18 shutter release button, 8 shutter speed, 8, 23 software, installing, 39 status gauge, 8, 10 storing camera, 44 T technical support, 45 V viewfinder window, 7 W white balance...
... lens, 15 release button, 7 removing M-mount lens, 16 M memory card access light, 9 formatting, 42 inserting, 14 removing, 14 slot, 9 slot cover, 9 write protecting, 14, 42 O option, flash, 23 optional accessory, 48 P power on/off, 18 power switch, 8 PRINT image matching, 47 R rangefinder eyepiece, 9 rangefinder window, 7 S SD memory card, formatting, 42 setting aperture, 23 white balance, 19 shutter charge lever, 8, 18 shutter release button, 8 shutter speed, 8, 23 software, installing, 39 status gauge, 8, 10 storing camera, 44 T technical support, 45 V viewfinder window, 7 W white balance...


