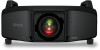

Installation Guide - ELPMBUNI Universal Mount Assembly
Page 2
... warranty from ship date against defects in the completion of Contents Warranty ...- 3 Contact Premier Mounts ...- 3 Warning Statements ...- 4 Parts List ...- 5 Installation Tools ...- 5 ELPMBUNI Universal Mount Assembly ...- 6 Projector Preparation ...- 7 Securing the Bracket to the Projector ...- 9 Leveling the Mounting bracket ...- 14 Securing the Upper Assembly Ceiling Plate...- 15 Low-Profile Installation ...- 16 Securing the...
... warranty from ship date against defects in the completion of Contents Warranty ...- 3 Contact Premier Mounts ...- 3 Warning Statements ...- 4 Parts List ...- 5 Installation Tools ...- 5 ELPMBUNI Universal Mount Assembly ...- 6 Projector Preparation ...- 7 Securing the Bracket to the Projector ...- 9 Leveling the Mounting bracket ...- 14 Securing the Upper Assembly Ceiling Plate...- 15 Low-Profile Installation ...- 16 Securing the...

Installation Guide - ELPMBUNI Universal Mount Assembly
Page 3
... BE ADHERED TO. Warning and Caution statements. Failure to do so may result in damage to the projector and/or damage to be confirmed prior to the projector and could result in damage to installation. KEEP THESE INSTALLATION INSTRUCTIONS IN AN EASILY ACCESSIBLE LOCATION FOR FUTURE...READ AND COMPLETELY UNDERSTOOD. WARNING: THE CEILING STRUCTURE MUST BE CAPABLE OF SUPPORTING A MAX WEIGHT OF 25 LBS., THE WEIGHT OF THE PROJECTOR. Failure to do so could increase the risk of direct heat energy. Recommended mounting surfaces: wooden studs, solid-flat concrete, and reinforced ...
... BE ADHERED TO. Warning and Caution statements. Failure to do so may result in damage to the projector and/or damage to be confirmed prior to the projector and could result in damage to installation. KEEP THESE INSTALLATION INSTRUCTIONS IN AN EASILY ACCESSIBLE LOCATION FOR FUTURE...READ AND COMPLETELY UNDERSTOOD. WARNING: THE CEILING STRUCTURE MUST BE CAPABLE OF SUPPORTING A MAX WEIGHT OF 25 LBS., THE WEIGHT OF THE PROJECTOR. Failure to do so could increase the risk of direct heat energy. Recommended mounting surfaces: wooden studs, solid-flat concrete, and reinforced ...

Installation Guide - ELPMBUNI Universal Mount Assembly
Page 4
... (Qty 4) M6 x 12mm Security Head Screws (Qty 4) Portable Drill Pencil Level (Supplied) Stud Finder (Commercially Available) M5 Allen Wrench NOTE: Mounting screws will vary by projector.
... (Qty 4) M6 x 12mm Security Head Screws (Qty 4) Portable Drill Pencil Level (Supplied) Stud Finder (Commercially Available) M5 Allen Wrench NOTE: Mounting screws will vary by projector.

Installation Guide - ELPMBUNI Universal Mount Assembly
Page 5
... Installation Manual ELPMBUNI A NOTE: The four (2-piece) leg assemblies can be used as single leg or any combination C of your projector for your G projector. ELPMBUNI Universal Mount Assembly A Single Wooden Stud Mounting Points B Solid Structure Mounting Points C Ceiling Plate D Allen Wrench E Height ...Adjustment Screws F Tension Knobs G Safety Knob H Security Screws I Leveling Barrels J Universal Mounting Bracket K Leg Assembly L Projector (Not Supplied) M Tri-Lock Opening Option 1 H B D F Combination I Leg Single Leg D Option 2 M NOTE: See the best configuration for...
... Installation Manual ELPMBUNI A NOTE: The four (2-piece) leg assemblies can be used as single leg or any combination C of your projector for your G projector. ELPMBUNI Universal Mount Assembly A Single Wooden Stud Mounting Points B Solid Structure Mounting Points C Ceiling Plate D Allen Wrench E Height ...Adjustment Screws F Tension Knobs G Safety Knob H Security Screws I Leveling Barrels J Universal Mounting Bracket K Leg Assembly L Projector (Not Supplied) M Tri-Lock Opening Option 1 H B D F Combination I Leg Single Leg D Option 2 M NOTE: See the best configuration for...

Installation Guide - ELPMBUNI Universal Mount Assembly
Page 6
... either three or four mounting points and are M4 in the installation instructions must be adhered to the lens of the projector, top of mounting points and screw thread (pitch) size. 3. Here you will enhance the quality of your installation will ...normally find important reference information regarding installation dimensions such as outlined in thread size (Figure 1). Carefully invert the projector and place it on the screen. 1. ELPMBUNI Projector Preparation WARNING: Proper installation procedure by qualified personnel as (distance from the screen to . Failure to do so ...
... either three or four mounting points and are M4 in the installation instructions must be adhered to the lens of the projector, top of mounting points and screw thread (pitch) size. 3. Here you will enhance the quality of your installation will ...normally find important reference information regarding installation dimensions such as outlined in thread size (Figure 1). Carefully invert the projector and place it on the screen. 1. ELPMBUNI Projector Preparation WARNING: Proper installation procedure by qualified personnel as (distance from the screen to . Failure to do so ...

Installation Guide - ELPMBUNI Universal Mount Assembly
Page 7
Installation Manual Figure 2 Tri-Lock Opening Rotate 180° To Unlock Tension Knobs Upper Assembly Safety Knob Figure 3 Figure 4 Page - 8 - Next loosen the safety screw knurl knob far enough to allow the two parts to create free play between the bracket tri-lock assembly and the upper section tri-lock assembly points. 5. ELPMBUNI 4. Separate the upper assembly from the projector mounting bracket by slightly loosening the two tension knurl knobs to be rotated 180° apart and separate.
Installation Manual Figure 2 Tri-Lock Opening Rotate 180° To Unlock Tension Knobs Upper Assembly Safety Knob Figure 3 Figure 4 Page - 8 - Next loosen the safety screw knurl knob far enough to allow the two parts to create free play between the bracket tri-lock assembly and the upper section tri-lock assembly points. 5. ELPMBUNI 4. Separate the upper assembly from the projector mounting bracket by slightly loosening the two tension knurl knobs to be rotated 180° apart and separate.

Installation Guide - ELPMBUNI Universal Mount Assembly
Page 8
...16 Phillips screws with the M3 flat washers (supplied). Page - 9 - FIGURE 6 Two-Piece Leg FIGURE 7 One-Piece Leg Allen Wrench Mounting Hardware Inverted Projector Leveling Barrels FIGURE A Installation Manual Figure 5 Line up the leveling barrels to adjust the height of the mounting bracket. Locate the mounting points on the... points. You may also reduce the two-piece leg to a one-piece leg as shown. ELPMBUNI Securing the Bracket to the Projector NOTE: The two-piece mounting legs are designed to allow routing of the legs around critical ventilation screens on the bottom of the...
...16 Phillips screws with the M3 flat washers (supplied). Page - 9 - FIGURE 6 Two-Piece Leg FIGURE 7 One-Piece Leg Allen Wrench Mounting Hardware Inverted Projector Leveling Barrels FIGURE A Installation Manual Figure 5 Line up the leveling barrels to adjust the height of the mounting bracket. Locate the mounting points on the... points. You may also reduce the two-piece leg to a one-piece leg as shown. ELPMBUNI Securing the Bracket to the Projector NOTE: The two-piece mounting legs are designed to allow routing of the legs around critical ventilation screens on the bottom of the...

Installation Guide - ELPMBUNI Universal Mount Assembly
Page 9
This mount works with all sub-25 pound projectors. PowerLite 830p, 835p Hardware: M4 x 12mm (Qty 4) Installation Manual ELPMBUNI NOTE: If your projector model is not shown, when arranging the leg combination, simply ensure access to filters and lamp housings when aligning brackets. PowerLite S3, S4, 62C, 76C, 82C, Hardware: M4 x 12mm (Qty 3) Page - 10 -
This mount works with all sub-25 pound projectors. PowerLite 830p, 835p Hardware: M4 x 12mm (Qty 4) Installation Manual ELPMBUNI NOTE: If your projector model is not shown, when arranging the leg combination, simply ensure access to filters and lamp housings when aligning brackets. PowerLite S3, S4, 62C, 76C, 82C, Hardware: M4 x 12mm (Qty 3) Page - 10 -

Installation Guide - ELPMBUNI Universal Mount Assembly
Page 13
Rotate the leveling barrels to the projector then tighten the hex head leg screws with the Allen wrench (supplied) (Figure 8 and Figure 9). Installation Manual When the position desired is achieved tighten the ..., if not all, ventilation points (including lamp & filter access doors). 2. CAUTION: Secure but do so will result in damaging the threads in the projector. Allen Wrench Level Inverted Projector DOWN UP Adjusting the Mount Figure 8 Leveling Barrels Page - 14 - ELPMBUNI Leveling the Mounting bracket 1. Failure to do not over-tighten the mounting...
Rotate the leveling barrels to the projector then tighten the hex head leg screws with the Allen wrench (supplied) (Figure 8 and Figure 9). Installation Manual When the position desired is achieved tighten the ..., if not all, ventilation points (including lamp & filter access doors). 2. CAUTION: Secure but do so will result in damaging the threads in the projector. Allen Wrench Level Inverted Projector DOWN UP Adjusting the Mount Figure 8 Leveling Barrels Page - 14 - ELPMBUNI Leveling the Mounting bracket 1. Failure to do not over-tighten the mounting...

Installation Guide - ELPMBUNI Universal Mount Assembly
Page 14
... #14 x 2" wood screws (supplied) or with the top image edge of the screen for best picture ratio. 2. Locate the inverted projectors top of the projector. Before you mount your installation environment (Figure 9). Page - 15 - NOTE: If installing the security kit (ELPMBSEC), please refer to the ...security kit installation guide before attaching the ceiling plate to a point centered horizontally on your screen and projector, make sure the mounting location will safely support the weight of the lens point to the ceiling or wall. 5. Ceiling Structure ...
... #14 x 2" wood screws (supplied) or with the top image edge of the screen for best picture ratio. 2. Locate the inverted projectors top of the projector. Before you mount your installation environment (Figure 9). Page - 15 - NOTE: If installing the security kit (ELPMBSEC), please refer to the ...security kit installation guide before attaching the ceiling plate to a point centered horizontally on your screen and projector, make sure the mounting location will safely support the weight of the lens point to the ceiling or wall. 5. Ceiling Structure ...

Installation Guide - ELPMBUNI Universal Mount Assembly
Page 17
...tri-lock cutout into the mating portion of the upper assembly. 2. Safety Knurl Knob Tension Knurl Knobs Figure 13 Tri-Lock Opening Alignment Slot Projector Mount Installation Manual Tighten the remaining two tension knurl knobs until the mount becomes rigid. 5. The safety knob should line up with the ... be in direct alignment with the alignment slot on the mounting bracket (Figure 13). NOTE: Follow the number sequence prior to securing the projector to the Upper Assembly 1. Make sure the three-knurl knobs are loosened to fully expose to prevent further rotation of the bracket in the...
...tri-lock cutout into the mating portion of the upper assembly. 2. Safety Knurl Knob Tension Knurl Knobs Figure 13 Tri-Lock Opening Alignment Slot Projector Mount Installation Manual Tighten the remaining two tension knurl knobs until the mount becomes rigid. 5. The safety knob should line up with the ... be in direct alignment with the alignment slot on the mounting bracket (Figure 13). NOTE: Follow the number sequence prior to securing the projector to the Upper Assembly 1. Make sure the three-knurl knobs are loosened to fully expose to prevent further rotation of the bracket in the...

Installation Guide - ELPMBUNI Universal Mount Assembly
Page 18
...and tilt to the desired angle to optimize the projected image. 2. With the projector secured in the mount and power on the screen, slightly loosen the front and rear M8 screws and adjust to the projector you can be adjusted by slightly loosening the two 8mm height adjustment screws and ...raising or lowering the projector (Figure 14). 3. Once the height is needed to square the images on and signal ...
...and tilt to the desired angle to optimize the projected image. 2. With the projector secured in the mount and power on the screen, slightly loosen the front and rear M8 screws and adjust to the projector you can be adjusted by slightly loosening the two 8mm height adjustment screws and ...raising or lowering the projector (Figure 14). 3. Once the height is needed to square the images on and signal ...

Operation Guide - EasyMP Multi PC Projection
Page 3
... (Windows 14 Installing EasyMP Multi PC Projection (Mac OS X 14 Setting Up the Projector ...15 Setting Up a Projector to Connect in Advanced Connection Mode (Wireless 15 Setting Up a Projector to Connect in Advanced Connection Mode (Wired 16 Connecting to the Projector and Projecting Images 18 Connection Methods ...18 Connection Methods for Various Meeting Styles...
... (Windows 14 Installing EasyMP Multi PC Projection (Mac OS X 14 Setting Up the Projector ...15 Setting Up a Projector to Connect in Advanced Connection Mode (Wireless 15 Setting Up a Projector to Connect in Advanced Connection Mode (Wired 16 Connecting to the Projector and Projecting Images 18 Connection Methods ...18 Connection Methods for Various Meeting Styles...
Operation Guide - EasyMP Multi PC Projection
Page 4
...Projection Control Screen 47 Solving Problems ...49 Solving Network Connection Problems 49 Solutions When You Cannot Connect Projectors (Wireless 49 Solutions When You Cannot Connect Projectors (Wired 51 Solving Problems During Projection 52 Solutions When the Computer Screen is Not Displayed Properly 53...Error Messages List ...54 Error Messages When Starting up EasyMP Multi PC Projection 55 Error Messages When Searching for and Selecting Projectors 57 Error Messages When Projecting 58 Error Messages When Operating a Profile 58 Error Messages When Using the Moderator Function 59 Event...
...Projection Control Screen 47 Solving Problems ...49 Solving Network Connection Problems 49 Solutions When You Cannot Connect Projectors (Wireless 49 Solutions When You Cannot Connect Projectors (Wired 51 Solving Problems During Projection 52 Solutions When the Computer Screen is Not Displayed Properly 53...Error Messages List ...54 Error Messages When Starting up EasyMP Multi PC Projection 55 Error Messages When Searching for and Selecting Projectors 57 Error Messages When Projecting 58 Error Messages When Operating a Profile 58 Error Messages When Using the Moderator Function 59 Event...

Operation Guide - EasyMP Multi PC Projection
Page 7
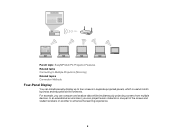
... you to hold remote meetings over a network by projecting images from multiple devices, but the devices running Epson iProjection. You can control the projection from network projectors. EasyMP Multi PC Projection Features EasyMP Multi PC Projection Features EasyMP Multi PC Projection is software that allows ... hold interactive meetings by simultaneously projecting the same image on up to 50 other devices on the network can project images from the projector. (Up to four devices can project at one time.) The 50 devices can be a combination of display options for your environment...
... you to hold remote meetings over a network by projecting images from multiple devices, but the devices running Epson iProjection. You can control the projection from network projectors. EasyMP Multi PC Projection Features EasyMP Multi PC Projection Features EasyMP Multi PC Projection is software that allows ... hold interactive meetings by simultaneously projecting the same image on up to 50 other devices on the network can project images from the projector. (Up to four devices can project at one time.) The 50 devices can be a combination of display options for your environment...
Operation Guide - EasyMP Multi PC Projection
Page 8
For example, you can project lesson material on one part of the screen and student answers on another to four screens in separate projected panels, which is useful in both business and educational environments. In an educational environment, you can compare and analyze data while simultaneously projecting screens from multiple devices. Parent topic: EasyMP Multi PC Projection Features Related tasks Connecting to Multiple Projectors (Mirroring) Related topics Connection Methods Four-Panel Display You can simultaneously display up to enhance the learning experience. 8
For example, you can project lesson material on one part of the screen and student answers on another to four screens in separate projected panels, which is useful in both business and educational environments. In an educational environment, you can compare and analyze data while simultaneously projecting screens from multiple devices. Parent topic: EasyMP Multi PC Projection Features Related tasks Connecting to Multiple Projectors (Mirroring) Related topics Connection Methods Four-Panel Display You can simultaneously display up to enhance the learning experience. 8
Operation Guide - EasyMP Multi PC Projection
Page 9
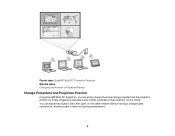
Parent topic: EasyMP Multi PC Projection Features Related tasks Changing the Number of Projected Panels Change Presenters and Projection Position Using EasyMP Multi PC Projection, you can share the projector with other users on the projection control screen. You can easily change the screen being projected and the projection position by simply dragging and dropping user names in panels on the same network without having to change cable connections, allowing users to take turns giving presentations. 9
Parent topic: EasyMP Multi PC Projection Features Related tasks Changing the Number of Projected Panels Change Presenters and Projection Position Using EasyMP Multi PC Projection, you can share the projector with other users on the projection control screen. You can easily change the screen being projected and the projection position by simply dragging and dropping user names in panels on the same network without having to change cable connections, allowing users to take turns giving presentations. 9

Operation Guide - EasyMP Multi PC Projection
Page 12
... the Software Install EasyMP Multi PC Projection from the EPSON Web site. • If a previous version of EasyMP Multi PC Projection is already installed on your projector. EasyMP Multi PC Projection System Requirements Installing EasyMP Multi PC Projection (Windows) Installing EasyMP Multi PC Projection (Mac OS X) Parent topic: ... used, the screens may not be displayed correctly. • You can download the latest version of EasyMP Multi PC Projection from the EPSON Projector Software CD-ROM supplied with your computer, uninstall it first and then install EasyMP Multi PC Projection.
... the Software Install EasyMP Multi PC Projection from the EPSON Web site. • If a previous version of EasyMP Multi PC Projection is already installed on your projector. EasyMP Multi PC Projection System Requirements Installing EasyMP Multi PC Projection (Windows) Installing EasyMP Multi PC Projection (Mac OS X) Parent topic: ... used, the screens may not be displayed correctly. • You can download the latest version of EasyMP Multi PC Projection from the EPSON Projector Software CD-ROM supplied with your computer, uninstall it first and then install EasyMP Multi PC Projection.
Operation Guide - EasyMP Multi PC Projection
Page 14
...Parent topic: Installing the Software Installing EasyMP Multi PC Projection (Mac OS X) Install EasyMP Multi PC Projection on your computer. Insert the EPSON Projector Software CD-ROM into the computer. Follow the on your computer. 1. Turn on -screen instructions to install the software. 1. If ... does not start automatically, open the CD-ROM drive from My Computer (or Computer), and then double-click InstallNavi.exe. 5. Insert the EPSON Projector Software CD-ROM into the computer. 4. Requirement Display Windows Mac Resolution between 1024 × 768 (XGA) and 1920 × 1200 (...
...Parent topic: Installing the Software Installing EasyMP Multi PC Projection (Mac OS X) Install EasyMP Multi PC Projection on your computer. Insert the EPSON Projector Software CD-ROM into the computer. Follow the on your computer. 1. Turn on -screen instructions to install the software. 1. If ... does not start automatically, open the CD-ROM drive from My Computer (or Computer), and then double-click InstallNavi.exe. 5. Insert the EPSON Projector Software CD-ROM into the computer. 4. Requirement Display Windows Mac Resolution between 1024 × 768 (XGA) and 1920 × 1200 (...
Operation Guide - EasyMP Multi PC Projection
Page 15
...need to install. Installation starts. 5. Press the Menu button on the projector. 5. When connecting the projector to the network. Setting Up a Projector to Connect in Advanced Connection Mode (Wireless) Setting Up a Projector to Connect in Advanced Connection Mode (Wired) Parent topic: Setting Up EasyMP... Multi PC Projection for the First Time Setting Up a Projector to Connect in the projector, if necessary. Contact your computer or network adapter. 3. Parent topic: Installing the Software Setting Up the Projector Follow these instructions to a wireless or wired LAN. Note: ...
...need to install. Installation starts. 5. Press the Menu button on the projector. 5. When connecting the projector to the network. Setting Up a Projector to Connect in Advanced Connection Mode (Wireless) Setting Up a Projector to Connect in Advanced Connection Mode (Wired) Parent topic: Setting Up EasyMP... Multi PC Projection for the First Time Setting Up a Projector to Connect in the projector, if necessary. Contact your computer or network adapter. 3. Parent topic: Installing the Software Setting Up the Projector Follow these instructions to a wireless or wired LAN. Note: ...


