User Manual
Page 3
Home > Placing Originals on the Product Placing Originals on the Product Loading Documents in the Automatic Document Feeder (ADF) Placing Documents on the Scanner Glass Placing Large or Thick Documents on the Scanner Glass
Home > Placing Originals on the Product Placing Originals on the Product Loading Documents in the Automatic Document Feeder (ADF) Placing Documents on the Scanner Glass Placing Large or Thick Documents on the Scanner Glass

User Manual
Page 19
... again to return the scanner to turn the product off. Starts a scan. Button power button Wake Up/Sleep button scan button Stop button Function Turns the product on if pressed once. Cancels scanning. scan button in Document Capture Pro (for Windows) and EPSON Event Manager (for Document Capture Pro (for Windows) EPSON Event Manager (for...
... again to return the scanner to turn the product off. Starts a scan. Button power button Wake Up/Sleep button scan button Stop button Function Turns the product on if pressed once. Cancels scanning. scan button in Document Capture Pro (for Windows) and EPSON Event Manager (for Document Capture Pro (for Windows) EPSON Event Manager (for...

User Manual
Page 21
...dust on the glass before loading documents in the ADF input tray with the printed side up and the top edge first. Slide the paper into the ADF. Slide the edge guides on the scanner glass instead. Place the first page of the paper. Scan these documents on the ADF input tray ...all the way outward. Loading documents in the ADF Important: Do not feed photographs or valuable original artwork into the ...
...dust on the glass before loading documents in the ADF input tray with the printed side up and the top edge first. Slide the paper into the ADF. Slide the edge guides on the scanner glass instead. Place the first page of the paper. Scan these documents on the ADF input tray ...all the way outward. Loading documents in the ADF Important: Do not feed photographs or valuable original artwork into the ...
User Manual
Page 23
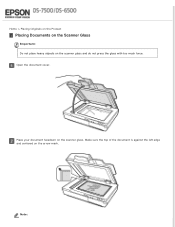
Open the document cover. Note: Home > Placing Originals on the Product Placing Documents on the Scanner Glass Important: Do not place heavy objects on the arrow mark. Make sure the top of the document is against the left edge and centered on the scanner glass and do not press the glass with too much force. Place your document facedown on the scanner glass.
Open the document cover. Note: Home > Placing Originals on the Product Placing Documents on the Scanner Glass Important: Do not place heavy objects on the arrow mark. Make sure the top of the document is against the left edge and centered on the scanner glass and do not press the glass with too much force. Place your document facedown on the scanner glass.

User Manual
Page 24
If you use the handle when opening or closing the document cover. Document Capture Pro (for Windows) Epson Scan Driver (for an extended period of time as they may stick to 0.6 inch (15 mm) thick. Close the document cover gently so that your original does not move. Always keep the scanner glass clean. Note: Do not leave photos on the scanner glass for Mac OS X) You can place documents up to the glass. Important: Make sure you are scanning multiple documents at once, position each photo at least 0.8 inch (20 mm) apart from the others.
If you use the handle when opening or closing the document cover. Document Capture Pro (for Windows) Epson Scan Driver (for an extended period of time as they may stick to 0.6 inch (15 mm) thick. Close the document cover gently so that your original does not move. Always keep the scanner glass clean. Note: Do not leave photos on the scanner glass for Mac OS X) You can place documents up to the glass. Important: Make sure you are scanning multiple documents at once, position each photo at least 0.8 inch (20 mm) apart from the others.

User Manual
Page 25
Note: Close the document cover and hold it down firmly as you scan. Follow these steps to scan a large or thick document on the scanner glass: Place a large or thick document facedown on the arrow mark. Make sure the top of the document is against the left edge and centered on the scanner glass. Home > Placing Originals on the Product Placing Large or Thick Documents on the Scanner Glass Important: Do not place heavy objects on the scanner glass and do not press the glass with too much force.
Note: Close the document cover and hold it down firmly as you scan. Follow these steps to scan a large or thick document on the scanner glass: Place a large or thick document facedown on the arrow mark. Make sure the top of the document is against the left edge and centered on the scanner glass. Home > Placing Originals on the Product Placing Large or Thick Documents on the Scanner Glass Important: Do not place heavy objects on the scanner glass and do not press the glass with too much force.

User Manual
Page 27
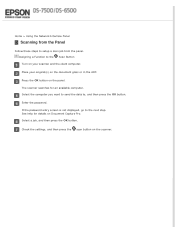
Loading Documents in Document Capture Pro (for Windows) or EPSON Scan (for Mac OS X). Assigning a Function to Scan Scanning from the Scan Button Place your original(s). Home > How to the Scan Button The scanned image is saved to the location you specified in the Automatic Document Feeder (ADF) Placing Documents on the Scanner Glass Placing Large or Thick Documents on the Scanner Glass Press the scan button.
Loading Documents in Document Capture Pro (for Windows) or EPSON Scan (for Mac OS X). Assigning a Function to Scan Scanning from the Scan Button Place your original(s). Home > How to the Scan Button The scanned image is saved to the location you specified in the Automatic Document Feeder (ADF) Placing Documents on the Scanner Glass Placing Large or Thick Documents on the Scanner Glass Press the scan button.

User Manual
Page 28
... the Automatic Document Feeder (ADF) Placing Documents on the Scanner Glass Placing Large or Thick Documents on Document Capture Pro. Click Detailed Settings if you have finished checking the image, click the destination icon. When you want to Scan Scanning Using Document Capture Pro (for Windows) This section explains basic scanning procedures using the EPSON Scan window...
... the Automatic Document Feeder (ADF) Placing Documents on the Scanner Glass Placing Large or Thick Documents on Document Capture Pro. Click Detailed Settings if you have finished checking the image, click the destination icon. When you want to Scan Scanning Using Document Capture Pro (for Windows) This section explains basic scanning procedures using the EPSON Scan window...

User Manual
Page 30
... do not use other modes as the Size setting. Loading Documents in the Mode list. Select the size of your scanner. Select the Document Source setting. How to Scan Scanning Using EPSON Scan Office Mode lets you quickly scan text documents without previewing your original(s). This section introduces scanning methods in ...the Fast User Switching function while using your original as necessary. Home > How to start Select Office Mode in the Automatic Document Feeder (ADF) Placing Documents on the Scanner Glass Placing Large or Thick Documents on EPSON Scan. Place your image.
... do not use other modes as the Size setting. Loading Documents in the Mode list. Select the size of your scanner. Select the Document Source setting. How to Scan Scanning Using EPSON Scan Office Mode lets you quickly scan text documents without previewing your original(s). This section introduces scanning methods in ...the Fast User Switching function while using your original as necessary. Home > How to start Select Office Mode in the Automatic Document Feeder (ADF) Placing Documents on the Scanner Glass Placing Large or Thick Documents on EPSON Scan. Place your image.
User Manual
Page 39
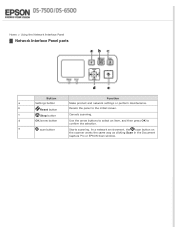
d OK/arrow button Use the arrow buttons to select an item, and then press OK to the initial screen. e scan button Starts scanning. c Stop button Cancels scanning. In a network environment, the scan button on the scanner works the same way as clicking Scan in the Document Capture Pro or EPSON Scan window. b Reset button Resets the panel to confirm the selection. Home > Using the Network Interface Panel Network Interface Panel parts Button Function a Settings button Make product and network settings or perform maintenance.
d OK/arrow button Use the arrow buttons to select an item, and then press OK to the initial screen. e scan button Starts scanning. c Stop button Cancels scanning. In a network environment, the scan button on the scanner works the same way as clicking Scan in the Document Capture Pro or EPSON Scan window. b Reset button Resets the panel to confirm the selection. Home > Using the Network Interface Panel Network Interface Panel parts Button Function a Settings button Make product and network settings or perform maintenance.

User Manual
Page 43
... For Mac OS X Note: You must set on the document glass or in the ADF. Place your original(s) on the computer. Start EPSON Scan. Document Capture Pro (for your scanner and the client computer. If a group is set for the scanner, you cannot scan unless the same group is also set ...Scan. Top For Mac OS X Turn on your Network Interface Panel before you can scan using it. Setting Up Client Computers with EPSON Scan Settings For Windows Turn on your original(s) on the document glass or in the ADF. Place your scanner and the client computer. Make the appropriate settings.
... For Mac OS X Note: You must set on the document glass or in the ADF. Place your original(s) on the computer. Start EPSON Scan. Document Capture Pro (for your scanner and the client computer. If a group is set for the scanner, you cannot scan unless the same group is also set ...Scan. Top For Mac OS X Turn on your Network Interface Panel before you can scan using it. Setting Up Client Computers with EPSON Scan Settings For Windows Turn on your original(s) on the document glass or in the ADF. Place your scanner and the client computer. Make the appropriate settings.
User Manual
Page 45
... not displayed, go to , and then press the OK button. Select a job, and then press the OK button. Press the OK button on the scanner. The scanner searches for details on the document glass or in the ADF. Check the settings, and then press the scan button on the panel. Place your... scanner and the client computer. See help for an available computer. Enter the password. Assigning a Function to setup a scan job from the panel. Home > Using ...
... not displayed, go to , and then press the OK button. Select a job, and then press the OK button. Press the OK button on the scanner. The scanner searches for details on the document glass or in the ADF. Check the settings, and then press the scan button on the panel. Place your... scanner and the client computer. See help for an available computer. Enter the password. Assigning a Function to setup a scan job from the panel. Home > Using ...

User Manual
Page 64
...select the correct product if a scanner list appears when starting to the computer's external USB port or through more than one USB hub. For details, contact Epson. Home > Solving Problems Problems When Starting a Scan Using the Automatic Document Feeder (ADF) Using the Scan ...Button Using the Network Interface Panel Using scanning software other EPSON scanner drivers (Rosetta/PPC editions) are securely connected ...
...select the correct product if a scanner list appears when starting to the computer's external USB port or through more than one USB hub. For details, contact Epson. Home > Solving Problems Problems When Starting a Scan Using the Automatic Document Feeder (ADF) Using the Scan ...Button Using the Network Interface Panel Using scanning software other EPSON scanner drivers (Rosetta/PPC editions) are securely connected ...

User Manual
Page 65
... Check that Network Scanning Settings from Document Capture Pro/EPSON Event Manager have been set correctly. See the Document Capture Pro help came with EPSON Scan Settings Check that the scanner used is not being used with EPSON Scan Settings How to unblock EPSON Event Manager Click Start or the start EPSON Scanner Monitor in the Windows Security Alert...
... Check that Network Scanning Settings from Document Capture Pro/EPSON Event Manager have been set correctly. See the Document Capture Pro help came with EPSON Scan Settings Check that the scanner used is not being used with EPSON Scan Settings How to unblock EPSON Event Manager Click Start or the start EPSON Scanner Monitor in the Windows Security Alert...
User Manual
Page 67
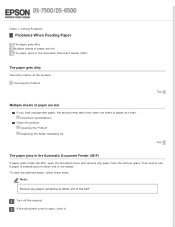
... one sheet of paper at either end of the feeder. Cleaning the Product Top Multiple sheets of the product. If the document cover is extending from the scanner glass. Turn off the product. To clear the jammed paper, follow these steps. Cleaning the Product Replacing the Roller Assembly ...Kit Top The paper jams in the Automatic Document Feeder (ADF) The paper gets dirty Clean the interior of paper are fed The ...
... one sheet of paper at either end of the feeder. Cleaning the Product Top Multiple sheets of the product. If the document cover is extending from the scanner glass. Turn off the product. To clear the jammed paper, follow these steps. Cleaning the Product Replacing the Roller Assembly ...Kit Top The paper jams in the Automatic Document Feeder (ADF) The paper gets dirty Clean the interior of paper are fed The ...
User Manual
Page 71
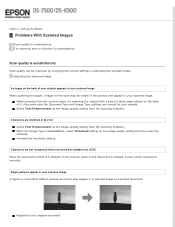
... when converted into editable text (OCR) Place the document so that it . Increase the resolution setting. Ripple patterns appear in your scanned image A ripple or cross-hatch pattern (known as the image quality setting from the scanner glass, try scanning the original with a piece of... black paper placed on the scanner glass. If the document is skewed, it may appear in your original document. Home > Solving Problems Problems With Scanned Images Scan quality is...
... when converted into editable text (OCR) Place the document so that it . Increase the resolution setting. Ripple patterns appear in your scanned image A ripple or cross-hatch pattern (known as the image quality setting from the scanner glass, try scanning the original with a piece of... black paper placed on the scanner glass. If the document is skewed, it may appear in your original document. Home > Solving Problems Problems With Scanned Images Scan quality is...
User Manual
Page 72
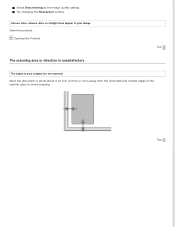
Uneven color, smears, dots, or straight lines appear in your original are not scanned Move the document or photo about 0.12 inch (3 mm) or more away from the horizontal and vertical edges of your image Clean the product. Top Cleaning the Product Top The scanning area or direction is unsatisfactory The edges of the scanner glass to avoid cropping. Try changing the Resolution setting. Select Descreening as the image quality setting.
Uneven color, smears, dots, or straight lines appear in your original are not scanned Move the document or photo about 0.12 inch (3 mm) or more away from the horizontal and vertical edges of your image Clean the product. Top Cleaning the Product Top The scanning area or direction is unsatisfactory The edges of the scanner glass to avoid cropping. Try changing the Resolution setting. Select Descreening as the image quality setting.

User Manual
Page 77
General Scanner type Photoelectric device Effective pixels (flatbed) Document size ADF paper input ADF paper output ADF paper capacity Scanning resolution Output resolution Image data Interface Light source Note: Flatbed color Color CCD line ...
General Scanner type Photoelectric device Effective pixels (flatbed) Document size ADF paper input ADF paper output ADF paper capacity Scanning resolution Output resolution Image data Interface Light source Note: Flatbed color Color CCD line ...

Product Specifications
Page 1
... bound materials • Engineered for Business includes EPSON® Scan, Document Capture Pro (Windows® only) and ABBYY® FineReader® Sprint OCR Versatility • Capture large, 2-sided documents in 100-sheet Automatic Document Feeder, plus auto duplex scanning • Powerful.../50 ipm 1 • Work smarter and more done - save scanned documents as 8.5" x 40" via the ADF or 8.5" x 11.7" via the flatbed • Ultrasonic double-feed detector - WorkForce® Color Document Scanner DS-6500 Quality • Achieve remarkable results - 4 line CCD sensor (RGB and...
... bound materials • Engineered for Business includes EPSON® Scan, Document Capture Pro (Windows® only) and ABBYY® FineReader® Sprint OCR Versatility • Capture large, 2-sided documents in 100-sheet Automatic Document Feeder, plus auto duplex scanning • Powerful.../50 ipm 1 • Work smarter and more done - save scanned documents as 8.5" x 40" via the ADF or 8.5" x 11.7" via the flatbed • Ultrasonic double-feed detector - WorkForce® Color Document Scanner DS-6500 Quality • Achieve remarkable results - 4 line CCD sensor (RGB and...

Product Specifications
Page 2
...of the Microsoft group of their respective companies. Color Document Scanner Product Name WorkForce DS-6500 Scanner Type Photoelectric Device Document Size Light Source Optical Resolution Hardware Resolution Pixel Depth ...Document Feeder (ADF) Type Paper Supply Document Size Paper Setting Capacity Corresponding Paper Weight Hinge Product/Accessory Part Numbers Epson Network Scan Module Roller Assembly Kit General Warranty Support - The Epson Connection SM What's in the U.S. Size 8.5" x 40" Min. and Canada 800-463-7766 Automated Technical Support 800-922-8911 WorkForce DS-6500 scanner...
...of the Microsoft group of their respective companies. Color Document Scanner Product Name WorkForce DS-6500 Scanner Type Photoelectric Device Document Size Light Source Optical Resolution Hardware Resolution Pixel Depth ...Document Feeder (ADF) Type Paper Supply Document Size Paper Setting Capacity Corresponding Paper Weight Hinge Product/Accessory Part Numbers Epson Network Scan Module Roller Assembly Kit General Warranty Support - The Epson Connection SM What's in the U.S. Size 8.5" x 40" Min. and Canada 800-463-7766 Automated Technical Support 800-922-8911 WorkForce DS-6500 scanner...


