User Manual
Page 3
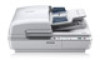
Home > Placing Originals on the Product Placing Originals on the Product Loading Documents in the Automatic Document Feeder (ADF) Placing Documents on the Scanner Glass Placing Large or Thick Documents on the Scanner Glass
Home > Placing Originals on the Product Placing Originals on the Product Loading Documents in the Automatic Document Feeder (ADF) Placing Documents on the Scanner Glass Placing Large or Thick Documents on the Scanner Glass

User Manual
Page 19
... the Product Parts Buttons The product has four buttons for Mac OS X) scan button in Document Capture Pro (for Windows) and EPSON Event Manager (for Document Capture Pro (for Windows) EPSON Event Manager (for scanning operations. Before using the product buttons, make sure you have installed your scanning software. Home > Guide to... Turns the product on if pressed once. Press again to ready status. You can customize the Mac OS X). Starts a scan. Press again to return the scanner to turn the product off. Cancels scanning.
... the Product Parts Buttons The product has four buttons for Mac OS X) scan button in Document Capture Pro (for Windows) and EPSON Event Manager (for Document Capture Pro (for Windows) EPSON Event Manager (for scanning operations. Before using the product buttons, make sure you have installed your scanning software. Home > Guide to... Turns the product on if pressed once. Press again to ready status. You can customize the Mac OS X). Starts a scan. Press again to return the scanner to turn the product off. Cancels scanning.

User Manual
Page 21
... the edges of your document in the ADF input tray with the printed side up and the top edge first. Remove any documents from the scanner glass. Place the first page of the paper. Loading documents in the ADF Important: Do not feed photographs or valuable original artwork into the feeder...
... the edges of your document in the ADF input tray with the printed side up and the top edge first. Remove any documents from the scanner glass. Place the first page of the paper. Loading documents in the ADF Important: Do not feed photographs or valuable original artwork into the feeder...
User Manual
Page 23
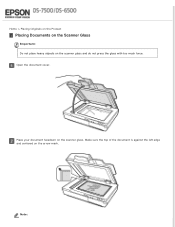
Place your document facedown on the arrow mark. Make sure the top of the document is against the left edge and centered on the scanner glass. Open the document cover. Note: Home > Placing Originals on the Product Placing Documents on the Scanner Glass Important: Do not place heavy objects on the scanner glass and do not press the glass with too much force.
Place your document facedown on the arrow mark. Make sure the top of the document is against the left edge and centered on the scanner glass. Open the document cover. Note: Home > Placing Originals on the Product Placing Documents on the Scanner Glass Important: Do not place heavy objects on the scanner glass and do not press the glass with too much force.

User Manual
Page 24
You can place documents up to the glass. Close the document cover gently so that your original does not move. Document Capture Pro (for Windows) Epson Scan Driver (for an extended period of time as they may stick to 0.6 inch (15 mm) thick. Always keep the scanner glass clean. If you use the handle when opening or closing the document cover. Important: Make sure you are scanning multiple documents at once, position each photo at least 0.8 inch (20 mm) apart from the others. Note: Do not leave photos on the scanner glass for Mac OS X)
You can place documents up to the glass. Close the document cover gently so that your original does not move. Document Capture Pro (for Windows) Epson Scan Driver (for an extended period of time as they may stick to 0.6 inch (15 mm) thick. Always keep the scanner glass clean. If you use the handle when opening or closing the document cover. Important: Make sure you are scanning multiple documents at once, position each photo at least 0.8 inch (20 mm) apart from the others. Note: Do not leave photos on the scanner glass for Mac OS X)

User Manual
Page 25
Home > Placing Originals on the Product Placing Large or Thick Documents on the Scanner Glass Important: Do not place heavy objects on the arrow mark. Close the document cover and hold it down firmly as you scan. Make sure the top of the document is against the left edge and centered on the scanner glass and do not press the glass with too much force. Note: Follow these steps to scan a large or thick document on the scanner glass: Place a large or thick document facedown on the scanner glass.
Home > Placing Originals on the Product Placing Large or Thick Documents on the Scanner Glass Important: Do not place heavy objects on the arrow mark. Close the document cover and hold it down firmly as you scan. Make sure the top of the document is against the left edge and centered on the scanner glass and do not press the glass with too much force. Note: Follow these steps to scan a large or thick document on the scanner glass: Place a large or thick document facedown on the scanner glass.

User Manual
Page 27
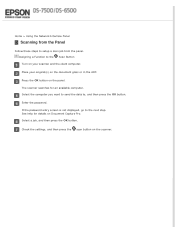
Assigning a Function to Scan Scanning from the Scan Button Place your original(s). Home > How to the Scan Button Loading Documents in Document Capture Pro (for Windows) or EPSON Scan (for Mac OS X). The scanned image is saved to the location you specified in the Automatic Document Feeder (ADF) Placing Documents on the Scanner Glass Placing Large or Thick Documents on the Scanner Glass Press the scan button.
Assigning a Function to Scan Scanning from the Scan Button Place your original(s). Home > How to the Scan Button Loading Documents in Document Capture Pro (for Windows) or EPSON Scan (for Mac OS X). The scanned image is saved to the location you specified in the Automatic Document Feeder (ADF) Placing Documents on the Scanner Glass Placing Large or Thick Documents on the Scanner Glass Press the scan button.

User Manual
Page 28
...using Document Capture Pro. The document is scanned and displayed as an image in the Automatic Document Feeder (ADF) Placing Documents on the Scanner Glass Placing Large or Thick Documents on Document Capture Pro. Check the scanned images (pages), and then edit as necessary, and then ... have finished checking the image, click the destination icon. See help for Windows) Click Scan. Document Capture Pro (for details on the Scanner Glass Start Document Capture Pro. Place your original(s). When you want to Scan Scanning Using Document Capture Pro (for Windows) This section explains...
...using Document Capture Pro. The document is scanned and displayed as an image in the Automatic Document Feeder (ADF) Placing Documents on the Scanner Glass Placing Large or Thick Documents on Document Capture Pro. Check the scanned images (pages), and then edit as necessary, and then ... have finished checking the image, click the destination icon. See help for Windows) Click Scan. Document Capture Pro (for details on the Scanner Glass Start Document Capture Pro. Place your original(s). When you want to Scan Scanning Using Document Capture Pro (for Windows) This section explains...

User Manual
Page 30
.... This section introduces scanning methods in Office Mode. How to Scan Scanning Using EPSON Scan Office Mode lets you quickly scan text documents without previewing your scanner. Select the Document Source setting. Place your original as necessary. Select the Image Type setting. Loading Documents ...in the Automatic Document Feeder (ADF) Placing Documents on the Scanner Glass Placing Large or Thick Documents on EPSON Scan. Select the size of your original(s). Home > How to start Select Office Mode in the Mode list...
.... This section introduces scanning methods in Office Mode. How to Scan Scanning Using EPSON Scan Office Mode lets you quickly scan text documents without previewing your scanner. Select the Document Source setting. Place your original as necessary. Select the Image Type setting. Loading Documents ...in the Automatic Document Feeder (ADF) Placing Documents on the Scanner Glass Placing Large or Thick Documents on EPSON Scan. Select the size of your original(s). Home > How to start Select Office Mode in the Mode list...

User Manual
Page 35
Note: Frequently used actions are registered in advance in the list next to the action name, then select the action you want to use. Scanning from the Scan Button Top Click the arrow in EPSON Event Manager. You can also customize the action by clicking Make Job Settings. Click Close. In the window displayed, select the scanner you want to assign.
Note: Frequently used actions are registered in advance in the list next to the action name, then select the action you want to use. Scanning from the Scan Button Top Click the arrow in EPSON Event Manager. You can also customize the action by clicking Make Job Settings. Click Close. In the window displayed, select the scanner you want to assign.
User Manual
Page 39
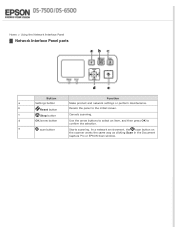
e scan button Starts scanning. b Reset button Resets the panel to confirm the selection. d OK/arrow button Use the arrow buttons to select an item, and then press OK to the initial screen. In a network environment, the scan button on the scanner works the same way as clicking Scan in the Document Capture Pro or EPSON Scan window. c Stop button Cancels scanning. Home > Using the Network Interface Panel Network Interface Panel parts Button Function a Settings button Make product and network settings or perform maintenance.
e scan button Starts scanning. b Reset button Resets the panel to confirm the selection. d OK/arrow button Use the arrow buttons to select an item, and then press OK to the initial screen. In a network environment, the scan button on the scanner works the same way as clicking Scan in the Document Capture Pro or EPSON Scan window. c Stop button Cancels scanning. Home > Using the Network Interface Panel Network Interface Panel parts Button Function a Settings button Make product and network settings or perform maintenance.

User Manual
Page 40
support.epson.net/netscan/ After setting up the Network Interface Panel. You can download the User's Guide for the Network Interface Panel from the following website. Setting Up Client Computers with the optional Network Interface Panel (B12B808411) to enable direct control of all of the features of your scanner in a network environment. Home > Using the Network Interface Panel Installing the Network Interface Panel EPSON Scan works together with EPSON Scan Settings
support.epson.net/netscan/ After setting up the Network Interface Panel. You can download the User's Guide for the Network Interface Panel from the following website. Setting Up Client Computers with the optional Network Interface Panel (B12B808411) to enable direct control of all of the features of your scanner in a network environment. Home > Using the Network Interface Panel Installing the Network Interface Panel EPSON Scan works together with EPSON Scan Settings

User Manual
Page 41
...a Computer Administrator account. Mac OS X: Do not use EPSON Scan Settings to enable network scanning. Windows: Start > All Programs or Programs > EPSON > EPSON Scan > EPSON Scan Settings Mac OS X: Select Applications > EPSON Software > EPSON Scan Settings. Start EPSON Scan Settings. Windows: Log in as a user with ... You must log on and working properly. Home > Using the Network Interface Panel Setting Up Client Computers with EPSON Scan Settings Make sure your scanner and Network Interface Panel are asked to enter an administrator's password, enter the password, and then continue with ...
...a Computer Administrator account. Mac OS X: Do not use EPSON Scan Settings to enable network scanning. Windows: Start > All Programs or Programs > EPSON > EPSON Scan > EPSON Scan Settings Mac OS X: Select Applications > EPSON Software > EPSON Scan Settings. Start EPSON Scan Settings. Windows: Log in as a user with ... You must log on and working properly. Home > Using the Network Interface Panel Setting Up Client Computers with EPSON Scan Settings Make sure your scanner and Network Interface Panel are asked to enter an administrator's password, enter the password, and then continue with ...

User Manual
Page 43
...Main Settings window as necessary, and then click Scan. Click Scan. If a group is also set for the scanner, you can scan using it. Make the appropriate settings. Start EPSON Scan. Adjust settings in the Document Capture Pro Main window. Place your original(s) on the document glass or ...in the ADF. Top For Mac OS X Turn on your scanner and the client computer. Home > Using the Network Interface ...
...Main Settings window as necessary, and then click Scan. Click Scan. If a group is also set for the scanner, you can scan using it. Make the appropriate settings. Start EPSON Scan. Adjust settings in the Document Capture Pro Main window. Place your original(s) on the document glass or ...in the ADF. Top For Mac OS X Turn on your scanner and the client computer. Home > Using the Network Interface ...
User Manual
Page 45
...and then press the OK button. Select the computer you want to send the data to the next step. Press the OK button on the scanner. The scanner searches for details on Document Capture Pro. Enter the password. Check the settings, and then press the scan button on the panel. Place your... scanner and the client computer. Home > Using the Network Interface Panel Scanning from the Panel Follow these steps to the Scan Button Turn on your ...
...and then press the OK button. Select the computer you want to send the data to the next step. Press the OK button on the scanner. The scanner searches for details on Document Capture Pro. Enter the password. Check the settings, and then press the scan button on the panel. Place your... scanner and the client computer. Home > Using the Network Interface Panel Scanning from the Panel Follow these steps to the Scan Button Turn on your ...
User Manual
Page 53
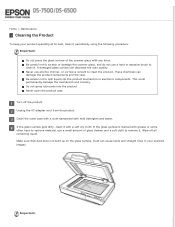
... press the glass surface of glass cleaner and a soft cloth to spill liquid into the product. Be careful not to scratch or damage the scanner glass, and do not use alcohol, thinner, or corrosive solvent to clean it with mild detergent and water. Turn off all remaining liquid. ...If the glass surface is stained with grease or some other hard-to-remove material, use a small amount of the scanner glass with any force. Home > Maintenance Cleaning the Product To keep your scanned images. These chemicals can damage the product components and the case....
... press the glass surface of glass cleaner and a soft cloth to spill liquid into the product. Be careful not to scratch or damage the scanner glass, and do not use alcohol, thinner, or corrosive solvent to clean it with mild detergent and water. Turn off all remaining liquid. ...If the glass surface is stained with grease or some other hard-to-remove material, use a small amount of the scanner glass with any force. Home > Maintenance Cleaning the Product To keep your scanned images. These chemicals can damage the product components and the case....

User Manual
Page 55
Open the ADF cover. Turn off the scanner. Unplug the AC adapter from the input tray. Number of the pickup roller cover, then open the cover. Press the hook on the Roller Assembly Kit after scanning every 100,000 times. Home > Maintenance Replacing the Roller Assembly Kit You need to replace the parts on both sides of scanning 100,000 Remove all paper from the product. Removal part Roller Assembly Kit Part number B12B813481 To replace the Roller Assembly Kit, follow the steps below.
Open the ADF cover. Turn off the scanner. Unplug the AC adapter from the input tray. Number of the pickup roller cover, then open the cover. Press the hook on the Roller Assembly Kit after scanning every 100,000 times. Home > Maintenance Replacing the Roller Assembly Kit You need to replace the parts on both sides of scanning 100,000 Remove all paper from the product. Removal part Roller Assembly Kit Part number B12B813481 To replace the Roller Assembly Kit, follow the steps below.
User Manual
Page 59
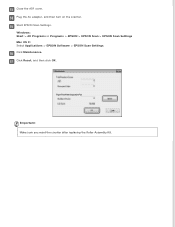
Click Reset, and then click OK. Start EPSON Scan Settings. Windows: Start > All Programs or Programs > EPSON > EPSON Scan > EPSON Scan Settings Mac OS X: Select Applications > EPSON Software > EPSON Scan Settings. Important: Make sure you reset the counter after replacing the Roller Assembly Kit. Click Maintenance. Plug the AC adapter, and then turn on the scanner. Close the ADF cover.
Click Reset, and then click OK. Start EPSON Scan Settings. Windows: Start > All Programs or Programs > EPSON > EPSON Scan > EPSON Scan Settings Mac OS X: Select Applications > EPSON Software > EPSON Scan Settings. Important: Make sure you reset the counter after replacing the Roller Assembly Kit. Click Maintenance. Plug the AC adapter, and then turn on the scanner. Close the ADF cover.

User Manual
Page 61
... you transport the product for a long distance or store it for an extended period of time, you need to lock the carriage to secure the scanner carriage. Slide the transportation lock lever on the left of the...
... you transport the product for a long distance or store it for an extended period of time, you need to lock the carriage to secure the scanner carriage. Slide the transportation lock lever on the left of the...

User Manual
Page 62
Otherwise, the firmware may not be updated correctly. Home > Maintenance Updating the Firmware Check the Epson home page for the latest firmware update releases. www.epson.com Important: Do not turn off the scanner while the firmware is no firmware information on the home page, you are already using the latest firmware. If there is updating.
Otherwise, the firmware may not be updated correctly. Home > Maintenance Updating the Firmware Check the Epson home page for the latest firmware update releases. www.epson.com Important: Do not turn off the scanner while the firmware is no firmware information on the home page, you are already using the latest firmware. If there is updating.

