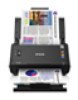
User Manual
Page 3
... Button Settings or Scan Jobs 34 Scanning with Document Capture Pro and Document Capture 35 Scanning with Epson Scan...38 Available Image Adjustments ...40 Scanning Special Projects...41 Scanning Two Originals onto One Sheet (Stitching Images 41 Scanning Multi-Page Originals as Separate Files - Contents DS-520 User's Guide ...7 Scanner Basics...8 Scanner Parts Locations ...8 Scanner...
... Button Settings or Scan Jobs 34 Scanning with Document Capture Pro and Document Capture 35 Scanning with Epson Scan...38 Available Image Adjustments ...40 Scanning Special Projects...41 Scanning Two Originals onto One Sheet (Stitching Images 41 Scanning Multi-Page Originals as Separate Files - Contents DS-520 User's Guide ...7 Scanner Basics...8 Scanner Parts Locations ...8 Scanner...
User Manual
Page 12
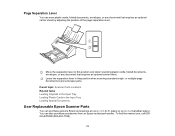
.... Leave the separation lever in the Input Tray Loading Special Documents User Replaceable Epson Scanner Parts You can purchase genuine Epson accessories at epson.com (U.S. sales) or epson.ca (Canadian sales). To find the nearest one, call 800GO-EPSON (800-463-7766). 12 or multiple-page documents to this position when scanning standard single- Move the separation...
.... Leave the separation lever in the Input Tray Loading Special Documents User Replaceable Epson Scanner Parts You can purchase genuine Epson accessories at epson.com (U.S. sales) or epson.ca (Canadian sales). To find the nearest one, call 800GO-EPSON (800-463-7766). 12 or multiple-page documents to this position when scanning standard single- Move the separation...
User Manual
Page 15
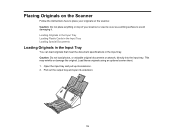
.... 1. Open the input tray and pull up its extension. 15 This may wrinkle or damage the original. Caution: Do not load photos, or valuable original documents or artwork, directly into the input tray. Placing Originals on the Scanner Follow the instructions here to place your originals on top of your scanner... it. Pull out the output tray and open its extension. 2. Loading Originals in the Input Tray Loading Plastic Cards in the Input Tray Loading Special Documents Loading Originals in the Input Tray You can load originals that meet the...
.... 1. Open the input tray and pull up its extension. 15 This may wrinkle or damage the original. Caution: Do not load photos, or valuable original documents or artwork, directly into the input tray. Placing Originals on the Scanner Follow the instructions here to place your originals on top of your scanner... it. Pull out the output tray and open its extension. 2. Loading Originals in the Input Tray Loading Plastic Cards in the Input Tray Loading Special Documents Loading Originals in the Input Tray You can load originals that meet the...

User Manual
Page 16
Check to make sure that the page separation lever is in this position for most types of documents. 16 Slide the input tray edge guides all the way out. 4. 3. Note: To prevent paper jams, keep the lever in the position shown here.
Check to make sure that the page separation lever is in this position for most types of documents. 16 Slide the input tray edge guides all the way out. 4. 3. Note: To prevent paper jams, keep the lever in the position shown here.

User Manual
Page 17
Make sure the printed side is face down and top edge first. Note: If you are loading a paper business card, load it horizontally. 17 If you are loading a multi-page document, fan your originals into the input tray as shown until they meet resistance. 5. Slide your stack of originals and tap them gently on a flat surface to even the edges. 6.
Make sure the printed side is face down and top edge first. Note: If you are loading a paper business card, load it horizontally. 17 If you are loading a multi-page document, fan your originals into the input tray as shown until they meet resistance. 5. Slide your stack of originals and tap them gently on a flat surface to even the edges. 6.

User Manual
Page 18
Slide the edge guides against the edges of the original. Original Document Loading Capacity Parent topic: Placing Originals on the Scanner Original Document Loading Capacity You can load original documents that meet these specifications in your scanner. 18 7.
Slide the edge guides against the edges of the original. Original Document Loading Capacity Parent topic: Placing Originals on the Scanner Original Document Loading Capacity You can load original documents that meet these specifications in your scanner. 18 7.
User Manual
Page 19
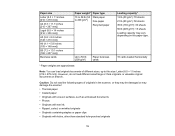
... (8.5 × 11 inches [216 × 279 mm]). However, do not load different-sized large or thick originals, or valuable original documents or artwork. Caution: Do not load the following types of different sizes, up to 209 g/m²) Fine paper Recycled paper Loading capacity* ...;): 15 sheets Loading capacity may damage the scanner: • Thermal paper • Coated paper • Originals with uneven surfaces, such as embossed documents • Photos • Originals with wet ink • Ripped, curled, or wrinkled originals • Originals containing staples or paper clips •...
... (8.5 × 11 inches [216 × 279 mm]). However, do not load different-sized large or thick originals, or valuable original documents or artwork. Caution: Do not load the following types of different sizes, up to 209 g/m²) Fine paper Recycled paper Loading capacity* ...;): 15 sheets Loading capacity may damage the scanner: • Thermal paper • Coated paper • Originals with uneven surfaces, such as embossed documents • Photos • Originals with wet ink • Ripped, curled, or wrinkled originals • Originals containing staples or paper clips •...
User Manual
Page 23
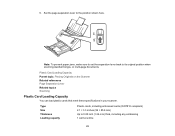
or multi-page documents. Set the page separation lever to 0.05 inch (1.24 mm) thick, including any embossing 1 card at a time 23 6. Plastic Card Loading Capacity Parent topic: Placing ...
or multi-page documents. Set the page separation lever to 0.05 inch (1.24 mm) thick, including any embossing 1 card at a time 23 6. Plastic Card Loading Capacity Parent topic: Placing ...

User Manual
Page 24
Note: When scanning special documents, turn off the Detect Double Feed setting in the input tray. Loading direction Horizontal Note: Plastic cards with glossy surfaces may not scan properly. Select ... input tray and pull up its extension. 24 Parent topic: Loading Plastic Cards in the Input Tray Loading Special Documents You can load a single envelope or large, thick, or folded original in Epson Scan. Make sure the original meets the specifications for special originals before loading it. Pull out the output tray...
Note: When scanning special documents, turn off the Detect Double Feed setting in the input tray. Loading direction Horizontal Note: Plastic cards with glossy surfaces may not scan properly. Select ... input tray and pull up its extension. 24 Parent topic: Loading Plastic Cards in the Input Tray Loading Special Documents You can load a single envelope or large, thick, or folded original in Epson Scan. Make sure the original meets the specifications for special originals before loading it. Pull out the output tray...

User Manual
Page 26
• For a folded original, fold and load the original as shown. Caution: Do not load the document with the open side facing down. 26
• For a folded original, fold and load the original as shown. Caution: Do not load the document with the open side facing down. 26

User Manual
Page 27
... arrow on the sheet. • If the original is larger than the carrier sheet, fold it meets resistance. 27 Do the following to load the document into the scanner until it in the center of the original faceup with the sides to load the...
... arrow on the sheet. • If the original is larger than the carrier sheet, fold it meets resistance. 27 Do the following to load the document into the scanner until it in the center of the original faceup with the sides to load the...

User Manual
Page 28
6. Note: To prevent paper jams, make sure to set the separation lever back to the position shown here. or multi-page documents. 28 Set the page separation lever to its original position when scanning standard single- Slide the edge guides against the edges of the sheet. 7.
6. Note: To prevent paper jams, make sure to set the separation lever back to the position shown here. or multi-page documents. 28 Set the page separation lever to its original position when scanning standard single- Slide the edge guides against the edges of the sheet. 7.
User Manual
Page 29
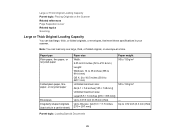
... size: A4 (8.3 × 11.7 inches [210 × 297 mm]) Paper weight 50 to 130 g/m² 50 to .012 inch (0.3 mm) thick Parent topic: Loading Special Documents 29 Paper type Plain paper, fine paper, or recycled paper Folded plain paper, fine paper, or recycled paper Envelopes Irregularly shaped originals (load only in...
... size: A4 (8.3 × 11.7 inches [210 × 297 mm]) Paper weight 50 to 130 g/m² 50 to .012 inch (0.3 mm) thick Parent topic: Loading Special Documents 29 Paper type Plain paper, fine paper, or recycled paper Folded plain paper, fine paper, or recycled paper Envelopes Irregularly shaped originals (load only in...
User Manual
Page 31
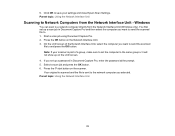
... your scanner. Note: Make a note of the IP address or host name of the following to start Epson Scan Settings: • Windows 8.x: Navigate to set up computers for instructions on connecting it in these steps...EPSON Scan Settings. • Windows (other versions): Click or Start > All Programs or Programs > EPSON > EPSON Scan > EPSON Scan Settings. • OS X: Open the Applications folder, click Epson Software, and click EPSON Scan Settings. 2. Select your scanner through the optional Epson Network Interface Unit. Connecting the Network Interface Unit See the documentation...
... your scanner. Note: Make a note of the IP address or host name of the following to start Epson Scan Settings: • Windows 8.x: Navigate to set up computers for instructions on connecting it in these steps...EPSON Scan Settings. • Windows (other versions): Click or Start > All Programs or Programs > EPSON > EPSON Scan > EPSON Scan Settings. • OS X: Open the Applications folder, click Epson Software, and click EPSON Scan Settings. 2. Select your scanner through the optional Epson Network Interface Unit. Connecting the Network Interface Unit See the documentation...
User Manual
Page 33
... Windows You can scan to Network Computers from the Network Interface Unit (Windows only). If you selected. 6. You first set up a scan job in Document Capture Pro, enter the password at the prompt. 5. On the LCD screen of a group, make sure to set up on the LCD screen. 4. ...your scanner is sent to the network computer you set the computer to save your settings and close Epson Scan Settings. Select a scan job and press the OK button. 6. Start a scan job using Document Capture Pro. 2. Press the OK button on the scanner. Parent topic: Using the Network Interface ...
... Windows You can scan to Network Computers from the Network Interface Unit (Windows only). If you selected. 6. You first set up a scan job in Document Capture Pro, enter the password at the prompt. 5. On the LCD screen of a group, make sure to set up on the LCD screen. 4. ...your scanner is sent to the network computer you set the computer to save your settings and close Epson Scan Settings. Select a scan job and press the OK button. 6. Start a scan job using Document Capture Pro. 2. Press the OK button on the scanner. Parent topic: Using the Network Interface ...
User Manual
Page 34
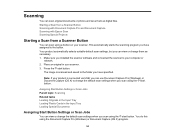
Starting a Scan from a Scanner Button Scanning with Document Capture Pro and Document Capture Scanning with Epson Scan Scanning Special Projects Starting a Scan from a Scanner Button You can scan using a button on your product is scanned and saved to the folder you ... assigned to change the default scan settings when you scan using the start button. The image is connected via USB, you can use Document Capture Pro (Windows) or Document Capture (OS X) to the button. Assigning Start Button Settings or Scan Jobs Parent topic: Scanning Related tasks Loading Originals in the Input Tray...
Starting a Scan from a Scanner Button Scanning with Document Capture Pro and Document Capture Scanning with Epson Scan Scanning Special Projects Starting a Scan from a Scanner Button You can scan using a button on your product is scanned and saved to the folder you ... assigned to change the default scan settings when you scan using the start button. The image is connected via USB, you can use Document Capture Pro (Windows) or Document Capture (OS X) to the button. Assigning Start Button Settings or Scan Jobs Parent topic: Scanning Related tasks Loading Originals in the Input Tray...
User Manual
Page 35
...On the Job Management window, click Add or the + icon. 4. Parent topic: Starting a Scan from a Scanner Button Scanning with Document Capture Pro and Document Capture When you specify. Do one of the following : • Windows: On the Job Management window, click Event Settings. &#... (other versions): Click or Start, and select All Programs or Programs. Select EPSON Software, then select Document Capture Pro. • OS X: Open the Applications folder, select the Epson Software folder, and select Document Capture. 35 Note: The settings may vary, depending on a computer connected to...
...On the Job Management window, click Add or the + icon. 4. Parent topic: Starting a Scan from a Scanner Button Scanning with Document Capture Pro and Document Capture When you specify. Do one of the following : • Windows: On the Job Management window, click Event Settings. &#... (other versions): Click or Start, and select All Programs or Programs. Select EPSON Software, then select Document Capture Pro. • OS X: Open the Applications folder, select the Epson Software folder, and select Document Capture. 35 Note: The settings may vary, depending on a computer connected to...

User Manual
Page 37
... use a scan job that you created instead, select it from the Job list in Document Capture Pro or Document Capture for details. 4. If you want to use. Note: See the Help information in the Document Capture Pro or Document Capture window, click the Start Job button, and skip the rest of the screen and...
... use a scan job that you created instead, select it from the Job list in Document Capture Pro or Document Capture for details. 4. If you want to use. Note: See the Help information in the Document Capture Pro or Document Capture window, click the Start Job button, and skip the rest of the screen and...

User Manual
Page 38
...the Applications folder, open the Epson Software folder, and double-click the EPSON Scan icon. 38 Do one of the Destination icons to choose where to send your scanned files. (If you cannot see a preview of your computer in the Document Capture Pro (Windows) or Document Capture (OS X) window. ...6. Parent topic: Scanning Related tasks Loading Originals in the Input Tray Loading Plastic Cards in the Input Tray Loading Special Documents Scanning with Epson Scan Epson Scan automatically saves your scanned file on the destination you chose, click OK or Send to the icons.) 8. Check the ...
...the Applications folder, open the Epson Software folder, and double-click the EPSON Scan icon. 38 Do one of the Destination icons to choose where to send your scanned files. (If you cannot see a preview of your computer in the Document Capture Pro (Windows) or Document Capture (OS X) window. ...6. Parent topic: Scanning Related tasks Loading Originals in the Input Tray Loading Plastic Cards in the Input Tray Loading Special Documents Scanning with Epson Scan Epson Scan automatically saves your scanned file on the destination you chose, click OK or Send to the icons.) 8. Check the ...

User Manual
Page 40
...setting. Click Scan. Available Image Adjustments Parent topic: Scanning Related tasks Loading Originals in the Input Tray Loading Plastic Cards in text documents. Turn off this option to access additional settings. Click the Image Adjustment tab and select any of descreening do not appear in the... preview image, only in Epson Scan. Change any of certain image areas clearer. Descreening Removes the ripple pattern that might appear in the Preview window. 6. If ...
...setting. Click Scan. Available Image Adjustments Parent topic: Scanning Related tasks Loading Originals in the Input Tray Loading Plastic Cards in text documents. Turn off this option to access additional settings. Click the Image Adjustment tab and select any of descreening do not appear in the... preview image, only in Epson Scan. Change any of certain image areas clearer. Descreening Removes the ripple pattern that might appear in the Preview window. 6. If ...


