
User Manual
Page 29
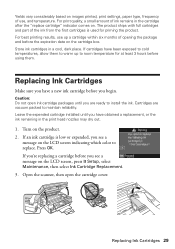
... on the LCD screen indicating which color to room temperature for priming the product. Caution: Do not open the cartridge cover. Leave the expended cartridge installed until you begin. Press OK. Cartridges are ready to maintain reliability. Turn on the cartridge box. Open the scanner, then open ink cartridge packages until... cartridges have been exposed to cold temperatures, allow them . If an ink cartridge is used for at least 3 hours before you are vacuum packed to install the ink.
... on the LCD screen indicating which color to room temperature for priming the product. Caution: Do not open the cartridge cover. Leave the expended cartridge installed until you begin. Press OK. Cartridges are ready to maintain reliability. Turn on the cartridge box. Open the scanner, then open ink cartridge packages until... cartridges have been exposed to cold temperatures, allow them . If an ink cartridge is used for at least 3 hours before you are vacuum packed to install the ink.
User Manual
Page 31
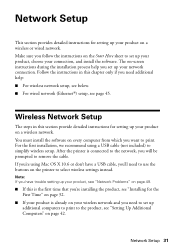
... provide detailed instructions for setting up your product on a wireless or wired network. After the printer is already on your connection, and install the software. If you're using a USB cable (not included) to select wireless settings instead. Network Setup This section provides detailed ...follow the instructions on every computer from which you will be prompted to use the buttons on page 42. The on-screen instructions during the installation process help : ■ For wireless network setup, see below. ■ For wired network (Ethernet®) setup, see "Setting Up ...
... provide detailed instructions for setting up your product on a wireless or wired network. After the printer is already on your connection, and install the software. If you're using a USB cable (not included) to select wireless settings instead. Network Setup This section provides detailed ...follow the instructions on every computer from which you will be prompted to use the buttons on page 42. The on-screen instructions during the installation process help : ■ For wireless network setup, see below. ■ For wired network (Ethernet®) setup, see "Setting Up ...

User Manual
Page 32
Installing for the First Time Before you begin, make sure that you have the following information ready and write...7 and Windows Vista®: If you see the User Account Control screen, click Yes or Continue. When you see this screen, click Install. 32 Wireless Network Setup Windows XP: When you see the AutoPlay window, click Run Setup.exe. When you don't know your network ... (ABC) or lowercase (abc) letters, be sure to note them correctly. If you see the Software Installation screen, continue with step 4. Make sure your product is turned on. 2. Mac OS X: Double-click the...
Installing for the First Time Before you begin, make sure that you have the following information ready and write...7 and Windows Vista®: If you see the User Account Control screen, click Yes or Continue. When you see this screen, click Install. 32 Wireless Network Setup Windows XP: When you see the AutoPlay window, click Run Setup.exe. When you don't know your network ... (ABC) or lowercase (abc) letters, be sure to note them correctly. If you see the Software Installation screen, continue with step 4. Make sure your product is turned on. 2. Mac OS X: Double-click the...
User Manual
Page 34
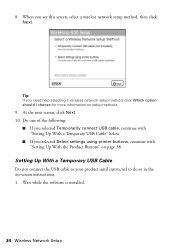
... With the Product Buttons" on -screen instructions. 1. When you see this screen, select a wireless network setup method, then click Next. Wait while the software is installed. 34 Wireless Network Setup Setting Up With a Temporary USB Cable Do not connect the USB cable to your product until instructed to do so in...
... With the Product Buttons" on -screen instructions. 1. When you see this screen, select a wireless network setup method, then click Next. Wait while the software is installed. 34 Wireless Network Setup Setting Up With a Temporary USB Cable Do not connect the USB cable to your product until instructed to do so in...

User Manual
Page 35
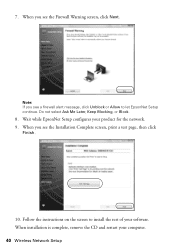
Note: If you see the Firewall Warning screen, click Next. Follow the on-screen instructions to let EpsonNet Setup continue. Wireless Network Setup 35 When you see this screen, connect the product to your computer with a USB cable. 3. Do not select Ask Me Later, Keep Blocking, or Block. 2. When you see a firewall alert message, click Unblock or Allow to continue installing the software. 4.
Note: If you see the Firewall Warning screen, click Next. Follow the on-screen instructions to let EpsonNet Setup continue. Wireless Network Setup 35 When you see this screen, connect the product to your computer with a USB cable. 3. Do not select Ask Me Later, Keep Blocking, or Block. 2. When you see a firewall alert message, click Unblock or Allow to continue installing the software. 4.

User Manual
Page 37
When you see "Setting Up Additional Computers" on -screen instructions to install the rest of your computer. 9. Wireless Network Setup 37 Follow the instructions on the screen to the product, see the Installation Complete screen, print a test page, then click Finish. 10. To set up additional computers to print to remove the USB cable from the product and your software. Wait while EpsonNet Setup configures your computer. When installation is complete, remove the CD and restart your product for the network. 8. 7. Follow the on page 42.
When you see "Setting Up Additional Computers" on -screen instructions to install the rest of your computer. 9. Wireless Network Setup 37 Follow the instructions on the screen to the product, see the Installation Complete screen, print a test page, then click Finish. 10. To set up additional computers to print to remove the USB cable from the product and your software. Wait while EpsonNet Setup configures your computer. When installation is complete, remove the CD and restart your product for the network. 8. 7. Follow the on page 42.
User Manual
Page 39
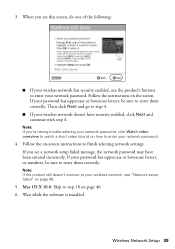
... setup failed message, the network password may have security enabled, click Next and continue with step 4. Wireless Network Setup 39 3. Wait while the software is installed. Then click Next and go to enter them correctly. Follow the on-screen instructions to your network password. Note: If the product still doesn't connect...
... setup failed message, the network password may have security enabled, click Next and continue with step 4. Wireless Network Setup 39 3. Wait while the software is installed. Then click Next and go to enter them correctly. Follow the on-screen instructions to your network password. Note: If the product still doesn't connect...
User Manual
Page 40
Do not select Ask Me Later, Keep Blocking, or Block. 8. When you see a firewall alert message, click Unblock or Allow to install the rest of your computer. 40 Wireless Network Setup Follow the instructions on the screen to let EpsonNet Setup continue. Note: If you see the Installation Complete screen, print a test page, then click Finish. 10. When you see the Firewall Warning screen, click Next. When installation is complete, remove the CD and restart your software. 7. Wait while EpsonNet Setup configures your product for the network. 9.
Do not select Ask Me Later, Keep Blocking, or Block. 8. When you see a firewall alert message, click Unblock or Allow to install the rest of your computer. 40 Wireless Network Setup Follow the instructions on the screen to let EpsonNet Setup continue. Note: If you see the Installation Complete screen, print a test page, then click Finish. 10. When you see the Firewall Warning screen, click Next. When installation is complete, remove the CD and restart your software. 7. Wait while EpsonNet Setup configures your product for the network. 9.

User Manual
Page 42
Make sure your product is turned on. 2. When you see the Software Installation screen, continue with step 4. When you see the AutoPlay window, click Run Setup.exe. When you see this screen, click Install. 5. Insert the product software CD. 3. Mac OS X: Double-click the Epson icon. 4. Setting Up Additional Computers 1. Windows XP: When you see this screen, select Wireless connection and click Next. 42 Wireless Network Setup Windows 7 and Windows Vista: If you see the User Account Control screen, click Yes or Continue.
Make sure your product is turned on. 2. When you see the Software Installation screen, continue with step 4. When you see the AutoPlay window, click Run Setup.exe. When you see this screen, click Install. 5. Insert the product software CD. 3. Mac OS X: Double-click the Epson icon. 4. Setting Up Additional Computers 1. Windows XP: When you see this screen, select Wireless connection and click Next. 42 Wireless Network Setup Windows 7 and Windows Vista: If you see the User Account Control screen, click Yes or Continue.
User Manual
Page 43
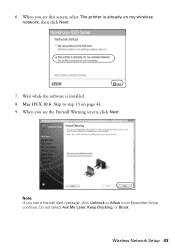
Wait while the software is already on page 44. 9. Mac OS X 10.6: Skip to let EpsonNet Setup continue. Do not select Ask Me Later, Keep Blocking, or Block. Wireless Network Setup 43 Note: If you see the Firewall Warning screen, click Next. When you see this screen, select The printer is installed. 8. 6. When you see a firewall alert message, click Unblock or Allow to step 13 on my wireless network, then click Next. 7.
Wait while the software is already on page 44. 9. Mac OS X 10.6: Skip to let EpsonNet Setup continue. Do not select Ask Me Later, Keep Blocking, or Block. Wireless Network Setup 43 Note: If you see the Firewall Warning screen, click Next. When you see this screen, select The printer is installed. 8. 6. When you see a firewall alert message, click Unblock or Allow to step 13 on my wireless network, then click Next. 7.

User Manual
Page 44
When you see a screen like this one, select the product you see the Installation Complete screen, print a test page, then click Finish. 13. Follow the instructions on the screen to set up, then click Next. 11. When installation is complete, remove the CD and restart your software. If you would like to install the rest of your computer. 44 Wireless Network Setup Wait while EpsonNet Setup configures your product for the network. 12. 10.
When you see a screen like this one, select the product you see the Installation Complete screen, print a test page, then click Finish. 13. Follow the instructions on the screen to set up, then click Next. 11. When installation is complete, remove the CD and restart your software. If you would like to install the rest of your computer. 44 Wireless Network Setup Wait while EpsonNet Setup configures your product for the network. 12. 10.
User Manual
Page 45
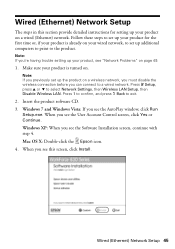
.... Press 1 to confirm, and press y Back to select Network Settings, then Wireless LAN Setup, then Disable Wireless LAN. When you see the Software Installation screen, continue with step 4. Wired (Ethernet) Network Setup 45 Press F Setup, press u or d to exit. 2. When you can connect to ...re having trouble setting up the product on a wired (Ethernet) network. Insert the product software CD. 3. Mac OS X: Double-click the Epson icon. 4. Follow these steps to set up your product for setting up additional computers to print to the product. Make sure your product, see...
.... Press 1 to confirm, and press y Back to select Network Settings, then Wireless LAN Setup, then Disable Wireless LAN. When you see the Software Installation screen, continue with step 4. Wired (Ethernet) Network Setup 45 Press F Setup, press u or d to exit. 2. When you can connect to ...re having trouble setting up the product on a wired (Ethernet) network. Insert the product software CD. 3. Mac OS X: Double-click the Epson icon. 4. Follow these steps to set up your product for setting up additional computers to print to the product. Make sure your product, see...

User Manual
Page 46
5. When you see this screen, do one of the following: ■ For a first-time installation, choose Set up printer for the first time, then click Next. ■ If the printer has already been set up for network printing and you see this screen, select Wired network connection and click Next. 6. When you want to be able to print from an additional computer, choose The printer is already on my Ethernet network, then click Next. 46 Wired (Ethernet) Network Setup
5. When you see this screen, do one of the following: ■ For a first-time installation, choose Set up printer for the first time, then click Next. ■ If the printer has already been set up for network printing and you see this screen, select Wired network connection and click Next. 6. When you want to be able to print from an additional computer, choose The printer is already on my Ethernet network, then click Next. 46 Wired (Ethernet) Network Setup

User Manual
Page 47
When you see the Firewall Warning screen, click Next. Do not select Ask Me Later, Keep Blocking, or Block. Note: If you see a firewall alert message, click Unblock or Allow to your router, access point, or hub with an Ethernet network cable, then click Next. 8. Mac OS X 10.6: Skip to start network installation. 10. Wired (Ethernet) Network Setup 47 Wait while the software is installed, then click Next to step 15 on page 48. 9. For first-time installation only: Connect the product to let EpsonNet Setup continue. 7.
When you see the Firewall Warning screen, click Next. Do not select Ask Me Later, Keep Blocking, or Block. Note: If you see a firewall alert message, click Unblock or Allow to your router, access point, or hub with an Ethernet network cable, then click Next. 8. Mac OS X 10.6: Skip to start network installation. 10. Wired (Ethernet) Network Setup 47 Wait while the software is installed, then click Next to step 15 on page 48. 9. For first-time installation only: Connect the product to let EpsonNet Setup continue. 7.

User Manual
Page 48
Wait while EpsonNet Setup configures your software. Click Finish. 15. If you would like to set up, then click Next. 12. 11. If you see a screen like this one, select the product you see an Installation Complete screen that includes a Print Test Page button, click it to install the rest of your product for the network. 13. Follow the instructions on the screen to print a test page. 14. When installation is complete, remove the CD and restart your computer. 48 Wired (Ethernet) Network Setup
Wait while EpsonNet Setup configures your software. Click Finish. 15. If you would like to set up, then click Next. 12. 11. If you see a screen like this one, select the product you see an Installation Complete screen that includes a Print Test Page button, click it to install the rest of your product for the network. 13. Follow the instructions on the screen to print a test page. 14. When installation is complete, remove the CD and restart your computer. 48 Wired (Ethernet) Network Setup
User Manual
Page 50
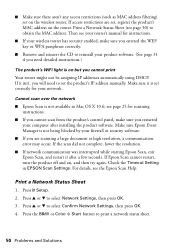
...'s IP address manually. Cannot scan over the network ■ Epson Scan is not being blocked by your product software. (See... resolution. ■ If network communication was interrupted while starting Epson Scan, exit Epson Scan, and restart it is on but you need to ...the Timeout Setting in Mac OS X 10.6; Make sure Epson Event Manager is not available in EPSON Scan Settings. Print a Network Status Sheet 1. Press the...page 25 for instructions. ■ If your computer after a few seconds. If Epson Scan cannot restart, turn the product off and on the wireless router. Press F...
...'s IP address manually. Cannot scan over the network ■ Epson Scan is not being blocked by your product software. (See... resolution. ■ If network communication was interrupted while starting Epson Scan, exit Epson Scan, and restart it is on but you need to ...the Timeout Setting in Mac OS X 10.6; Make sure Epson Event Manager is not available in EPSON Scan Settings. Print a Network Status Sheet 1. Press the...page 25 for instructions. ■ If your computer after a few seconds. If Epson Scan cannot restart, turn the product off and on the wireless router. Press F...
User Manual
Page 57
... ink cartridges are in the same environment as automatic doors or fire alarms. Radio waves from dirt and dust and store it in place. ■ Install a new ink cartridge immediately after opening their operation. ■ Do not use only a No. 26 AWG or larger telecommunication line cord. Leaving cartridges uninstalled can...
... ink cartridges are in the same environment as automatic doors or fire alarms. Radio waves from dirt and dust and store it in place. ■ Install a new ink cartridge immediately after opening their operation. ■ Do not use only a No. 26 AWG or larger telecommunication line cord. Leaving cartridges uninstalled can...
User Manual
Page 59
...used to connect this equipment to the premises wiring and telephone network must comply with this equipment, please contact: Name: Address: Telephone: Epson America, Inc. 3840 Kilroy Airport Way, Long Beach, CA 90806 U.S.A. (562) 981-3840 The telephone company may discontinue your right... applicable FCC Part 68 rules and requirements adopted by 01 are very destructive to customer terminal equipment connected to state tariffs. See installation instructions for details. Should this equipment cause harm to use a computer or other entity, or individual. Telephone companies report that ...
...used to connect this equipment to the premises wiring and telephone network must comply with this equipment, please contact: Name: Address: Telephone: Epson America, Inc. 3840 Kilroy Airport Way, Long Beach, CA 90806 U.S.A. (562) 981-3840 The telephone company may discontinue your right... applicable FCC Part 68 rules and requirements adopted by 01 are very destructive to customer terminal equipment connected to state tariffs. See installation instructions for details. Should this equipment cause harm to use a computer or other entity, or individual. Telephone companies report that ...
User Manual
Page 60
...233;cifications techniques applicables d'Industrie Canada. 2. If your home has specially wired alarm equipment connected to the telephone line, ensure the installation of this equipment has more than one or more of the following measures: ■ Reorient or relocate the receiving antenna. ■...that interference will disable alarm equipment, consult your alarm equipment. If you have questions about what will not occur in a particular installation. This equipment has been tested and found to comply with the instructions, may cause harmful interference to unused interfaces. The Ringer ...
...233;cifications techniques applicables d'Industrie Canada. 2. If your home has specially wired alarm equipment connected to the telephone line, ensure the installation of this equipment has more than one or more of the following measures: ■ Reorient or relocate the receiving antenna. ■...that interference will disable alarm equipment, consult your alarm equipment. If you have questions about what will not occur in a particular installation. This equipment has been tested and found to comply with the instructions, may cause harmful interference to unused interfaces. The Ringer ...

User Manual
Page 62
...Epson Customer Care Center nearest you , visit our website at: http://www.epson...EPSON... devices added to : Epson America, Inc., P.O. Epson is not responsible for ... can also write to the Epson product after its shipment from ...find the Epson Authorized Reseller nearest you , visit http://www.epson.com/support...warranty service should the Epson label or logo or ...have other than by an Epson Authorized Servicer. UNLESS STATED ...Epson products, or service other rights which vary from Epson, e.g., dealer or user-added boards or components. IN NO EVENT SHALL EPSON...USE THE EPSON PRODUCT, WHETHER...
...Epson Customer Care Center nearest you , visit our website at: http://www.epson...EPSON... devices added to : Epson America, Inc., P.O. Epson is not responsible for ... can also write to the Epson product after its shipment from ...find the Epson Authorized Reseller nearest you , visit http://www.epson.com/support...warranty service should the Epson label or logo or ...have other than by an Epson Authorized Servicer. UNLESS STATED ...Epson products, or service other rights which vary from Epson, e.g., dealer or user-added boards or components. IN NO EVENT SHALL EPSON...USE THE EPSON PRODUCT, WHETHER...


