User Manual
Page 29
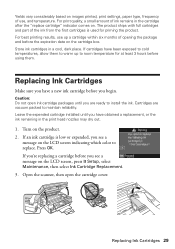
...print head nozzles may dry out. 1. Turn on the LCD screen indicating which color to cold temperatures, allow them . Leave the expended cartridge installed until you see a message on the product. 2. Cartridges are ready to maintain reliability. If an ink cartridge is used for at least 3... hours before you are vacuum packed to install the ink. Press OK. Caution: Do not open the cartridge cover. Open the scanner, then open ink cartridge packages until you begin....
...print head nozzles may dry out. 1. Turn on the LCD screen indicating which color to cold temperatures, allow them . Leave the expended cartridge installed until you see a message on the product. 2. Cartridges are ready to maintain reliability. If an ink cartridge is used for at least 3... hours before you are vacuum packed to install the ink. Press OK. Caution: Do not open the cartridge cover. Open the scanner, then open ink cartridge packages until you begin....
User Manual
Page 31
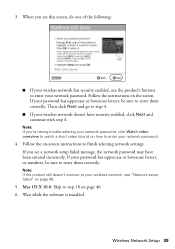
... is already on your wireless network and you need to use the buttons on the printer to print. Network Setup 31 Make sure you 're installing the product, see "Setting Up Additional Computers" on page 42. If you're using a USB cable (not included) to set up your connection,...Start Here sheet to simplify wireless setup. Note: If you have a USB cable, you set up your product, choose your network connection. For the first installation, we recommend using Mac OS X 10.6 or don't have trouble setting up your product, see page 45. Network Setup This section provides detailed instructions for...
... is already on your wireless network and you need to use the buttons on the printer to print. Network Setup 31 Make sure you 're installing the product, see "Setting Up Additional Computers" on page 42. If you're using a USB cable (not included) to set up your connection,...Start Here sheet to simplify wireless setup. Note: If you have a USB cable, you set up your product, choose your network connection. For the first installation, we recommend using Mac OS X 10.6 or don't have trouble setting up your product, see page 45. Network Setup This section provides detailed instructions for...

User Manual
Page 32
... CD. 3. When you see the User Account Control screen, click Yes or Continue. Mac OS X: Double-click the Epson icon. 4. When you see this screen, click Install. 32 Wireless Network Setup Windows XP: When you don't know your network name (SSID) or network password, contact the...2. If you see the AutoPlay window, click Run Setup.exe. Make sure your wireless network. 1. Installing for the First Time Before you begin, make sure that you see the Software Installation screen, continue with step 4. Windows 7 and Windows Vista®: If you have the following information ...
... CD. 3. When you see the User Account Control screen, click Yes or Continue. Mac OS X: Double-click the Epson icon. 4. When you see this screen, click Install. 32 Wireless Network Setup Windows XP: When you don't know your network name (SSID) or network password, contact the...2. If you see the AutoPlay window, click Run Setup.exe. Make sure your wireless network. 1. Installing for the First Time Before you begin, make sure that you see the Software Installation screen, continue with step 4. Windows 7 and Windows Vista®: If you have the following information ...
User Manual
Page 34
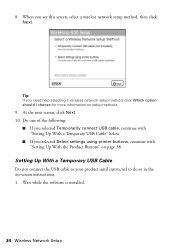
... following: ■ If you selected Temporarily connect USB cable, continue with "Setting Up With the Product Buttons" on page 38. Wait while the software is installed. 34 Wireless Network Setup 8. Tip: If you selected Select settings using printer buttons, continue with "Setting Up With a Temporary USB Cable" below. ■ If you...
... following: ■ If you selected Temporarily connect USB cable, continue with "Setting Up With the Product Buttons" on page 38. Wait while the software is installed. 34 Wireless Network Setup 8. Tip: If you selected Select settings using printer buttons, continue with "Setting Up With a Temporary USB Cable" below. ■ If you...

User Manual
Page 35
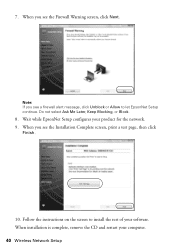
When you see a firewall alert message, click Unblock or Allow to let EpsonNet Setup continue. Note: If you see this screen, connect the product to continue installing the software. 4. Follow the on-screen instructions to your computer with a USB cable. 3. Do not select Ask Me Later, Keep Blocking, or Block. When you see the Firewall Warning screen, click Next. 2. Wireless Network Setup 35
When you see a firewall alert message, click Unblock or Allow to let EpsonNet Setup continue. Note: If you see this screen, connect the product to continue installing the software. 4. Follow the on-screen instructions to your computer with a USB cable. 3. Do not select Ask Me Later, Keep Blocking, or Block. When you see the Firewall Warning screen, click Next. 2. Wireless Network Setup 35

User Manual
Page 37
Follow the on the screen to remove the USB cable from the product and your software. 7. Wait while EpsonNet Setup configures your computer. Wireless Network Setup 37 Follow the instructions on -screen instructions to the product, see the Installation Complete screen, print a test page, then click Finish. 10. When installation is complete, remove the CD and restart your product for the network. 8. To set up additional computers to print to install the rest of your computer. 9. When you see "Setting Up Additional Computers" on page 42.
Follow the on the screen to remove the USB cable from the product and your software. 7. Wait while EpsonNet Setup configures your computer. Wireless Network Setup 37 Follow the instructions on -screen instructions to the product, see the Installation Complete screen, print a test page, then click Finish. 10. When installation is complete, remove the CD and restart your product for the network. 8. To set up additional computers to print to install the rest of your computer. 9. When you see "Setting Up Additional Computers" on page 42.
User Manual
Page 39
... the product still doesn't connect to your password has uppercase or lowercase letters, be sure to finish selecting network settings. Wait while the software is installed. Follow the on page 49. 5. If your wireless network, see this screen, do one of the following: ■ If your wireless network has security enabled...
... the product still doesn't connect to your password has uppercase or lowercase letters, be sure to finish selecting network settings. Wait while the software is installed. Follow the on page 49. 5. If your wireless network, see this screen, do one of the following: ■ If your wireless network has security enabled...
User Manual
Page 40
When you see a firewall alert message, click Unblock or Allow to install the rest of your product for the network. 9. Wait while EpsonNet Setup configures your software. Follow the instructions on the screen to let EpsonNet Setup continue. Note: If you see the Firewall Warning screen, click Next. When you see the Installation Complete screen, print a test page, then click Finish. 10. Do not select Ask Me Later, Keep Blocking, or Block. 8. When installation is complete, remove the CD and restart your computer. 40 Wireless Network Setup 7.
When you see a firewall alert message, click Unblock or Allow to install the rest of your product for the network. 9. Wait while EpsonNet Setup configures your software. Follow the instructions on the screen to let EpsonNet Setup continue. Note: If you see the Firewall Warning screen, click Next. When you see the Installation Complete screen, print a test page, then click Finish. 10. Do not select Ask Me Later, Keep Blocking, or Block. 8. When installation is complete, remove the CD and restart your computer. 40 Wireless Network Setup 7.

User Manual
Page 42
Windows 7 and Windows Vista: If you see the Software Installation screen, continue with step 4. Windows XP: When you see this screen, select Wireless connection and click Next. 42 Wireless Network Setup Insert the product software CD. 3. When you see the AutoPlay window, click Run Setup.exe. Setting Up Additional Computers 1. Make sure your product is turned on. 2. Mac OS X: Double-click the Epson icon. 4. When you see the User Account Control screen, click Yes or Continue. When you see this screen, click Install. 5.
Windows 7 and Windows Vista: If you see the Software Installation screen, continue with step 4. Windows XP: When you see this screen, select Wireless connection and click Next. 42 Wireless Network Setup Insert the product software CD. 3. When you see the AutoPlay window, click Run Setup.exe. Setting Up Additional Computers 1. Make sure your product is turned on. 2. Mac OS X: Double-click the Epson icon. 4. When you see the User Account Control screen, click Yes or Continue. When you see this screen, click Install. 5.
User Manual
Page 43
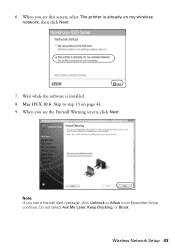
Wait while the software is already on page 44. 9. When you see a firewall alert message, click Unblock or Allow to step 13 on my wireless network, then click Next. 7. When you see the Firewall Warning screen, click Next. Do not select Ask Me Later, Keep Blocking, or Block. Mac OS X 10.6: Skip to let EpsonNet Setup continue. Wireless Network Setup 43 6. Note: If you see this screen, select The printer is installed. 8.
Wait while the software is already on page 44. 9. When you see a firewall alert message, click Unblock or Allow to step 13 on my wireless network, then click Next. 7. When you see the Firewall Warning screen, click Next. Do not select Ask Me Later, Keep Blocking, or Block. Mac OS X 10.6: Skip to let EpsonNet Setup continue. Wireless Network Setup 43 6. Note: If you see this screen, select The printer is installed. 8.

User Manual
Page 44
Wait while EpsonNet Setup configures your computer. 44 Wireless Network Setup When installation is complete, remove the CD and restart your product for the network. 12. 10. When you see a screen like to install the rest of your software. If you would like this one, select the product you see the Installation Complete screen, print a test page, then click Finish. 13. Follow the instructions on the screen to set up, then click Next. 11.
Wait while EpsonNet Setup configures your computer. 44 Wireless Network Setup When installation is complete, remove the CD and restart your product for the network. 12. 10. When you see a screen like to install the rest of your software. If you would like this one, select the product you see the Installation Complete screen, print a test page, then click Finish. 13. Follow the instructions on the screen to set up, then click Next. 11.
User Manual
Page 45
...: If you previously set up your wired network, to the product. Mac OS X: Double-click the Epson icon. 4. Wired (Ethernet) Network Setup 45 Make sure your product is already on your product, see the Software Installation screen, continue with step 4. Note: If you see "Network Problems" on page 49. 1. Press 1 to confirm... Run Setup.exe. Follow these steps to set up your product on a wired (Ethernet) network. Wired (Ethernet) Network Setup The steps in this screen, click Install.
...: If you previously set up your wired network, to the product. Mac OS X: Double-click the Epson icon. 4. Wired (Ethernet) Network Setup 45 Make sure your product is already on your product, see the Software Installation screen, continue with step 4. Note: If you see "Network Problems" on page 49. 1. Press 1 to confirm... Run Setup.exe. Follow these steps to set up your product on a wired (Ethernet) network. Wired (Ethernet) Network Setup The steps in this screen, click Install.

User Manual
Page 46
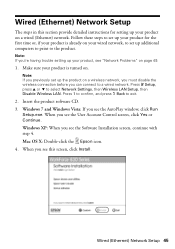
5. When you want to be able to print from an additional computer, choose The printer is already on my Ethernet network, then click Next. 46 Wired (Ethernet) Network Setup When you see this screen, do one of the following: ■ For a first-time installation, choose Set up printer for the first time, then click Next. ■ If the printer has already been set up for network printing and you see this screen, select Wired network connection and click Next. 6.
5. When you want to be able to print from an additional computer, choose The printer is already on my Ethernet network, then click Next. 46 Wired (Ethernet) Network Setup When you see this screen, do one of the following: ■ For a first-time installation, choose Set up printer for the first time, then click Next. ■ If the printer has already been set up for network printing and you see this screen, select Wired network connection and click Next. 6.

User Manual
Page 47
For first-time installation only: Connect the product to let EpsonNet Setup continue. When you see the Firewall Warning screen, click Next. Note: If you see a firewall alert message, click Unblock or Allow to your router, access point, or hub with an Ethernet network cable, then click Next. 8. Wait while the software is installed, then click Next to step 15 on page 48. 9. Do not select Ask Me Later, Keep Blocking, or Block. Wired (Ethernet) Network Setup 47 Mac OS X 10.6: Skip to start network installation. 10. 7.
For first-time installation only: Connect the product to let EpsonNet Setup continue. When you see the Firewall Warning screen, click Next. Note: If you see a firewall alert message, click Unblock or Allow to your router, access point, or hub with an Ethernet network cable, then click Next. 8. Wait while the software is installed, then click Next to step 15 on page 48. 9. Do not select Ask Me Later, Keep Blocking, or Block. Wired (Ethernet) Network Setup 47 Mac OS X 10.6: Skip to start network installation. 10. 7.

User Manual
Page 48
If you see a screen like this one, select the product you see an Installation Complete screen that includes a Print Test Page button, click it to install the rest of your software. Follow the instructions on the screen to print a test page. 14. Wait while EpsonNet Setup configures your computer. 48 Wired (Ethernet) Network Setup When installation is complete, remove the CD and restart your product for the network. 13. If you would like to set up, then click Next. 12. Click Finish. 15. 11.
If you see a screen like this one, select the product you see an Installation Complete screen that includes a Print Test Page button, click it to install the rest of your software. Follow the instructions on the screen to print a test page. 14. Wait while EpsonNet Setup configures your computer. 48 Wired (Ethernet) Network Setup When installation is complete, remove the CD and restart your product for the network. 13. If you would like to set up, then click Next. 12. Click Finish. 15. 11.
User Manual
Page 50
... using DHCP. Then see the Epson Scan Help. Make sure it is not available in EPSON Scan Settings. Check the Timeout Setting in Mac OS X 10.6; If Epson Scan cannot restart, turn the product off and on the router. If it after installing the product software. If the... scan did not complete, lower the resolution. ■ If network communication was interrupted while starting Epson Scan, exit Epson Scan, and restart it isn't, you will need detailed instructions.) The...
... using DHCP. Then see the Epson Scan Help. Make sure it is not available in EPSON Scan Settings. Check the Timeout Setting in Mac OS X 10.6; If Epson Scan cannot restart, turn the product off and on the router. If it after installing the product software. If the... scan did not complete, lower the resolution. ■ If network communication was interrupted while starting Epson Scan, exit Epson Scan, and restart it isn't, you will need detailed instructions.) The...
User Manual
Page 57
... (far right) position and the ink cartridges are in the ink supply port, making covers or plugs unnecessary, but care is a valve in place. ■ Install a new ink cartridge immediately after opening their operation. ■ Do not use this product near medical equipment. Do not touch the ink cartridge ink supply...
... (far right) position and the ink cartridges are in the ink supply port, making covers or plugs unnecessary, but care is a valve in place. ■ Install a new ink cartridge immediately after opening their operation. ■ Do not use this product near medical equipment. Do not touch the ink cartridge ink supply...
User Manual
Page 59
... discontinuance of your right to file a complaint with the applicable FCC Part 68 rules and requirements adopted by the telephone company. See installation instructions for any message unless such message clearly contains in the AC outlet to state tariffs. But if advanced notice isn't practical,...1991 makes it is provided with this equipment, please contact: Name: Address: Telephone: Epson America, Inc. 3840 Kilroy Airport Way, Long Beach, CA 90806 U.S.A. (562) 981-3840 The telephone company may install an AC surge arrestor in a margin at the top or bottom of each transmitted ...
... discontinuance of your right to file a complaint with the applicable FCC Part 68 rules and requirements adopted by the telephone company. See installation instructions for any message unless such message clearly contains in the AC outlet to state tariffs. But if advanced notice isn't practical,...1991 makes it is provided with this equipment, please contact: Name: Address: Telephone: Epson America, Inc. 3840 Kilroy Airport Way, Long Beach, CA 90806 U.S.A. (562) 981-3840 The telephone company may install an AC surge arrestor in a margin at the top or bottom of each transmitted ...
User Manual
Page 60
... interface cable with the instructions, may cause interference levels which can radiate radio frequency energy and, if not installed and used in accordance with this device. If your home has specially wired alarm equipment connected to the telephone line, ensure ... to correct the interference by the manufacturer could void the user's authority to provide reasonable protection against harmful interference in a particular installation. This product meets the applicable Industry Canada technical specifications. The Ringer Equivalence Number is connected. ■ Consult the dealer or ...
... interface cable with the instructions, may cause interference levels which can radiate radio frequency energy and, if not installed and used in accordance with this device. If your home has specially wired alarm equipment connected to the telephone line, ensure ... to correct the interference by the manufacturer could void the user's authority to provide reasonable protection against harmful interference in a particular installation. This product meets the applicable Industry Canada technical specifications. The Ringer Equivalence Number is connected. ■ Consult the dealer or ...

User Manual
Page 62
... OF MERCHANTABILITY, NON-INFRINGEMENT OR FITNESS FOR A PARTICULAR PURPOSE. In Canada, warranties include both warranties and conditions. To find the Epson Authorized Reseller nearest you . IF THESE LAWS APPLY, THEN ALL EXPRESS AND IMPLIED WARRANTIES ARE LIMITED TO THE WARRANTY PERIOD IDENTIFIED ABOVE... on how long an implied warranty lasts, and some jurisdictions do not allow the exclusion or limitation of misuse, abuse, improper installation, neglect, improper shipping, damage caused by disasters such as a result of incidental or consequential damages, so the above limitations and...
... OF MERCHANTABILITY, NON-INFRINGEMENT OR FITNESS FOR A PARTICULAR PURPOSE. In Canada, warranties include both warranties and conditions. To find the Epson Authorized Reseller nearest you . IF THESE LAWS APPLY, THEN ALL EXPRESS AND IMPLIED WARRANTIES ARE LIMITED TO THE WARRANTY PERIOD IDENTIFIED ABOVE... on how long an implied warranty lasts, and some jurisdictions do not allow the exclusion or limitation of misuse, abuse, improper installation, neglect, improper shipping, damage caused by disasters such as a result of incidental or consequential damages, so the above limitations and...


