

Quick Guide
Page 3
Maintaining Your All-in-One 36 Checking the Print Head Nozzles 36 Cleaning the Print Head 37 Checking the Ink Cartridge Status 38 Purchasing Epson Ink Cartridges 39 Replacing Ink Cartridges 40 Solving Problems 42 Checking for Software Updates 42 Problems and Solutions 42 Where To Get Help 46 Notices 47 Contents 3
Maintaining Your All-in-One 36 Checking the Print Head Nozzles 36 Cleaning the Print Head 37 Checking the Ink Cartridge Status 38 Purchasing Epson Ink Cartridges 39 Replacing Ink Cartridges 40 Solving Problems 42 Checking for Software Updates 42 Problems and Solutions 42 Where To Get Help 46 Notices 47 Contents 3
Quick Guide
Page 36
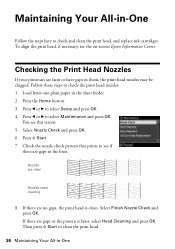
... see this screen: 5. You see the on-screen Epson Information Center. Check the nozzle check pattern that prints to see if there are gaps in the sheet feeder. 2. If there are no gaps, the print head is faint, select Head Cleaning and press OK. Load letter-size plain paper in the... Press l or r to check and clean the print head, and replace ink cartridges. Press x Start. 7. Select Finish Nozzle Check and press OK. Select Nozzle Check and press OK. 6. Then press x Start to clean the print head. 36 Maintaining Your All-in -One Follow the steps here to select Maintenance and...
... see this screen: 5. You see the on-screen Epson Information Center. Check the nozzle check pattern that prints to see if there are gaps in the sheet feeder. 2. If there are no gaps, the print head is faint, select Head Cleaning and press OK. Load letter-size plain paper in the... Press l or r to check and clean the print head, and replace ink cartridges. Press x Start. 7. Select Finish Nozzle Check and press OK. Select Nozzle Check and press OK. 6. Then press x Start to clean the print head. 36 Maintaining Your All-in -One Follow the steps here to select Maintenance and...
Quick Guide
Page 37
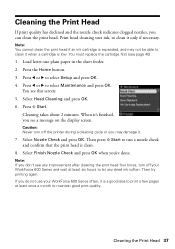
Press l or r to select Setup and press OK. 4. Cleaning takes about 2 minutes. Caution: Never turn off the printer during a cleaning cycle or you don't see a message on the display screen. Press the Home button. 3. Cleaning the Print Head 37 You must replace the cartridge first (see this screen: 5....six hours to let any improvement after cleaning the print head four times, turn off your WorkForce 600 Series often, it is a good idea to print a few pages at least once a month to maintain good print quality. If you can clean the print head. Press l or r to select ...
Press l or r to select Setup and press OK. 4. Cleaning takes about 2 minutes. Caution: Never turn off the printer during a cleaning cycle or you don't see a message on the display screen. Press the Home button. 3. Cleaning the Print Head 37 You must replace the cartridge first (see this screen: 5....six hours to let any improvement after cleaning the print head four times, turn off your WorkForce 600 Series often, it is a good idea to print a few pages at least once a month to maintain good print quality. If you can clean the print head. Press l or r to select ...
Quick Guide
Page 45
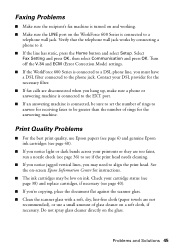
... if the print head needs cleaning. ■ If you notice jagged vertical lines, you must have a DSL filter connected to the phone jack. Print Quality Problems ■ For the best print quality, use a small amount of rings for the answering machine. See the on-screen Epson Information Center for... may need to the EXT. Turn off the V.34 and ECM (Error Correction Mode) settings. ■ If the WorkForce 600 Series is connected to align the print head. Select Fax Setting and press OK, then select Communication and press OK. Verify that the telephone wall jack works by connecting...
... if the print head needs cleaning. ■ If you notice jagged vertical lines, you must have a DSL filter connected to the phone jack. Print Quality Problems ■ For the best print quality, use a small amount of rings for the answering machine. See the on-screen Epson Information Center for... may need to the EXT. Turn off the V.34 and ECM (Error Correction Mode) settings. ■ If the WorkForce 600 Series is connected to align the print head. Select Fax Setting and press OK, then select Communication and press OK. Verify that the telephone wall jack works by connecting...


