User Manual
Page 2
... Machine 15 Setting Up Fax Features 16 Sending a Fax From the Control Panel 18 Receiving Faxes 19 Scanning a Document or Photo 20 Scanning With Epson Scan Software 20 Scanning With Mac OS X 10.6 21 Maintaining Your Product 22 Checking the Print Head Nozzles 22 Cleaning the Print Head 23 Checking Ink Levels...
... Machine 15 Setting Up Fax Features 16 Sending a Fax From the Control Panel 18 Receiving Faxes 19 Scanning a Document or Photo 20 Scanning With Epson Scan Software 20 Scanning With Mac OS X 10.6 21 Maintaining Your Product 22 Checking the Print Head Nozzles 22 Cleaning the Print Head 23 Checking Ink Levels...

User Manual
Page 3
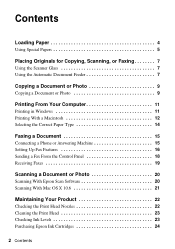
Replacing Ink Cartridges 25 Wireless Network Setup 27 Installing for the First Time 28 Setting Up Additional Computers 37 Solving Problems 41 Checking for Software Updates 41 Error Indicators 41 Problems and Solutions 42 Where to Get Help 46 Notices 47 Contents 3
Replacing Ink Cartridges 25 Wireless Network Setup 27 Installing for the First Time 28 Setting Up Additional Computers 37 Solving Problems 41 Checking for Software Updates 41 Error Indicators 41 Problems and Solutions 42 Where to Get Help 46 Notices 47 Contents 3
User Manual
Page 11
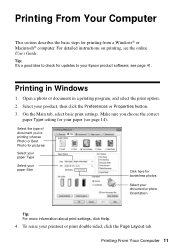
..., click Help. 4. On the Main tab, select basic print settings. Printing From Your Computer This section describes the basic steps for borderless photos Select your Epson product software; Tip: It's a good idea to check for your product, then click the Preferences or Properties button. 3. Printing From Your Computer 11 Make sure you...
..., click Help. 4. On the Main tab, select basic print settings. Printing From Your Computer This section describes the basic steps for borderless photos Select your Epson product software; Tip: It's a good idea to check for your product, then click the Preferences or Properties button. 3. Printing From Your Computer 11 Make sure you...
User Manual
Page 14
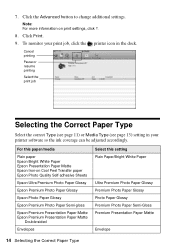
...your printer software so the ink coverage can be adjusted accordingly. 7. Note: For more information on Cool Peel Transfer paper Epson Photo Quality Self-adhesive Sheets Epson Ultra Premium Photo Paper Glossy Epson Premium Photo Paper Glossy Epson Photo Paper Glossy Epson Premium Photo Paper Semi-gloss Epson Premium Presentation Paper Matte Epson Premium ... Photo Paper Semi-Gloss Premium Presentation Paper Matte Envelope 14 Selecting the Correct Paper Type For this paper/media Plain paper Epson Bright White Paper Epson Presentation Paper Matte Epson Iron-on print settings, click ?. 8.
...your printer software so the ink coverage can be adjusted accordingly. 7. Note: For more information on Cool Peel Transfer paper Epson Photo Quality Self-adhesive Sheets Epson Ultra Premium Photo Paper Glossy Epson Premium Photo Paper Glossy Epson Photo Paper Glossy Epson Premium Photo Paper Semi-gloss Epson Premium Presentation Paper Matte Epson Premium ... Photo Paper Semi-Gloss Premium Presentation Paper Matte Envelope 14 Selecting the Correct Paper Type For this paper/media Plain paper Epson Bright White Paper Epson Presentation Paper Matte Epson Iron-on print settings, click ?. 8.
User Manual
Page 20
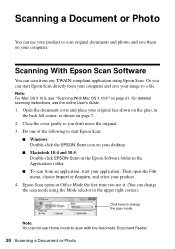
... original face-down on the glass, in the back left corner, as shown on your desktop. ■ Macintosh 10.4 and 10.5: Double-click EPSON Scan in the Epson Software folder in the Applications folder. ■ To scan from any TWAIN-compliant application using the Mode selector in Office Mode the first time you... use it. (You can scan from an application, start Epson Scan directly from your computer and save them on page 21. Scanning With Epson Scan Software You can change the scan mode using...
... original face-down on the glass, in the back left corner, as shown on your desktop. ■ Macintosh 10.4 and 10.5: Double-click EPSON Scan in the Epson Software folder in the Applications folder. ■ To scan from any TWAIN-compliant application using the Mode selector in Office Mode the first time you... use it. (You can scan from an application, start Epson Scan directly from your computer and save them on page 21. Scanning With Epson Scan Software You can change the scan mode using...
User Manual
Page 23
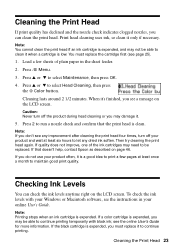
... to maintain good print quality. Note: If you don't see any improvement after cleaning the print head four times, turn off your Windows or Macintosh software, see a message on page 46. If a color cartridge is expended, you see the instructions in the sheet feeder. 2. Cleaning the Print Head 23..., then press OK. 4. You must replace it only if necessary. Press u or d to run a nozzle check and confirm that doesn't help, contact Epson as described on the LCD screen. Note: Printing stops when an ink cartridge is expended, you can check the ink levels anytime right on the...
... to maintain good print quality. Note: If you don't see any improvement after cleaning the print head four times, turn off your Windows or Macintosh software, see a message on page 46. If a color cartridge is expended, you see the instructions in the sheet feeder. 2. Cleaning the Print Head 23..., then press OK. 4. You must replace it only if necessary. Press u or d to run a nozzle check and confirm that doesn't help, contact Epson as described on the LCD screen. Note: Printing stops when an ink cartridge is expended, you can check the ink levels anytime right on the...
User Manual
Page 27
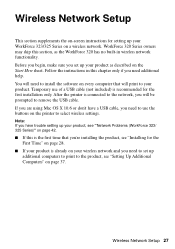
... Setup 27 Follow the instructions in wireless network functionality. Wireless Network Setup This section supplements the on-screen instructions for setting up your WorkForce 323/325 Series on the Start Here sheet. You will need to install the software on your wireless network and you need to set up your product as the...
... Setup 27 Follow the instructions in wireless network functionality. Wireless Network Setup This section supplements the on-screen instructions for setting up your WorkForce 323/325 Series on the Start Here sheet. You will need to install the software on your wireless network and you need to set up your product as the...
User Manual
Page 28
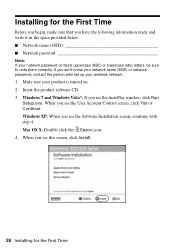
.... 3. Windows 7 and Windows Vista®: If you see the AutoPlay window, click Run Setup.exe. Windows XP: When you see the Software Installation screen, continue with step 4. Installing for the First Time If you have the following information ready and write it in the space provided below...Note: If your product is turned on. 2. When you see the User Account Control screen, click Yes or Continue. Mac OS X: Double-click the Epson icon. 4. When you see this screen, click Install. 28 Installing for the First Time Before you begin, make sure that you don't know your network...
.... 3. Windows 7 and Windows Vista®: If you see the AutoPlay window, click Run Setup.exe. Windows XP: When you see the Software Installation screen, continue with step 4. Installing for the First Time If you have the following information ready and write it in the space provided below...Note: If your product is turned on. 2. When you see the User Account Control screen, click Yes or Continue. Mac OS X: Double-click the Epson icon. 4. When you see this screen, click Install. 28 Installing for the First Time Before you begin, make sure that you don't know your network...
User Manual
Page 30
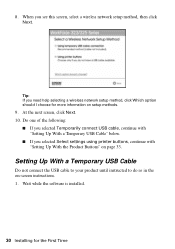
... a Temporary USB Cable Do not connect the USB cable to your product until instructed to do so in the on-screen instructions. 1. 8. Wait while the software is installed. 30 Installing for more information on page 33. When you need help selecting a wireless network setup method, click Which option should I choose for...
... a Temporary USB Cable Do not connect the USB cable to your product until instructed to do so in the on-screen instructions. 1. 8. Wait while the software is installed. 30 Installing for more information on page 33. When you need help selecting a wireless network setup method, click Which option should I choose for...
User Manual
Page 31
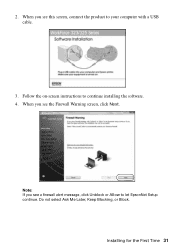
Note: If you see this screen, connect the product to your computer with a USB cable. 3. Do not select Ask Me Later, Keep Blocking, or Block. When you see the Firewall Warning screen, click Next. 2. When you see a firewall alert message, click Unblock or Allow to continue installing the software. 4. Installing for the First Time 31 Follow the on-screen instructions to let EpsonNet Setup continue.
Note: If you see this screen, connect the product to your computer with a USB cable. 3. Do not select Ask Me Later, Keep Blocking, or Block. When you see the Firewall Warning screen, click Next. 2. When you see a firewall alert message, click Unblock or Allow to continue installing the software. 4. Installing for the First Time 31 Follow the on-screen instructions to let EpsonNet Setup continue.

User Manual
Page 33
... Computers" on your wireless network, follow these steps to set up using the product buttons: 1. When installation is complete, remove the CD and restart your software. Installing for the network. 8. Wait while EpsonNet Setup configures your computer. 9. When you did not connect a USB cable to set up the product on page...
... Computers" on your wireless network, follow these steps to set up using the product buttons: 1. When installation is complete, remove the CD and restart your software. Installing for the network. 8. Wait while EpsonNet Setup configures your computer. 9. When you did not connect a USB cable to set up the product on page...

User Manual
Page 35
... password. 4. When you 're having trouble entering your network password, click Watch video overview to watch a short video tutorial on page 42. 5. Wait while the software is installed. 7. If you see a network setup failed message, the network password may have security enabled, click Next and continue with step 4. Note: If you...
... password. 4. When you 're having trouble entering your network password, click Watch video overview to watch a short video tutorial on page 42. 5. Wait while the software is installed. 7. If you see a network setup failed message, the network password may have security enabled, click Next and continue with step 4. Note: If you...
User Manual
Page 36
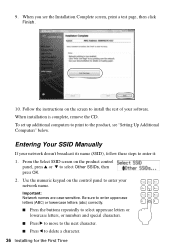
... your network doesn't broadcast its name (SSID), follow these steps to delete a character. 36 Installing for the First Time Entering Your SSID Manually If your software.
... your network doesn't broadcast its name (SSID), follow these steps to delete a character. 36 Installing for the First Time Entering Your SSID Manually If your software.
User Manual
Page 37
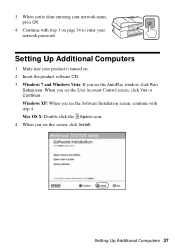
... Yes or Continue. When you see this screen, click Install. Continue with step 4. Setting Up Additional Computers 1. Insert the product software CD. 3. Setting Up Additional Computers 37 Mac OS X: Double-click the Epson icon. 4. 3. Windows XP: When you 're done entering your network password. When you see the AutoPlay window, click Run...
... Yes or Continue. When you see this screen, click Install. Continue with step 4. Setting Up Additional Computers 1. Insert the product software CD. 3. Setting Up Additional Computers 37 Mac OS X: Double-click the Epson icon. 4. 3. Windows XP: When you 're done entering your network password. When you see the AutoPlay window, click Run...
User Manual
Page 38
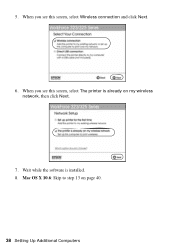
When you see this screen, select Wireless connection and click Next. 6. Mac OS X 10.6: Skip to step 13 on my wireless network, then click Next. 7. 5. When you see this screen, select The printer is installed. 8. Wait while the software is already on page 40. 38 Setting Up Additional Computers
When you see this screen, select Wireless connection and click Next. 6. Mac OS X 10.6: Skip to step 13 on my wireless network, then click Next. 7. 5. When you see this screen, select The printer is installed. 8. Wait while the software is already on page 40. 38 Setting Up Additional Computers

User Manual
Page 40
When installation is complete, remove the CD. 40 Setting Up Additional Computers Follow the instructions on the screen to install the rest of your software. When you see the Installation Complete screen, print a test page, then click Finish. 13. 12.
When installation is complete, remove the CD. 40 Setting Up Additional Computers Follow the instructions on the screen to install the rest of your software. When you see the Installation Complete screen, print a test page, then click Finish. 13. 12.
User Manual
Page 41
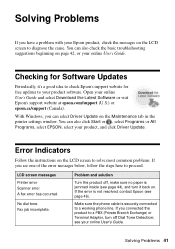
...see one of the error messages below, follow the steps here to diagnose the cause. Solving Problems If you have a problem with your Epson product, check the messages on . You can also check the basic troubleshooting suggestions beginning on page 42, or your online User's Guide....product, and click Driver Update. Make sure the phone cable is not resolved, contact Epson (see your online User's Guide and select Download the Latest Software or visit Epson's support website at epson.com/support (U.S.) or epson.ca/support (Canada). No dial tone. You can also click Start or , ...
...see one of the error messages below, follow the steps here to diagnose the cause. Solving Problems If you have a problem with your Epson product, check the messages on . You can also check the basic troubleshooting suggestions beginning on page 42, or your online User's Guide....product, and click Driver Update. Make sure the phone cable is not resolved, contact Epson (see your online User's Guide and select Download the Latest Software or visit Epson's support website at epson.com/support (U.S.) or epson.ca/support (Canada). No dial tone. You can also click Start or , ...

User Manual
Page 42
...incorrectly. LCD screen messages The product's ink pads are nearing or at the end of your Epson product. Then see your router or access point's documentation for instructions. ■ If your ... access point doesn't broadcast its network name (SSID), see page 43) to reinstall the product software. 42 Problems and Solutions Network setup was unable to replace ink pads and continue printing. Then... life. Problem and solution When the ink pads are set on . Network Problems (WorkForce 323/325 Series) The product cannot find my product on the network Make sure the product is...
...incorrectly. LCD screen messages The product's ink pads are nearing or at the end of your Epson product. Then see your router or access point's documentation for instructions. ■ If your ... access point doesn't broadcast its network name (SSID), see page 43) to reinstall the product software. 42 Problems and Solutions Network setup was unable to replace ink pads and continue printing. Then... life. Problem and solution When the ink pads are set on . Network Problems (WorkForce 323/325 Series) The product cannot find my product on the network Make sure the product is...
User Manual
Page 44
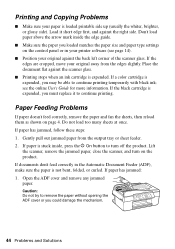
... doesn't feed correctly, remove the paper and fan the sheets, then reload them as shown on page 4. If documents don't feed correctly in your printer software (see the online User's Guide for more information. Gently pull out jammed paper from the edges slightly. Printing and Copying Problems ■ Make sure your...
... doesn't feed correctly, remove the paper and fan the sheets, then reload them as shown on page 4. If documents don't feed correctly in your printer software (see the online User's Guide for more information. Gently pull out jammed paper from the edges slightly. Printing and Copying Problems ■ Make sure your...
User Manual
Page 46
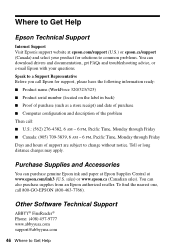
...common problems. You can download drivers and documentation, get FAQs and troubleshooting advice, or e-mail Epson with your product for support, please have the following information ready: ■ Product name (WorkForce 320/323/325) ■ Product serial number (located on the label in back) ■ Proof of... 709-3839, 6 AM - 6 PM, Pacific Time, Monday through Friday Days and hours of the problem Then call 800-GO-EPSON (800-463-7766). Other Software Technical Support ABBYY® FineReader® Phone: (408) 457-9777 www.abbyyusa.com [email protected] 46 Where to change without ...
...common problems. You can download drivers and documentation, get FAQs and troubleshooting advice, or e-mail Epson with your product for support, please have the following information ready: ■ Product name (WorkForce 320/323/325) ■ Product serial number (located on the label in back) ■ Proof of... 709-3839, 6 AM - 6 PM, Pacific Time, Monday through Friday Days and hours of the problem Then call 800-GO-EPSON (800-463-7766). Other Software Technical Support ABBYY® FineReader® Phone: (408) 457-9777 www.abbyyusa.com [email protected] 46 Where to change without ...


