
Product Brochure
Page 1
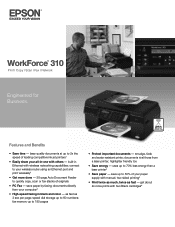
...one with manual, two-sided printing5 • Print twice as much, twice as 3 sec per page; as fast as fast - documents rival those from your paper supply with others - highlighter friendly too • Save energy - save paper by faxing documents directly from a laser printer; WorkForce® 310 Print...printers1 • Easily share your wireless router using an Ethernet port and print wirelessly2 • Get more prints with wireless networking capabilities; smudge, fade and water resistant prints; save up to quickly copy, scan or fax stacks of your ...
...one with manual, two-sided printing5 • Print twice as much, twice as 3 sec per page; as fast as fast - documents rival those from your paper supply with others - highlighter friendly too • Save energy - save paper by faxing documents directly from a laser printer; WorkForce® 310 Print...printers1 • Easily share your wireless router using an Ethernet port and print wirelessly2 • Get more prints with wireless networking capabilities; smudge, fade and water resistant prints; save up to quickly copy, scan or fax stacks of your ...
Product Brochure
Page 2
... cartridge" signal. For maximum print life, display all -in these marks. Part of prints on continuous printing of a suite of their respective companies. Copyright 2009 Epson America, Inc. and Canada WorkForce 310 all rights in -ones priced at www.epson.com/recycle Epson America, Inc. 3840 Kilroy Airport...®. 6 Two Black cartridges allow about yields for this printer, see www.epson.com/cartridgeinfo 9 See our website for convenient and reasonable recycling options at $179 or less as of prints. Epson does not guarantee the longevity of January 1, 2009. Actual yields...
... cartridge" signal. For maximum print life, display all -in these marks. Part of prints on continuous printing of a suite of their respective companies. Copyright 2009 Epson America, Inc. and Canada WorkForce 310 all rights in -ones priced at www.epson.com/recycle Epson America, Inc. 3840 Kilroy Airport...®. 6 Two Black cartridges allow about yields for this printer, see www.epson.com/cartridgeinfo 9 See our website for convenient and reasonable recycling options at $179 or less as of prints. Epson does not guarantee the longevity of January 1, 2009. Actual yields...
Quick Guide
Page 1
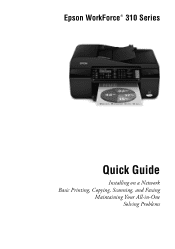
Epson WorkForce® 310 Series Quick Guide Installing on a Network Basic Printing, Copying, Scanning, and Faxing Maintaining Your All-in-One Solving Problems
Epson WorkForce® 310 Series Quick Guide Installing on a Network Basic Printing, Copying, Scanning, and Faxing Maintaining Your All-in-One Solving Problems
Quick Guide
Page 2
Contents Introduction 4 Installing Your WorkForce 310 Series on a Network 5 Connect an Ethernet Network Cable 5 Install Software 6 Loading Paper 14 Using Special Papers 15 Placing Originals for Copying, Scanning, or Faxing 17 ... a Phone or Answering Machine 22 Setting Up Fax Features 24 Sending a Fax From the Control Panel 28 Sending a Fax From Windows 29 Receiving Faxes 31 Printing From Your Computer 32 Printing in Windows 32 Printing With a Macintosh 34 Selecting the Correct Paper Type 38 2 Contents
Contents Introduction 4 Installing Your WorkForce 310 Series on a Network 5 Connect an Ethernet Network Cable 5 Install Software 6 Loading Paper 14 Using Special Papers 15 Placing Originals for Copying, Scanning, or Faxing 17 ... a Phone or Answering Machine 22 Setting Up Fax Features 24 Sending a Fax From the Control Panel 28 Sending a Fax From Windows 29 Receiving Faxes 31 Printing From Your Computer 32 Printing in Windows 32 Printing With a Macintosh 34 Selecting the Correct Paper Type 38 2 Contents
Quick Guide
Page 3
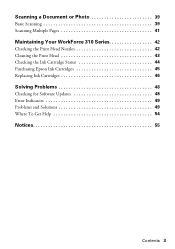
Scanning a Document or Photo 39 Basic Scanning 39 Scanning Multiple Pages 41 Maintaining Your WorkForce 310 Series 42 Checking the Print Head Nozzles 42 Cleaning the Print Head 43 Checking the Ink Cartridge Status 44 Purchasing Epson Ink Cartridges 45 Replacing Ink Cartridges 46 Solving Problems 48 Checking for Software Updates 48 Error Indicators 49 Problems and Solutions 49 Where To Get Help 54 Notices 55 Contents 3
Scanning a Document or Photo 39 Basic Scanning 39 Scanning Multiple Pages 41 Maintaining Your WorkForce 310 Series 42 Checking the Print Head Nozzles 42 Cleaning the Print Head 43 Checking the Ink Cartridge Status 44 Purchasing Epson Ink Cartridges 45 Replacing Ink Cartridges 46 Solving Problems 48 Checking for Software Updates 48 Error Indicators 49 Problems and Solutions 49 Where To Get Help 54 Notices 55 Contents 3
Quick Guide
Page 4
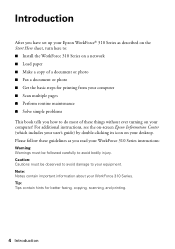
...; Get the basic steps for better faxing, copying, scanning, and printing. 4 Introduction Introduction After you have set up your Epson WorkForce® 310 Series as described on the Start Here sheet, turn here to: ■ Install the WorkForce 310 Series on a network ■ Load paper ■ Make a copy... of these guidelines as you read your WorkForce 310 Series instructions: Warning: Warnings ...
...; Get the basic steps for better faxing, copying, scanning, and printing. 4 Introduction Introduction After you have set up your Epson WorkForce® 310 Series as described on the Start Here sheet, turn here to: ■ Install the WorkForce 310 Series on a network ■ Load paper ■ Make a copy... of these guidelines as you read your WorkForce 310 Series instructions: Warning: Warnings ...
Quick Guide
Page 5
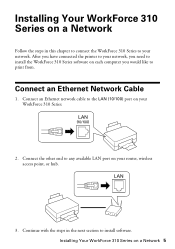
...print from. Installing Your WorkForce 310 Series on a Network 5 After you have connected the printer to your network, you need to install the WorkForce 310 Series software on each computer you would like to any available LAN port on your router, wireless access point, or hub. 3. Installing Your WorkForce 310... Series on a Network Follow the steps in the next section to install software. Connect an Ethernet network cable to your WorkForce 310 Series. 2. Connect an Ethernet Network Cable 1. Continue with the...
...print from. Installing Your WorkForce 310 Series on a Network 5 After you have connected the printer to your network, you need to install the WorkForce 310 Series software on each computer you would like to any available LAN port on your router, wireless access point, or hub. 3. Installing Your WorkForce 310... Series on a Network Follow the steps in the next section to install software. Connect an Ethernet network cable to your WorkForce 310 Series. 2. Connect an Ethernet Network Cable 1. Continue with the...
Quick Guide
Page 10
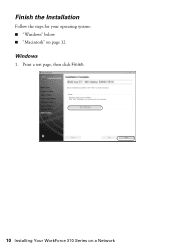
Print a test page, then click Finish. 10 Installing Your WorkForce 310 Series on page 12 Windows 1. Finish the Installation Follow the steps for your operating system: ■ "Windows" below ■ "Macintosh" on a Network
Print a test page, then click Finish. 10 Installing Your WorkForce 310 Series on page 12 Windows 1. Finish the Installation Follow the steps for your operating system: ■ "Windows" below ■ "Macintosh" on a Network

Quick Guide
Page 11
Install Software 11 2. See your computer. When installation is complete, restart your printed documentation and on-screen Epson Information Center for details. You're ready to install bonus software and finish the installation. 5. Do one of the following: ■ To set up your Fax Header information, select Yes, click Next, then continue with step... to set up your Fax Header information later, select No, click Next, then continue with step 4. 3. Follow the prompts on the screen to scan and print.
Install Software 11 2. See your computer. When installation is complete, restart your printed documentation and on-screen Epson Information Center for details. You're ready to install bonus software and finish the installation. 5. Do one of the following: ■ To set up your Fax Header information, select Yes, click Next, then continue with step... to set up your Fax Header information later, select No, click Next, then continue with step 4. 3. Follow the prompts on the screen to scan and print.

Quick Guide
Page 13
When installation is complete, restart your printed documentation and on the screen to scan and print. You're ready to print a test page, install bonus software, and finish the installation. 5. Install Software 13 See your computer. Follow the prompts on -screen Epson Information Center for details. 4.
When installation is complete, restart your printed documentation and on the screen to scan and print. You're ready to print a test page, install bonus software, and finish the installation. 5. Install Software 13 See your computer. Follow the prompts on -screen Epson Information Center for details. 4.
Quick Guide
Page 14
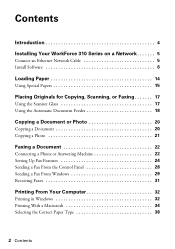
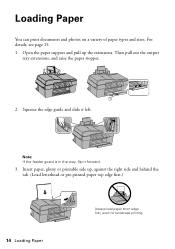
Then pull out the output tray extensions, and raise the paper stopper. 2. Note: If the feeder guard is in the way, flip it left. Insert paper, glossy or printable side up the extensions. Loading Paper You can print documents and photos on a variety of paper types and sizes. Squeeze the edge guide and slide it forward. 3. Open the paper support and pull up , against the right side and behind the tab. (Load letterhead or pre-printed paper top edge first.) FPO 14 Loading Paper Always load paper short edge first, even for landscape printing. For details, see page 15. 1.
Then pull out the output tray extensions, and raise the paper stopper. 2. Note: If the feeder guard is in the way, flip it left. Insert paper, glossy or printable side up the extensions. Loading Paper You can print documents and photos on a variety of paper types and sizes. Squeeze the edge guide and slide it forward. 3. Open the paper support and pull up , against the right side and behind the tab. (Load letterhead or pre-printed paper top edge first.) FPO 14 Loading Paper Always load paper short edge first, even for landscape printing. For details, see page 15. 1.
Quick Guide
Page 15
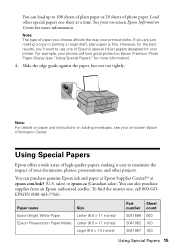
...details on paper and instructions on -screen Epson Information Center. sales) or epson.ca (Canadian sales). To find the nearest one of high quality papers, making a copy or printing a rough draft, plain paper is fine. See your printer. For example, your documents, photos, ...presentations, and other special papers one sheet at epson.com/ink3 (U.S. Using Special Papers Epson offers a wide array of Epson's special ink jet papers designed for your on Epson ...
...details on paper and instructions on -screen Epson Information Center. sales) or epson.ca (Canadian sales). To find the nearest one of high quality papers, making a copy or printing a rough draft, plain paper is fine. See your printer. For example, your documents, photos, ...presentations, and other special papers one sheet at epson.com/ink3 (U.S. Using Special Papers Epson offers a wide array of Epson's special ink jet papers designed for your on Epson ...

Quick Guide
Page 19
Using the Automatic Document Feeder 19 To copy a legal-size document on letter-size paper, press x Menu, select Reduce/Enlarge, then press OK. 5. Note: When you copy a legal-size document, the image will be cut off. Slide the edge guide against the originals, but not too tightly. If you use the Copy function, letter-size paper is automatically selected for your printed copies. Press u or d to select Legal->Letter, then press OK.
Using the Automatic Document Feeder 19 To copy a legal-size document on letter-size paper, press x Menu, select Reduce/Enlarge, then press OK. 5. Note: When you copy a legal-size document, the image will be cut off. Slide the edge guide against the originals, but not too tightly. If you use the Copy function, letter-size paper is automatically selected for your printed copies. Press u or d to select Legal->Letter, then press OK.
Quick Guide
Page 20
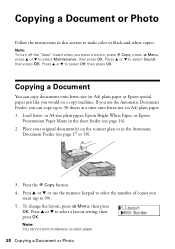
..., you want (up to 30 sheets at a time onto letter-size (or A4) plain paper. 1. Press the r Copy button. 4. Note: You cannot print borderless on a copy machine. If you use the numeric keypad to select the number of copies you can copy documents onto letter-size (or A4... a button, press r Copy, press x Menu, press u or d to select Sound, then press OK. Load letter- or A4-size plain paper, Epson Bright White Paper, or Epson Presentation Paper Matte in the Automatic Document Feeder (see page 14). 2. Press u or d to select a layout setting, then press OK. Place your original...
..., you want (up to 30 sheets at a time onto letter-size (or A4) plain paper. 1. Press the r Copy button. 4. Note: You cannot print borderless on a copy machine. If you use the numeric keypad to select the number of copies you can copy documents onto letter-size (or A4... a button, press r Copy, press x Menu, press u or d to select Sound, then press OK. Load letter- or A4-size plain paper, Epson Bright White Paper, or Epson Presentation Paper Matte in the Automatic Document Feeder (see page 14). 2. Press u or d to select a layout setting, then press OK. Place your original...
Quick Guide
Page 21
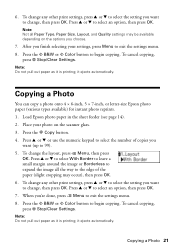
... options you want (up to begin copying. Press the x B&W or x Color button to 99). 5. To cancel copying, press y Stop/Clear Settings. Load Epson photo paper in the sheet feeder (see page 14). 2. Press u or d to select an option, then press OK. 6. Press u or d to select... paper as it is printing; To change any other print settings, press u or d to select the setting you want to select the setting you choose. 7. it ejects automatically. Copying a Photo You can copy a photo onto 4 × 6-inch, 5 × 7-inch, or letter-size Epson photo paper (various types...
... options you want (up to begin copying. Press the x B&W or x Color button to 99). 5. To cancel copying, press y Stop/Clear Settings. Load Epson photo paper in the sheet feeder (see page 14). 2. Press u or d to select an option, then press OK. 6. Press u or d to select... paper as it is printing; To change any other print settings, press u or d to select the setting you want to select the setting you choose. 7. it ejects automatically. Copying a Photo You can copy a photo onto 4 × 6-inch, 5 × 7-inch, or letter-size Epson photo paper (various types...

Quick Guide
Page 24
...settings, print fax reports, or set up to 40 digits. 6. Press u or d to select Fax Header, then press OK. 5. Note: To change other header information (see the on-screen Epson Information Center. Entering Your Sender Name 1. When you leave the WorkForce 310 Series unplugged... for instructions on -screen Epson Information Center for a long period of the fax. Press the K Fax button, then press...
...settings, print fax reports, or set up to 40 digits. 6. Press u or d to select Fax Header, then press OK. 5. Note: To change other header information (see the on-screen Epson Information Center. Entering Your Sender Name 1. When you leave the WorkForce 310 Series unplugged... for instructions on -screen Epson Information Center for a long period of the fax. Press the K Fax button, then press...
Quick Guide
Page 26
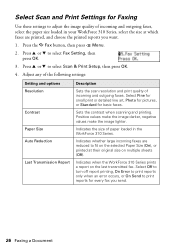
... their original size on the last transmitted fax. Press u or d to select Scan & Print Setup, then press OK. 4. Indicates when the WorkForce 310 Series prints a report on multiple sheets (Off). Sets the contrast when scanning and printing. Indicates whether large incoming faxes are printed, and choose the printed reports you send. 26 Faxing a Document Select Scan and...
... their original size on the last transmitted fax. Press u or d to select Scan & Print Setup, then press OK. 4. Indicates when the WorkForce 310 Series prints a report on multiple sheets (Off). Sets the contrast when scanning and printing. Indicates whether large incoming faxes are printed, and choose the printed reports you send. 26 Faxing a Document Select Scan and...
Quick Guide
Page 27
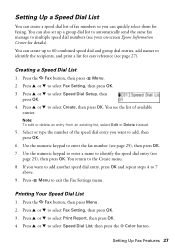
... press OK and repeat steps 4 to select Fax Setting, then press OK. 3. Use the numeric keypad to enter a name to identify the recipients, and print a list for easy reference (see page 27). You return to exit the Fax Settings menu. Press x Menu to the Create menu. 8. Press the K... d to 7 above. 9. You can create up a group dial list to automatically send the same fax message to enter the fax number (see your on-screen Epson Information Center for faxing. Creating a Speed Dial List 1. Press u or d to select Create, then press OK. Press the K Fax button, then press Menu. 2....
... press OK and repeat steps 4 to select Fax Setting, then press OK. 3. Use the numeric keypad to enter a name to identify the recipients, and print a list for easy reference (see page 27). You return to exit the Fax Settings menu. Press x Menu to the Create menu. 8. Press the K... d to 7 above. 9. You can create up a group dial list to automatically send the same fax message to enter the fax number (see your on-screen Epson Information Center for faxing. Creating a Speed Dial List 1. Press u or d to select Create, then press OK. Press the K Fax button, then press Menu. 2....

Quick Guide
Page 28
... pages, place your original on the scanner glass, you see this screen after one minute. Note: To dial the number using the Epson FAX Utility, see page 17). 2. Note: In Windows, you need to ...send your fax. Note: If the recipient's fax machine prints only in black and white, your .... ■ If the fax number is busy, you see a redialing message and the WorkForce 310 Series redials after the first page is automatically scanned and faxed. ■ If you do not need to...
... pages, place your original on the scanner glass, you see this screen after one minute. Note: To dial the number using the Epson FAX Utility, see page 17). 2. Note: In Windows, you need to ...send your fax. Note: If the recipient's fax machine prints only in black and white, your .... ■ If the fax number is busy, you see a redialing message and the WorkForce 310 Series redials after the first page is automatically scanned and faxed. ■ If you do not need to...
Quick Guide
Page 29
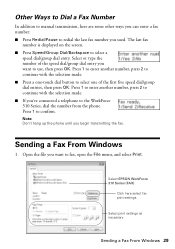
Open the file you want to the WorkForce 310 Series, dial the number from the phone. Select EPSON WorkForce 310 Series (FAX) Click here select fax print settings Select print settings as necessary Sending a Fax From Windows 29 Press 1 to enter another number, press 2 to continue with the selection made . ■..., then press OK. Press 1 to enter another number, press 2 to continue with the selection made . ■ Press a one-touch dial button to select one of the speed dial/group dial entry you want to confirm. Other Ways to Dial a Fax Number In addition to manual transmission,...
Open the file you want to the WorkForce 310 Series, dial the number from the phone. Select EPSON WorkForce 310 Series (FAX) Click here select fax print settings Select print settings as necessary Sending a Fax From Windows 29 Press 1 to enter another number, press 2 to continue with the selection made . ■..., then press OK. Press 1 to enter another number, press 2 to continue with the selection made . ■ Press a one-touch dial button to select one of the speed dial/group dial entry you want to confirm. Other Ways to Dial a Fax Number In addition to manual transmission,...


