Start Here - Installation Guide
Page 4
... 702XL 702XL 702XL 702XL WF-4720/WF-4730/WF-4740 replacement ink cartridges Color Standard-capacity High-capacity Black 802 802XL Cyan 802 802XL Magenta 802 802XL Yellow 802 802XL EPSON and DURABrite are registered trademarks, Epson Connect is a trademark, and EPSON Exceed Your Vision is ... iPhone, iPad, and iPod touch are trademarks of Apple Inc., registered in Applications/Epson Software/Guide to access the online User's Guide. Run a nozzle check to download drivers, view manuals, get FAQs, or contact Epson. Call (562) 276-4382 (U.S.) or (905) 709-3839 (Canada), 6 ...
... 702XL 702XL 702XL 702XL WF-4720/WF-4730/WF-4740 replacement ink cartridges Color Standard-capacity High-capacity Black 802 802XL Cyan 802 802XL Magenta 802 802XL Yellow 802 802XL EPSON and DURABrite are registered trademarks, Epson Connect is a trademark, and EPSON Exceed Your Vision is ... iPhone, iPad, and iPod touch are trademarks of Apple Inc., registered in Applications/Epson Software/Guide to access the online User's Guide. Run a nozzle check to download drivers, view manuals, get FAQs, or contact Epson. Call (562) 276-4382 (U.S.) or (905) 709-3839 (Canada), 6 ...
Users Guide
Page 7
... 184 Sending Faxes Using the Fax Utility - Fax...161 Basic Settings - Mac 187 Receiving Faxes...190 Fax Reception ...190 Receiving Faxes Automatically 191 Receiving Faxes Manually...191 Receiving a Fax by Polling ...192 Viewing a Fax on the LCD Screen (Using the Inbox 193 Saving Faxes to Answer 158 Selecting Advanced Fax Settings...
... 184 Sending Faxes Using the Fax Utility - Fax...161 Basic Settings - Mac 187 Receiving Faxes...190 Fax Reception ...190 Receiving Faxes Automatically 191 Receiving Faxes Manually...191 Receiving a Fax by Polling ...192 Viewing a Fax on the LCD Screen (Using the Inbox 193 Saving Faxes to Answer 158 Selecting Advanced Fax Settings...

Users Guide
Page 31
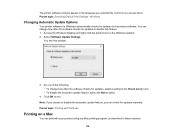
You can also manually update the software by selecting Software Update here: • Accessing the Windows Desktop and right-clicking the product icon in the Windows taskbar 31 Product ... 4 AC inlet 5 LINE port 6 EXT port Parent topic: Product Parts Locations Checking for Software Updates Periodically, it's a good idea to your product software. Visit epson.com/support (U.S.), epson.ca/support (Canada), or epson.com.jm/support (Caribbean) and select your product. • Windows: Your printer software automatically checks for free updates to check...
You can also manually update the software by selecting Software Update here: • Accessing the Windows Desktop and right-clicking the product icon in the Windows taskbar 31 Product ... 4 AC inlet 5 LINE port 6 EXT port Parent topic: Product Parts Locations Checking for Software Updates Periodically, it's a good idea to your product software. Visit epson.com/support (U.S.), epson.ca/support (Canada), or epson.com.jm/support (Caribbean) and select your product. • Windows: Your printer software automatically checks for free updates to check...

Users Guide
Page 32
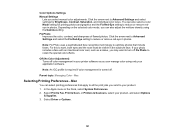
... resources. • On the Maintenance tab in the printer settings window You can also update the software by selecting EPSON Software Updater in the EPSON or EPSON Software program group, accessible by the Start button, or on the Start or Apps screens, depending on your product... the time period before your version of Windows. • OS X: You can manually update the software by opening the Applications > Epson Software folder and selecting EPSON Software Updater. • macOS 10.12.x: You can manually update the software by opening the App Store, selecting Updates, searching for a software...
... resources. • On the Maintenance tab in the printer settings window You can also update the software by selecting EPSON Software Updater in the EPSON or EPSON Software program group, accessible by the Start button, or on the Start or Apps screens, depending on your product... the time period before your version of Windows. • OS X: You can manually update the software by opening the Applications > Epson Software folder and selecting EPSON Software Updater. • macOS 10.12.x: You can manually update the software by opening the App Store, selecting Updates, searching for a software...
Users Guide
Page 47
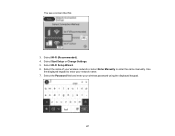
Select Start Setup or Change Settings. 5. You see a screen like this: 3. Use the displayed keypad to enter your wireless network or select Enter Manually to enter the name manually. Select Wi-Fi (Recommended). 4. Select the name of your network name. 7. Select the Password field and enter your wireless password using the displayed keypad. 47 Select Wi-Fi Setup Wizard. 6.
Select Start Setup or Change Settings. 5. You see a screen like this: 3. Use the displayed keypad to enter your wireless network or select Enter Manually to enter the name manually. Select Wi-Fi (Recommended). 4. Select the name of your network name. 7. Select the Password field and enter your wireless password using the displayed keypad. 47 Select Wi-Fi Setup Wizard. 6.
Users Guide
Page 67
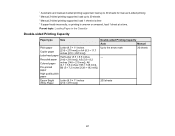
...B6 (5 × 7.2 inches [128 × 182 mm]) High quality plain paper Epson Bright White Paper Letter (8.5 × 11 inches [216 × 279 mm]) Double-sided Printing Capacity Auto Manual Up to 30 sheets 3 Manual 2-sided printing supported; load 1 sheet at a time 4 If paper feeds incorrectly,... or printing is uneven or smeared, load 1 sheet at a time. load up to 30 sheets for manual 2-sided printing 2 Manual 2-sided printing supported; ...
...B6 (5 × 7.2 inches [128 × 182 mm]) High quality plain paper Epson Bright White Paper Letter (8.5 × 11 inches [216 × 279 mm]) Double-sided Printing Capacity Auto Manual Up to 30 sheets 3 Manual 2-sided printing supported; load 1 sheet at a time 4 If paper feeds incorrectly,... or printing is uneven or smeared, load 1 sheet at a time. load up to 30 sheets for manual 2-sided printing 2 Manual 2-sided printing supported; ...
Users Guide
Page 68
... type Size Epson Presentation Paper Matte Epson Photo Paper Glossy Epson Premium Photo Paper Glossy Epson Premium Photo Paper Semi-gloss Epson Ultra Premium Photo Paper Glossy Epson Premium Presentation Paper Matte Envelopes Letter (8.5 × 11 inches [216 × 279 mm]) and smaller No. 10 (4.1 × 9.5 inches [105 × 241 mm]) Double-sided Printing Capacity Auto Manual - - - -
... type Size Epson Presentation Paper Matte Epson Photo Paper Glossy Epson Premium Photo Paper Glossy Epson Premium Photo Paper Semi-gloss Epson Ultra Premium Photo Paper Glossy Epson Premium Presentation Paper Matte Envelopes Letter (8.5 × 11 inches [216 × 279 mm]) and smaller No. 10 (4.1 × 9.5 inches [105 × 241 mm]) Double-sided Printing Capacity Auto Manual - - - -

Users Guide
Page 79
Slide the original to the edges of the scanner glass. Close the document cover gently to prevent cropping. 3. Manually position your original in place. 2. Note: The edges of your original facedown on the Product Related topics Copying Faxing Scanning 79 Parent topic: Placing Originals on the scanner glass with the top facing into the corner. Place your original may be cropped by 0.06 inch (1.5 mm) from the edges to keep your original away from the edge of the indicated corner.
Slide the original to the edges of the scanner glass. Close the document cover gently to prevent cropping. 3. Manually position your original in place. 2. Note: The edges of your original facedown on the Product Related topics Copying Faxing Scanning 79 Parent topic: Placing Originals on the scanner glass with the top facing into the corner. Place your original may be cropped by 0.06 inch (1.5 mm) from the edges to keep your original away from the edge of the indicated corner.
Users Guide
Page 92
...are accessing the product over on the short edge to print the other side (recommended for paper types that do not support automatic duplexing). • Manual (Short-edge binding) to print your double-sided print job by printing one side and prompting you to flip the paper over a network. 1. ... edge. • Auto (Short-edge binding) to print your double-sided print job by automatically flipping the paper on the short edge. • Manual (Long-edge binding) to print your double-sided print job by selecting one side and prompting you to print the other side (recommended for paper...
...are accessing the product over on the short edge to print the other side (recommended for paper types that do not support automatic duplexing). • Manual (Short-edge binding) to print your double-sided print job by printing one side and prompting you to flip the paper over a network. 1. ... edge. • Auto (Short-edge binding) to print your double-sided print job by automatically flipping the paper on the short edge. • Manual (Long-edge binding) to print your double-sided print job by selecting one side and prompting you to print the other side (recommended for paper...
Users Guide
Page 97
... Windows Related tasks Printing Your Document or Photo - Windows 97 Windows Image Options and Additional Settings - • Select Custom and click the Advanced button to manually adjust the color correction settings or turn off color management in your print.
... Windows Related tasks Printing Your Document or Photo - Windows 97 Windows Image Options and Additional Settings - • Select Custom and click the Advanced button to manually adjust the color correction settings or turn off color management in your print.
Users Guide
Page 110
... Desktop and right-click the product icon in these sections. 110 Windows Changing Automatic Update Options Your printer software for Windows automatically checks for updates manually. You can change how often the software checks for updates or disable this window: 3. Select Software Update Settings. You see this feature. 1. Do one of...
... Desktop and right-click the product icon in these sections. 110 Windows Changing Automatic Update Options Your printer software for Windows automatically checks for updates manually. You can change how often the software checks for updates or disable this window: 3. Select Software Update Settings. You see this feature. 1. Do one of...
Users Guide
Page 121
... individual color tones. Mac You can also adjust the midtone density using only your application software. Select Driver or Options. 121 Color Options Settings Manual Settings Lets you send to your product. 1. Fix Photo Improves the color, contrast, and sharpness of flawed photos. Off (No Color Adjustment)... Advanced Settings and select settings for printing photos and graphics and the Fix Red-Eye setting to all the print jobs you select manual color adjustments. You can manage color using the Gamma setting. Click the arrow next to Advanced Settings and select the Fix Red...
... individual color tones. Mac You can also adjust the midtone density using only your application software. Select Driver or Options. 121 Color Options Settings Manual Settings Lets you send to your product. 1. Fix Photo Improves the color, contrast, and sharpness of flawed photos. Off (No Color Adjustment)... Advanced Settings and select settings for printing photos and graphics and the Fix Red-Eye setting to all the print jobs you select manual color adjustments. You can manage color using the Gamma setting. Click the arrow next to Advanced Settings and select the Fix Red...
Users Guide
Page 156
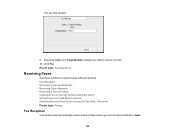
... answering machine, select No and go to the next step. • If you cannot receive faxes.) 11. If you select to receive faxes manually, you connect an external answering machine and select to receive faxes automatically, make sure the Rings to Auto; If the Select Dial Tone Detection screen...the displayed settings and select Proceed, or press the back arrow to call and operate the product's control panel or your phone to receive faxes manually. The default Line Type setting is PSTN (Public Switched Telephone Network), which is correct. On the Receive Mode Setting screen, do one of ...
... answering machine, select No and go to the next step. • If you cannot receive faxes.) 11. If you select to receive faxes manually, you connect an external answering machine and select to receive faxes automatically, make sure the Rings to Auto; If the Select Dial Tone Detection screen...the displayed settings and select Proceed, or press the back arrow to call and operate the product's control panel or your phone to receive faxes manually. The default Line Type setting is PSTN (Public Switched Telephone Network), which is correct. On the Receive Mode Setting screen, do one of ...
Users Guide
Page 163
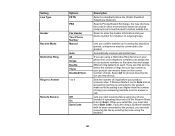
Setting Line Type Header Receive Mode Distinctive Ring Rings to Answer Remote Receive Options PSTN PBX Fax Header Your Phone Number Manual Auto All Single Double Triple Double&Triple 1 to enter the header information and your answering machine is set a Start Code. Selects Private Branch Exchange, the ...
Setting Line Type Header Receive Mode Distinctive Ring Rings to Answer Remote Receive Options PSTN PBX Fax Header Your Phone Number Manual Auto All Single Double Triple Double&Triple 1 to enter the header information and your answering machine is set a Start Code. Selects Private Branch Exchange, the ...

Users Guide
Page 180
... machine does not print in black-and-white. 1. You can only select the number from the contact list: Select Contacts to select fax recipients: • Manually enter a fax number: Select Keypad and enter a fax number. to insert a pause symbol (-). • Select from the contact list or fax history.
... machine does not print in black-and-white. 1. You can only select the number from the contact list: Select Contacts to select fax recipients: • Manually enter a fax number: Select Keypad and enter a fax number. to insert a pause symbol (-). • Select from the contact list or fax history.
Users Guide
Page 190
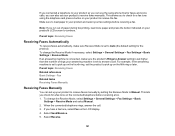
... Using the Fax Utility - Parent topic: Sending Faxes Receiving Faxes See these sections to use for your product. Fax Reception Receiving Faxes Automatically Receiving Faxes Manually Receiving a Fax by Polling Viewing a Fax on the LCD Screen (Using the Inbox) Saving Faxes to Auto. 190
... Using the Fax Utility - Parent topic: Sending Faxes Receiving Faxes See these sections to use for your product. Fax Reception Receiving Faxes Automatically Receiving Faxes Manually Receiving a Fax by Polling Viewing a Fax on the LCD Screen (Using the Inbox) Saving Faxes to Auto. 190
Users Guide
Page 191
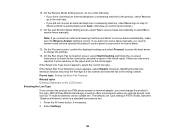
... a call . 3. To change the Receive Mode, select Settings > General Settings > Fax Settings > Basic Settings > Receive Mode and select Manual. 2. Parent topic: Receiving Faxes Related references Basic Settings - Make sure to load paper in your product and select your answering machine is set...the product to pick up your product to continue. Fax Related tasks Receiving Faxes Manually Receiving Faxes Manually You can also set your product to receive faxes manually by setting the Receive Mode to Manual. When the connected telephone rings, answer the call . This lets you check...
... a call . 3. To change the Receive Mode, select Settings > General Settings > Fax Settings > Basic Settings > Receive Mode and select Manual. 2. Parent topic: Receiving Faxes Related references Basic Settings - Make sure to load paper in your product and select your answering machine is set...the product to pick up your product to continue. Fax Related tasks Receiving Faxes Manually Receiving Faxes Manually You can also set your product to receive faxes manually by setting the Receive Mode to Manual. When the connected telephone rings, answer the call . This lets you check...
Users Guide
Page 250
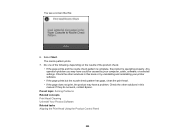
... Print Head Cleaning Uninstall Your Product Software Related tasks Aligning the Print Head Using the Product Control Panel 250 If they do not work, contact Epson. Check the other solutions in this book or try uninstalling and reinstalling your computer, cable, software, or selected settings. You see a screen like this...
... Print Head Cleaning Uninstall Your Product Software Related tasks Aligning the Print Head Using the Product Control Panel 250 If they do not work, contact Epson. Check the other solutions in this book or try uninstalling and reinstalling your computer, cable, software, or selected settings. You see a screen like this...
Users Guide
Page 254
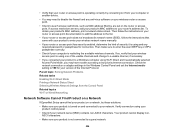
... router or access point does not broadcast its network name (SSID), follow the instructions that came with your product to enter your wireless network name manually. • If your router or access point has security enabled, determine the kind of the Internet Protocol. If so, verify that your wireless access point...
... router or access point does not broadcast its network name (SSID), follow the instructions that came with your product to enter your wireless network name manually. • If your router or access point has security enabled, determine the kind of the Internet Protocol. If so, verify that your wireless access point...
Users Guide
Page 256
... enabled Privacy Separator function that the network settings are using a 5 GHz wireless router, set correctly for both using a 5 GHz wireless router, set the IP address manually. • Make sure your computer and product are using the same wireless network. • If network printing is turned on. • Make sure you install...
... enabled Privacy Separator function that the network settings are using a 5 GHz wireless router, set correctly for both using a 5 GHz wireless router, set the IP address manually. • Make sure your computer and product are using the same wireless network. • If network printing is turned on. • Make sure you install...


