User Manual
Page 5
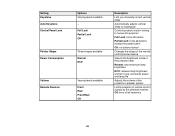
... Projector Case...77 Air Filter and Vent Maintenance ...77 Cleaning the Air Filter and Vents 77 Replacing the Air Filter...78 Projector Lamp Maintenance...80 Replacing the Lamp ...81 Resetting the Lamp Timer...86 Replacing the Remote Control Batteries 87 Transporting the Projector...89 Solving Problems ...90 Projection Problem Tips ...90 Projector Light...
... Projector Case...77 Air Filter and Vent Maintenance ...77 Cleaning the Air Filter and Vents 77 Replacing the Air Filter...78 Projector Lamp Maintenance...80 Replacing the Lamp ...81 Resetting the Lamp Timer...86 Replacing the Remote Control Batteries 87 Transporting the Projector...89 Solving Problems ...90 Projection Problem Tips ...90 Projector Light...
User Manual
Page 6
... to Problems With the Remote Control 101 Solutions to Password Problems 102 Where to Get Help...102 Technical Specifications ...104 General Projector Specifications ...104 Projector Lamp Specifications...106 Remote Control Specifications ...107 Projector Dimension Specifications 107 Projector Electrical Specifications ...107 Projector Environmental Specifications 108 Projector Safety and Approvals Specifications 108 Supported...
... to Problems With the Remote Control 101 Solutions to Password Problems 102 Where to Get Help...102 Technical Specifications ...104 General Projector Specifications ...104 Projector Lamp Specifications...106 Remote Control Specifications ...107 Projector Dimension Specifications 107 Projector Electrical Specifications ...107 Projector Environmental Specifications 108 Projector Safety and Approvals Specifications 108 Supported...
User Manual
Page 7
...to these special features: Bright, high-resolution projection system • Up to 2600 lumens of brightness (white light output and color light output) • VS210: Native resolution of 800 × 600 pixels (SVGA) • VS310: Native resolution of 1024 × 768 pixels (XGA) • VS315W: ... setup and operation features • Low total cost of ownership with longer lamp life • 1.2× optical zoom ratio for improved zooming capability (VS310/VS315W) • Built-in closed captioning decoder • Epson Instant Off and Direct Power On features for quick setup and shut down...
...to these special features: Bright, high-resolution projection system • Up to 2600 lumens of brightness (white light output and color light output) • VS210: Native resolution of 800 × 600 pixels (SVGA) • VS310: Native resolution of 1024 × 768 pixels (XGA) • VS315W: ... setup and operation features • Low total cost of ownership with longer lamp life • 1.2× optical zoom ratio for improved zooming capability (VS310/VS315W) • Built-in closed captioning decoder • Epson Instant Off and Direct Power On features for quick setup and shut down...
User Manual
Page 9
..., other optional accessories, and replacement parts from certain ports, you may need a commercially available audio cable compatible with your projector: Option or part Genuine Epson Replacement lamp (ELPLP67) Air filter replacement set (2 filters; Epson offers the following optional accessories and replacement parts for purchase information. To find the nearest reseller, call 800-GO...
..., other optional accessories, and replacement parts from certain ports, you may need a commercially available audio cable compatible with your projector: Option or part Genuine Epson Replacement lamp (ELPLP67) Air filter replacement set (2 filters; Epson offers the following optional accessories and replacement parts for purchase information. To find the nearest reseller, call 800-GO...
User Manual
Page 12
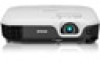
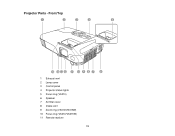
Front/Top 1 Exhaust vent 2 Lamp cover 3 Control panel 4 Projector status lights 5 Focus ring (VS210) 6 Speaker 7 Air filter cover 8 Intake vent 9 Zoom ring (VS310/VS315W) 10 Focus ring (VS310/VS315W) 11 Remote receiver 12 Projector Parts -
Front/Top 1 Exhaust vent 2 Lamp cover 3 Control panel 4 Projector status lights 5 Focus ring (VS210) 6 Speaker 7 Air filter cover 8 Intake vent 9 Zoom ring (VS310/VS315W) 10 Focus ring (VS310/VS315W) 11 Remote receiver 12 Projector Parts -
User Manual
Page 13
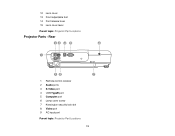
Rear 1 Remote control receiver 2 Audio ports 3 S-Video port 4 USB TypeB port 5 Computer port 6 Lamp cover screw 7 Kensington security lock slot 8 Video port 9 AC input port Parent topic: Projector Part Locations 13 12 Lens cover 13 Front adjustable foot 14 Foot release lever 15 Lens cover lever Parent topic: Projector Part Locations Projector Parts -
Rear 1 Remote control receiver 2 Audio ports 3 S-Video port 4 USB TypeB port 5 Computer port 6 Lamp cover screw 7 Kensington security lock slot 8 Video port 9 AC input port Parent topic: Projector Part Locations 13 12 Lens cover 13 Front adjustable foot 14 Foot release lever 15 Lens cover lever Parent topic: Projector Part Locations Projector Parts -

User Manual
Page 33
Plug the power cord into the projector lens when the lamp is open all the way. • Turn on (standby mode). Press the power button on the projector or the remote control to the projector's power ...
Plug the power cord into the projector lens when the lamp is open all the way. • Turn on (standby mode). Press the power button on the projector or the remote control to the projector's power ...
User Manual
Page 34
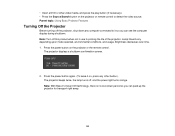
... Before turning off this product when not in use to prolong the life of the projector. The projector displays a shutdown confirmation screen. 2. Lamp life will vary depending upon mode selected, environmental conditions, and usage. Brightness decreases over time. 1. Press the power button again. (To leave... it on, press any computer connected to detect the video source. Note: With Epson's Instant Off technology, there is no cool-down any other video media, and press the play button (if necessary). • Press the Source...
... Before turning off this product when not in use to prolong the life of the projector. The projector displays a shutdown confirmation screen. 2. Lamp life will vary depending upon mode selected, environmental conditions, and usage. Brightness decreases over time. 1. Press the power button again. (To leave... it on, press any computer connected to detect the video source. Note: With Epson's Instant Off technology, there is no cool-down any other video media, and press the play button (if necessary). • Press the Source...

User Manual
Page 35
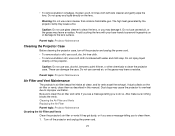
To transport or store the projector, make sure the power light is green or flashing orange. 4. 3. Close the projector's lens cover. 35 Caution: To avoid damaging the projector or lamp, never unplug the power cord when the power light is orange (but not flashing), then unplug the power cord.
To transport or store the projector, make sure the power light is green or flashing orange. 4. 3. Close the projector's lens cover. 35 Caution: To avoid damaging the projector or lamp, never unplug the power cord when the power light is orange (but not flashing), then unplug the power cord.

User Manual
Page 66
Note: You can use the Power Consumption setting. To change the lamp brightness mode, use the Signal menu. If you need to customize the settings, you can restore the default settings of individual hues in the image ... currently selected input source. The available settings depend on the image brightness when certain Color Modes are selected Note: The Brightness setting does not affect lamp brightness. Signal Menu Normally the projector detects and optimizes the input signal settings automatically. Setting Color Adjustment Auto Iris Options Slider bars for each color...
Note: You can use the Power Consumption setting. To change the lamp brightness mode, use the Signal menu. If you need to customize the settings, you can restore the default settings of individual hues in the image ... currently selected input source. The available settings depend on the image brightness when certain Color Modes are selected Note: The Brightness setting does not affect lamp brightness. Signal Menu Normally the projector detects and optimizes the input signal settings automatically. Setting Color Adjustment Auto Iris Options Slider bars for each color...
User Manual
Page 69
... buttons locked Changes the shape of the remote control pointer feature Selects the brightness mode of the projector lamp Normal: sets maximum lamp brightness ECO: reduces lamp brightness and fan noise, and saves power and lamp life Adjusts the volume of the projector's speaker system Limits reception of remote control signals by the selected...
... buttons locked Changes the shape of the remote control pointer feature Selects the brightness mode of the projector lamp Normal: sets maximum lamp brightness ECO: reduces lamp brightness and fan noise, and saves power and lamp life Adjusts the volume of the projector's speaker system Limits reception of remote control signals by the selected...
User Manual
Page 73
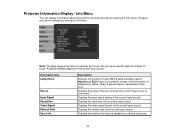
...Info Menu You can display information about the projector and input sources by a service technician 73 Projector Information Display - Information item Lamp Hours Source Input Signal Resolution Video Signal Refresh Rate Sync Info Description Displays the number of the current input source Displays information that... may be needed by viewing the Info menu. However, you have used in yellow, obtain a genuine Epson replacement lamp soon Displays the name of the port to which the current input source is connected Displays the input signal setting of the ...
...Info Menu You can display information about the projector and input sources by a service technician 73 Projector Information Display - Information item Lamp Hours Source Input Signal Resolution Video Signal Refresh Rate Sync Info Description Displays the number of the current input source Displays information that... may be needed by viewing the Info menu. However, you have used in yellow, obtain a genuine Epson replacement lamp soon Displays the name of the port to which the current input source is connected Displays the input signal setting of the ...
User Manual
Page 74
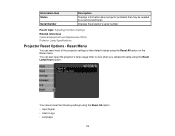
... a service technician Displays the projector's serial number Parent topic: Adjusting the Menu Settings Related references Optional Equipment and Replacement Parts Projector Lamp Specifications Projector Reset Options - You cannot reset the following settings using the Reset All option on the Reset menu. Reset Menu You... can also reset the projector's lamp usage timer to their default values using the Reset All option: • Input Signal • User's Logo • Language 74 You...
... a service technician Displays the projector's serial number Parent topic: Adjusting the Menu Settings Related references Optional Equipment and Replacement Parts Projector Lamp Specifications Projector Reset Options - You cannot reset the following settings using the Reset All option on the Reset menu. Reset Menu You... can also reset the projector's lamp usage timer to their default values using the Reset All option: • Input Signal • User's Logo • Language 74 You...

User Manual
Page 75
• Lamp Hours • Password • User Button • Zoom (VS210) Parent topic: Adjusting the Menu Settings 75
• Lamp Hours • Password • User Button • Zoom (VS210) Parent topic: Adjusting the Menu Settings 75
User Manual
Page 76
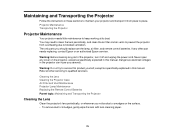
...paper. 76 Dangerous electrical voltages in this manual. Cleaning the Lens Cleaning the Projector Case Air Filter and Vent Maintenance Projector Lamp Maintenance Replacing the Remote Control Batteries Parent topic: Maintaining and Transporting the Projector Cleaning the Lens Clean the projector's lens periodically...little maintenance to qualified servicers. Warning: Do not try to blocked ventilation. Refer all other part needs replacing, contact Epson or an authorized Epson servicer. You may need to clean the lens periodically, and clean the air filter and air vents to prevent ...
...paper. 76 Dangerous electrical voltages in this manual. Cleaning the Lens Cleaning the Projector Case Air Filter and Vent Maintenance Projector Lamp Maintenance Replacing the Remote Control Batteries Parent topic: Maintaining and Transporting the Projector Cleaning the Lens Clean the projector's lens periodically...little maintenance to qualified servicers. Warning: Do not try to blocked ventilation. Refer all other part needs replacing, contact Epson or an authorized Epson servicer. You may need to clean the lens periodically, and clean the air filter and air vents to prevent ...
User Manual
Page 77
... to improper ventilation. • To remove stubborn smudges, moisten a soft, lint-free cloth with water and mild soap. The high heat generated by the projector lamp may leave a residue. Do not use canned air, or the gases may cause the projector to overheat due to clean them as described in this...
... to improper ventilation. • To remove stubborn smudges, moisten a soft, lint-free cloth with water and mild soap. The high heat generated by the projector lamp may leave a residue. Do not use canned air, or the gases may cause the projector to overheat due to clean them as described in this...
User Manual
Page 80
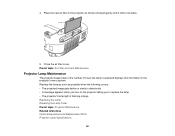
...; A message appears when you turn on the projector telling you to replace the lamp • The projector's lamp light is flashing orange Replacing the Lamp Resetting the Lamp Timer Parent topic: Projector Maintenance Related references Optional Equipment and Replacement Parts Projector Lamp Specifications 80 Place the new air filter in the projector's menu system. Replace...
...; A message appears when you turn on the projector telling you to replace the lamp • The projector's lamp light is flashing orange Replacing the Lamp Resetting the Lamp Timer Parent topic: Projector Maintenance Related references Optional Equipment and Replacement Parts Projector Lamp Specifications 80 Place the new air filter in the projector's menu system. Replace...
User Manual
Page 81
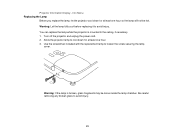
...if necessary. 1. Info Menu Replacing the Lamp Before you replace the lamp, let the projector cool down for at least one hour so the lamp will not be loose inside the lamp chamber. Allow the projector lamp to avoid injury. 81 You can replace the lamp while the projector is broken, glass fragments... may be hot. Warning: Let the lamp fully cool before replacing it to loosen ...
...if necessary. 1. Info Menu Replacing the Lamp Before you replace the lamp, let the projector cool down for at least one hour so the lamp will not be loose inside the lamp chamber. Allow the projector lamp to avoid injury. 81 You can replace the lamp while the projector is broken, glass fragments... may be hot. Warning: Let the lamp fully cool before replacing it to loosen ...

User Manual
Page 82
4. The screws do not come all the way out. 82 Slide the lamp cover out and lift it off. 5. Loosen the screws securing the lamp to the projector.
4. The screws do not come all the way out. 82 Slide the lamp cover out and lift it off. 5. Loosen the screws securing the lamp to the projector.

User Manual
Page 83
Do not put in this product contain mercury. Please consult your state and local regulations regarding disposal or recycling. 6. Note: The lamp(s) in the trash. 83 Lift up the lamp handle and gently pull the lamp out of the projector.
Do not put in this product contain mercury. Please consult your state and local regulations regarding disposal or recycling. 6. Note: The lamp(s) in the trash. 83 Lift up the lamp handle and gently pull the lamp out of the projector.


