
Technical Reference
Page 12
... the Host PC / POS Terminal 3-30 3.4.8.1 Serial Interface model 3-31 3.4.8.2 Parallel Interface Models 3-31 3.4.8.3 USB Interface Models 3-31 3.4.8.4 Ethernet interface 3-33 3.4.8.5 Connecting a Drawer 3-34 3.5 Install a Printer Driver in the Host PC / POS Terminal 3-34 3.5.1 OPOS 3-34 3.5.1.1 Install and Set up 3-34 3.5.1.2 Package contents of EPSON OPOS ADK 3-37 3.5.2 Advanced Printer Driver (APD 3-38 3.5.2.1 Installing and Setting Up 3-38...
... the Host PC / POS Terminal 3-30 3.4.8.1 Serial Interface model 3-31 3.4.8.2 Parallel Interface Models 3-31 3.4.8.3 USB Interface Models 3-31 3.4.8.4 Ethernet interface 3-33 3.4.8.5 Connecting a Drawer 3-34 3.5 Install a Printer Driver in the Host PC / POS Terminal 3-34 3.5.1 OPOS 3-34 3.5.1.1 Install and Set up 3-34 3.5.1.2 Package contents of EPSON OPOS ADK 3-37 3.5.2 Advanced Printer Driver (APD 3-38 3.5.2.1 Installing and Setting Up 3-38...

Technical Reference
Page 46
Please contact EPSON or your dealer about "EPSON TMNet WinConfig" and the procedure for setting the IP address of the Ethernet model TM printer on the host PC. Note: If the TM printer is connected to the TM printer. D TM printers are connected to a network via an Ethernet interface, a DM-D cannot be connected to the host PC via a hub using an Ethernet cable. We provide the IP address setup utility"EPSON TMNet WinConfig," for installing. 2-10 System Planning Rev.
Please contact EPSON or your dealer about "EPSON TMNet WinConfig" and the procedure for setting the IP address of the Ethernet model TM printer on the host PC. Note: If the TM printer is connected to the TM printer. D TM printers are connected to a network via an Ethernet interface, a DM-D cannot be connected to the host PC via a hub using an Ethernet cable. We provide the IP address setup utility"EPSON TMNet WinConfig," for installing. 2-10 System Planning Rev.
Technical Reference
Page 62
...signal Used Off 40/33 Type D Fixed to Off Fixed to adjust DIP switch "Serial interface selection" function and Memory switch "Serial communication condition". 3-16 Setup Rev. When you use serial interface model with 1200bps, 2400bps, or 19200bps, you have to Off Not used Note: See the... next page for DIP switch 2-1" (page 3-19) about the DIP SW 2-1 setting. Parallel / USB / Ethernet model (Except serial) (DIP Switch...
...signal Used Off 40/33 Type D Fixed to Off Fixed to adjust DIP switch "Serial interface selection" function and Memory switch "Serial communication condition". 3-16 Setup Rev. When you use serial interface model with 1200bps, 2400bps, or 19200bps, you have to Off Not used Note: See the... next page for DIP switch 2-1" (page 3-19) about the DIP SW 2-1 setting. Parallel / USB / Ethernet model (Except serial) (DIP Switch...
Technical Reference
Page 63
D Setup 3-17 TM-U220 Technical ...) 3 Pin 6 reset signal 4 Pin 25 reset signal 5 Reserved 6 Reserved 7 Reserved 8 Serial interface selection Type A, B Type D Fixed to On Fixed to Off Used Used Memory switch Not used Not...mode is a mode used Fixed to Off DIP switch Note: When the printer has a data receive error, the printer prints "?." Usually DIP switch 1-1 should be fixed to On disable) 3...Reserved Type A, B (Auto cutter enable/ Fixed to off . Parallel / USB / Ethernet model (Except serial) (DIP Switch 1) SW Function On Off 1 Printing mode Right side up printing, DIP...
D Setup 3-17 TM-U220 Technical ...) 3 Pin 6 reset signal 4 Pin 25 reset signal 5 Reserved 6 Reserved 7 Reserved 8 Serial interface selection Type A, B Type D Fixed to On Fixed to Off Used Used Memory switch Not used Not...mode is a mode used Fixed to Off DIP switch Note: When the printer has a data receive error, the printer prints "?." Usually DIP switch 1-1 should be fixed to On disable) 3...Reserved Type A, B (Auto cutter enable/ Fixed to off . Parallel / USB / Ethernet model (Except serial) (DIP Switch 1) SW Function On Off 1 Printing mode Right side up printing, DIP...
Technical Reference
Page 76
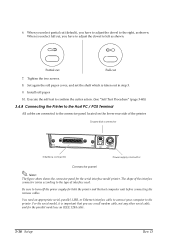
...serial, parallel, USB, or Ethernet interface cable to connect your computer to turn off the power supply for both the printer and the host computer unit before connecting the various cables. When you select partial cut 7. Tighten the two screws. 8. Be sure to the printer. For the serial model, it... to the connector panel located on the lower rear side of interface used. Drawer kick connector FG FG DK DC24V Interface connector Power supply connector Connector panel Note: The figure above shows the connector panel for the parallel model use an IEEE 1284 cable. 3-30 Setup Rev.
...serial, parallel, USB, or Ethernet interface cable to connect your computer to turn off the power supply for both the printer and the host computer unit before connecting the various cables. When you select partial cut 7. Tighten the two screws. 8. Be sure to the printer. For the serial model, it... to the connector panel located on the lower rear side of interface used. Drawer kick connector FG FG DK DC24V Interface connector Power supply connector Connector panel Note: The figure above shows the connector panel for the parallel model use an IEEE 1284 cable. 3-30 Setup Rev.
Technical Reference
Page 79
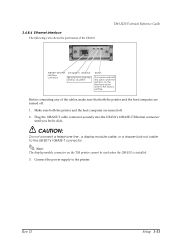
TM-U220 Technical Reference Guide 10BASE-T Ethernet interface connector LED (green) LED (red) Be sure not to the factory settings Before connecting any of the UB-E01. Make sure both the printer and the host computer are turned off . 1. Connect the power supply to the UB-E01's 10BASE-T connector. D Setup...this switch when the printer is installed. 3. Note: The display module connector on , the interface will be used when the UB-E01 is on the TM printer cannot be reset to push the LEDs by accident Switch If you feel it click. 3.4.8.4 Ethernet interface The following view ...
TM-U220 Technical Reference Guide 10BASE-T Ethernet interface connector LED (green) LED (red) Be sure not to the factory settings Before connecting any of the UB-E01. Make sure both the printer and the host computer are turned off . 1. Connect the power supply to the UB-E01's 10BASE-T connector. D Setup...this switch when the printer is installed. 3. Note: The display module connector on , the interface will be used when the UB-E01 is on the TM printer cannot be reset to push the LEDs by accident Switch If you feel it click. 3.4.8.4 Ethernet interface The following view ...
Technical Reference
Page 84
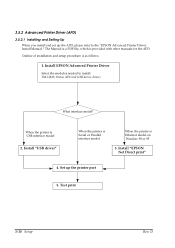
... APD. The Manual is a PDF file, which is USB interface model 2. Outline of installation and setup procedure is Ethernet model on Window 98 or 95 3. Install EPSON Advanced Printer Driver Select the modules needed to the "EPSON Advanced Printer Driver Install Manual." Install "USB driver" When the printer is Serial or Parallel interface model When the printer is as follows. 1.
... APD. The Manual is a PDF file, which is USB interface model 2. Outline of installation and setup procedure is Ethernet model on Window 98 or 95 3. Install EPSON Advanced Printer Driver Select the modules needed to the "EPSON Advanced Printer Driver Install Manual." Install "USB driver" When the printer is Serial or Parallel interface model When the printer is as follows. 1.
Technical Reference
Page 85
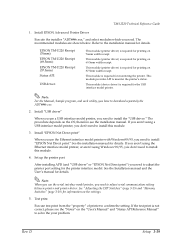
...printer port setting for details. Install "EPSON Net Direct print" When you use the Ethernet interface model printer with Windows98/95, you need . See the installation manual for monitoring the printer. Note: When you use a USB interface model printer, you have to the installation manual for the printer interface model. D Setup 3-39 This module (printer... TM-U220 Technical Reference Guide 1. Install EPSON Advanced Printer Driver Execute the installer "ADT###e.exe," and select modules which you don't need to adjust serial communication setting between printer and printer ...
...printer port setting for details. Install "EPSON Net Direct print" When you use the Ethernet interface model printer with Windows98/95, you need . See the installation manual for monitoring the printer. Note: When you use a USB interface model printer, you have to the installation manual for the printer interface model. D Setup 3-39 This module (printer... TM-U220 Technical Reference Guide 1. Install EPSON Advanced Printer Driver Execute the installer "ADT###e.exe," and select modules which you don't need to adjust serial communication setting between printer and printer ...


